
User Manual (ENGLISH)
Page 2
...section of their respective companies or organizations. 1 All rights reserved. • ML-2010 is model names of Samsung Electronics Co., Ltd. • SAMSUNG and Samsung logo are trademarks of this manual. © 2005 Samsung Electronics Co., Ltd. This manual is not responsible for any damages, direct ...or indirect, arising from or related to change without notice. Samsung Electronics is provided for setting up your printer and information for installing the supplied software and using your printer. About the User's Guide This User's Guide provides...
...section of their respective companies or organizations. 1 All rights reserved. • ML-2010 is model names of Samsung Electronics Co., Ltd. • SAMSUNG and Samsung logo are trademarks of this manual. © 2005 Samsung Electronics Co., Ltd. This manual is not responsible for any damages, direct ...or indirect, arising from or related to change without notice. Samsung Electronics is provided for setting up your printer and information for installing the supplied software and using your printer. About the User's Guide This User's Guide provides...

User Manual (ENGLISH)
Page 5
... Line/Error and Toner Save LEDs 1.6 Cancel button 1.7 Chapter 2: SETTING UP YOUR PRINTER Unpacking 2.2 Selecting a Location 2.3 Installing the Toner Cartridge 2.4 Loading Paper 2.7 Connecting a Printer Cable 2.9 Turning the Printer on 2.10 Printing a Demo Page 2.11 Installing Printer Software 2.12 System Requirements 2.13 Chapter 3: USING PRINT MATERIALS Choosing Paper and Other Materials 3.2 Type, Input...
... Line/Error and Toner Save LEDs 1.6 Cancel button 1.7 Chapter 2: SETTING UP YOUR PRINTER Unpacking 2.2 Selecting a Location 2.3 Installing the Toner Cartridge 2.4 Loading Paper 2.7 Connecting a Printer Cable 2.9 Turning the Printer on 2.10 Printing a Demo Page 2.11 Installing Printer Software 2.12 System Requirements 2.13 Chapter 3: USING PRINT MATERIALS Choosing Paper and Other Materials 3.2 Type, Input...

User Manual (ENGLISH)
Page 11
...must accept any interference received, including interference that may cause harmful interference to which can radiate radio frequency energy and, if not installed and used in accordance with Part 15 of the FCC Rules. This device has been tested and found to comply with the ...does not exceed the Class B limits for a Class B digital device, pursuant to provide reasonable protection against harmful interference in a residential installation. These limits are designed to Part 15 of the Industry and Science Canada. Cet appareil numérique respecte les limites de bruits radio...
...must accept any interference received, including interference that may cause harmful interference to which can radiate radio frequency energy and, if not installed and used in accordance with Part 15 of the FCC Rules. This device has been tested and found to comply with the ...does not exceed the Class B limits for a Class B digital device, pursuant to provide reasonable protection against harmful interference in a residential installation. These limits are designed to Part 15 of the Industry and Science Canada. Cet appareil numérique respecte les limites de bruits radio...

User Manual (ENGLISH)
Page 21
This chapter includes: • Unpacking • Installing the Toner Cartridge • Loading Paper • Connecting a Printer Cable • Turning the Printer on setting up your printer. 2 Setting Up Your Printer This chapter provides step by step information on • Printing a Demo Page • Installing Printer Software
This chapter includes: • Unpacking • Installing the Toner Cartridge • Loading Paper • Connecting a Printer Cable • Turning the Printer on setting up your printer. 2 Setting Up Your Printer This chapter provides step by step information on • Printing a Demo Page • Installing Printer Software

User Manual (ENGLISH)
Page 22
...SETTING UP YOUR PRINTER 2.2 Make sure that the printer has been packed with the following items: 2 Toner Cartridge Power Cord CD-ROM Quick Install Guide Paper Cover a a. The paper cover is differ depending on the country. • The CD-ROM contains the printer driver, the...machine (for example, cleaning inside of the power cord is to another. • The appearance of the machine, removing the jammed paper or installing the toner cartridge), remove the paper cover from contaminating your dealer immediately. • Components may differ from the packing carton. Unpacking 1 Remove...
...SETTING UP YOUR PRINTER 2.2 Make sure that the printer has been packed with the following items: 2 Toner Cartridge Power Cord CD-ROM Quick Install Guide Paper Cover a a. The paper cover is differ depending on the country. • The CD-ROM contains the printer driver, the...machine (for example, cleaning inside of the power cord is to another. • The appearance of the machine, removing the jammed paper or installing the toner cartridge), remove the paper cover from contaminating your dealer immediately. • Components may differ from the packing carton. Unpacking 1 Remove...

User Manual (ENGLISH)
Page 24
Installing the Toner Cartridge 1 Grasp the front cover and pull it toward you to move the printer. 2 Remove the toner cartridge from its bag and remove the paper protecting the cartridge by pulling the packing tape. SETTING UP YOUR PRINTER 2.4 for example, when opening/closing the tray or installing/ removing the toner cartridge. Be careful not to open. 2 Note: Because the printer is very light, it may be moved when you use it;
Installing the Toner Cartridge 1 Grasp the front cover and pull it toward you to move the printer. 2 Remove the toner cartridge from its bag and remove the paper protecting the cartridge by pulling the packing tape. SETTING UP YOUR PRINTER 2.4 for example, when opening/closing the tray or installing/ removing the toner cartridge. Be careful not to open. 2 Note: Because the printer is very light, it may be moved when you use it;

User Manual (ENGLISH)
Page 27
Be careful not to move the printer. 2 Prepare a stack of paper in the tray. 1 Grasp the paper input tray and pull it ; for loading by flexing or fanning them back and forth. Loading Paper You can load approximately 150 sheets of paper for example, when opening/closing the tray or installing/ removing the toner cartridge. Note: Because the printer is very light, it may be moved when you use it toward you to extend the tray. Straighten the edges on a level surface. 2.7 SETTING UP YOUR PRINTER Pinch the rear guide and pull it out to open.
Be careful not to move the printer. 2 Prepare a stack of paper in the tray. 1 Grasp the paper input tray and pull it ; for loading by flexing or fanning them back and forth. Loading Paper You can load approximately 150 sheets of paper for example, when opening/closing the tray or installing/ removing the toner cartridge. Note: Because the printer is very light, it may be moved when you use it toward you to extend the tray. Straighten the edges on a level surface. 2.7 SETTING UP YOUR PRINTER Pinch the rear guide and pull it out to open.

User Manual (ENGLISH)
Page 32
... computer. For details, see Software User's Guide. Macintosh Driver Your machine supports printing on Macintosh 10.3 or higher. Linux Driver You can install the following printer software using the supplied CD-ROM after you have set up your machine and connected it to see Software User's Guide. ...• Status Monitor allows you are printing from Windows You can print in Linux using your machine. Installing Printer Software You must install software using the CD-ROM. 2 • Printer driver for Windows. For details, see Software User's Guide.
... computer. For details, see Software User's Guide. Macintosh Driver Your machine supports printing on Macintosh 10.3 or higher. Linux Driver You can install the following printer software using the supplied CD-ROM after you have set up your machine and connected it to see Software User's Guide. ...• Status Monitor allows you are printing from Windows You can print in Linux using your machine. Installing Printer Software You must install software using the CD-ROM. 2 • Printer driver for Windows. For details, see Software User's Guide.

User Manual (ENGLISH)
Page 33
... 98/Me/2000 Windows XP 300 MB or higher 1 GB or higher Internet Explorer 5.0 or higher NOTE: For Windows 2000/XP, the system administrator should install the software. • Various Linux - See Software User's Guide. 2.13 SETTING UP YOUR PRINTER The following operating system. • Windows 98/Me/2000/XP - System...
... 98/Me/2000 Windows XP 300 MB or higher 1 GB or higher Internet Explorer 5.0 or higher NOTE: For Windows 2000/XP, the system administrator should install the software. • Various Linux - See Software User's Guide. 2.13 SETTING UP YOUR PRINTER The following operating system. • Windows 98/Me/2000/XP - System...

User Manual (ENGLISH)
Page 49
... use less toner on page 2.4. Selecting this option will extend the life of the printer properties. For details, see page 4.3), replace the toner cartridge. See "Installing the Toner Cartridge" on each page. Remove the old cartridge and...
... use less toner on page 2.4. Selecting this option will extend the life of the printer properties. For details, see page 4.3), replace the toner cartridge. See "Installing the Toner Cartridge" on each page. Remove the old cartridge and...

User Manual (ENGLISH)
Page 53
... Approx. 50,000 pages Pick-up Roller Approx. 50,000 pages Fuser Unit Approx. 50,000 pages To purchase the consumables and replacement parts, contact Samsung dealer or the place where you will need to replace the roller and fuser unit to maintain top performance and avoid print quality problems and... problems resulting from worn parts. We strongly recommend that items be replaced after you have printed a specified number of pages. The following items should be installed by a trained service personnel. 4.9 MAINTAINING YOUR PRINTER See the table below.
... Approx. 50,000 pages Pick-up Roller Approx. 50,000 pages Fuser Unit Approx. 50,000 pages To purchase the consumables and replacement parts, contact Samsung dealer or the place where you will need to replace the roller and fuser unit to maintain top performance and avoid print quality problems and... problems resulting from worn parts. We strongly recommend that items be replaced after you have printed a specified number of pages. The following items should be installed by a trained service personnel. 4.9 MAINTAINING YOUR PRINTER See the table below.

User Manual (ENGLISH)
Page 56
... power. the following: • Close the door. • The printer cover is defective. page 2.7. • The toner cartridge • Install the toner cartridge. cartridge is sent to begin printing. service representative. 5 The printer may be in Windows as the default printer. Check the ..." on page 5.6. • Paper is incorrect. Cancel button on • The installed toner page 2.4. that the printer is loaded. Check the power cord connections. The printer is not installed. See is not selected as your printer, refer to the correct one port, make...
... power. the following: • Close the door. • The printer cover is defective. page 2.7. • The toner cartridge • Install the toner cartridge. cartridge is sent to begin printing. service representative. 5 The printer may be in Windows as the default printer. Check the ..." on page 5.6. • Paper is incorrect. Cancel button on • The installed toner page 2.4. that the printer is loaded. Check the power cord connections. The printer is not installed. See is not selected as your printer, refer to the correct one port, make...

User Manual (ENGLISH)
Page 57
... choose the Spool Settings button. From the Start menu, choose Settings and Printers. Select the desired spool setting. The page orientation setting may be incorrectly installed. Problem Possible Cause Solution The printer does not print. (continued) The printer driver may be incorrect. For many software applications, the paper source selection is...
... choose the Spool Settings button. From the Start menu, choose Settings and Printers. Select the desired spool setting. The page orientation setting may be incorrectly installed. Problem Possible Cause Solution The printer does not print. (continued) The printer driver may be incorrect. For many software applications, the paper source selection is...

User Manual (ENGLISH)
Page 64
Solving Print Quality Problems Print Quality Checklist Print quality problems can be resolved by following the checklist below. • Redistribute toner in the toner cartridge (see page 4.3). • Clean the inside of the printer (see page 4.6). • Adjust the print resolution from the printer properties (see Software User's Guide). • Ensure that the Toner Save mode is off (see Software User's Guide and page 4.5). • Clear general printing problems (see page 5.3). • Install a new toner cartridge, and check the print quality (see page 2.4). 5 SOLVING PROBLEMS 5.11
Solving Print Quality Problems Print Quality Checklist Print quality problems can be resolved by following the checklist below. • Redistribute toner in the toner cartridge (see page 4.3). • Clean the inside of the printer (see page 4.6). • Adjust the print resolution from the printer properties (see Software User's Guide). • Ensure that the Toner Save mode is off (see Software User's Guide and page 4.5). • Clear general printing problems (see page 5.3). • Install a new toner cartridge, and check the print quality (see page 2.4). 5 SOLVING PROBLEMS 5.11

User Manual (ENGLISH)
Page 65
If this does not improve the print quality, install a new toner cartridge. • The paper may not meet specifications (for example, the paper is too moist or too rough). See "Cleaning the Inside" on ...
If this does not improve the print quality, install a new toner cartridge. • The paper may not meet specifications (for example, the paper is too moist or too rough). See "Cleaning the Inside" on ...

User Manual (ENGLISH)
Page 66
...representative. Problem Vertical lines Solution If black vertical streaks appear on the page: • The drum inside the machine may be dirty. Install a new toner cartridge. If white vertical streaks appear on them. Gray background If the amount of the LSU part inside the toner ...cartridge has probably been scratched. See 5 "Installing the Toner Cartridge" on page 4.6. • Check the paper type and quality. After cleaning the inside of the page, the problem ...
...representative. Problem Vertical lines Solution If black vertical streaks appear on the page: • The drum inside the machine may be dirty. Install a new toner cartridge. If white vertical streaks appear on them. Gray background If the amount of the LSU part inside the toner ...cartridge has probably been scratched. See 5 "Installing the Toner Cartridge" on page 4.6. • Check the paper type and quality. After cleaning the inside of the page, the problem ...
User Manual (ENGLISH)
Page 68
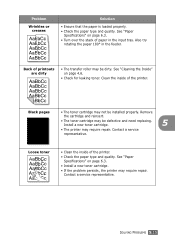
... paper 180° in the input tray. Loose toner • Clean the inside of printouts are dirty • The transfer roller may be installed properly. Remove the cartridge and reinsert. • The toner cartridge may require repair. See "Paper Specifications" on page 6.3. •...; Install a new toner cartridge. • If the problem persists, the printer may not be dirty. Problem Wrinkles or creases Solution • Ensure that the ...
... paper 180° in the input tray. Loose toner • Clean the inside of printouts are dirty • The transfer roller may be installed properly. Remove the cartridge and reinsert. • The toner cartridge may require repair. See "Paper Specifications" on page 6.3. •...; Install a new toner cartridge. • If the problem persists, the printer may not be dirty. Problem Wrinkles or creases Solution • Ensure that the ...

User Manual (ENGLISH)
Page 69
See "Paper Specifications" on page 2.4. • If the problem persists, the printer may require repair. Install a new toner cartridge. See "Installing the Toner Cartridge" on page 6.3. Contact a service representative. Horizontal stripes If horizontally aligned black streaks or smears appear: • The ...toner cartridge may be defective. Remove the cartridge and reinsert. • The toner cartridge may be installed improperly. Curl If the printed paper is curl or paper does not feed into the printer: • Turn over the stack of paper ...
See "Paper Specifications" on page 2.4. • If the problem persists, the printer may require repair. Install a new toner cartridge. See "Installing the Toner Cartridge" on page 6.3. Contact a service representative. Horizontal stripes If horizontally aligned black streaks or smears appear: • The ...toner cartridge may be defective. Remove the cartridge and reinsert. • The toner cartridge may be installed improperly. Curl If the printed paper is curl or paper does not feed into the printer: • Turn over the stack of paper ...

User Manual (ENGLISH)
Page 70
Remove the old toner cartridge and install a new one. To solve the problem, see "Clearing Paper Jams" on " symbol for "light on page 5.6. • The front cover is open. Close the front ... paper in the manual tray. Find the light pattern below that matches the printer light pattern and follow the solutions to clear the error. See "Installing the Toner Cartridge" on page 2.4. • You pressed the Cancel button while the printer is receiving data. • In Manual Feed mode, there is out...
Remove the old toner cartridge and install a new one. To solve the problem, see "Clearing Paper Jams" on " symbol for "light on page 5.6. • The front cover is open. Close the front ... paper in the manual tray. Find the light pattern below that matches the printer light pattern and follow the solutions to clear the error. See "Installing the Toner Cartridge" on page 2.4. • You pressed the Cancel button while the printer is receiving data. • In Manual Feed mode, there is out...
User Manual (ENGLISH)
Page 71
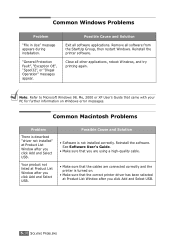
...selected at Product List Window after you click Add and Select USB. Common Macintosh Problems Problem There is described "driver not installed" at Product List Window after you click Add and Select USB. 5.18 SOLVING PROBLEMS Close all software applications. Your ...Add and Select USB. See Software User's Guide. • Make sure that the cables are connected correctly and the printer is not installed correctly. Reinstall the printer software. Remove all software from the StartUp Group, then restart Windows. Reinstall the software. "General Protection Fault",...
...selected at Product List Window after you click Add and Select USB. Common Macintosh Problems Problem There is described "driver not installed" at Product List Window after you click Add and Select USB. 5.18 SOLVING PROBLEMS Close all software applications. Your ...Add and Select USB. See Software User's Guide. • Make sure that the cables are connected correctly and the printer is not installed correctly. Reinstall the printer software. Remove all software from the StartUp Group, then restart Windows. Reinstall the software. "General Protection Fault",...


