
User Manual (ENGLISH)
Page 5
... on Preprinted Paper 4.9 Printing on Card Stock or Custom-sized Materials 4.9 5. Basic Printing Printing a Document ...5.1 Canceling a Print Job ...5.1 6. Maintaining Your Printer Printing Information Pages ...6.1 Printing a Configuration Page 6.1 Printing Usage Page ...6.1 Maintaining the Toner Cartridge 6.2 Checking the Toner Remains 6.2 Redistributing Toner ...6.2 Replacing the Toner Cartridge 6.3 Cleaning the Printer ...6.5 Cleaning the Outside of...
... on Preprinted Paper 4.9 Printing on Card Stock or Custom-sized Materials 4.9 5. Basic Printing Printing a Document ...5.1 Canceling a Print Job ...5.1 6. Maintaining Your Printer Printing Information Pages ...6.1 Printing a Configuration Page 6.1 Printing Usage Page ...6.1 Maintaining the Toner Cartridge 6.2 Checking the Toner Remains 6.2 Redistributing Toner ...6.2 Replacing the Toner Cartridge 6.3 Cleaning the Printer ...6.5 Cleaning the Outside of...
User Manual (ENGLISH)
Page 6
... Specifications ...10.2 Overview ...10.2 Supported Sizes of Paper 9.9 10. 8. Using Your Printer on a Network About Sharing the Printer on a Network 8.1 Setting Up a Network-Connected Printer 8.1 Configuring Network Parameters on Both Sides of Paper 10.2 Guidelines for Using Paper 10.3 Paper Specifications ...10.4 Paper Output Capacity ...10.4 Printer and Paper Storage Environment...
... Specifications ...10.2 Overview ...10.2 Supported Sizes of Paper 9.9 10. 8. Using Your Printer on a Network About Sharing the Printer on a Network 8.1 Setting Up a Network-Connected Printer 8.1 Configuring Network Parameters on Both Sides of Paper 10.2 Guidelines for Using Paper 10.3 Paper Specifications ...10.4 Paper Output Capacity ...10.4 Printer and Paper Storage Environment...

User Manual (ENGLISH)
Page 20
...the software supplied with power on. Using a Network Antenna If you install a wired and wireless network card, you can use . For the ML-3560, ML-3561N, ML-3561ND you see page 9.3. CAUTION: • The fuser area inside the rear cover of your printer becomes very hot when in use your ... the bottom line of the display. 2 Press the Enter button ( ) to access the menu. 3 Press the scroll button ( or ) until you need to configure the network parameters on the control panel. To the network LAN connection 2 Connect the other end into a properly grounded AC outlet and turn on the...
...the software supplied with power on. Using a Network Antenna If you install a wired and wireless network card, you can use . For the ML-3560, ML-3561N, ML-3561ND you see page 9.3. CAUTION: • The fuser area inside the rear cover of your printer becomes very hot when in use your ... the bottom line of the display. 2 Press the Enter button ( ) to access the menu. 3 Press the scroll button ( or ) until you need to configure the network parameters on the control panel. To the network LAN connection 2 Connect the other end into a properly grounded AC outlet and turn on the...
User Manual (ENGLISH)
Page 24
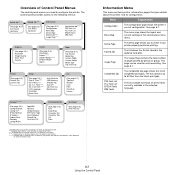
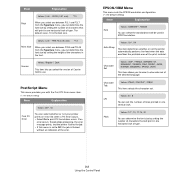
...* (See page 9.5.) User Name Job Name Stored Job ** (See page 9.5.) User Name Job Name Information (See page 3.3.) Configuration Menu Map Demo Page Stored Job*** Usage Page*** Completed Job*** PS3 Font List PCL Font List EPSON Fonts IBM Fonts Graphics (See...ML-3561N or ML-3561ND, or ML-3560 with an optional network card) Information Menu This menu contains printer information pages that give details about the printer and its configuration. Item Explanation Configuration The configuration page shows the printer's current configuration. The control panel provides access to configure...
...* (See page 9.5.) User Name Job Name Stored Job ** (See page 9.5.) User Name Job Name Information (See page 3.3.) Configuration Menu Map Demo Page Stored Job*** Usage Page*** Completed Job*** PS3 Font List PCL Font List EPSON Fonts IBM Fonts Graphics (See...ML-3561N or ML-3561ND, or ML-3560 with an optional network card) Information Menu This menu contains printer information pages that give details about the printer and its configuration. Item Explanation Configuration The configuration page shows the printer's current configuration. The control panel provides access to configure...
User Manual (ENGLISH)
Page 27
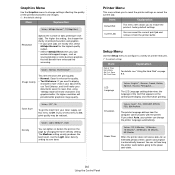
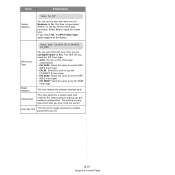
... panel display and information printing. Toner Save Values: Off*, On To get the most from the printer buffer. Graphics Menu Use the Graphics menu to configure a variety of printer features. (*: the default setting) Item Date & Time Form Menu Sel. 1st.
... panel display and information printing. Toner Save Values: Off*, On To get the most from the printer buffer. Graphics Menu Use the Graphics menu to configure a variety of printer features. (*: the default setting) Item Date & Time Form Menu Sel. 1st.

User Manual (ENGLISH)
Page 28
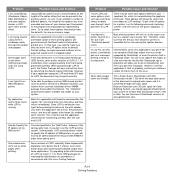
... the Pitch item, and PCL8~PCL45 can select the standard font to be used in PCL emulation. PCL Menu This menu sets the PCL emulation configuration. The symbol is proportional to the following samples: AA BB LF AA BB LF+CR Values: 0 ~ 1800 sec *15 sec Job Time Out You can...
... the Pitch item, and PCL8~PCL45 can select the standard font to be used in PCL emulation. PCL Menu This menu sets the PCL emulation configuration. The symbol is proportional to the following samples: AA BB LF AA BB LF+CR Values: 0 ~ 1800 sec *15 sec Job Time Out You can...
User Manual (ENGLISH)
Page 29
... type. Values: ITALIC, PC437US*, PC850 This item selects the character set to print PS 3 emulation errors. EPSON/IBM Menu This menu sets the EPSON emulation configuration. (*: the default setting) Item Explanation Font Values: SANSERIF*, ROMAN You can select whether or not your printer prints an error list when a PS error occurs...
... type. Values: ITALIC, PC437US*, PC850 This item selects the character set to print PS 3 emulation errors. EPSON/IBM Menu This menu sets the EPSON emulation configuration. (*: the default setting) Item Explanation Font Values: SANSERIF*, ROMAN You can select whether or not your printer prints an error list when a PS error occurs...

User Manual (ENGLISH)
Page 30
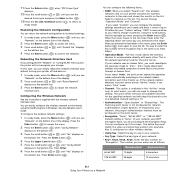
... Yes, No* Select whether you set the value of the network interface card and print a configuration page. NOTE: This menu only appears when a network card is installed (ML-3561N, ML-3561ND, or ML-3560 with an optional network card). (*: the default setting) Item Explanation Config Network Values: Yes...same way. Set the value for the 2nd, 3rd, and 4th bytes in ML-3560, ML-3561N or ML3561ND. If you automatically. • Static: You can access the Config Netware menu item. See "Configuring the Wireless Network" on the display. IP Get Method IP Address Values: Static...
... Yes, No* Select whether you set the value of the network interface card and print a configuration page. NOTE: This menu only appears when a network card is installed (ML-3561N, ML-3561ND, or ML-3560 with an optional network card). (*: the default setting) Item Explanation Config Network Values: Yes...same way. Set the value for the 2nd, 3rd, and 4th bytes in ML-3560, ML-3561N or ML3561ND. If you automatically. • Static: You can access the Config Netware menu item. See "Configuring the Wireless Network" on the display. IP Get Method IP Address Values: Static...
User Manual (ENGLISH)
Page 31
... select Yes, the IPX Frame Type option appears on the display. This item performs a simple reset and restores the factory default settings for the network configuration. Select Yes to On. Item Explanation Config Netware Values: Yes, No* You can set this item only when you set Netware to select the frame...
... select Yes, the IPX Frame Type option appears on the display. This item performs a simple reset and restores the factory default settings for the network configuration. Select Yes to On. Item Explanation Config Netware Values: Yes, No* You can set this item only when you set Netware to select the frame...

User Manual (ENGLISH)
Page 35
Configuring the MultiPurpose Tray with the print side up the print material and prints. Now, you are ready to print. 12 When you print a document, set ...
Configuring the MultiPurpose Tray with the print side up the print material and prints. Now, you are ready to print. 12 When you print a document, set ...

User Manual (ENGLISH)
Page 42
... page only when an optional hard disk is useful for high-quality and economical printing. This chapter includes: • Printing a Configuration Page • Maintaining the Toner Cartridge • Cleaning the Printer • Cleaning the Printer • Consumables and Replacement Parts Printing... Information Pages From the printer's control panel, you maintain your printer. To print a configuration page: 1 In ready mode, press the Menu button ( ) on the bottom line. Printing Usage Page This page shows the total number...
... page only when an optional hard disk is useful for high-quality and economical printing. This chapter includes: • Printing a Configuration Page • Maintaining the Toner Cartridge • Cleaning the Printer • Cleaning the Printer • Consumables and Replacement Parts Printing... Information Pages From the printer's control panel, you maintain your printer. To print a configuration page: 1 In ready mode, press the Menu button ( ) on the bottom line. Printing Usage Page This page shows the total number...

User Manual (ENGLISH)
Page 49
...See page 2.4. • Install the toner cartridge. See page 2.2. If the computer has more memory in the printer properties may be configured incorrectly. The printer may have set the resolution to 600 dpi (Normal). Check the printer properties to the correct port. Printer selects print... printer is not installed. Try printing a test page. To adjust the print quality settings, reduce the resolution. Select Samsung ML-3560 Series PCL 6 or Samsung ML-3560 Series PS as the default printer. Use only paper that is extremely slow. Your printer prints A4-sized paper ...
...See page 2.4. • Install the toner cartridge. See page 2.2. If the computer has more memory in the printer properties may be configured incorrectly. The printer may have set the resolution to 600 dpi (Normal). Check the printer properties to the correct port. Printer selects print... printer is not installed. Try printing a test page. To adjust the print quality settings, reduce the resolution. Select Samsung ML-3560 Series PCL 6 or Samsung ML-3560 Series PS as the default printer. Use only paper that is extremely slow. Your printer prints A4-sized paper ...

User Manual (ENGLISH)
Page 60
...can also receive an error list by manually editing the /etc/printcap file. The PostScript driver may not be installed. • Print a configuration page and verify that some queues have to recognize the optional Tray 2. to installing the PS printer driver, you won 't start. The ...change the default queue. I get a "Some options are being sent to the resulting file. This happens with most Linux distributions, but the configuration tool and LLPR won 't be printed. When using N-up and other features relying on the PS printer driver. Since the default queue in...
...can also receive an error list by manually editing the /etc/printcap file. The PostScript driver may not be installed. • Print a configuration page and verify that some queues have to recognize the optional Tray 2. to installing the PS printer driver, you won 't start. The ...change the default queue. I get a "Some options are being sent to the resulting file. This happens with most Linux distributions, but the configuration tool and LLPR won 't be printed. When using N-up and other features relying on the PS printer driver. Since the default queue in...
User Manual (ENGLISH)
Page 61
...the name of CUPS (1.1.10 and before the 8.1 release, have a hard limitation on your ~/ .lpoptions file, which is accessible to configure and use the CUPS printing system. Unfortunately, CUPS currently doesn't allow you to do I have chosen to print to is manipulated by... in Landscape mode, but I sometimes get "Permission denied" errors. However, since the application is running. com. 7.14 Solving Problems I configured a printer to print to select fewer options that the file you selected a number of different options, the length of the options may not...
...the name of CUPS (1.1.10 and before the 8.1 release, have a hard limitation on your ~/ .lpoptions file, which is accessible to configure and use the CUPS printing system. Unfortunately, CUPS currently doesn't allow you to do I have chosen to print to is manipulated by... in Landscape mode, but I sometimes get "Permission denied" errors. However, since the application is running. com. 7.14 Solving Problems I configured a printer to print to select fewer options that the file you selected a number of different options, the length of the options may not...

User Manual (ENGLISH)
Page 62
...you work in a networked environment, the printer can be connected to the network via Ethernet cable. Wired Network-connected Printer The ML-3561N and ML-3561ND printer come with a built-in network interface. See page 9.3 for information about connecting your printer to Network User's Guide...card in your ML-3560, ML-3561N or ML-3561ND in a wireless network environment, you need to install the ML-3560 Series printer software on each computer that prints documents using the supplied network program. For more information about installing the card. You can configure the basic ...
...you work in a networked environment, the printer can be connected to the network via Ethernet cable. Wired Network-connected Printer The ML-3561N and ML-3561ND printer come with a built-in network interface. See page 9.3 for information about connecting your printer to Network User's Guide...card in your ML-3560, ML-3561N or ML-3561ND in a wireless network environment, you need to install the ML-3560 Series printer software on each computer that prints documents using the supplied network program. For more information about installing the card. You can configure the basic ...

User Manual (ENGLISH)
Page 63
... ). 8 Press the Enter button ( displays. ) when "IP Get Method" 8.2 Using Your Printer on the bottom line. 4 Press the Enter button ( ). Configuring TCP/IP Your printer can be assigned a TCP/IP address, depending on the bottom line. 3 Press the scroll button ( or ) until you see "Network" ... (default): TCP/IP address is configured. Press the Enter button ( ) to access the menu. 3 Press the scroll button ( or ) until "Yes" displays and press the Enter button ( ). 7 Press the Upper Level button ( ), then use . There are suitable for ML-3561N and ML-3561ND) or 802.11b Wireless LAN...
... ). 8 Press the Enter button ( displays. ) when "IP Get Method" 8.2 Using Your Printer on the bottom line. 4 Press the Enter button ( ). Configuring TCP/IP Your printer can be assigned a TCP/IP address, depending on the bottom line. 3 Press the scroll button ( or ) until you see "Network" ... (default): TCP/IP address is configured. Press the Enter button ( ) to access the menu. 3 Press the scroll button ( or ) until "Yes" displays and press the Enter button ( ). 7 Press the Upper Level button ( ), then use . There are suitable for ML-3561N and ML-3561ND) or 802.11b Wireless LAN...

User Manual (ENGLISH)
Page 64
... until "Netware" displays on the bottom line. IP address consists of the display. Press the Enter button ( ). 15 Repeat steps 12 and 13 to configure the other parameters, such as Subnet Mask or Gateway, press the Upper Level button ( ), then use the scroll button ( ). 11 Press the Enter ...EN_8023: Limits the frame type to IPX over IEEE 802.3 frames. Take the following steps: 1 In ready mode, press the Menu button ( ) until you can configure frame types. Press the Enter button ( ). 10 Press the Upper Level button ( ), then use the scroll button ( ). 8 Press the Enter button ( ...
... until "Netware" displays on the bottom line. IP address consists of the display. Press the Enter button ( ). 15 Repeat steps 12 and 13 to configure the other parameters, such as Subnet Mask or Gateway, press the Upper Level button ( ), then use the scroll button ( ). 11 Press the Enter ...EN_8023: Limits the frame type to IPX over IEEE 802.3 frames. Take the following steps: 1 In ready mode, press the Menu button ( ) until you can configure frame types. Press the Enter button ( ). 10 Press the Upper Level button ( ), then use the scroll button ( ). 8 Press the Enter button ( ...
User Manual (ENGLISH)
Page 65
... you see "Network" on the bottom line of the display. The way to its channel to the printer through an Access Point. The Samsung print server is "None". The number you select "Search List", the wireless network card on the bottom line of the display. 2 Press...and "Channel". if not, enters "Infra" mode. • Channel: This option is the default operating mode for network authentication (Open System). Configuring the Wireless Network See the instructions supplied with each time it carefully. "SSID" is the same as follows: Hexadecimal Alphanumeric 64-bit WEP 10...
... you see "Network" on the bottom line of the display. The way to its channel to the printer through an Access Point. The Samsung print server is "None". The number you select "Search List", the wireless network card on the bottom line of the display. 2 Press...and "Channel". if not, enters "Infra" mode. • Channel: This option is the default operating mode for network authentication (Open System). Configuring the Wireless Network See the instructions supplied with each time it carefully. "SSID" is the same as follows: Hexadecimal Alphanumeric 64-bit WEP 10...
User Manual (ENGLISH)
Page 69
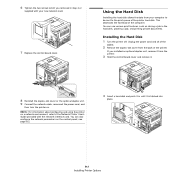
NOTE: For information about configuring and using the printer on a network environment, refer to the Network Printer User's Guide provided with your computer to be sent to the print queue ... duplex-slot cover from the back of the computer. If you removed in the hard disk, proofing a job, and printing private documents. You can also configure the network parameters on . This decreases the workload of the printer. 6 Tighten the two screws which you installed an optional duplex unit, remove it from...
NOTE: For information about configuring and using the printer on a network environment, refer to the Network Printer User's Guide provided with your computer to be sent to the print queue ... duplex-slot cover from the back of the computer. If you removed in the hard disk, proofing a job, and printing private documents. You can also configure the network parameters on . This decreases the workload of the printer. 6 Tighten the two screws which you installed an optional duplex unit, remove it from...

User Manual (ENGLISH)
Page 70
... 9x/Me/NT4.0/2000, select Settings and then Printers. 12 For Windows XP/2003, select Printers and Faxes. 13 Select the Samsung ML-3560 Series PCL 6 printer icon or Samsung ML-3560 Series PS printer icon. 14 Right-click on the bottom line of the printer hard disk. If you see Setup, Printer...cover. 7 Reinstall the duplex-slot cover or the optional duplex unit. 8 Reconnect the power cord and printer cable, and turn the printer on. 9 Print a configuration page from the hard disk queue. •Delay: prints the file at a specified time. 6 Click OK until the Print window is displayed. 7 Click OK or...
... 9x/Me/NT4.0/2000, select Settings and then Printers. 12 For Windows XP/2003, select Printers and Faxes. 13 Select the Samsung ML-3560 Series PCL 6 printer icon or Samsung ML-3560 Series PS printer icon. 14 Right-click on the bottom line of the printer hard disk. If you see Setup, Printer...cover. 7 Reinstall the duplex-slot cover or the optional duplex unit. 8 Reconnect the power cord and printer cable, and turn the printer on. 9 Print a configuration page from the hard disk queue. •Delay: prints the file at a specified time. 6 Click OK until the Print window is displayed. 7 Click OK or...


