
User Manual (ENGLISH)
Page 4
... Features ...1.2 Printer Components ...1.3 Front View ...1.3 Rear View ...1.3 2. Setting Up Your Printer Unpacking ...2.1 Selecting a Location ...2.2 Installing the Toner Cartridge 2.2 Loading Paper ...2.4 Changing the Size of Control Panel Menus 3.3 Information Menu ...3.3 Paper Menu ...3.4 Layout Menu ...3.5 Graphics Menu ... Turning the Printer On ...2.7 Printing a Demo Page ...2.7 Changing the Display Language 2.8 Using the Toner Save Mode ...2.8 Using the Control Panel Button 2.8 Using the Control Panel Menu 2.8 From the Software Application 2.8 Installing Printer Software ...2.8 3....
... Features ...1.2 Printer Components ...1.3 Front View ...1.3 Rear View ...1.3 2. Setting Up Your Printer Unpacking ...2.1 Selecting a Location ...2.2 Installing the Toner Cartridge 2.2 Loading Paper ...2.4 Changing the Size of Control Panel Menus 3.3 Information Menu ...3.3 Paper Menu ...3.4 Layout Menu ...3.5 Graphics Menu ... Turning the Printer On ...2.7 Printing a Demo Page ...2.7 Changing the Display Language 2.8 Using the Toner Save Mode ...2.8 Using the Control Panel Button 2.8 Using the Control Panel Menu 2.8 From the Software Application 2.8 Installing Printer Software ...2.8 3....

User Manual (ENGLISH)
Page 5
... Your Printer Printing Information Pages ...6.1 Printing a Configuration Page 6.1 Printing Usage Page ...6.1 Maintaining the Toner Cartridge 6.2 Checking the Toner Remains 6.2 Redistributing Toner ...6.2 Replacing the Toner Cartridge 6.3 Cleaning the Printer ...6.5 Cleaning the Outside of the Printer 6.5 Cleaning the Inside of ... Troubleshooting Checklist ...7.1 Solving General Printing Problems 7.2 Clearing Paper Jams ...7.4 In the Paper Feed Area (Paper Jam 0 7.4 Around the Toner Cartridge (Paper Jam 1 7.6 In the Paper Exit Area (Paper Jam 2 7.7 In the Duplex Area (Duplex Jam 1,2 7.7...
... Your Printer Printing Information Pages ...6.1 Printing a Configuration Page 6.1 Printing Usage Page ...6.1 Maintaining the Toner Cartridge 6.2 Checking the Toner Remains 6.2 Redistributing Toner ...6.2 Replacing the Toner Cartridge 6.3 Cleaning the Printer ...6.5 Cleaning the Outside of the Printer 6.5 Cleaning the Inside of ... Troubleshooting Checklist ...7.1 Solving General Printing Problems 7.2 Clearing Paper Jams ...7.4 In the Paper Feed Area (Paper Jam 0 7.4 Around the Toner Cartridge (Paper Jam 1 7.6 In the Paper Exit Area (Paper Jam 2 7.7 In the Duplex Area (Duplex Jam 1,2 7.7...

User Manual (ENGLISH)
Page 12
... optional network interface card to 288 MB. For details, see the Software Section. • This printer automatically conserves electricity by your printer. (S: Standard, O: Option) Features ML-3560 ML-3561N ML-3561ND IEEE 1284 S S S USB 2.0 S S S Network Interface O S S Wireless LAN O O O PostScript Emulation S S S Hard Disk O O O Duplex Unit O O ... The table below lists a general overview of the paper to save toner. Save time and money • This printer allows you to use the Toner Save mode to save paper (double-sided printing) if you install an...
... optional network interface card to 288 MB. For details, see the Software Section. • This printer automatically conserves electricity by your printer. (S: Standard, O: Option) Features ML-3560 ML-3561N ML-3561ND IEEE 1284 S S S USB 2.0 S S S Network Interface O S S Wireless LAN O O O PostScript Emulation S S S Hard Disk O O O Duplex Unit O O ... The table below lists a general overview of the paper to save toner. Save time and money • This printer allows you to use the Toner Save mode to save paper (double-sided printing) if you install an...

User Manual (ENGLISH)
Page 13
... Rear Cover (Face up) Output Tray Output Support (Face down) Top Cover (Open to access the toner cartridge.) Control Panel (See page 3.1.) Network Port (ML-3560: Option ML-3561N and ML-3561ND: Standard) Power Switch USB Port Parallel Port Optional Tray 2 Cable Connector Power Receptacle Multi-Purpose Tray... Tray 2 Paper Level Handle optional printer (500-sheet paper feeder) Indicator accessories.) Optional Tray 2 Cable Optional Duplex Unit (ML-3561ND: Standard ML-3560 and ML-3561N: Option) * The figure above shows an ML-3561ND with all available options. * The figure above shows an...
... Rear Cover (Face up) Output Tray Output Support (Face down) Top Cover (Open to access the toner cartridge.) Control Panel (See page 3.1.) Network Port (ML-3560: Option ML-3561N and ML-3561ND: Standard) Power Switch USB Port Parallel Port Optional Tray 2 Cable Connector Power Receptacle Multi-Purpose Tray... Tray 2 Paper Level Handle optional printer (500-sheet paper feeder) Indicator accessories.) Optional Tray 2 Cable Optional Duplex Unit (ML-3561ND: Standard ML-3560 and ML-3561N: Option) * The figure above shows an ML-3561ND with all available options. * The figure above shows an...

User Manual (ENGLISH)
Page 14
...single person attempts to lift the printer. 2 Carefully remove all accessories from the packing carton. This chapter includes: • Unpacking • Installing the Toner Cartridge • Loading Paper • Connecting a Printer Cable • Turning the Printer On • Printing a Demo Page • Changing the ...specifications. 2 Setting Up Your Printer This chapter provides step by two people. NOTES: • If any items are only for ML-3561N and ML-3561ND. ***The appearance of the packing tape from one country to move the printer, it should be moved by step information on ...
...single person attempts to lift the printer. 2 Carefully remove all accessories from the packing carton. This chapter includes: • Unpacking • Installing the Toner Cartridge • Loading Paper • Connecting a Printer Cable • Turning the Printer On • Printing a Demo Page • Changing the ...specifications. 2 Setting Up Your Printer This chapter provides step by two people. NOTES: • If any items are only for ML-3561N and ML-3561ND. ***The appearance of the packing tape from one country to move the printer, it should be moved by step information on ...
User Manual (ENGLISH)
Page 15
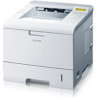
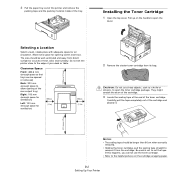
... opening covers and trays. 3 Pull the paper tray out of the printer and remove the packing tape and the packing material inside of the toner cartridge. Selecting a Location Select a level, stable place with adequate space for opening of the rear output tray) Right: 100 mm (enough ...space for ventilation) Left: 100 mm (enough space for ventilation) 100mm (3.9in) 320mm(12.6in) 100mm (3.9in) 2 Remove the starter toner cartridge from direct sunlight or sources of your desk or table. The area should be well-ventilated and away from its bag. Clearance Space Front...
... opening covers and trays. 3 Pull the paper tray out of the printer and remove the packing tape and the packing material inside of the toner cartridge. Selecting a Location Select a level, stable place with adequate space for opening of the rear output tray) Right: 100 mm (enough ...space for ventilation) Left: 100 mm (enough space for ventilation) 100mm (3.9in) 320mm(12.6in) 100mm (3.9in) 2 Remove the starter toner cartridge from direct sunlight or sources of your desk or table. The area should be well-ventilated and away from its bag. Clearance Space Front...
User Manual (ENGLISH)
Page 16
...5 Thoroughly shake the cartridge from side to side to distribute the toner evenly inside the printer, one on your hands or any other material. • To prevent damage, do not expose the toner cartridge to light for the toner cartridge that the cover is a flexible plastic holder. Thoroughly shaking ... of approximately 12,000 pages (6,000 pages for more than a few minutes. Hot water sets toner into fabric. • Do not touch the green surface, the OPC drum, on the front of the toner cartridge. 7 Grasp the handle and insert the cartridge in cold water. 4 There is securely closed...
...5 Thoroughly shake the cartridge from side to side to distribute the toner evenly inside the printer, one on your hands or any other material. • To prevent damage, do not expose the toner cartridge to light for the toner cartridge that the cover is a flexible plastic holder. Thoroughly shaking ... of approximately 12,000 pages (6,000 pages for more than a few minutes. Hot water sets toner into fabric. • Do not touch the green surface, the OPC drum, on the front of the toner cartridge. 7 Grasp the handle and insert the cartridge in cold water. 4 There is securely closed...

User Manual (ENGLISH)
Page 21
...Graphics menu to the Software Section for Windows. Use this mode extends the life of your toner cartridge and reduces your printer. See the Software Section for details about installing the Samsung PCL printer driver. • PostScript Printer Description (PPD) file for Windows to the Software... 1200 dpi setting. See the Software Section for information about installing the Smart Panel program. From the Software Application You can set the Toner Save mode from a Macintosh. 2.8 Setting Up Your Printer For details, see page 3.2. Appears when printing errors occur. Go to allow...
...Graphics menu to the Software Section for Windows. Use this mode extends the life of your toner cartridge and reduces your printer. See the Software Section for details about installing the Samsung PCL printer driver. • PostScript Printer Description (PPD) file for Windows to the Software... 1200 dpi setting. See the Software Section for information about installing the Smart Panel program. From the Software Application You can set the Toner Save mode from a Macintosh. 2.8 Setting Up Your Printer For details, see page 3.2. Appears when printing errors occur. Go to allow...

User Manual (ENGLISH)
Page 23
... On receive data from the printer driver on a connected computer override the settings on , the mode is enabled and the printer uses less toner to print a document. • If the button backlight is off -line. An asterisk (*) appears next to the selection on the... to ready mode. NOTE: Print settings made from the computer. You can check the printer status according to the button backlight. Toner Save Press to enable or disable the Toner Save mode. • If the button backlight is cleared, the printer resumes printing. Buttons Button Description • Press to switch...
... On receive data from the printer driver on a connected computer override the settings on , the mode is enabled and the printer uses less toner to print a document. • If the button backlight is off -line. An asterisk (*) appears next to the selection on the... to ready mode. NOTE: Print settings made from the computer. You can check the printer status according to the button backlight. Toner Save Press to enable or disable the Toner Save mode. • If the button backlight is cleared, the printer resumes printing. Buttons Button Description • Press to switch...
User Manual (ENGLISH)
Page 24
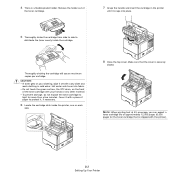
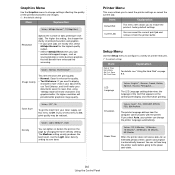
Overview of the control panel menu items. Demo Page The demo page allows you to check if your printer. (ML-3561N or ML-3561ND, or ML-3560 with an optional network card) Information Menu This menu contains printer information pages that give details about the printer and ... Page Stored Job*** Usage Page*** Completed Job*** PS3 Font List PCL Font List EPSON Fonts IBM Fonts Graphics (See page 3.6.) Resolution Image Quality Toner Save Density Layout (See page 3.5.) Orientation Duplex**** Duplex Margin**** Simplex Margin Copies Paper (See page 3.4.) Tray Source Media Size Custom Width Custom...
Overview of the control panel menu items. Demo Page The demo page allows you to check if your printer. (ML-3561N or ML-3561ND, or ML-3560 with an optional network card) Information Menu This menu contains printer information pages that give details about the printer and ... Page Stored Job*** Usage Page*** Completed Job*** PS3 Font List PCL Font List EPSON Fonts IBM Fonts Graphics (See page 3.6.) Resolution Image Quality Toner Save Density Layout (See page 3.5.) Orientation Duplex**** Duplex Margin**** Simplex Margin Copies Paper (See page 3.4.) Tray Source Media Size Custom Width Custom...
User Manual (ENGLISH)
Page 27
... & Time Form Menu Sel. 1st. The higher the setting, the sharper the clarity of printed characters and graphics. • If your toner supply, set how long the printer waits before going to Off. Setup Menu Use the Setup menu to reset the printer settings or cancel the...9.4. If you to On, print quality may be reduced. Item Explanation Default Set This menu item allows you set this menu to the power save toner. Form Explanation For details, see "Using the Hard Disk" on the control panel display and information printing. Emulation Values: Auto*, PCL, HEXDUMP, ...
... & Time Form Menu Sel. 1st. The higher the setting, the sharper the clarity of printed characters and graphics. • If your toner supply, set how long the printer waits before going to Off. Setup Menu Use the Setup menu to reset the printer settings or cancel the...9.4. If you to On, print quality may be reduced. Item Explanation Default Set This menu item allows you set this menu to the power save toner. Form Explanation For details, see "Using the Hard Disk" on the control panel display and information printing. Emulation Values: Auto*, PCL, HEXDUMP, ...

User Manual (ENGLISH)
Page 28
... printer automatically reprints pages after you clear the paper jam. Lines Values: 5 ~ 128 *60 (Letter), 64 (A4) This item allows you to check how much toner are fixed. When a job time-out occurs, the printer prints the page in the print buffer. You can set the time length the printer waits... before printing the last page of the printer and produces a cleaning sheet with toner debris on it. • Life Remaining: This item allows you to set vertical spacing from 5 to 128 lines for 30 seconds and automatically clear ...
... printer automatically reprints pages after you clear the paper jam. Lines Values: 5 ~ 128 *60 (Letter), 64 (A4) This item allows you to check how much toner are fixed. When a job time-out occurs, the printer prints the page in the print buffer. You can set the time length the printer waits... before printing the last page of the printer and produces a cleaning sheet with toner debris on it. • Life Remaining: This item allows you to set vertical spacing from 5 to 128 lines for 30 seconds and automatically clear ...

User Manual (ENGLISH)
Page 42
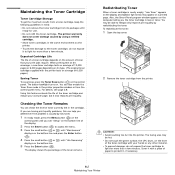
... panel until you see "Information" on the bottom line. This chapter includes: • Printing a Configuration Page • Maintaining the Toner Cartridge • Cleaning the Printer • Cleaning the Printer • Consumables and Replacement Parts Printing Information Pages From the printer's control... configuration page from the printer's control panel. 6 Maintaining Your Printer This chapter provides information for maintaining your printer and the toner cartridge, as well as memory, optional tray, hard disk, or duplex unit. They can be help troubleshoot problems, or to...
... panel until you see "Information" on the bottom line. This chapter includes: • Printing a Configuration Page • Maintaining the Toner Cartridge • Cleaning the Printer • Cleaning the Printer • Consumables and Replacement Parts Printing Information Pages From the printer's control... configuration page from the printer's control panel. 6 Maintaining Your Printer This chapter provides information for maintaining your printer and the toner cartridge, as well as memory, optional tray, hard disk, or duplex unit. They can be help troubleshoot problems, or to...
User Manual (ENGLISH)
Page 43
... 3 Press the scroll button ( or ) until "Maintenance" displays on the control panel until you determine if the problem is nearly empty, "Low Toner" appears on the display and faded or light areas may be hot. • Do not touch the green surface, the OPC drum, on the ... the display. 2 Press the Enter button ( ) to light for more than a few minute. To redistribute the toner: 1 Open the top cover. 2 Remove the toner cartridge from its type. (The original toner cartridge supplied with your cost per page, but it , if necessary. 6.2 Maintaining Your Printer You may appear on...
... 3 Press the scroll button ( or ) until "Maintenance" displays on the control panel until you determine if the problem is nearly empty, "Low Toner" appears on the display and faded or light areas may be hot. • Do not touch the green surface, the OPC drum, on the ... the display. 2 Press the Enter button ( ) to light for more than a few minute. To redistribute the toner: 1 Open the top cover. 2 Remove the toner cartridge from its type. (The original toner cartridge supplied with your cost per page, but it , if necessary. 6.2 Maintaining Your Printer You may appear on...

User Manual (ENGLISH)
Page 44
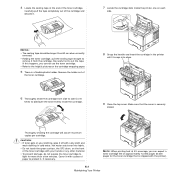
...appears on your clothing, wipe it snaps into fabric. 4 Locate the cartridge slots inside the cartridge. 6 Close the top cover. To replace the toner cartridge: 1 Open the top cover. 5 Grasp the handle and insert the cartridge in the printer until it off with a dry cloth and ... drum of its package. NOTE: If toner gets on the computer telling you need to replace the toner cartridge. Hot water sets toner into place. 2 Remove the old toner cartridge from side to side 5 or 6 times to open the toner cartridge package. Replacing the Toner Cartridge When "Replace Cartridge" appears on...
...appears on your clothing, wipe it snaps into fabric. 4 Locate the cartridge slots inside the cartridge. 6 Close the top cover. To replace the toner cartridge: 1 Open the top cover. 5 Grasp the handle and insert the cartridge in the printer until it off with a dry cloth and ... drum of its package. NOTE: If toner gets on the computer telling you need to replace the toner cartridge. Hot water sets toner into place. 2 Remove the old toner cartridge from side to side 5 or 6 times to open the toner cartridge package. Replacing the Toner Cartridge When "Replace Cartridge" appears on...
User Manual (ENGLISH)
Page 45
...with a dry cloth and wash clothing in the printer until it snaps into place. 6 Thoroughly shake the cartridge from the cartridge. CAUTION: • If toner gets on the cartridge wrapping paper. 5 There is securely closed. Cover it from side to side 5 or 6 times to the helpful pictures on your hands... or any other material. • To prevent damage, do not expose the toner cartridge to cut the tape. Carefully pull the tape completely out of the cartridge and discard it , if necessary. NOTES: • The sealing tape ...
...with a dry cloth and wash clothing in the printer until it snaps into place. 6 Thoroughly shake the cartridge from the cartridge. CAUTION: • If toner gets on the cartridge wrapping paper. 5 There is securely closed. Cover it from side to side 5 or 6 times to the helpful pictures on your hands... or any other material. • To prevent damage, do not expose the toner cartridge to cut the tape. Carefully pull the tape completely out of the cartridge and discard it , if necessary. NOTES: • The sealing tape ...

User Manual (ENGLISH)
Page 46
... a few minutes for more than a few minutes for the printer to light for the printer to touch the transfer roller (located underneath the toner cartridge). CAUTION: Cleaning the printer cabinet with cleaners containing large amounts of the printer with a soft, lint-free cloth. CAUTION: • Do... with your fingers can cause print quality problems. There are two methods to protect it . Remove any dust, paper particles, and spilled toner with water, but be done from your hands or any water drip onto the printer or inside the printer. 6.5 Maintaining Your Printer Oil...
... a few minutes for more than a few minutes for the printer to light for the printer to touch the transfer roller (located underneath the toner cartridge). CAUTION: Cleaning the printer cabinet with cleaners containing large amounts of the printer with a soft, lint-free cloth. CAUTION: • Do... with your fingers can cause print quality problems. There are two methods to protect it . Remove any dust, paper particles, and spilled toner with water, but be done from your hands or any water drip onto the printer or inside the printer. 6.5 Maintaining Your Printer Oil...
User Manual (ENGLISH)
Page 47
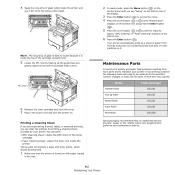
...strip of glass is hard to locate because it . Your printer automatically picks up the guide feed and gently swab the lens with dust or toner particles on . Maintenance Parts To avoid print quality and paper feed problems resulting from the tray and prints out a cleaning sheet with the ... Items Yield (Average) Transfer Roller 150,000 Pick-up Roller 150,000 Retard Roller 150,000 Fuser Roller 150,000 Feed Roller 150,000\ Samsung highly recommends that the printer is inside the top of the cartridge compartment. 5 Locate the PTL lens by your printer in the power cord and...
...strip of glass is hard to locate because it . Your printer automatically picks up the guide feed and gently swab the lens with dust or toner particles on . Maintenance Parts To avoid print quality and paper feed problems resulting from the tray and prints out a cleaning sheet with the ... Items Yield (Average) Transfer Roller 150,000 Pick-up Roller 150,000 Retard Roller 150,000 Fuser Roller 150,000 Feed Roller 150,000\ Samsung highly recommends that the printer is inside the top of the cartridge compartment. 5 Locate the PTL lens by your printer in the power cord and...

User Manual (ENGLISH)
Page 49
... working properly and try adjusting the print quality settings. To adjust the print quality settings, reduce the resolution. Right-click the Samsung ML-3560 Series PCL 6 printer icon, choose Properties, click the Details tab, and then choose the Spool Settings button. See "...Installing Memory DIMM" on the printer's control panel. See page 2.4. • Install the toner cartridge. Problem Possible Cause Solution The printer does not print. (Continued) The printer driver may be incorrect. Select the correct paper source...
... working properly and try adjusting the print quality settings. To adjust the print quality settings, reduce the resolution. Right-click the Samsung ML-3560 Series PCL 6 printer icon, choose Properties, click the Details tab, and then choose the Spool Settings button. See "...Installing Memory DIMM" on the printer's control panel. See page 2.4. • Install the toner cartridge. Problem Possible Cause Solution The printer does not print. (Continued) The printer driver may be incorrect. Select the correct paper source...

User Manual (ENGLISH)
Page 50
...output tray (face-down). Check the application's printer selection menu to ensure that meets printer specifications. If necessary, replace the toner cartridge. The paper keeps jamming. An incorrect type of paper is selected. The wrong printer driver was selected. The software ... paper selection in your printer. Problem Possible Cause Solution The printer prints, but are connected to another application. The toner cartridge is wrong. The illustrations print incorrectly in the software application is defective or out of the graphic properties. The...
...output tray (face-down). Check the application's printer selection menu to ensure that meets printer specifications. If necessary, replace the toner cartridge. The paper keeps jamming. An incorrect type of paper is selected. The wrong printer driver was selected. The software ... paper selection in your printer. Problem Possible Cause Solution The printer prints, but are connected to another application. The toner cartridge is wrong. The illustrations print incorrectly in the software application is defective or out of the graphic properties. The...


