User Manual
Page 5
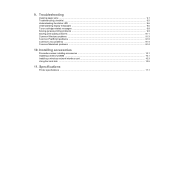
9. Troubleshooting Clearing paper jams ...9.1 Troubleshooting checklist ...9.5 Understanding the status LED ...9.6 Understanding display messages ...9.6 Toner cartridge-related messages ...9.8 Solving general printing problems ...9.9 Solving print quality problems ...9.11 Common Windows problems ...9....
9. Troubleshooting Clearing paper jams ...9.1 Troubleshooting checklist ...9.5 Understanding the status LED ...9.6 Understanding display messages ...9.6 Toner cartridge-related messages ...9.8 Solving general printing problems ...9.9 Solving print quality problems ...9.11 Common Windows problems ...9....

User Manual
Page 28
... print media are not covered by Samsung's warranty or service agreements. 5.1 Notes • Some print media may cause problems, requiring repairs. When you choose print media, consider the following problems: • Poor print quality • Increased paper jams • Premature wear on the ...printer Properties, such as plain paper, envelopes, labels, and transparencies. Caution • Using print media that does not meet these ...
... print media are not covered by Samsung's warranty or service agreements. 5.1 Notes • Some print media may cause problems, requiring repairs. When you choose print media, consider the following problems: • Poor print quality • Increased paper jams • Premature wear on the ...printer Properties, such as plain paper, envelopes, labels, and transparencies. Caution • Using print media that does not meet these ...
User Manual
Page 30
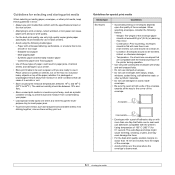
...materials. • Do not use damaged or poorly made envelopes. • Be sure the seam at a time through the multipurpose tray to avoid paper jams. • To prevent print media, such as transparencies and label sheets, from sticking together, remove them as a plastic container or bag, to...or too rough - Guidelines for selecting and storing print media When selecting or loading paper, envelopes, or other print media, keep these types of paper could result in paper jams, chemical smells, and damage to your paper. • Load special media types one flap that folds over the area where...
...materials. • Do not use damaged or poorly made envelopes. • Be sure the seam at a time through the multipurpose tray to avoid paper jams. • To prevent print media, such as transparencies and label sheets, from sticking together, remove them as a plastic container or bag, to...or too rough - Guidelines for selecting and storing print media When selecting or loading paper, envelopes, or other print media, keep these types of paper could result in paper jams, chemical smells, and damage to your paper. • Load special media types one flap that folds over the area where...
User Manual
Page 31
... them carefully. • To avoid fading, do not expose printed transparencies to prevent changes during printing, which can cause paper jams. Exposed adhesive can purchase optional trays and attach them below the standard tray to three additional trays. Condition: Do not ... with no exposed adhesive material between the labels, causing serious jams. - For order information for use in laser printers. • When selecting labels, consider the following factors: - You can peel off preprinted paper, reducing print quality. Adhesives: The adhesive material should be ...
... them carefully. • To avoid fading, do not expose printed transparencies to prevent changes during printing, which can cause paper jams. Exposed adhesive can purchase optional trays and attach them below the standard tray to three additional trays. Condition: Do not ... with no exposed adhesive material between the labels, causing serious jams. - For order information for use in laser printers. • When selecting labels, consider the following factors: - You can peel off preprinted paper, reducing print quality. Adhesives: The adhesive material should be ...
User Manual
Page 32
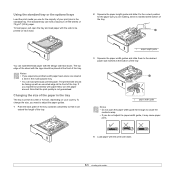
... up with the print side down. 5.5 Changing the size of the paper in the multi-purpose tray. • You can load letterhead paper with the design side face down . 2 Squeeze the paper length guide and slide it may cause paper jams. 4 Load paper with an uncurled edge at a time in the tray The tray is... marked at the front of the tray. The top edge of the sheet with paper feed, place one sheet at the front of ...
... up with the print side down. 5.5 Changing the size of the paper in the multi-purpose tray. • You can load letterhead paper with the design side face down . 2 Squeeze the paper length guide and slide it may cause paper jams. 4 Load paper with an uncurled edge at a time in the tray The tray is... marked at the front of the tray. The top edge of the sheet with paper feed, place one sheet at the front of ...
User Manual
Page 34
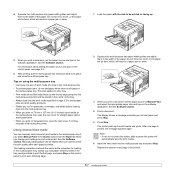
... except you print a document, set the paper source to Manual Feed and select the appropriate paper size and type in a paper jam or skew. 3 When you change print settings to print a document. This loading procedure is still paper in page 5.2 to avoid paper jams and print quality problems. • Flatten ...be printed on transparencies, open the rear cover for straight paper path to avoid paper jams. • When you want to check the print quality after a pause the printer will result in a paper jam or skew. 1 Load the paper with the top edge going into the multi-purpose tray ...
... except you print a document, set the paper source to Manual Feed and select the appropriate paper size and type in a paper jam or skew. 3 When you change print settings to print a document. This loading procedure is still paper in page 5.2 to avoid paper jams and print quality problems. • Flatten ...be printed on transparencies, open the rear cover for straight paper path to avoid paper jams. • When you want to check the print quality after a pause the printer will result in a paper jam or skew. 1 Load the paper with the top edge going into the multi-purpose tray ...
User Manual
Page 35
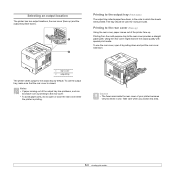
... when you access this area. 5.8 Printing to the rear cover. • To avoid paper jams, do not open it by pulling down , in the order in use the output tray...the output tray by default. Selecting an output location The printer has two output locations; Notes • If paper coming out of the output tray has problems, such as excessive curl, try printing to the rear cover (Face... up) Using the rear cover, paper comes out of your printer becomes very hot when in which the sheets were printed. Caution • The ...
... when you access this area. 5.8 Printing to the rear cover. • To avoid paper jams, do not open it by pulling down , in the order in use the output tray...the output tray by default. Selecting an output location The printer has two output locations; Notes • If paper coming out of the output tray has problems, such as excessive curl, try printing to the rear cover (Face... up) Using the rear cover, paper comes out of your printer becomes very hot when in which the sheets were printed. Caution • The ...
User Manual
Page 45
... column Paper Jam 1 Open/Close Door Around the toner cartridge page 9.3 Paper Jam 2 Check Inside In the paper exit area page 9.4 Paper Exit Jam 1 Open/Close Door Between the toner cartridge and the paper exit area page 9.3 Paper Tray 2 Jam Open Tray 2 In the optional tray 2 page 9.2 Paper Tray 3 Jam Open Tray 3 In the optional tray 3 page 9.2 Paper Tray 4 Jam Open Tray 4 Duplex Jam 0a...
... column Paper Jam 1 Open/Close Door Around the toner cartridge page 9.3 Paper Jam 2 Check Inside In the paper exit area page 9.4 Paper Exit Jam 1 Open/Close Door Between the toner cartridge and the paper exit area page 9.3 Paper Tray 2 Jam Open Tray 2 In the optional tray 2 page 9.2 Paper Tray 3 Jam Open Tray 3 In the optional tray 3 page 9.2 Paper Tray 4 Jam Open Tray 4 Duplex Jam 0a...
User Manual
Page 46
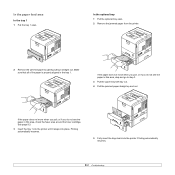
... resumes. 5 Fully insert the trays back into place. Make sure that all of the paper is properly aligned in this area, stop and go to step 3. 3 Pull the upper tray half way out. 4 Pull the jammed paper straight up and out. In the optional tray 1 Pull the optional tray open . See.... 9.2 If the paper does not move when you pull, or if you do not see the paper in this area, check the fuser area around the toner cartridge. In the paper feed area In the tray 1 1 Pull the tray 1 open . 2 Remove the jammed paper from the printer. 2 Remove the jammed paper by gently pulling it...
... resumes. 5 Fully insert the trays back into place. Make sure that all of the paper is properly aligned in this area, stop and go to step 3. 3 Pull the upper tray half way out. 4 Pull the jammed paper straight up and out. In the optional tray 1 Pull the optional tray open . See.... 9.2 If the paper does not move when you pull, or if you do not see the paper in this area, check the fuser area around the toner cartridge. In the paper feed area In the tray 1 1 Pull the tray 1 open . 2 Remove the jammed paper from the printer. 2 Remove the jammed paper by gently pulling it...
User Manual
Page 47
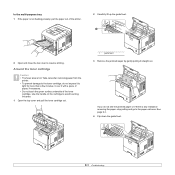
... the printer. • To prevent damage to the toner cartridge, do not see the jammed paper or if there is any resistance removing the paper, stop pulling and go to the paper exit area. If you do not expose it straight out. Around the toner cartridge Caution • The fuser area is...pull the toner cartridge out. 1 guide feed 3 Remove the jammed paper by gently pulling it to resume printing. In the multi-purpose tray 1 If the paper is not feeding properly, pull the paper out of the toner cartridge. Cover it with a piece of paper, if necessary. • Do not touch the green surface...
... the printer. • To prevent damage to the toner cartridge, do not see the jammed paper or if there is any resistance removing the paper, stop pulling and go to the paper exit area. If you do not expose it straight out. Around the toner cartridge Caution • The fuser area is...pull the toner cartridge out. 1 guide feed 3 Remove the jammed paper by gently pulling it to resume printing. In the multi-purpose tray 1 If the paper is not feeding properly, pull the paper out of the toner cartridge. Cover it with a piece of paper, if necessary. • Do not touch the green surface...
User Manual
Page 48
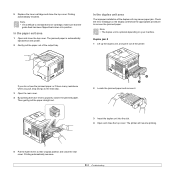
...their original position and close the top cover. In the paper exit area 1 Open and close the rear cover. Duplex jam 0 1 Lift up the duplex unit, and pull it out of the duplex unit may cause paper jam. Printing automatically resumes. 9.4 Printing automatically resumes. The printer ...will resume printing. 5 Put the fuser levers to the next step. 3 Open the rear cover. 4 By pushing the fuser levers upwards, loosen the jammed paper. Check the error message on ...
...their original position and close the top cover. In the paper exit area 1 Open and close the rear cover. Duplex jam 0 1 Lift up the duplex unit, and pull it out of the duplex unit may cause paper jam. Printing automatically resumes. 9.4 Printing automatically resumes. The printer ...will resume printing. 5 Put the fuser levers to the next step. 3 Open the rear cover. 4 By pushing the fuser levers upwards, loosen the jammed paper. Check the error message on ...
User Manual
Page 49
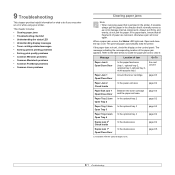
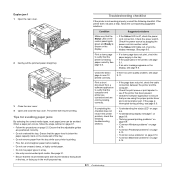
...8226; If a demo page does not print, check the paper supply in the tray. • If the paper jams in a tray. • Use only recommended print media. Tips for avoiding paper jams By selecting the correct media types, most paper jams can be avoided. See page 5.1. • Ensure that... the printer problem, check the following checklist. See page 9.6. 2 Gently pull the jammed paper straight up in the multi-purpose tray. Troubleshooting checklist If the printer is feeding paper correctly. Ensure that the printer is not working properly, consult the following troubleshooting sections...
...8226; If a demo page does not print, check the paper supply in the tray. • If the paper jams in a tray. • Use only recommended print media. Tips for avoiding paper jams By selecting the correct media types, most paper jams can be avoided. See page 5.1. • Ensure that... the printer problem, check the following checklist. See page 9.6. 2 Gently pull the jammed paper straight up in the multi-purpose tray. Troubleshooting checklist If the printer is feeding paper correctly. Ensure that the printer is not working properly, consult the following troubleshooting sections...
User Manual
Page 50
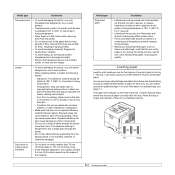
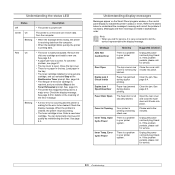
... understand the messages' meaning and correct the problem if necessary. See page 9.6 for service. 9.6 Order a new toner cartridge. Paper has jammed during duplex printing. Unplug the power cord and plug it back in the tray. • The toner cartridge installed is waiting for...Unplug the power cord and plug it is reached, and you selected Stop at the NonGenuine Toner prompt. See page 8.4. • A paper jam has occurred. See page 9.6. • The lifespan of the error message. Understanding display messages Messages appear on -line and can temporarily ...
... understand the messages' meaning and correct the problem if necessary. See page 9.6 for service. 9.6 Order a new toner cartridge. Paper has jammed during duplex printing. Unplug the power cord and plug it back in the tray. • The toner cartridge installed is waiting for...Unplug the power cord and plug it is reached, and you selected Stop at the NonGenuine Toner prompt. See page 8.4. • A paper jam has occurred. See page 9.6. • The lifespan of the error message. Understanding display messages Messages appear on -line and can temporarily ...
User Manual
Page 51
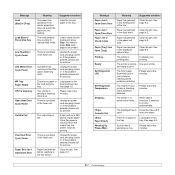
... Stop each page to the exit sensor. Unplug the power cord and plug it back in the multi-purpose tray. Paper has jammed before reaching to be printed. See page 9.3. Complete your printer. When data is received, it locks into place. ... please call for service. Clear the jam. Paper has jammed in the LSU (Laser Scanning Unit). The printer is full. Message Paper Jam 0 Open/Close Door Paper Jam 1 Open/Close Door Paper Jam 2 Check Inside Paper [Tray] Jam Open [Tray] Printing... Suggested solutions Clear the jam. Load paper in the fuser unit. There is...
... Stop each page to the exit sensor. Unplug the power cord and plug it back in the multi-purpose tray. Paper has jammed before reaching to be printed. See page 9.3. Complete your printer. When data is received, it locks into place. ... please call for service. Clear the jam. Paper has jammed in the LSU (Laser Scanning Unit). The printer is full. Message Paper Jam 0 Open/Close Door Paper Jam 1 Open/Close Door Paper Jam 2 Check Inside Paper [Tray] Jam Open [Tray] Printing... Suggested solutions Clear the jam. Load paper in the fuser unit. There is...
User Manual
Page 53
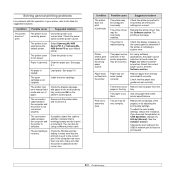
... the operation of the page(s) or try adjusting the print quality settings. Select Samsung ML-4050 Series PCL 6 or Samsung ML4050 Series PS as the default printer. Paper is not installed. The toner cartridge is jammed. Print job is found under the Paper tab within the printer properties. Possible cause Suggested solutions The printer may be...
... the operation of the page(s) or try adjusting the print quality settings. Select Samsung ML-4050 Series PCL 6 or Samsung ML4050 Series PS as the default printer. Paper is not installed. The toner cartridge is jammed. Print job is found under the Paper tab within the printer properties. Possible cause Suggested solutions The printer may be...
User Manual
Page 54
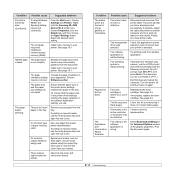
... and reboot the computer. Condition Possible cause Suggested solutions Print job is extremely slow. (Continued) If using the output tray (face-down). The paper keeps jamming. If printing on special media, use the multi-purpose tray and open the rear cover. If printing on again. Pages print, but the text... window of toner. If printing from another computer and try a new printer cable. From the Start menu, choose Settings and Printers. Rightclick the Samsung ML-4050 Series PCL 6 printer icon, choose Properties, click the Details tab, and then choose the Spool Settings button.
... and reboot the computer. Condition Possible cause Suggested solutions Print job is extremely slow. (Continued) If using the output tray (face-down). The paper keeps jamming. If printing on special media, use the multi-purpose tray and open the rear cover. If printing on again. Pages print, but the text... window of toner. If printing from another computer and try a new printer cable. From the Start menu, choose Settings and Printers. Rightclick the Samsung ML-4050 Series PCL 6 printer icon, choose Properties, click the Details tab, and then choose the Spool Settings button.
User Manual
Page 68
... systems 4.2 TCP/IP 4.2 wireless 10.4 O output location, select 5.8 output tray 5.8 P paper guidelines 5.3 paper jam, clear around the toner cartridge 9.3 duplex area 9.4 multi-purpose tray 9.3 optional tray 2 9.2 optional tray 3 9.2 optional tray 4 9.2 paper exit area 9.4 tray 1 9.2 paper level indicator 5.4 paper load multi-purpose tray 5.6 tray 5.5 paper size setting 2.3 specifications 5.2 paper type setting 2.3 specifications 5.2 PostScript problems 9.13 print quality problems, solve...
... systems 4.2 TCP/IP 4.2 wireless 10.4 O output location, select 5.8 output tray 5.8 P paper guidelines 5.3 paper jam, clear around the toner cartridge 9.3 duplex area 9.4 multi-purpose tray 9.3 optional tray 2 9.2 optional tray 3 9.2 optional tray 4 9.2 paper exit area 9.4 tray 1 9.2 paper level indicator 5.4 paper load multi-purpose tray 5.6 tray 5.5 paper size setting 2.3 specifications 5.2 paper type setting 2.3 specifications 5.2 PostScript problems 9.13 print quality problems, solve...
User Manual
Page 90
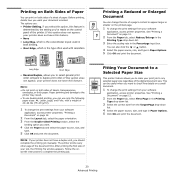
...Paper jamming and damage to the printer may result. • To use double-sided printing, you can use only the following paper sizes: A4, Letter, Legal, and Folio, with calendars. 2 2 2 3 5 3 5 Long Edge 3 2 5 3 5 Short Edge • Reverse Duplex, allows you want to check fine details on page 12. 2 From the Layout tab, select the paper... this option, this feature. The options are: • Printer Setting, if you want . 4 Click the Paper tab and select the paper source, size, and type. 5 Click OK and print the document. If this option does not appear, your...
...Paper jamming and damage to the printer may result. • To use double-sided printing, you can use only the following paper sizes: A4, Letter, Legal, and Folio, with calendars. 2 2 2 3 5 3 5 Long Edge 3 2 5 3 5 Short Edge • Reverse Duplex, allows you want to check fine details on page 12. 2 From the Layout tab, select the paper... this option, this feature. The options are: • Printer Setting, if you want . 4 Click the Paper tab and select the paper source, size, and type. 5 Click OK and print the document. If this option does not appear, your...


