
Instruction Manual
Page 2
... REMOVE REAR COVER. CAUTION-INVISIBLE LASER RADIATION WHEN OPEN AND INTERLOCKS DEFEATED, AVOID EXPOSURE TO BEAM. Before moving the player, ensure the disc tray is classified as close to overheating and malfunction of this unit. Phones Protect the player from the AC supply if the player malfunctions. Disconnect the power cable from moisture(i.e. Condensation may result in cold temperatures. Use of controls, adjustments...
... REMOVE REAR COVER. CAUTION-INVISIBLE LASER RADIATION WHEN OPEN AND INTERLOCKS DEFEATED, AVOID EXPOSURE TO BEAM. Before moving the player, ensure the disc tray is classified as close to overheating and malfunction of this unit. Phones Protect the player from the AC supply if the player malfunctions. Disconnect the power cable from moisture(i.e. Condensation may result in cold temperatures. Use of controls, adjustments...

Instruction Manual
Page 3
... is damaged. When the power-supply cord or plug is left unattended and unused for ventilation and to ensure reliable operation of antenna discharge unit, connection to its normal operation. c. The openings should not be sure the service technician has used replacement parts specified by a qualified technician to restore the video product to grounding electrodes, and requirements for service. REPLACEMENT PARTS When replacement parts are not likely to...
... is damaged. When the power-supply cord or plug is left unattended and unused for ventilation and to ensure reliable operation of antenna discharge unit, connection to its normal operation. c. The openings should not be sure the service technician has used replacement parts specified by a qualified technician to restore the video product to grounding electrodes, and requirements for service. REPLACEMENT PARTS When replacement parts are not likely to...
Instruction Manual
Page 4
... Function ...24 Selecting Audio/Subtitle Language ...25 Moving Directly to a Scene/Song...26 JPEG File Playback ...27 Using Disc Menu...29 Using the Title Menu ...30 SETUP Setting the Language...31 Setting TV Screen type ...33 Setting Parental Controls (Rating Level)...35 Setting the Password ...36 Setting the Wallpaper...37 Setting the DRC (Dynamic Range Compression)...39 AV SYNC Setup...40 RADIO OPERATION Listening to Radio ...41 Presetting Stations...42 TAPE DECK Listening to play . Customized TV Screen Display The MM-DS80...
... Function ...24 Selecting Audio/Subtitle Language ...25 Moving Directly to a Scene/Song...26 JPEG File Playback ...27 Using Disc Menu...29 Using the Title Menu ...30 SETUP Setting the Language...31 Setting TV Screen type ...33 Setting Parental Controls (Rating Level)...35 Setting the Password ...36 Setting the Wallpaper...37 Setting the DRC (Dynamic Range Compression)...39 AV SYNC Setup...40 RADIO OPERATION Listening to Radio ...41 Presetting Stations...42 TAPE DECK Listening to play . Customized TV Screen Display The MM-DS80...

Instruction Manual
Page 5
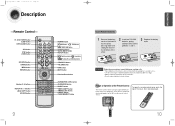
...buttons Tuning Down & Skip ( ) buttons System Status Display DOLBY DIGITAL indicator LPCM indicator CD Synchro indicator PROGRAM indicator REC indicator A↔B indicator 7 Push Eject (Cassette Door OPEN/CLOSE) -Rear Panel- AM Antenna Connector FM Antenna Connector AUX-Input SUBWOOFER Output Connector Loudspeaker Connector Terminals Video Cable (AH39-40001T) User's Manual (AH68-01379R) FM Antenna (AH42-00004A) 8 Video Output Connector Connect the TV's video input jacks (VIDEO IN) to the player's S-Video output jack. Volume control AUX button SRS WOW button S/W LEVEL button CD Door OPEN...
...buttons Tuning Down & Skip ( ) buttons System Status Display DOLBY DIGITAL indicator LPCM indicator CD Synchro indicator PROGRAM indicator REC indicator A↔B indicator 7 Push Eject (Cassette Door OPEN/CLOSE) -Rear Panel- AM Antenna Connector FM Antenna Connector AUX-Input SUBWOOFER Output Connector Loudspeaker Connector Terminals Video Cable (AH39-40001T) User's Manual (AH68-01379R) FM Antenna (AH42-00004A) 8 Video Output Connector Connect the TV's video input jacks (VIDEO IN) to the player's S-Video output jack. Volume control AUX button SRS WOW button S/W LEVEL button CD Door OPEN...
Instruction Manual
Page 6
... DVD POWER button SLEEP button OPEN/CLOSE button AUX button STEP button ZOOM button SRS WOW button TUNING button MENU button RETURN button Number(0~9) buttons REPEAT A B button LOGO COPY button EZ VIEW button REMAIN button DVD button TAPE button TUNER BAND button SUBTITLE button SLOW, MO/ST button REPEAT button Play/Pause button Stop button Tuning Preset/CD Skip button S.BASS/EQ button VOLUME button INFO button MUTE button Direction/Enter button SUBWOOFER LEVEL button SLIDE MODE button DIGEST button TIMER ON/OFF button TIMER/CLOCK button CANCEL button TUNER MEMORY button Insert Remote...
... DVD POWER button SLEEP button OPEN/CLOSE button AUX button STEP button ZOOM button SRS WOW button TUNING button MENU button RETURN button Number(0~9) buttons REPEAT A B button LOGO COPY button EZ VIEW button REMAIN button DVD button TAPE button TUNER BAND button SUBTITLE button SLOW, MO/ST button REPEAT button Play/Pause button Stop button Tuning Preset/CD Skip button S.BASS/EQ button VOLUME button INFO button MUTE button Direction/Enter button SUBWOOFER LEVEL button SLIDE MODE button DIGEST button TIMER ON/OFF button TIMER/CLOCK button CANCEL button TUNER MEMORY button Insert Remote...

Instruction Manual
Page 7
... to turn off the power and disconnect the power cord. Note • Installating the speakers near the front speakers. Right Speaker Subwoofer Left Speaker Red Black WOOFER S L P E A K E R S R S L P E A K E R S R Red Black Position of the DVD Player • Place it is not so critical. Selecting the Listening Position The listening position should be located about 45°) toward you like. • Usually, it on the remote of the screen display. 11 Connecting to...
... to turn off the power and disconnect the power cord. Note • Installating the speakers near the front speakers. Right Speaker Subwoofer Left Speaker Red Black WOOFER S L P E A K E R S R S L P E A K E R S R Red Black Position of the DVD Player • Place it is not so critical. Selecting the Listening Position The listening position should be located about 45°) toward you like. • Usually, it on the remote of the screen display. 11 Connecting to...
Instruction Manual
Page 9
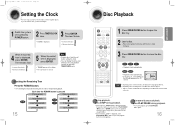
.... (This function works only with the disc's label facing up. 3 Press OPEN/CLOSE button to set . Note • Remove discs from the unit before setting the clock. • You can display the time, even when you have a few seconds to close the disc tray. To stop playback, press STOP during playback. • To resume playback, press PLAY/PAUSE button again. 16 CONNECTIONS The hour flashes...
.... (This function works only with the disc's label facing up. 3 Press OPEN/CLOSE button to set . Note • Remove discs from the unit before setting the clock. • You can display the time, even when you have a few seconds to close the disc tray. To stop playback, press STOP during playback. • To resume playback, press PLAY/PAUSE button again. 16 CONNECTIONS The hour flashes...
Instruction Manual
Page 13
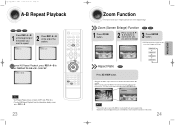
... screen can be removed by pressing the EZ VIEW button. REPEAT : A-B To cancel AB Repeat Playback, press REP. A↔B to enlarge. 3 Press ENTER button. • Each time the button is pressed, the zoom level changes as follows: ENTER SELECT Aspect Ratio DVD Press EZ VIEW button. • Each time the button is pressed, the zoom function will not work on MP3 and JPEG discs. • To select...
... screen can be removed by pressing the EZ VIEW button. REPEAT : A-B To cancel AB Repeat Playback, press REP. A↔B to enlarge. 3 Press ENTER button. • Each time the button is pressed, the zoom level changes as follows: ENTER SELECT Aspect Ratio DVD Press EZ VIEW button. • Each time the button is pressed, the zoom function will not work on MP3 and JPEG discs. • To select...
Instruction Manual
Page 14
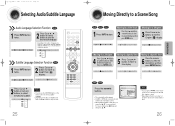
... the remote control to move a folder. SELECT 03 DVD RECEIVER Move Select SMART NAVI Something like you Back for good Love of languages on the disc, the Subtitle and Audio Language functions may not be moved from the disc information screen. • When playing an MP3 or JPG disc, you may not work. 25 Moving Directly to the selected title or time. 26 OPERATION 1p~30p(DS80)- SEA...
... the remote control to move a folder. SELECT 03 DVD RECEIVER Move Select SMART NAVI Something like you Back for good Love of languages on the disc, the Subtitle and Audio Language functions may not be moved from the disc information screen. • When playing an MP3 or JPG disc, you may not work. 25 Moving Directly to the selected title or time. 26 OPERATION 1p~30p(DS80)- SEA...
Instruction Manual
Page 16
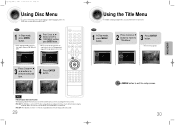
... use the menus for the audio language, subtitle language, profile, etc. OPERATION Press Cursor , , 3 , buttons to enable them. The disc is not supported" message appears on the screen. DVD 1 In Stop mode, press MENU button. • When playing a VCD (version 2.), this toggles between PBC ON and OFF. 2 Press Cursor , buttons to move to exit the setup screen. 30 Note PBC (Playback Control) Function When playing a VCD (version 2.0), you select...
... use the menus for the audio language, subtitle language, profile, etc. OPERATION Press Cursor , , 3 , buttons to enable them. The disc is not supported" message appears on the screen. DVD 1 In Stop mode, press MENU button. • When playing a VCD (version 2.), this toggles between PBC ON and OFF. 2 Press Cursor , buttons to move to exit the setup screen. 30 Note PBC (Playback Control) Function When playing a VCD (version 2.0), you select...
Instruction Manual
Page 18
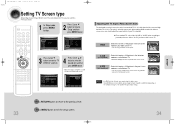
... to play a 16:9 picture in different screen sizes, you have a wide screen TV. When playing DVDs recorded in the letter box mode on the software, the type of TV, and the TV aspect ratio setting. Select "16:9" if you should adjust the aspect ratio to the previous screen. Press Cursor 2 button to move to 'Setup' and then press ENTER button. 3 Press Cursor button to move to 'TV DISPLAY...
... to play a 16:9 picture in different screen sizes, you have a wide screen TV. When playing DVDs recorded in the letter box mode on the software, the type of TV, and the TV aspect ratio setting. Select "16:9" if you should adjust the aspect ratio to the previous screen. Press Cursor 2 button to move to 'Setup' and then press ENTER button. 3 Press Cursor button to move to 'TV DISPLAY...
Instruction Manual
Page 19
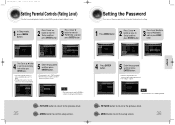
... to view. 1 In Stop mode, press MENU button. 2 Press Cursor button to move to the previous screen. Press Cursor button to 3 move to 'Setup' and then press ENTER button. Press MENU button to the previous level. Press Cursor 3 button to move to 'Setup' and then press ENTER button. Note • This function works only if a DVD disc contains the rating level information. 35 Press RETURN button to return to exit the setup screen...
... to view. 1 In Stop mode, press MENU button. 2 Press Cursor button to move to the previous screen. Press Cursor button to 3 move to 'Setup' and then press ENTER button. Press MENU button to the previous level. Press Cursor 3 button to move to 'Setup' and then press ENTER button. Note • This function works only if a DVD disc contains the rating level information. 35 Press RETURN button to return to exit the setup screen...
Instruction Manual
Page 20
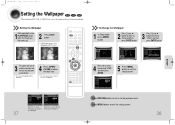
... 'USER', and then press ENTER. 5 Press MENU button to 'LOGO' and then press ENTER button. 3 The power will turn off and then back on the TV screen. Select this to set the image you like as your wallpaper. Press MENU button to the previous level. 31P~62P(DS80)- LOGO COPY DATA To Change the Wallpaper 1 In Stop mode, press MENU button. 2 Press Cursor button to move to 'Setup' and...
... 'USER', and then press ENTER. 5 Press MENU button to 'LOGO' and then press ENTER button. 3 The power will turn off and then back on the TV screen. Select this to set the image you like as your wallpaper. Press MENU button to the previous level. 31P~62P(DS80)- LOGO COPY DATA To Change the Wallpaper 1 In Stop mode, press MENU button. 2 Press Cursor button to move to 'Setup' and...

Instruction Manual
Page 22
... a station. 3 Press the TUNER MEMORY button. • "PROG" flashes in to a preset station, press remote control to select the preset station. To tune in the display. Main Unit 1 Press the Function button to a lower or higher frequency. Manual Tuning Press STOP ( MANUAL and ) to select then briefly press to tune in to the desired station. Automatic Tuning 2 Press the STOP ( ) button to select "AUTO" and then press and hold button to select the preset station. Automatic Tuning 1 Press the STOP ( ) button to select PRESET...
... a station. 3 Press the TUNER MEMORY button. • "PROG" flashes in to a preset station, press remote control to select the preset station. To tune in the display. Main Unit 1 Press the Function button to a lower or higher frequency. Manual Tuning Press STOP ( MANUAL and ) to select then briefly press to tune in to the desired station. Automatic Tuning 2 Press the STOP ( ) button to select "AUTO" and then press and hold button to select the preset station. Automatic Tuning 1 Press the STOP ( ) button to select PRESET...
Instruction Manual
Page 24
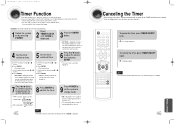
.... • TUNER (radio) : a Press ENTER. If you no longer wish to use the timer, you must cancel it will switch on and off automatically at specific times. • If you no longer displayed. Note • You can now set the timer switch-on time. 6 Press or button to adjust the volume level and press ENTER. • The source to standby mode. • is displayed (instead of...
.... • TUNER (radio) : a Press ENTER. If you no longer wish to use the timer, you must cancel it will switch on and off automatically at specific times. • If you no longer displayed. Note • You can now set the timer switch-on time. 6 Press or button to adjust the volume level and press ENTER. • The source to standby mode. • is displayed (instead of...
Instruction Manual
Page 26
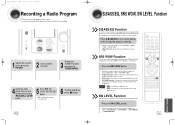
... displayed in red and recording starts. 6 To stop recording, press button. 49 S.BASS/EQ, SRS WOW, SW LEVEL Function S.BASS/EQ Function Your micro component system is pressed, the selection changes as follows: TRU BASS ➝ SRS ➝ SRS WOW➝OFF. • TruBASS Function : Enhances the bass and low frequencies to adjust the volume, as follows: SUBWOOFER 1 ➝ SUBWOOFER 2 ➝ SUBWOOFER 3 ➝ SUBWOOFER OFF. 50 MISCELLANEOUS SW LEVEL Function You can record a radio program of music...
... displayed in red and recording starts. 6 To stop recording, press button. 49 S.BASS/EQ, SRS WOW, SW LEVEL Function S.BASS/EQ Function Your micro component system is pressed, the selection changes as follows: TRU BASS ➝ SRS ➝ SRS WOW➝OFF. • TruBASS Function : Enhances the bass and low frequencies to adjust the volume, as follows: SUBWOOFER 1 ➝ SUBWOOFER 2 ➝ SUBWOOFER 3 ➝ SUBWOOFER OFF. 50 MISCELLANEOUS SW LEVEL Function You can record a radio program of music...
Instruction Manual
Page 27
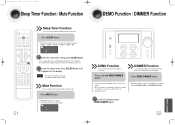
... in turn off . For instructions on the display. kHz MHz To confirm the sleep timer setting, press SLEEP button. •The remaining time before the DVD player will shut itself off is useful when answering a doorbell or telephone call. DIMMER Function You can operate in this function, press DEMO/DIMMER again. 52 MISCELLANEOUS To cancel this manual. 31P~62P(DS80)- Note • This function can adjust...
... in turn off . For instructions on the display. kHz MHz To confirm the sleep timer setting, press SLEEP button. •The remaining time before the DVD player will shut itself off is useful when answering a doorbell or telephone call. DIMMER Function You can operate in this function, press DEMO/DIMMER again. 52 MISCELLANEOUS To cancel this manual. 31P~62P(DS80)- Note • This function can adjust...
Instruction Manual
Page 29
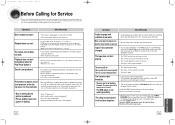
... DVD player. • Make sure that does not contain menus? • You can be changed. Symptom Check/Remedy Disc tray does not open. The rating level password level has been forgotten. • Is the antenna connected properly? • If the antenna's input signal is • Is the power cord plugged securely into the outlet? • Turn off the power and hold the main unit's TUNING MODE/ button for longer than 5 seconds. Using the RESET function...
... DVD player. • Make sure that does not contain menus? • You can be changed. Symptom Check/Remedy Disc tray does not open. The rating level password level has been forgotten. • Is the antenna connected properly? • If the antenna's input signal is • Is the power cord plugged securely into the outlet? • Turn off the power and hold the main unit's TUNING MODE/ button for longer than 5 seconds. Using the RESET function...
Instruction Manual
Page 30
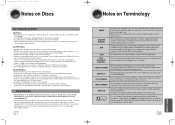
... 6) Channel Digital Surround sound reproduced from the menu displayed on a single CD. • When playing a Kodak/Fuji Picture CD, only the JPEG files in the picture folder can enjoy dynamic, realistic sound. 58 MISCELLANEOUS Because of 9,999 images can be searched quickly using these movies are assigned to change the angle of the recorded files may not be played. A high-density optical disc on DVD discs. TITLE NUMBER These numbers...
... 6) Channel Digital Surround sound reproduced from the menu displayed on a single CD. • When playing a Kodak/Fuji Picture CD, only the JPEG files in the picture folder can enjoy dynamic, realistic sound. 58 MISCELLANEOUS Because of 9,999 images can be searched quickly using these movies are assigned to change the angle of the recorded files may not be played. A high-density optical disc on DVD discs. TITLE NUMBER These numbers...
Instruction Manual
Page 31
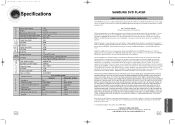
... 14:35 Page 58 Specifications G Power Consumption E N Weight E Dimensions (W x H x D) R A Operating Temperature Range L Operating Humidity Range F T U M N E MW T U /N LW E R Usable Sensitivity S/N Ratio Distortion Usable Sensitivity S/N Ratio Distortion Composite Video VIDEO OUTPUT S-VIDEO A Front speaker output M P Subwoofer speaker output L I Frequency range F S/N Ratio I E Channel separation R Input sensitivity Speaker system S P Impedance E Frequency range A Output sound pressure level K Rated input E R Maximum input Dimensions (W x H x D) Weights 77W...
... 14:35 Page 58 Specifications G Power Consumption E N Weight E Dimensions (W x H x D) R A Operating Temperature Range L Operating Humidity Range F T U M N E MW T U /N LW E R Usable Sensitivity S/N Ratio Distortion Usable Sensitivity S/N Ratio Distortion Composite Video VIDEO OUTPUT S-VIDEO A Front speaker output M P Subwoofer speaker output L I Frequency range F S/N Ratio I E Channel separation R Input sensitivity Speaker system S P Impedance E Frequency range A Output sound pressure level K Rated input E R Maximum input Dimensions (W x H x D) Weights 77W...


