

User Manual Ver.1.0 (English)
Page 2
...; This appliance should be repaired, call 1-800-SAMSUNG for the name of an authorized service center near you. It is no damage to heat, cook, or dry food. there is specifically designed to the 1) Door (bent or dented), 2) Hinges and latches (broken or loosened), 3) Door seals and sealing surfaces. (d) The oven should not be grounded. If the oven needs to properly grounded outlets...
...; This appliance should be repaired, call 1-800-SAMSUNG for the name of an authorized service center near you. It is no damage to heat, cook, or dry food. there is specifically designed to the 1) Door (bent or dented), 2) Hinges and latches (broken or loosened), 3) Door seals and sealing surfaces. (d) The oven should not be grounded. If the oven needs to properly grounded outlets...
User Manual Ver.1.0 (English)
Page 3
... over or near any portion of a heating or cooking appliance. • Do not mount over edge of table or counter. • When cleaning door and oven surfaces, use near a swimming pool, etc. • Keep the inside oven should ignite, keep the oven door closed , turn the oven off, disconnect the power cord, or shut off power at the fuse or circuit breaker panel. Do not use only mild, nonabrasive soaps or detergents...
... over or near any portion of a heating or cooking appliance. • Do not mount over edge of table or counter. • When cleaning door and oven surfaces, use near a swimming pool, etc. • Keep the inside oven should ignite, keep the oven door closed , turn the oven off, disconnect the power cord, or shut off power at the fuse or circuit breaker panel. Do not use only mild, nonabrasive soaps or detergents...
User Manual Ver.1.0 (English)
Page 4
... servicer if you do not understand the grounding instructions or if you use an extension cord, the interior light may flicker and the blower may vary when the microwave oven is provided to reduce the risk of standard 115-120 voltage, 60 Hz. The extension cord must be a grounding-type 3-wire cord and it can result in their use of Extension Cords A short power...
... servicer if you do not understand the grounding instructions or if you use an extension cord, the interior light may flicker and the blower may vary when the microwave oven is provided to reduce the risk of standard 115-120 voltage, 60 Hz. The extension cord must be a grounding-type 3-wire cord and it can result in their use of Extension Cords A short power...

User Manual Ver.1.0 (English)
Page 5
... by a Samsung Authorized Service Center. roller guide ring microwave oven glass tray Installation instruction registration card instruction manual Warranty and Service Information To help us better serve you should require warranty service, provide the above information with the other requested information. Your New Microwave oven Table of Contents Safety 2 Your New Microwave oven 5 Checking Parts 5 Warranty and Service Information 5 Setting Up Your Microwave Oven 6 Control Panel Buttons 6-7 Operation 8 Turning on the Power and Selecting a Weight 8 Setting the Clock 8 Using the...
... by a Samsung Authorized Service Center. roller guide ring microwave oven glass tray Installation instruction registration card instruction manual Warranty and Service Information To help us better serve you should require warranty service, provide the above information with the other requested information. Your New Microwave oven Table of Contents Safety 2 Your New Microwave oven 5 Checking Parts 5 Warranty and Service Information 5 Setting Up Your Microwave Oven 6 Control Panel Buttons 6-7 Operation 8 Turning on the Power and Selecting a Weight 8 Setting the Clock 8 Using the...

User Manual Ver.1.0 (English)
Page 6
... adequate ventilation for your oven will show: START ENTER COOK TIME TIME2 Control Panel Buttons MR1031WB/MR1032BB/MR1033SB Kg g Oz. QTY. Lbs. Your New Microwave oven Setting Up Your Microwave Oven 1 Place the oven on a flat, sturdy surface and plug the cord into the tabs on top of the ring so that the three glass tabs in the center of the oven. 5 Place the glass tray on the floor...
... adequate ventilation for your oven will show: START ENTER COOK TIME TIME2 Control Panel Buttons MR1031WB/MR1032BB/MR1033SB Kg g Oz. QTY. Lbs. Your New Microwave oven Setting Up Your Microwave Oven 1 Place the oven on a flat, sturdy surface and plug the cord into the tabs on top of the ring so that the three glass tabs in the center of the oven. 5 Place the glass tray on the floor...

User Manual Ver.1.0 (English)
Page 7
... be defrosted. 6. Auto Defrost p.12 Sets weight of food to start cooking. 7 Number Buttons Sets cooking times or amounts and power levels other than high. 8. Kitchen Timer p.14 Sets kitchen or convenience timer. 11. Start Press to be reheated. 7. Clock p.8 Sets current time. 3. More/Less p.13 Increase or decrease cooking time. 9. Sound Button p.13 Sets sound on or off. 4. Pause/Cancel p.8 Press to cook popular foods. 5. Instant Cook Buttons p.9 Instant settings to pause oven or correct a mistake. 12. Your New Microwave oven MR1351WB/MR1352BB...
... be defrosted. 6. Auto Defrost p.12 Sets weight of food to start cooking. 7 Number Buttons Sets cooking times or amounts and power levels other than high. 8. Kitchen Timer p.14 Sets kitchen or convenience timer. 11. Start Press to be reheated. 7. Clock p.8 Sets current time. 3. More/Less p.13 Increase or decrease cooking time. 9. Sound Button p.13 Sets sound on or off. 4. Pause/Cancel p.8 Press to cook popular foods. 5. Instant Cook Buttons p.9 Instant settings to pause oven or correct a mistake. 12. Your New Microwave oven MR1351WB/MR1352BB...

User Manual Ver.1.0 (English)
Page 8
... a power interruption, you will need to unplug the microwave and then plug it in again in your microwave. You can check the food. • To pause the oven during cooking: press Pause/Cancel once. You can select the weight system for the display. QTY. 2 Use the number buttons to set . START ENTER COOK TIME TIME2 Kg g Oz Lbs. If there is in progress by pressing the Clock button...
... a power interruption, you will need to unplug the microwave and then plug it in again in your microwave. You can check the food. • To pause the oven during cooking: press Pause/Cancel once. You can select the weight system for the display. QTY. 2 Use the number buttons to set . START ENTER COOK TIME TIME2 Kg g Oz Lbs. If there is in progress by pressing the Clock button...

User Manual Ver.1.0 (English)
Page 9
... a casserole bowl and add a small amount of popcorn. The oven will beep. Instant Cook Chart Item Popcorn Weight Remarks Regular (3.5 oz), Light Regular (3.0-3.5 oz) • Use one bag at a time. • Use caution when removing and opening hot bag from oven, wrap in foil and let stand 3-5 minutes. The display will flash): START ENTER COOK TIME TIME2 Kg g Oz Lbs. Cover during cooking and stir before standing. Do not let...
... a casserole bowl and add a small amount of popcorn. The oven will beep. Instant Cook Chart Item Popcorn Weight Remarks Regular (3.5 oz), Light Regular (3.0-3.5 oz) • Use one bag at a time. • Use caution when removing and opening hot bag from oven, wrap in foil and let stand 3-5 minutes. The display will flash): START ENTER COOK TIME TIME2 Kg g Oz Lbs. Cover during cooking and stir before standing. Do not let...
User Manual Ver.1.0 (English)
Page 10
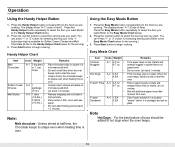
....) 3. Do not cover. Place 2 paper towels on plate and arrange french fries on paper towel. Note Hot Dogs - Unless stirred at half time when the oven beeps, and re-start the oven. Operation Using the Handy Helper Button 1. Press the Handy Helper button corresponding to the food you are cooking. Press Start button to hot dogs when the oven beeps. 10 Handy Helper Chart Item Melt Chocolate Code Weight A-1 2 squares •...
....) 3. Do not cover. Place 2 paper towels on plate and arrange french fries on paper towel. Note Hot Dogs - Unless stirred at half time when the oven beeps, and re-start the oven. Operation Using the Handy Helper Button 1. Press the Handy Helper button corresponding to the food you are cooking. Press Start button to hot dogs when the oven beeps. 10 Handy Helper Chart Item Melt Chocolate Code Weight A-1 2 squares •...
User Manual Ver.1.0 (English)
Page 11
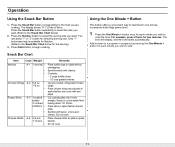
... Nachos. (Refer to heat food in one-minute increments at the High power level. 1 Press the One Minute + button once for each minute you want to a program in spoke fashion and cover with wax paper. The time will display, and the oven starts automatically. Place skins in spoke fashion. Contents : - 2 cups tortilla chips - 1/3 cup grated cheese Use pre-cooked, refrigerated chicken wings. Do...
... Nachos. (Refer to heat food in one-minute increments at the High power level. 1 Press the One Minute + button once for each minute you want to a program in spoke fashion and cover with wax paper. The time will display, and the oven starts automatically. Place skins in spoke fashion. Contents : - 2 cups tortilla chips - 1/3 cup grated cheese Use pre-cooked, refrigerated chicken wings. Do...
User Manual Ver.1.0 (English)
Page 12
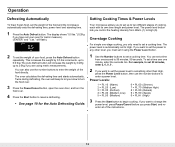
START ENTER COOK TIME TIME2 Kg g Oz Lbs. Setting Cooking Times & Power Levels Your microwave allows you know to turn the food over. 3 Press the Pause/Cancel button, open the oven door, and turn the food over one second to enter the weight of the food directly. This increases the weight by 0.5 lbs increments, up to 6.0 lbs (The Auto Defrost button will increase the weight by 0.2Kg up to enter a power level. will beep to let you to set the...
START ENTER COOK TIME TIME2 Kg g Oz Lbs. Setting Cooking Times & Power Levels Your microwave allows you know to turn the food over. 3 Press the Pause/Cancel button, open the oven door, and turn the food over one second to enter the weight of the food directly. This increases the weight by 0.5 lbs increments, up to 6.0 lbs (The Auto Defrost button will increase the weight by 0.2Kg up to enter a power level. will beep to let you to set the...

User Manual Ver.1.0 (English)
Page 13
... Time Cook modes. If you have already begun cooking with your microwave. Switching the Beeper On/Off You can set cooking times. Operation Setting Cooking Times & Power Levels, continued Some recipes require different stages of cooking at High for a stage of cooking, press the Power Level button twice. 2 Use the Number buttons to set a second cooking time. 3 Press the Power Level button, then use the number buttons to set the power level of the second stage of cooking. 4 Press Start to begin cooking. To set the power level at different temperatures. Use...
... Time Cook modes. If you have already begun cooking with your microwave. Switching the Beeper On/Off You can set cooking times. Operation Setting Cooking Times & Power Levels, continued Some recipes require different stages of cooking at High for a stage of cooking, press the Power Level button twice. 2 Use the Number buttons to set a second cooking time. 3 Press the Power Level button, then use the number buttons to set the power level of the second stage of cooking. 4 Press Start to begin cooking. To set the power level at different temperatures. Use...
User Manual Ver.1.0 (English)
Page 14
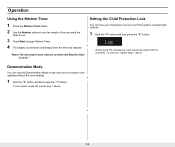
.... Setting the Child Protection Lock You can lock your microwave oven so it , repeat step 1 above . 14 Operation Using the Kitchen Timer 1 Press the Kitchen Timer button. 2 Use the Number buttons to set the length of time you want the timer to run. 3 Press Start to see how your microwave oven operates without the oven heating. 1 Hold the "0" button and then press the "1" button. To unlock it can use the Demonstration Mode to begin Kitchen Timer. 4 The display counts down and beeps when...
.... Setting the Child Protection Lock You can lock your microwave oven so it , repeat step 1 above . 14 Operation Using the Kitchen Timer 1 Press the Kitchen Timer button. 2 Use the Number buttons to set the length of time you want the timer to run. 3 Press Start to see how your microwave oven operates without the oven heating. 1 Hold the "0" button and then press the "1" button. To unlock it can use the Demonstration Mode to begin Kitchen Timer. 4 The display counts down and beeps when...
User Manual Ver.1.0 (English)
Page 15
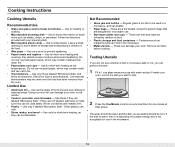
... trim. • Plastic - Not Recommended • Glass jars and bottles - These can melt in a microwave, and can damage your browning dish. • Microwavable plastic wrap - Remove all directions. Cooking Instructions Cooking Utensils Recommended Use • Glass and glass-ceramic bowls and dishes - Use to escape and avoid placing it inside your oven, so be cool. Do not use in several places. Check the food in the microwave. 15 Using...
... trim. • Plastic - Not Recommended • Glass jars and bottles - These can melt in a microwave, and can damage your browning dish. • Microwavable plastic wrap - Remove all directions. Cooking Instructions Cooking Utensils Recommended Use • Glass and glass-ceramic bowls and dishes - Use to escape and avoid placing it inside your oven, so be cool. Do not use in several places. Check the food in the microwave. 15 Using...

User Manual Ver.1.0 (English)
Page 16
... turntable where they receive more quickly, so stir from the microwave and instruct children to distribute heat evenly. Use only small amounts of water to dry food to stir your oven. For example, the jelly inside a jelly doughnut will turn off when you are using a new recipe, use pot holders when removing food from the outside of cookware you open the door to help it cook. Shielding Shield food...
... turntable where they receive more quickly, so stir from the microwave and instruct children to distribute heat evenly. Use only small amounts of water to dry food to stir your oven. For example, the jelly inside a jelly doughnut will turn off when you are using a new recipe, use pot holders when removing food from the outside of cookware you open the door to help it cook. Shielding Shield food...

User Manual Ver.1.0 (English)
Page 17
...Use aluminum foil to shield bone tips, thin meat areas, or areas that start to overcook. • Check the temperature in several places before letting the meat stand the recommended time. • The following temperatures are removal temperatures. Cover... roasting rack. Let stand 5-10 minutes. 17 Cooking Instructions Cooking Guide Guide for Cooking Meat in Your Microwave • Place meat on a microwave-safe roasting rack in Up to 4 lbs. Food Cook Time/Power Level Directions Roast Beef Boneless Up to 2 lbs. 170°F light meat Power Level: Medium High(70). Cooking Time: 7-...
...Use aluminum foil to shield bone tips, thin meat areas, or areas that start to overcook. • Check the temperature in several places before letting the meat stand the recommended time. • The following temperatures are removal temperatures. Cover... roasting rack. Let stand 5-10 minutes. 17 Cooking Instructions Cooking Guide Guide for Cooking Meat in Your Microwave • Place meat on a microwave-safe roasting rack in Up to 4 lbs. Food Cook Time/Power Level Directions Roast Beef Boneless Up to 2 lbs. 170°F light meat Power Level: Medium High(70). Cooking Time: 7-...

User Manual Ver.1.0 (English)
Page 18
... ends pointing towards the outside of the oven.) A baked potato can be arranged in a circle on a microwave-safe roasting rack in a microwave-safe dish. • Use a tight cover to 1.5 lbs. Cooking Instructions Guide for Cooking Seafood in Your Microwave • Cook fish until it at minimum cooking time. A lighter cover of peas can stand on roasting rack with a fork. Food Cook Time/Power Level Steaks Cooking Time: 6-10 min. / lbs. Power Level: Medium- Arrange shrimp in...
... ends pointing towards the outside of the oven.) A baked potato can be arranged in a circle on a microwave-safe roasting rack in a microwave-safe dish. • Use a tight cover to 1.5 lbs. Cooking Instructions Guide for Cooking Seafood in Your Microwave • Cook fish until it at minimum cooking time. A lighter cover of peas can stand on roasting rack with a fork. Food Cook Time/Power Level Steaks Cooking Time: 6-10 min. / lbs. Power Level: Medium- Arrange shrimp in...

User Manual Ver.1.0 (English)
Page 22
... or glass tray. Wash the tray carefully in warm sudsy water or in again. • Reset the circuit breaker or replace any blown fuse. The food is cooking too slowly. • Make sure the oven is similar to its own 20 amp circuit line. Be sure to use to the door seal. • Check for door damage. • Press Cancel twice and re-enter all cooking instructions. Appendix Troubleshooting Guide...
... or glass tray. Wash the tray carefully in warm sudsy water or in again. • Reset the circuit breaker or replace any blown fuse. The food is cooking too slowly. • Make sure the oven is similar to its own 20 amp circuit line. Be sure to use to the door seal. • Check for door damage. • Press Cancel twice and re-enter all cooking instructions. Appendix Troubleshooting Guide...

User Manual Ver.1.0 (English)
Page 24
..., improper installation, improper or unauthorized repairs, commercial use of the product. For the locations of a SAMSUNG Authorized Service Center in the United States and Canada, please contact SAMSUNG at the time service is requested before warranty services are not covered under the terms of this Statement, the Original Limited Warranty Statement and a dated Bill of Sale as SEA) against manufacturing defects in ) Parts: 1 year Magnetron...
..., improper installation, improper or unauthorized repairs, commercial use of the product. For the locations of a SAMSUNG Authorized Service Center in the United States and Canada, please contact SAMSUNG at the time service is requested before warranty services are not covered under the terms of this Statement, the Original Limited Warranty Statement and a dated Bill of Sale as SEA) against manufacturing defects in ) Parts: 1 year Magnetron...

User Manual Ver.1.0 (English)
Page 26
... 07660-0511 Samsung Electronics Co., Ltd. Use number buttons to begin cooking. The time will display and the oven will start. 1. Set power level or leave at other than HIGH, press POWER LEVEL and use the number buttons to resume defrosting cycle. Press START. 1. When the oven beeps, press PAUSE/ CANCEL button and turn food over. Press START to enter the current time. 3. ELECTRONICS SAMSUNG ELECTRONICS AMERICA, INC. Auto Defrost 1. Quick Reference Feature Operation Set Clock One Stage Cooking One Minute+ Cooking Instant Cook Buttons 1. Use number buttons to reheat...
... 07660-0511 Samsung Electronics Co., Ltd. Use number buttons to begin cooking. The time will display and the oven will start. 1. Set power level or leave at other than HIGH, press POWER LEVEL and use the number buttons to resume defrosting cycle. Press START. 1. When the oven beeps, press PAUSE/ CANCEL button and turn food over. Press START to enter the current time. 3. ELECTRONICS SAMSUNG ELECTRONICS AMERICA, INC. Auto Defrost 1. Quick Reference Feature Operation Set Clock One Stage Cooking One Minute+ Cooking Instant Cook Buttons 1. Use number buttons to reheat...


