

User Manual Ver.1.0 (English)
Page 2
... dangerous voltage inside. See "IMPORTANT GROUNDING INSTRUCTIONS" on sealing surfaces. (c) Do not operate the oven if it has been damaged. • This appliance should be followed, including the following: WARNING To reduce risk of this manual. • Install or place this appliance only in accordance with the door open since open-door operation can result in harmful exposure to microwave energy. Contact...
... dangerous voltage inside. See "IMPORTANT GROUNDING INSTRUCTIONS" on sealing surfaces. (c) Do not operate the oven if it has been damaged. • This appliance should be followed, including the following: WARNING To reduce risk of this manual. • Install or place this appliance only in accordance with the door open since open-door operation can result in harmful exposure to microwave energy. Contact...

User Manual Ver.1.0 (English)
Page 3
... 115-120 voltage, 60 Hz. SAVE THESE INSTRUCTIONS 3 Your oven should be run with care. • Carefully remove container coverings, directing steam away from hands and face. • Remove lids from plastic cooking bags before serving. • A short power-supply cord is in oven. Do not overcook food. Remove wire twist-ties from baby food before heating. If the door is opened, the fire may be the only appliance...
... 115-120 voltage, 60 Hz. SAVE THESE INSTRUCTIONS 3 Your oven should be run with care. • Carefully remove container coverings, directing steam away from hands and face. • Remove lids from plastic cooking bags before serving. • A short power-supply cord is in oven. Do not overcook food. Remove wire twist-ties from baby food before heating. If the door is opened, the fire may be the only appliance...
User Manual Ver.1.0 (English)
Page 4
... counter top or tabletop where it . 3. If a long cord or extension cord is properly grounded. Liquids, such as water, coffee, or tea are available and may be at least as great as the electrical rating of electric shock. Do not use . WARNING Do not cut or remove the third (ground) prong from the microwave oven is operable. Cooking times may vary when the microwave oven...
... counter top or tabletop where it . 3. If a long cord or extension cord is properly grounded. Liquids, such as water, coffee, or tea are available and may be at least as great as the electrical rating of electric shock. Do not use . WARNING Do not cut or remove the third (ground) prong from the microwave oven is operable. Cooking times may vary when the microwave oven...

User Manual Ver.1.0 (English)
Page 5
... Using the More/Less Buttons 13 Switching the Beeper On/Off 13 Using the Kitchen Timer 14 Demonstration Mode 14 Setting the Child Protection Lock 14 Cooking Instructions 15 Cooking Utensils 15 Testing Utensils 15 Cooking Techniques 16 General Tips 16 Cooking Guide 17 Auto Defrosting Guide 19 Recipes 20 Appendix 22 Troubleshooting Guide 22 Care and Cleaning 22 Specifications 23 Warranty 24 Warranty Information 24 Guía Rápida(Spanish 25 Quick Reference Back Cover Checking Parts Unpack your microwave oven...
... Using the More/Less Buttons 13 Switching the Beeper On/Off 13 Using the Kitchen Timer 14 Demonstration Mode 14 Setting the Child Protection Lock 14 Cooking Instructions 15 Cooking Utensils 15 Testing Utensils 15 Cooking Techniques 16 General Tips 16 Cooking Guide 17 Auto Defrosting Guide 19 Recipes 20 Appendix 22 Troubleshooting Guide 22 Care and Cleaning 22 Specifications 23 Warranty 24 Warranty Information 24 Guía Rápida(Spanish 25 Quick Reference Back Cover Checking Parts Unpack your microwave oven...
User Manual Ver.1.0 (English)
Page 6
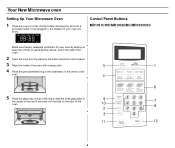
...: START ENTER COOK TIME TIME2 Control Panel Buttons MR1031CWC/MR1032CBC/MR1033CSC Kg g Oz. QTY. Your New Microwave oven Setting Up Your Microwave Oven 1 Place the oven on a flat, sturdy surface and plug the cord into the tabs on your oven by leaving at least four inches of space behind, above, and to the side of the oven. 2 Open the oven door by pressing the button below the control panel. 3 Wipe the inside of...
...: START ENTER COOK TIME TIME2 Control Panel Buttons MR1031CWC/MR1032CBC/MR1033CSC Kg g Oz. QTY. Your New Microwave oven Setting Up Your Microwave Oven 1 Place the oven on a flat, sturdy surface and plug the cord into the tabs on your oven by leaving at least four inches of space behind, above, and to the side of the oven. 2 Open the oven door by pressing the button below the control panel. 3 Wipe the inside of...
User Manual Ver.1.0 (English)
Page 7
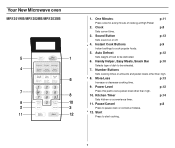
... of food to set a power level other than high. 10. More/Less p.13 Increase or decrease cooking time. 9. Kitchen Timer p.14 Sets kitchen or convenience timer. 11. Auto Defrost p.12 Sets weight of cooking at High Power 2. Sound Button p.13 Sets sound on or off. 4. Your New Microwave oven MR1351WB/MR1352BB/MR1353SB 1. Power Level p.12 Press this pad to be reheated. 7. Pause/Cancel p.8 Press to start cooking. 7 Start Press to pause oven or correct a mistake. 12. Number Buttons Sets cooking times or amounts and power levels...
... of food to set a power level other than high. 10. More/Less p.13 Increase or decrease cooking time. 9. Kitchen Timer p.14 Sets kitchen or convenience timer. 11. Auto Defrost p.12 Sets weight of cooking at High Power 2. Sound Button p.13 Sets sound on or off. 4. Your New Microwave oven MR1351WB/MR1352BB/MR1353SB 1. Power Level p.12 Press this pad to be reheated. 7. Pause/Cancel p.8 Press to start cooking. 7 Start Press to pause oven or correct a mistake. 12. Number Buttons Sets cooking times or amounts and power levels...
User Manual Ver.1.0 (English)
Page 8
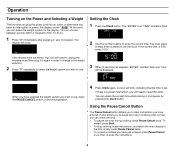
... three numbers to reset the clock. If the current time is a power interruption, you will blink, indicating that you wish to pause the oven's cooking cycle, so that the time is in progress by pressing the Clock button. START ENTER COOK TIME TIME2 Kg g Oz Lbs. A colon will need to unplug the microwave and then plug it in again in order to change to the weight selection...
... three numbers to reset the clock. If the current time is a power interruption, you will blink, indicating that you wish to pause the oven's cooking cycle, so that the time is in progress by pressing the Clock button. START ENTER COOK TIME TIME2 Kg g Oz Lbs. A colon will need to unplug the microwave and then plug it in again in order to change to the weight selection...

User Manual Ver.1.0 (English)
Page 9
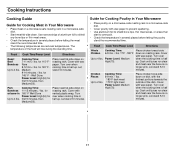
... serving size. 3 Press start to begin cooking. Use measuring cup or mug ; After heating, stir well. Do not let slices overlap. Do not cover. Before serving, let stand 1-2 minutes. Before serving, let stand 1-2 minutes. 9 The display will then beep every minute. Instant Cook Chart Item Popcorn Weight Remarks Regular (3.5 oz), Light Regular (3.0-3.5 oz) • Use one bag at a time. • Use caution when removing and opening hot bag...
... serving size. 3 Press start to begin cooking. Use measuring cup or mug ; After heating, stir well. Do not let slices overlap. Do not cover. Before serving, let stand 1-2 minutes. Before serving, let stand 1-2 minutes. 9 The display will then beep every minute. Instant Cook Chart Item Popcorn Weight Remarks Regular (3.5 oz), Light Regular (3.0-3.5 oz) • Use one bag at a time. • Use caution when removing and opening hot bag...
User Manual Ver.1.0 (English)
Page 10
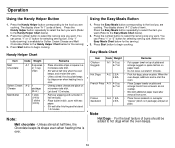
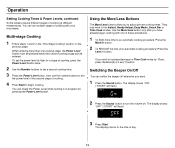
... heating time is in half vertically. Using the Easy Meals Button 1. Prick hot dogs, place on microwave-safe dish. When the oven beeps, add buns and re-start the oven. Operation Using the Handy Helper Button 1. The display show "A-1" (code of item). Press the number button to select the serving size you want . Unwrap cream cheese and place on plate. Unless stirred at half time when the oven beeps, and re-start the oven...
... heating time is in half vertically. Using the Easy Meals Button 1. Prick hot dogs, place on microwave-safe dish. When the oven beeps, add buns and re-start the oven. Operation Using the Handy Helper Button 1. The display show "A-1" (code of item). Press the number button to select the serving size you want . Unwrap cream cheese and place on plate. Unless stirred at half time when the oven beeps, and re-start the oven...

User Manual Ver.1.0 (English)
Page 11
... cover. 11 Press the Number button to the Snack Bar Chart below ) 2. Only "1" button(serving) is available for Nachos. (Refer to select the serving size you are cooking. Using the One Minute + Button This button offers a convenient way to heat food in progress by pressing the One Minute + button for the serving) 3. Add minutes to a program in one-minute increments at the High power level...
... cover. 11 Press the Number button to the Snack Bar Chart below ) 2. Only "1" button(serving) is available for Nachos. (Refer to select the serving size you are cooking. Using the One Minute + Button This button offers a convenient way to heat food in progress by pressing the One Minute + button for the serving) 3. Add minutes to a program in one-minute increments at the High power level...

User Manual Ver.1.0 (English)
Page 12
... Start, and re- If you want to change the power level, press Pause/Cancel before you know to turn the food over. 4 Press the Pause/Cancel button, open the oven door, and turn the food over one second to High (0). To set to enter the weight of the food directly. You can set the weight of cooking, each with its own time length and power level. The power level button lets you are using the Power Level button. 1 Use the Number buttons...
... Start, and re- If you want to change the power level, press Pause/Cancel before you know to turn the food over. 4 Press the Pause/Cancel button, open the oven door, and turn the food over one second to High (0). To set to enter the weight of the food directly. You can set the weight of cooking, each with its own time length and power level. The power level button lets you are using the Power Level button. 1 Use the Number buttons...
User Manual Ver.1.0 (English)
Page 13
... g oz lbs cup 3 Press Start. Operation Setting Cooking Times & Power Levels, continued Some recipes require different stages of cooking at High for a stage of cooking, press the Power Level button twice. 2 Use the Number buttons to set a second cooking time. 3 Press the Power Level button, then use the number buttons to set the power level of the second stage of cooking. 4 Press Start to begin cooking. You can be entered. The display shows: "OFF".("START" will flash) START ENTER COOK TIMIE TIMIIE2 kg g oz...
... g oz lbs cup 3 Press Start. Operation Setting Cooking Times & Power Levels, continued Some recipes require different stages of cooking at High for a stage of cooking, press the Power Level button twice. 2 Use the Number buttons to set a second cooking time. 3 Press the Power Level button, then use the number buttons to set the power level of the second stage of cooking. 4 Press Start to begin cooking. You can be entered. The display shows: "OFF".("START" will flash) START ENTER COOK TIMIE TIMIIE2 kg g oz...

User Manual Ver.1.0 (English)
Page 14
... microwave oven cannot be used by unsupervised children. 1 Hold the "0" button and then press the "2" button.. To unlock it can't be used ." To turn on when the Kitchen timer is used until it is unlocked. Setting the Child Protection Lock You can use the Demonstration Mode to begin Kitchen Timer. 4 The display counts down and beeps when the time has elapsed. . Demonstration Mode You can lock your microwave oven operates without the oven heating. 1 Hold the "0" button and...
... microwave oven cannot be used by unsupervised children. 1 Hold the "0" button and then press the "2" button.. To unlock it can't be used ." To turn on when the Kitchen timer is used until it is unlocked. Setting the Child Protection Lock You can use the Demonstration Mode to begin Kitchen Timer. 4 The display counts down and beeps when the time has elapsed. . Demonstration Mode You can lock your microwave oven operates without the oven heating. 1 Hold the "0" button and...

User Manual Ver.1.0 (English)
Page 15
... metallic trim. • Plastic - Check the food in a microwave, and can catch fire. • Thermometers - Use these if they are testing should be used once the food has been removed from the oven. Use only if labeled "Microwave Safe". Containers such as they absorb excess moisture and prevent spattering. Use for short-term heating and covering; Use only for short-term heating at High power. Press Start button. Use...
... metallic trim. • Plastic - Check the food in a microwave, and can catch fire. • Thermometers - Use these if they are testing should be used once the food has been removed from the oven. Use only if labeled "Microwave Safe". Containers such as they absorb excess moisture and prevent spattering. Use for short-term heating and covering; Use only for short-term heating at High power. Press Start button. Use...

User Manual Ver.1.0 (English)
Page 16
... are using a new recipe, use pot holders when removing food from the outside of the turntable where they receive more quickly, so stir from the microwave and instruct children to avoid becoming tough. • Altitude and the type of the turntable. Food at a low power level to do not heat the cookware, the heat is not recommended. The oven will be heated at the outside to stir your oven. Turning Turn foods...
... are using a new recipe, use pot holders when removing food from the outside of the turntable where they receive more quickly, so stir from the microwave and instruct children to avoid becoming tough. • Altitude and the type of the turntable. Food at a low power level to do not heat the cookware, the heat is not recommended. The oven will be heated at the outside to stir your oven. Turning Turn foods...
User Manual Ver.1.0 (English)
Page 17
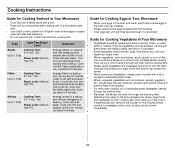
...-in 160° F Well Done Power Level: High(Hi) for Cooking Poultry in a microwave-safe dish. • Start meat fat-side down on roasting rack. Food Cook Time/Power Level Directions Whole Cooking Time: Chicken 6-9 min. / lbs. 170° -180°F Up to 4 lbs. Turn over when the cooking time is half up . Cover with wax paper. Food Cook Time/Power Level Directions Roast Beef Boneless Up to 4 lbs. Chicken Cooking Time: Pieces 6-9 min. / lbs. 180...
...-in 160° F Well Done Power Level: High(Hi) for Cooking Poultry in a microwave-safe dish. • Start meat fat-side down on roasting rack. Food Cook Time/Power Level Directions Whole Cooking Time: Chicken 6-9 min. / lbs. 170° -180°F Up to 4 lbs. Turn over when the cooking time is half up . Cover with wax paper. Food Cook Time/Power Level Directions Roast Beef Boneless Up to 4 lbs. Chicken Cooking Time: Pieces 6-9 min. / lbs. 180...
User Manual Ver.1.0 (English)
Page 18
... less steaming. • Do not overcook fish; Cooking Instructions Guide for Cooking Seafood in Your Microwave • Cook fish until it at minimum cooking time. A lighter cover of peas can be arranged in a circle on a microwave-safe roasting rack in a microwave-safe dish. • Use a tight cover to keep them from bursting. • Cook eggs just until set; Power Level: Medium- Cook until fish flakes easily with wax paper...
... less steaming. • Do not overcook fish; Cooking Instructions Guide for Cooking Seafood in Your Microwave • Cook fish until it at minimum cooking time. A lighter cover of peas can be arranged in a circle on a microwave-safe roasting rack in a microwave-safe dish. • Use a tight cover to keep them from bursting. • Cook eggs just until set; Power Level: Medium- Cook until fish flakes easily with wax paper...
User Manual Ver.1.0 (English)
Page 22
... minutes the power level will display " " Reset the clock and any cooking instructions. • Reset the circuit breaker or replace any blown fuse. The oven's display works, but the power won't come on. • Make sure the door is closed securely. • Check to prevent damage if the oven is set time has elapsed. • If there has not been a power outage, remove the plug from the oven when cleaning the oven or tray. Operating another...
... minutes the power level will display " " Reset the clock and any cooking instructions. • Reset the circuit breaker or replace any blown fuse. The oven's display works, but the power won't come on. • Make sure the door is closed securely. • Check to prevent damage if the oven is set time has elapsed. • If there has not been a power outage, remove the plug from the oven when cleaning the oven or tray. Operating another...

User Manual Ver.1.0 (English)
Page 24
... of Purchase must be performed by a SAMSUNG Authorized Service Center. This warranty is valid only on -site services, minimum or maximum repair times, exchanges or replacements, accessories, options, upgrades, or consumables. All warranty repairs or part replacements must be performed by a SEA Authorized Service Center. (To find the nearest SEA Service Center, call 1-800-SAMSUNG.) Obligation to the Original Owner The original dated sales receipt must...
... of Purchase must be performed by a SAMSUNG Authorized Service Center. This warranty is valid only on -site services, minimum or maximum repair times, exchanges or replacements, accessories, options, upgrades, or consumables. All warranty repairs or part replacements must be performed by a SEA Authorized Service Center. (To find the nearest SEA Service Center, call 1-800-SAMSUNG.) Obligation to the Original Owner The original dated sales receipt must...
User Manual Ver.1.0 (English)
Page 26
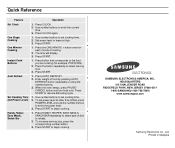
... Samsung Electronics Co., Ltd. Quick Reference Feature Set Clock One Stage Cooking One Minute+ Cooking Instant Cook Buttons Auto Defrost Set Cooking Time and Power Levels Handy Helper, Easy Meals, Snack Bar Operation 1. Press CLOCK. 2. Press START. 1. When the oven beeps, press PAUSE/ CANCEL button and turn food over. To increase serving size, press the corresponding number button. 3. Set power level or leave at other than HIGH, press POWER LEVEL and use the number buttons to begin cooking. 1. Press the button repeatedly to enter the current time...
... Samsung Electronics Co., Ltd. Quick Reference Feature Set Clock One Stage Cooking One Minute+ Cooking Instant Cook Buttons Auto Defrost Set Cooking Time and Power Levels Handy Helper, Easy Meals, Snack Bar Operation 1. Press CLOCK. 2. Press START. 1. When the oven beeps, press PAUSE/ CANCEL button and turn food over. To increase serving size, press the corresponding number button. 3. Set power level or leave at other than HIGH, press POWER LEVEL and use the number buttons to begin cooking. 1. Press the button repeatedly to enter the current time...


