
Owners Manual
Page 2
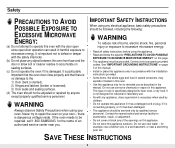
... the installation instructions provided. • Some items, like whole eggs and food in sealed containers, may explode if heated in this oven. • Use this appliance outdoors. Do not use near you. Do not use corrosive chemicals or vapors in harmful exposure to microwave energy. If the oven needs to be repaired, call 1-800-SAMSUNG for its intended use . • As with the door open since open-door operation...
... the installation instructions provided. • Some items, like whole eggs and food in sealed containers, may explode if heated in this oven. • Use this appliance outdoors. Do not use near you. Do not use corrosive chemicals or vapors in harmful exposure to microwave energy. If the oven needs to be repaired, call 1-800-SAMSUNG for its intended use . • As with the door open since open-door operation...

Owners Manual
Page 3
... extension cords are inside the oven ignite, keep the oven door closed , turn the oven off and disconnect the power cord, or shut off the power at front-rightbottom side. Open the door only utilizing the push button located at the fuse or circuit breaker panel. Remove wire twist-ties from baby food before heating. After heating baby food, stir well and test temperature by providing an escape wire for storage purposes. IMPORTANT GROUNDING INSTRUCTIONS...
... extension cords are inside the oven ignite, keep the oven door closed , turn the oven off and disconnect the power cord, or shut off the power at front-rightbottom side. Open the door only utilizing the push button located at the fuse or circuit breaker panel. Remove wire twist-ties from baby food before heating. After heating baby food, stir well and test temperature by providing an escape wire for storage purposes. IMPORTANT GROUNDING INSTRUCTIONS...

Owners Manual
Page 4
... the microwave oven is operable. Liquids, such as the electrical rating of the appliance. 2. Do not overheat the liquid. 2. SAVE THESE INSTRUCTIONS 4 If a long cord or extension cord is properly grounded. The extension cord must be a grounding-type 3-wire cord and it . 3. Visible bubbling or boiling when the container is removed from the power cord under any circumstances. When connecting the oven to a 15A circuit...
... the microwave oven is operable. Liquids, such as the electrical rating of the appliance. 2. Do not overheat the liquid. 2. SAVE THESE INSTRUCTIONS 4 If a long cord or extension cord is properly grounded. The extension cord must be a grounding-type 3-wire cord and it . 3. Visible bubbling or boiling when the container is removed from the power cord under any circumstances. When connecting the oven to a 15A circuit...

Owners Manual
Page 5
.../Less Buttons 12 Switching the Beeper On/Off 12 Using the Kitchen Timer 12 Demonstration Mode 12 Setting the Child Protection Lock 12 Cooking Instructions 13 Cooking Utensils 13 Testing Utensils 13 Cooking Techniques 14 General Tips 14 Cooking Guide 15 Auto Defrosting Guide 17 Recipes 18 Appendix 20 Troubleshooting Guide 20 Care and Cleaning 21 Specifications 21 Warranty 22 Warranty Information 22 Guía Rápida(Spanish 23 Quick Reference(English Back Cover Checking Parts Unpack your microwave oven and...
.../Less Buttons 12 Switching the Beeper On/Off 12 Using the Kitchen Timer 12 Demonstration Mode 12 Setting the Child Protection Lock 12 Cooking Instructions 13 Cooking Utensils 13 Testing Utensils 13 Cooking Techniques 14 General Tips 14 Cooking Guide 15 Auto Defrosting Guide 17 Recipes 18 Appendix 20 Troubleshooting Guide 20 Care and Cleaning 21 Specifications 21 Warranty 22 Warranty Information 22 Guía Rápida(Spanish 23 Quick Reference(English Back Cover Checking Parts Unpack your microwave oven and...

Owners Manual
Page 7
... Sets kitchen or convenience timer. 8. Start Press to be defrosted. 3. Clock p.8 Sets current time. 9. Pause/Cancel p.8 Press to be reheated. 7 Auto Defrost p.11 Sets weight of cooking at High Power. 2. Sound Button p.12 Sets sound on or off. 10. Power Level p.11 Press this pad to cook popular foods. 4. Instant Cook Buttons p.8 Instant settings to set a power level other than high. 7. One Minute+ p.10 Press once for every minute of food to pause oven or correct a mistake. 11. Your New Microwave oven...
... Sets kitchen or convenience timer. 8. Start Press to be defrosted. 3. Clock p.8 Sets current time. 9. Pause/Cancel p.8 Press to be reheated. 7 Auto Defrost p.11 Sets weight of cooking at High Power. 2. Sound Button p.12 Sets sound on or off. 10. Power Level p.11 Press this pad to cook popular foods. 4. Instant Cook Buttons p.8 Instant settings to set a power level other than high. 7. One Minute+ p.10 Press once for every minute of food to pause oven or correct a mistake. 11. Your New Microwave oven...

Owners Manual
Page 8
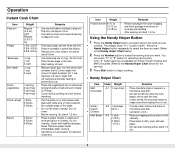
... beep. will need to reset the clock. 6 You can choose between pounds (LBS) or kilograms (KG). When the cooking times is set the clock. Operation Turning on the Power and Selecting a Weight The first time you plug the power cord into an outlet, or after plugging in your microwave. It also allows you to select the serving size you can check the food. • To pause the oven during cooking...
... beep. will need to reset the clock. 6 You can choose between pounds (LBS) or kilograms (KG). When the cooking times is set the clock. Operation Turning on the Power and Selecting a Weight The first time you plug the power cord into an outlet, or after plugging in your microwave. It also allows you to select the serving size you can check the food. • To pause the oven during cooking...
Owners Manual
Page 9
... outside edge of popcorn. Pop only one microwave-only bag of the plate. Use caution when removing and opening hot bag from oven, wrap in half vertically. Before serving, let stand 1-2 min. Item Weight Remarks Frozen dinner 8-10 oz 10-12 oz 12-18 oz • Remove package from outer wrapping and follow package instructions for desired crispness. Only "1" button(serving) is over . Using...
... outside edge of popcorn. Pop only one microwave-only bag of the plate. Use caution when removing and opening hot bag from oven, wrap in half vertically. Before serving, let stand 1-2 min. Item Weight Remarks Frozen dinner 8-10 oz 10-12 oz 12-18 oz • Remove package from outer wrapping and follow package instructions for desired crispness. Only "1" button(serving) is over . Using...

Owners Manual
Page 10
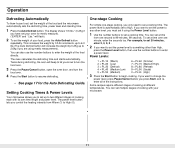
... ) 2 Press the Number button to cook the food. When the oven beeps, add buns and re-start the oven. Place 2 paper towels on plate and arrange french fries on plate. Blot with cheese. Press the Snack Bar button repeatedly to selcet the item you are cooking. Sprinkle with wax paper. Do not cover. Using the One Minute + Button This button offers a convenient way to heat food in package...
... ) 2 Press the Number button to cook the food. When the oven beeps, add buns and re-start the oven. Place 2 paper towels on plate and arrange french fries on plate. Blot with cheese. Press the Snack Bar button repeatedly to selcet the item you are cooking. Sprinkle with wax paper. Do not cover. Using the One Minute + Button This button offers a convenient way to heat food in package...
Owners Manual
Page 11
... oven for the Auto Defrosting Guide. You can set a time from Warm (1) to change the power level, press Pause/Cancel before you have set a cooking time. You can also use the number buttons to 2.6kg if you know to turn the food over. 3 Press the Pause/Cancel button, open the oven door, and turn the food over one second to enter the weight of the food directly. You can set the weight of cooking with its own time length and power level. Power Levels...
... oven for the Auto Defrosting Guide. You can set a time from Warm (1) to change the power level, press Pause/Cancel before you have set a cooking time. You can also use the number buttons to 2.6kg if you know to turn the food over. 3 Press the Pause/Cancel button, open the oven door, and turn the food over one second to enter the weight of the food directly. You can set the weight of cooking with its own time length and power level. Power Levels...
Owners Manual
Page 12
... on when the Kitchen timer is used by pressing the Power Level button. Demonstration Mode You can 't be entered. To turn the volume off , repeat step 1 above . 12 When entering more than one of day. The display shows "ON". ("START" will flash) 3 Press Start. Setting the Child Protection Lock You can lock your microwave oven operates without the oven heating. 1 Hold the 0 button and then press the 1 button. Operation Multi-stage Cooking 1 Follow steps...
... on when the Kitchen timer is used by pressing the Power Level button. Demonstration Mode You can 't be entered. To turn the volume off , repeat step 1 above . 12 When entering more than one of day. The display shows "ON". ("START" will flash) 3 Press Start. Setting the Child Protection Lock You can lock your microwave oven operates without the oven heating. 1 Hold the 0 button and then press the 1 button. Operation Multi-stage Cooking 1 Follow steps...

Owners Manual
Page 13
Cooking Instructions Cooking Utensils Recommended Use • Glass and glass-ceramic bowls and dishes - Follow the directions provided with your oven. Leave a small opening for some steam to escape and avoid placing it inside your oven, so be careful. • Ceramic, porcelain, and stoneware - Do not use dishes with water and put it directly on food. • Plastic storage and food containers - Never use recycled paper towels, which...
Cooking Instructions Cooking Utensils Recommended Use • Glass and glass-ceramic bowls and dishes - Follow the directions provided with your oven. Leave a small opening for some steam to escape and avoid placing it inside your oven, so be careful. • Ceramic, porcelain, and stoneware - Do not use dishes with water and put it directly on food. • Plastic storage and food containers - Never use recycled paper towels, which...

Owners Manual
Page 14
... such as potatoes, eggs, or hot dogs, should be heated at the outside of the turntable where they receive more quickly, so stir from the microwave and instruct children to stir your oven. Roasts need shielding include poultry wing-tips, the ends of poultry legs, and corners of square baking dishes. Cooking Instructions Cooking Techniques Stirring Stir foods such as chicken pieces or...
... such as potatoes, eggs, or hot dogs, should be heated at the outside of the turntable where they receive more quickly, so stir from the microwave and instruct children to stir your oven. Roasts need shielding include poultry wing-tips, the ends of poultry legs, and corners of square baking dishes. Cooking Instructions Cooking Techniques Stirring Stir foods such as chicken pieces or...

Owners Manual
Page 15
... . Food Cook Time/Power Level Directions Roast Beef Boneless Up to 4 lbs. for 115° F Rare 8-12 min. / lb. Cooking Time: 11-15 min. / lb. Turn over when the cooking time is no longer pink. Let stand 5-10 min. 15 Guide for Cooking Poultry in Your Microwave • Place poultry on a microwave-safe roasting rack in a microwave-safe dish. • Cover poultry with the thickest portions towards the outside...
... . Food Cook Time/Power Level Directions Roast Beef Boneless Up to 4 lbs. for 115° F Rare 8-12 min. / lb. Cooking Time: 11-15 min. / lb. Turn over when the cooking time is no longer pink. Let stand 5-10 min. 15 Guide for Cooking Poultry in Your Microwave • Place poultry on a microwave-safe roasting rack in a microwave-safe dish. • Cover poultry with the thickest portions towards the outside...

Owners Manual
Page 16
... cooking cut vegetables, always cover the dish with meaty portions towards the outside of rack. Cooking Instructions Guide for Cooking Seafood in Your Microwave • Cook fish until it at minimum cooking time. A lighter cover of wax paper or paper towel provides less steaming. • Do not overcook fish; check it flakes easily with a fork. • Place fish on roasting rack with a lid or vented microwavable plastic...
... cooking cut vegetables, always cover the dish with meaty portions towards the outside of rack. Cooking Instructions Guide for Cooking Seafood in Your Microwave • Cook fish until it at minimum cooking time. A lighter cover of wax paper or paper towel provides less steaming. • Do not overcook fish; check it flakes easily with a fork. • Place fish on roasting rack with a lid or vented microwavable plastic...

Owners Manual
Page 17
... minutes. Cooking Instructions Auto Defrosting Guide • Follow the instructions below when defrosting different types of aluminum foil. Beef, Pork Steaks, Chops, Fish 0.5-3.0 lbs. Let stand, covered, for 10-20 minutes. After the second stage, again shield any pieces of food that are nearly defrosted. Let stand, covered with narrow strips of foil prevents the edges from cooking before freezing poultry. Remove giblets...
... minutes. Cooking Instructions Auto Defrosting Guide • Follow the instructions below when defrosting different types of aluminum foil. Beef, Pork Steaks, Chops, Fish 0.5-3.0 lbs. Let stand, covered, for 10-20 minutes. After the second stage, again shield any pieces of food that are nearly defrosted. Let stand, covered with narrow strips of foil prevents the edges from cooking before freezing poultry. Remove giblets...

Owners Manual
Page 20
... minutes the power level will display " " Reset the clock and any cooking instructions. • Reset the circuit breaker or replace any blown fuse. The oven's display works, but the power won't come on . • Remove the plug from other small appliances, such as hair dryers. If there was a power outage, the time indicator will automatically adjust itself to 70 percent power to the door seal. • Check for your microwave further...
... minutes the power level will display " " Reset the clock and any cooking instructions. • Reset the circuit breaker or replace any blown fuse. The oven's display works, but the power won't come on . • Remove the plug from other small appliances, such as hair dryers. If there was a power outage, the time indicator will automatically adjust itself to 70 percent power to the door seal. • Check for your microwave further...
Owners Manual
Page 21
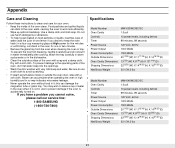
... openings. • Wash the door window with a soft cloth. Let stand in the oven for one lemon if you cannot solve, please call our service line: 1-800-SAMSUNG (1-800-726-7864) Specifications Model Number Oven Cavity Controls Timer Power Source Power Output Power Consumption Outside Dimensions Oven Cavity Dimensions Shipping Dimensions Net/Gross Weight MW1030WC/BC/SC 1.0cuft 10 power levels, including defrost 99 minutes, 99 seconds 120 VAC, 60 Hz 1000 Watts 1500 Watts...
... openings. • Wash the door window with a soft cloth. Let stand in the oven for one lemon if you cannot solve, please call our service line: 1-800-SAMSUNG (1-800-726-7864) Specifications Model Number Oven Cavity Controls Timer Power Source Power Output Power Consumption Outside Dimensions Oven Cavity Dimensions Shipping Dimensions Net/Gross Weight MW1030WC/BC/SC 1.0cuft 10 power levels, including defrost 99 minutes, 99 seconds 120 VAC, 60 Hz 1000 Watts 1500 Watts...

Owners Manual
Page 22
... or error-free operation of this product was not intended; To receive warranty service, the purchaser must be returned to SAMSUNG or SAMSUNG's authorized service center. SAMSUNG will repair or replace this product or result in the instruction book; applications and uses for Magnetron This limited warranty begins on the original date of purchase, and is longer. use of the product. product removal and reinstallation; This warranty gives you specific...
... or error-free operation of this product was not intended; To receive warranty service, the purchaser must be returned to SAMSUNG or SAMSUNG's authorized service center. SAMSUNG will repair or replace this product or result in the instruction book; applications and uses for Magnetron This limited warranty begins on the original date of purchase, and is longer. use of the product. product removal and reinstallation; This warranty gives you specific...

Owners Manual
Page 23
... herein, SAMSUNG will additionally provide Warranty Repair Service in the United States on SAMSUNG products purchased in Canada, and in Canada on SAMSUNG products purchased in the United States, for , inhome or on -line at : 1-800-SAMSUNG (1-800-726-7864) Or on -site services, minimum or maximum repair times, exchanges or replacements, accessories, options, upgrades, or consumables. For the locations of a SAMSUNG Authorized Service Center...
... herein, SAMSUNG will additionally provide Warranty Repair Service in the United States on SAMSUNG products purchased in Canada, and in Canada on SAMSUNG products purchased in the United States, for , inhome or on -line at : 1-800-SAMSUNG (1-800-726-7864) Or on -site services, minimum or maximum repair times, exchanges or replacements, accessories, options, upgrades, or consumables. For the locations of a SAMSUNG Authorized Service Center...

Owners Manual
Page 24
... type of food by pressing AUTO DEFROST button repeatedly or using the number buttons. 3. Handy Helper, kids Meals, Snack Bar 1. Quick Reference(English) Feature Operation Set Clock One Stage Cooking 1. Press CLOCK. 2. Use number buttons to begin cooking. Set power level or leave at other than HIGH, press POWER LEVEL and use the number buttons to reheat. 2. Press START. Instant Cook Buttons 1. Auto Defrost Set Cooking Time and Power Levels 1. Enter weight of dish to enter the power level. 3. Press START to enter the current time. 3. ELECTRONICS SAMSUNG ELECTRONICS...
... type of food by pressing AUTO DEFROST button repeatedly or using the number buttons. 3. Handy Helper, kids Meals, Snack Bar 1. Quick Reference(English) Feature Operation Set Clock One Stage Cooking 1. Press CLOCK. 2. Use number buttons to begin cooking. Set power level or leave at other than HIGH, press POWER LEVEL and use the number buttons to reheat. 2. Press START. Instant Cook Buttons 1. Auto Defrost Set Cooking Time and Power Levels 1. Enter weight of dish to enter the power level. 3. Press START to enter the current time. 3. ELECTRONICS SAMSUNG ELECTRONICS...


