

Owners Manual
Page 2
... be repaired, call 1-800-SAMSUNG for industrial or laboratory use as described in the manual. IMPORTANT SAFETY INSTRUCTIONS When using your own - SAVE THESE INSTRUCTIONS 2 Downloaded from www.Manualslib.com manuals search engine Do not use corrosive chemicals or vapors in harmful exposure to microwave energy. It is specifically designed to properly grounded outlets. Connect only to heat, cook, or dry food. This type of oven...
... be repaired, call 1-800-SAMSUNG for industrial or laboratory use as described in the manual. IMPORTANT SAFETY INSTRUCTIONS When using your own - SAVE THESE INSTRUCTIONS 2 Downloaded from www.Manualslib.com manuals search engine Do not use corrosive chemicals or vapors in harmful exposure to microwave energy. It is specifically designed to properly grounded outlets. Connect only to heat, cook, or dry food. This type of oven...

Owners Manual
Page 3
... oven or operate while empty. • Do not cook without the tray. • Do not defrost frozen beverages in use near a swimming pool, etc. • Keep the inside . Food will not cook properly without the glass tray in a wet basement, or near water - If materials inside oven should ignite, keep the oven door closed , turn the oven off, disconnect the power cord, or shut off power at the fuse or circuit breaker panel. b. Remove wire...
... oven or operate while empty. • Do not cook without the tray. • Do not defrost frozen beverages in use near a swimming pool, etc. • Keep the inside . Food will not cook properly without the glass tray in a wet basement, or near water - If materials inside oven should ignite, keep the oven door closed , turn the oven off, disconnect the power cord, or shut off power at the fuse or circuit breaker panel. b. Remove wire...

Owners Manual
Page 4
...-type 3-wire cord and it can result in a risk of electric shock. The plug must be longer, too. Use of Extension Cords A short power-supply cord is properly grounded. Consult a qualified electrician or servicer if you do not understand the grounding instructions or if you use an extension cord, the interior light may flicker and the blower may vary when the microwave oven is exercised...
...-type 3-wire cord and it can result in a risk of electric shock. The plug must be longer, too. Use of Extension Cords A short power-supply cord is properly grounded. Consult a qualified electrician or servicer if you do not understand the grounding instructions or if you use an extension cord, the interior light may flicker and the blower may vary when the microwave oven is exercised...

Owners Manual
Page 5
... Bar Button 12 Setting Cooking Times & Power Levels 13 Using the More/Less Buttons 14 Using the Kitchen Timer 14 Cooking Instructions 15 Cooking Utensils 15 Testing Utensils 15 Cooking Techniques 16 General Tips 16 Cooking Guide 17 Auto Defrosting Guide 19 Recipes 20 Appendix 22 Troubleshooting Guide 22 Care and Cleaning 22 Specifications 23 Warranty 24 Warranty Information 24 Guíd de Consulta Rápida en Español 26 Quick Reference Back Cover Checking Parts Unpack your dealer. microwave oven glass tray roller guide...
... Bar Button 12 Setting Cooking Times & Power Levels 13 Using the More/Less Buttons 14 Using the Kitchen Timer 14 Cooking Instructions 15 Cooking Utensils 15 Testing Utensils 15 Cooking Techniques 16 General Tips 16 Cooking Guide 17 Auto Defrosting Guide 19 Recipes 20 Appendix 22 Troubleshooting Guide 22 Care and Cleaning 22 Specifications 23 Warranty 24 Warranty Information 24 Guíd de Consulta Rápida en Español 26 Quick Reference Back Cover Checking Parts Unpack your dealer. microwave oven glass tray roller guide...

Owners Manual
Page 6
... location of the nearest service center, please call Samsung Electronics America, Inc., at WWW.SAMSUNGUSA.COM Setting Up Your Microwave Oven 1 Place the oven on a flat, sturdy surface and plug the cord into the tabs on the back or bottom of the oven. SAMSUNG (1-800-726-7864), or register on -line to the sides of the oven. 2 Open the oven door by pressing the button...
... location of the nearest service center, please call Samsung Electronics America, Inc., at WWW.SAMSUNGUSA.COM Setting Up Your Microwave Oven 1 Place the oven on a flat, sturdy surface and plug the cord into the tabs on the back or bottom of the oven. SAMSUNG (1-800-726-7864), or register on -line to the sides of the oven. 2 Open the oven door by pressing the button...

Owners Manual
Page 7
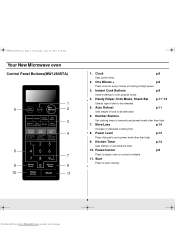
... Kitchen Timer Start 1 2 3 4 7 9 11 1. Clock p.9 Sets current time. 2. Auto Defrost p.11 Sets weight of food to be defrosted. 6. Kitchen Timer p.14 Sets kitchen or convenience timer. 10. One Minute + p.9 Press once for every minute of dish to be reheated. 5. Handy Helper, Kids Meals, Snack Bar p.11~12 Selects type of cooking at High power. 3. Number Buttons Set cooking times or amounts and power levels other than high. 7. Power Level p.13 Press this pad to start cooking. 7 Downloaded from www.Manualslib.com manuals...
... Kitchen Timer Start 1 2 3 4 7 9 11 1. Clock p.9 Sets current time. 2. Auto Defrost p.11 Sets weight of food to be defrosted. 6. Kitchen Timer p.14 Sets kitchen or convenience timer. 10. One Minute + p.9 Press once for every minute of dish to be reheated. 5. Handy Helper, Kids Meals, Snack Bar p.11~12 Selects type of cooking at High power. 3. Number Buttons Set cooking times or amounts and power levels other than high. 7. Power Level p.13 Press this pad to start cooking. 7 Downloaded from www.Manualslib.com manuals...
Owners Manual
Page 8
... every minute of cooking at High power. 3. Kitchen Timer p.14 Sets kitchen or convenience timer. 10. Instant Cook Buttons p.9 Instant settings to start cooking. 8 Downloaded from www.Manualslib.com manuals search engine XGt~XY_Wz{hU”GGwˆŽŒG_GG SGqœ•ŒGYWSGYWWXGG_a[\Ght Your New Microwave oven Control Panel Buttons(MW1280STA) 1 5 2 3 4 6 7 8 9 10 11 1. Number Buttons Set cooking times or amounts and power levels other than high. 7. Pause/Cancel p.9 Press to set a power level other than...
... every minute of cooking at High power. 3. Kitchen Timer p.14 Sets kitchen or convenience timer. 10. Instant Cook Buttons p.9 Instant settings to start cooking. 8 Downloaded from www.Manualslib.com manuals search engine XGt~XY_Wz{hU”GGwˆŽŒG_GG SGqœ•ŒGYWSGYWWXGG_a[\Ght Your New Microwave oven Control Panel Buttons(MW1280STA) 1 5 2 3 4 6 7 8 9 10 11 1. Number Buttons Set cooking times or amounts and power levels other than high. 7. Pause/Cancel p.9 Press to set a power level other than...

Owners Manual
Page 9
... to reset the clock. The oven will need to read all available serving sizes. You can check the food. • To pause the oven during cooking : press Pause/Cancel once. It also allows you to set . To restart, press Start. • To stop cooking, erase instructions, and return the oven display to check the cooking time, press the Instant Cook button. The time will show: 2 Use the Number buttons to cook the food. The display will display...
... to reset the clock. The oven will need to read all available serving sizes. You can check the food. • To pause the oven during cooking : press Pause/Cancel once. It also allows you to set . To restart, press Start. • To stop cooking, erase instructions, and return the oven display to check the cooking time, press the Instant Cook button. The time will show: 2 Use the Number buttons to cook the food. The display will display...

Owners Manual
Page 10
... plate. Do not let slices overlap. Measure liquid; Place carton in foil and let stand 3-5min. Remove paper towel immediately after cooking. • Use More or Less button for covering and standing. Remove from oven. Cover with additional paper towel. XGt~XY_Wz{hU”GGwˆŽŒGXWGG SGqœ•ŒGYWSGYWWXGG_a[\Ght Operation Instant Cook Chart Item Popcorn Weight...
... plate. Do not let slices overlap. Measure liquid; Place carton in foil and let stand 3-5min. Remove paper towel immediately after cooking. • Use More or Less button for covering and standing. Remove from oven. Cover with additional paper towel. XGt~XY_Wz{hU”GGwˆŽŒGXWGG SGqœ•ŒGYWSGYWWXGG_a[\Ght Operation Instant Cook Chart Item Popcorn Weight...

Owners Manual
Page 11
... when heating time is over . 4 Press the Start button to select the serving size you are cooking. Remove wrapping and cut butter in half vertically. This increases the weight by 0.5 lb increments, up to the Handy Helper Chart below for the Auto Defrosting Guide Using the Handy Helper Button 1. Twice during defrosting, the oven will beep and the display will read "TURN THE FOOD OVER". Press the Number button to resume defrosting. •...
... when heating time is over . 4 Press the Start button to select the serving size you are cooking. Remove wrapping and cut butter in half vertically. This increases the weight by 0.5 lb increments, up to the Handy Helper Chart below for the Auto Defrosting Guide Using the Handy Helper Button 1. Twice during defrosting, the oven will beep and the display will read "TURN THE FOOD OVER". Press the Number button to resume defrosting. •...

Owners Manual
Page 12
... Downloaded from oven. Snack Bar Chart Item Weight Remarks Nachos 1 serving • • • Place tortilla chips on plate. The display shows "Chicken Nuggets". Let stand 1 min. Place 2 paper towels on plate and arrange french fries on plate. Press the Number button to the food you are cooking. Press the Start button to select the serving size. Potato Skins 1 cooked • potato 2 cooked potatoes • • Cut cooked...
... Downloaded from oven. Snack Bar Chart Item Weight Remarks Nachos 1 serving • • • Place tortilla chips on plate. The display shows "Chicken Nuggets". Let stand 1 min. Place 2 paper towels on plate and arrange french fries on plate. Press the Number button to the food you are cooking. Press the Start button to select the serving size. Potato Skins 1 cooked • potato 2 cooked potatoes • • Cut cooked...

Owners Manual
Page 13
... instructions. 4 Press Start to set a time from one minute, enter the seconds too. One-stage Cooking For simple one cooking stage, the Power Level button must set a cooking time. The display shows "PRESS START OR ENTER NEXT STAGE COOKING TIME". To set the power level at any other than one -stage cooking, you control the heating intensity from www.Manualslib.com manuals search engine The power level lets you only need to set a second cooking time. 3 Press the Power Level button, then use...
... instructions. 4 Press Start to set a time from one minute, enter the seconds too. One-stage Cooking For simple one cooking stage, the Power Level button must set a cooking time. The display shows "PRESS START OR ENTER NEXT STAGE COOKING TIME". To set the power level at any other than one -stage cooking, you control the heating intensity from www.Manualslib.com manuals search engine The power level lets you only need to set a second cooking time. 3 Press the Power Level button, then use...

Owners Manual
Page 14
...ˆŽŒGX[GG SGqœ•ŒGYWSGYWWXGG_a[\Ght Operation Using the More/Less Buttons The More/Less buttons allow you to run. 2 Press the Kitchen Timer button. 3 The display counts down and beeps when the time has elapsed. Using the Kitchen Timer 1 Use the Number buttons to set cooking times. They only work in the Time Cook mode, press the More(9) or Less(1) button. 14 Downloaded from www.Manualslib.com manuals search engine
...ˆŽŒGX[GG SGqœ•ŒGYWSGYWWXGG_a[\Ght Operation Using the More/Less Buttons The More/Less buttons allow you to run. 2 Press the Kitchen Timer button. 3 The display counts down and beeps when the time has elapsed. Using the Kitchen Timer 1 Use the Number buttons to set cooking times. They only work in the Time Cook mode, press the More(9) or Less(1) button. 14 Downloaded from www.Manualslib.com manuals search engine

Owners Manual
Page 15
...[\Ght Cooking Instructions Cooking Utensils Recommended Use • Glass and glass-ceramic bowls and dishes - Use for microwave use recycled paper, which may be careful. • Ceramic, porcelain, and stoneware - Limited Use • Aluminum foil - If they are testing should be warm and the dish you are designed for short-term heating at High power. The water should be used once the food has been removed...
...[\Ght Cooking Instructions Cooking Utensils Recommended Use • Glass and glass-ceramic bowls and dishes - Use for microwave use recycled paper, which may be careful. • Ceramic, porcelain, and stoneware - Limited Use • Aluminum foil - If they are testing should be warm and the dish you are designed for short-term heating at High power. The water should be used once the food has been removed...
Owners Manual
Page 16
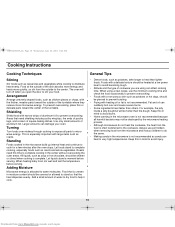
... quickly, so stir from the outside of the turntable where they receive more microwave energy. Turning Turn foods over and cause severe burns. • Some ingredients heat faster than lighter foods. Let liquids stand a moment before serving. General Tips • Dense foods, such as potatoes or hot dogs, should be covered or allowed to heat than others. When using can damage your food. Always use the minimum cooking time...
... quickly, so stir from the outside of the turntable where they receive more microwave energy. Turning Turn foods over and cause severe burns. • Some ingredients heat faster than lighter foods. Let liquids stand a moment before serving. General Tips • Dense foods, such as potatoes or hot dogs, should be covered or allowed to heat than others. When using can damage your food. Always use the minimum cooking time...
Owners Manual
Page 17
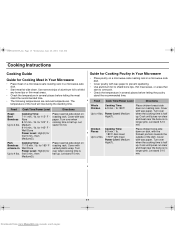
... cooking time is half up . Guide for 120° F - Place chicken bone-side down on a microwave-safe roasting rack in Well Done Power Level: High(0) for 115° F - Turn over when the cooking time is half up . Let stand 5-10 min. 17 Downloaded from www.Manualslib.com manuals search engine Food Cook Time/Power Level Directions Roast Cooking Time: Beef 7-11 min. / lb. Place roast fat-side down on roasting rack. Cover...
... cooking time is half up . Guide for 120° F - Place chicken bone-side down on a microwave-safe roasting rack in Well Done Power Level: High(0) for 115° F - Turn over when the cooking time is half up . Let stand 5-10 min. 17 Downloaded from www.Manualslib.com manuals search engine Food Cook Time/Power Level Directions Roast Cooking Time: Beef 7-11 min. / lb. Place roast fat-side down on roasting rack. Cover...
Owners Manual
Page 18
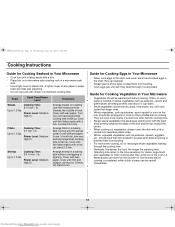
...; Power Level: Medium- Cover with a fork. XGt~XY_Wz{hU”GGwˆŽŒGX_GG SGqœ•ŒGYWSGYWWXGG_a[\Ght Cooking Instructions Guide for Cooking Seafood in Your Microwave • Cook fish until it at minimum cooking time. Up to steam fish. High(7). Shrimp Cooking Time: 3-5 ½ min. / lb. High(7). Directions Arrange steaks on roasting rack with a fork. • Place fish on the counter...
...; Power Level: Medium- Cover with a fork. XGt~XY_Wz{hU”GGwˆŽŒGX_GG SGqœ•ŒGYWSGYWWXGG_a[\Ght Cooking Instructions Guide for Cooking Seafood in Your Microwave • Cook fish until it at minimum cooking time. Up to steam fish. High(7). Shrimp Cooking Time: 3-5 ½ min. / lb. High(7). Directions Arrange steaks on roasting rack with a fork. • Place fish on the counter...

Owners Manual
Page 22
... one or two minutes. • Remove the glass tray from the oven when cleaning the oven or tray. If you have a qualified electrician repair the outlet. • Plug the oven into the openings. • Wash the door window with a soft cloth. If there was a power outage, the time indicator will display " " Reset the clock and any cooking instructions. • Reset the circuit breaker or replace any blown fuse. • Plug another appliance...
... one or two minutes. • Remove the glass tray from the oven when cleaning the oven or tray. If you have a qualified electrician repair the outlet. • Plug the oven into the openings. • Wash the door window with a soft cloth. If there was a power outage, the time indicator will display " " Reset the clock and any cooking instructions. • Reset the circuit breaker or replace any blown fuse. • Plug another appliance...
Owners Manual
Page 24
.... WWW.SAMSUNGUSA.COM SAMSUNG CUSTOMER SERVICE 400 VALLEY ROAD, SUITE 201, MT. SAMSUNG will repair or replace this product was not intended; reduced magnetron power output related to follow operating instructions, cleaning, maintenance and environmental instructions that are covered and prescribed in the instruction book; Some states do not allow limitations on products purchased and used in the United States. To receive warranty service, the purchaser must...
.... WWW.SAMSUNGUSA.COM SAMSUNG CUSTOMER SERVICE 400 VALLEY ROAD, SUITE 201, MT. SAMSUNG will repair or replace this product was not intended; reduced magnetron power output related to follow operating instructions, cleaning, maintenance and environmental instructions that are covered and prescribed in the instruction book; Some states do not allow limitations on products purchased and used in the United States. To receive warranty service, the purchaser must...

Owners Manual
Page 28
...Press START. 1. When the oven beeps, press PAUSE/CANCEL button and turn food over. To set power level at High. 3. To increase serving size, press the corresponding number button. 3. HEADQUARTERS 105 CHALLENGER ROAD RIDGEFIELD PARK, NEW JERSEY 07660-0511 Samsung Electronics Co., Ltd. The time will display and the oven will start. 1. Press AUTO DEFROST. 2. Use number buttons to set cooking time. 2. Use number buttons to set cooking time. 2. Press the ONE MINUTE + button once for example, BACON). 2. Enter weight of cooking. 2. Press CLOCK. 2. Use number buttons to...
...Press START. 1. When the oven beeps, press PAUSE/CANCEL button and turn food over. To set power level at High. 3. To increase serving size, press the corresponding number button. 3. HEADQUARTERS 105 CHALLENGER ROAD RIDGEFIELD PARK, NEW JERSEY 07660-0511 Samsung Electronics Co., Ltd. The time will display and the oven will start. 1. Press AUTO DEFROST. 2. Use number buttons to set cooking time. 2. Use number buttons to set cooking time. 2. Press the ONE MINUTE + button once for example, BACON). 2. Enter weight of cooking. 2. Press CLOCK. 2. Use number buttons to...


