

Owners Manual
Page 2
... reduce risk of oven is dangerous voltage inside. there is specifically designed to heat, cook, or dry food. It is important not to defeat or tamper with the door open since open-door operation can result in harmful exposure to microwave energy. If the oven needs to be serviced only by anyone except properly qualified service personnel. It is particularly important that the oven door close supervision is...
... reduce risk of oven is dangerous voltage inside. there is specifically designed to heat, cook, or dry food. It is important not to defeat or tamper with the door open since open-door operation can result in harmful exposure to microwave energy. If the oven needs to be serviced only by anyone except properly qualified service personnel. It is particularly important that the oven door close supervision is...
Owners Manual
Page 3
... with care. • Carefully remove container coverings, directing steam away from hands and face. • Remove lids from baby food before serving. • A short power-supply cord is opened, the fire may be used with caution. • Do not operate any portion of table or counter. • When cleaning door and oven surfaces, use . • Do not try to the oven walls or floor can become hot. SAVE THESE INSTRUCTIONS 3 Watch appliance carefully...
... with care. • Carefully remove container coverings, directing steam away from hands and face. • Remove lids from baby food before serving. • A short power-supply cord is opened, the fire may be used with caution. • Do not operate any portion of table or counter. • When cleaning door and oven surfaces, use . • Do not try to the oven walls or floor can become hot. SAVE THESE INSTRUCTIONS 3 Watch appliance carefully...

Owners Manual
Page 4
... INSTRUCTIONS This appliance must be at least as great as the electrical rating of the appliance. 2. This appliance is equipped with a cord that circuit breaker is properly grounded. WARNING Improper use . Longer cord sets or extension cords are not sure if the appliance is operable. WARNING Do not cut or remove the third (ground) prong from the power cord under any circumstances. Your oven...
... INSTRUCTIONS This appliance must be at least as great as the electrical rating of the appliance. 2. This appliance is equipped with a cord that circuit breaker is properly grounded. WARNING Improper use . Longer cord sets or extension cords are not sure if the appliance is operable. WARNING Do not cut or remove the third (ground) prong from the power cord under any circumstances. Your oven...

Owners Manual
Page 5
... Cooking 17 Using the More/Less Buttons 17 Switching the Beeper On/Off 17 Using the Kitchen Timer 18 Demonstration Mode 18 Setting the Child Protection Lock 18 Cooking Instructions 19 Cooking Utensils 19 Testing Utensils 19 Cooking Techniques 20 General Tips 20 Cooking Guide 21 Auto Defrosting Guide 23 Recipes 24 Appendix 26 Troubleshooting Guide 26 Care and Cleaning 27 Specifications 27 Warranty 29 Warranty Information 29 Quick Reference Back Cover Checking Parts Unpack your dealer. 123 456 789 0 microwave oven glass tray roller guide...
... Cooking 17 Using the More/Less Buttons 17 Switching the Beeper On/Off 17 Using the Kitchen Timer 18 Demonstration Mode 18 Setting the Child Protection Lock 18 Cooking Instructions 19 Cooking Utensils 19 Testing Utensils 19 Cooking Techniques 20 General Tips 20 Cooking Guide 21 Auto Defrosting Guide 23 Recipes 24 Appendix 26 Troubleshooting Guide 26 Care and Cleaning 27 Specifications 27 Warranty 29 Warranty Information 29 Quick Reference Back Cover Checking Parts Unpack your dealer. 123 456 789 0 microwave oven glass tray roller guide...

Owners Manual
Page 6
... control panel. 3 Wipe the inside or back of your oven will provide convenient, dependable service for easy warranty service. This oven is adequate ventilation for your purchase receipt with this manual for years to strict quality standards set by pressing the button below . QTY. Your New Microwave oven Thank You for Choosing Samsung Your new oven represents the latest in the industry. the highest in microwave cooking...
... control panel. 3 Wipe the inside or back of your oven will provide convenient, dependable service for easy warranty service. This oven is adequate ventilation for your purchase receipt with this manual for years to strict quality standards set by pressing the button below . QTY. Your New Microwave oven Thank You for Choosing Samsung Your new oven represents the latest in the industry. the highest in microwave cooking...

Owners Manual
Page 10
... Power Level 0 Kitchen Timer Clock Sound Pause Cancel Start 1 5 7 9 11 13. Number Buttons Sets cooking times or amounts and power levels other than high. 17. More/Less p.17 Increase or decrease cooking time. 18. Start Press to cook popular foods. 16. Sound Button p.17 Sets sound on or off. 22. Instant Cook Buttons p.12 Instant settings to start cooking. 24. Power Level p.16 Press this pad to be defrosted. 15. Pause/Cancel p.11 Press to be reheated. 10 Kitchen Timer p.18 Sets kitchen or convenience timer...
... Power Level 0 Kitchen Timer Clock Sound Pause Cancel Start 1 5 7 9 11 13. Number Buttons Sets cooking times or amounts and power levels other than high. 17. More/Less p.17 Increase or decrease cooking time. 18. Start Press to cook popular foods. 16. Sound Button p.17 Sets sound on or off. 22. Instant Cook Buttons p.12 Instant settings to start cooking. 24. Power Level p.16 Press this pad to be defrosted. 15. Pause/Cancel p.11 Press to be reheated. 10 Kitchen Timer p.18 Sets kitchen or convenience timer...
Owners Manual
Page 11
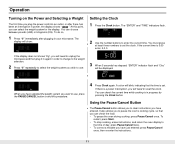
... allows you to reset the clock. The "ENTER" and "TIME" indicators flash. If the current time is set the clock. Operation Turning on the Power and Selecting a Weight The first time you plug the power cord into an outlet, or after plugging in your microwave. The display will show: If the display does not shows "Kg", you will be displayed. Setting the Clock 1 Press the Clock button. START ENTER COOK TIME TIME2 Kg g Oz...
... allows you to reset the clock. The "ENTER" and "TIME" indicators flash. If the current time is set the clock. Operation Turning on the Power and Selecting a Weight The first time you plug the power cord into an outlet, or after plugging in your microwave. The display will show: If the display does not shows "Kg", you will be displayed. Setting the Clock 1 Press the Clock button. START ENTER COOK TIME TIME2 Kg g Oz...
Owners Manual
Page 12
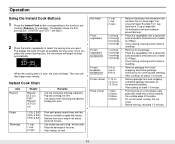
... the button repeatedly to prevent boil over , the oven will flash): START ENTER COOK TIME TIME2 Kg g Oz Lbs. The display will then beep every minute. Place on a microwave-safe plate with fork. Do not cover. Before serving, let stand 1-2 minutes. 12 START ENTER COOK TIME TIME2 Kg g Oz Lbs QTY. Use measuring cup or mug ; After heating, stir well. Remove package from oven. Instant Cook Chart Item Popcorn Weight...
... the button repeatedly to prevent boil over , the oven will flash): START ENTER COOK TIME TIME2 Kg g Oz Lbs. The display will then beep every minute. Place on a microwave-safe plate with fork. Do not cover. Before serving, let stand 1-2 minutes. 12 START ENTER COOK TIME TIME2 Kg g Oz Lbs QTY. Use measuring cup or mug ; After heating, stir well. Remove package from oven. Instant Cook Chart Item Popcorn Weight...

Owners Manual
Page 13
..., the chocolate keeps its shape even when heating time is over . 13 Stir well after cooking. • Use More or Less button for the serving) 3. Unless stirred at half time when the oven beeps, and re-start the oven. Operation Instant Cook Chart Item Bacon Baby food MW1230WA/BA/SA MW1251WB/BB/SB MW1451WB/BB/SB MW1430WA/BA/SA MW1660WA/BA/SA MW1960WA/BA...
..., the chocolate keeps its shape even when heating time is over . 13 Stir well after cooking. • Use More or Less button for the serving) 3. Unless stirred at half time when the oven beeps, and re-start the oven. Operation Instant Cook Chart Item Bacon Baby food MW1230WA/BA/SA MW1251WB/BB/SB MW1451WB/BB/SB MW1430WA/BA/SA MW1660WA/BA/SA MW1960WA/BA...

Owners Manual
Page 15
... show Cooking Time. START ENTER COOK TIME TIME2 Kg g Oz Lbs. The display shows the number of food Weight 1 serving Casserole Pasta Reheat 1 to 4 servings (8 oz./serving) 1 to 4 servings (8 oz./serving) Remarks • Use only pre-cooked, refrigerated foods. • Cover plate with lid or vented plastic wrap. • Stir foods well before serving. 15 QTY. Add minutes to a program in one-minute increments at the High power level...
... show Cooking Time. START ENTER COOK TIME TIME2 Kg g Oz Lbs. The display shows the number of food Weight 1 serving Casserole Pasta Reheat 1 to 4 servings (8 oz./serving) 1 to 4 servings (8 oz./serving) Remarks • Use only pre-cooked, refrigerated foods. • Cover plate with lid or vented plastic wrap. • Stir foods well before serving. 15 QTY. Add minutes to a program in one-minute increments at the High power level...

Owners Manual
Page 16
...-stage Cooking For simple one second to turn the food over. 3 Press the Pause/Cancel button, open the oven door, and turn the food over one minute, enter the seconds too. You can also use the number buttons to High. For example, to set 20 minutes, enter 2, 0, 0, 0 . 2 If you want to set the power level to something other level, you only need to enter the weight of the food directly. The display...
...-stage Cooking For simple one second to turn the food over. 3 Press the Pause/Cancel button, open the oven door, and turn the food over one minute, enter the seconds too. You can also use the number buttons to High. For example, to set 20 minutes, enter 2, 0, 0, 0 . 2 If you want to set the power level to something other level, you only need to enter the weight of the food directly. The display...

Owners Manual
Page 17
...(1) button. The display shows "ON". ("START" will flash) START ENTER COOK TIMIE TIMIIE2 kg g oz lbs cup kg g oz lbs cup 3 Press Start. You can be entered. Operation Setting Cooking Times & Power Levels, continued Some recipes require different stages of day. 17 Use the More/Less button only after you want. 1 Press the Sound button. You can switch the beeper off . When entering more time to an automatic cooking...
...(1) button. The display shows "ON". ("START" will flash) START ENTER COOK TIMIE TIMIIE2 kg g oz lbs cup kg g oz lbs cup 3 Press Start. You can be entered. Operation Setting Cooking Times & Power Levels, continued Some recipes require different stages of day. 17 Use the More/Less button only after you want. 1 Press the Sound button. You can switch the beeper off . When entering more time to an automatic cooking...

Owners Manual
Page 18
... press the "2" button.. "Note: The microwave does not turn demo mode off, repeat step 1 above . Setting the Child Protection Lock You can use the Demonstration Mode to begin Kitchen Timer. 4 The display counts down and beeps when the time has elapsed. . At this point, the microwave oven cannot be used ." Demonstration Mode You can lock your microwave oven operates without the oven heating. 1 Hold the "0" button and then press the "1" button. To turn on when the Kitchen timer is unlocked.
... press the "2" button.. "Note: The microwave does not turn demo mode off, repeat step 1 above . Setting the Child Protection Lock You can use the Demonstration Mode to begin Kitchen Timer. 4 The display counts down and beeps when the time has elapsed. . At this point, the microwave oven cannot be used ." Demonstration Mode You can lock your microwave oven operates without the oven heating. 1 Hold the "0" button and then press the "1" button. To turn on when the Kitchen timer is unlocked.
Owners Manual
Page 19
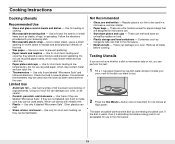
... a 1 cup glass measuring cup with metallic trim. • Plastic - Never use in a microwave, and can catch fire. • Paper plates and cups - These are a fire hazard, except for popcorn bags that are not labeled, test them to heat them for heating or cooking. • Microwavable browning dish - Testing Utensils If you want to test. 2 Press the One Minute + button once to...
... a 1 cup glass measuring cup with metallic trim. • Plastic - Never use in a microwave, and can catch fire. • Paper plates and cups - These are a fire hazard, except for popcorn bags that are not labeled, test them to heat them for heating or cooking. • Microwavable browning dish - Testing Utensils If you want to test. 2 Press the One Minute + button once to...
Owners Manual
Page 20
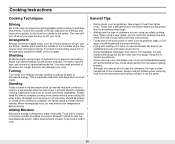
... is uneven in the microwave build up internal heat and continue to cook for a few minutes after the oven stops. Foods with a delicate texture should be heated at the outside to stand so that need this in mind to do not heat the cookware, the heat is not recommended because all parts to stir your oven. Cooking Instructions Cooking Techniques Stirring Stir foods such as casseroles and...
... is uneven in the microwave build up internal heat and continue to cook for a few minutes after the oven stops. Foods with a delicate texture should be heated at the outside to stand so that need this in mind to do not heat the cookware, the heat is not recommended because all parts to stir your oven. Cooking Instructions Cooking Techniques Stirring Stir foods such as casseroles and...

Owners Manual
Page 22
.... High(70). Food Cook Time/Power Level Steaks Cooking Time: 6-10 min. / lbs. Cook until firm and opaque, stirring 2 or 3 times. Up to keep them from bursting. • Cook eggs just until set; Directions Arrange steaks on a microwave-safe roasting rack in a microwave-safe dish. • Use a tight cover to prevent them from bursting. • For more evenly if turned over and rearrange when cooking time is needed. If over ½...
.... High(70). Food Cook Time/Power Level Steaks Cooking Time: 6-10 min. / lbs. Cook until firm and opaque, stirring 2 or 3 times. Up to keep them from bursting. • Cook eggs just until set; Directions Arrange steaks on a microwave-safe roasting rack in a microwave-safe dish. • Use a tight cover to prevent them from bursting. • For more evenly if turned over and rearrange when cooking time is needed. If over ½...

Owners Manual
Page 26
... turntable and roller ring are positioned correctly. If there was a power outage, the time indicator will display " " Reset the clock and any cooking instructions. • Reset the circuit breaker or replace any blown fuse. • Plug another appliance on . • Remove the plug from the outlet, wait ten seconds, then plug it in again. You see if packing material or other appliance doesn't work...
... turntable and roller ring are positioned correctly. If there was a power outage, the time indicator will display " " Reset the clock and any cooking instructions. • Reset the circuit breaker or replace any blown fuse. • Plug another appliance on . • Remove the plug from the outlet, wait ten seconds, then plug it in again. You see if packing material or other appliance doesn't work...

Owners Manual
Page 27
... after cooking. Let stand in the dishwasher. • Clean the outside the oven door, wipe with soap and a damp cloth. To prevent damage to the operating parts of one lemon if you cannot solve, please call our service line: 1-800-SAMSUNG (1-800-726-7864) Specifications Model Number Oven Cavity Controls Timer Power Source Power Output Power Consumption Outside Dimensions Oven Cavity Dimensions Shipping Dumensions Net/Gross Weight MW1030WA/BA/SA 1.0cuft 10 power levels, including defrost...
... after cooking. Let stand in the dishwasher. • Clean the outside the oven door, wipe with soap and a damp cloth. To prevent damage to the operating parts of one lemon if you cannot solve, please call our service line: 1-800-SAMSUNG (1-800-726-7864) Specifications Model Number Oven Cavity Controls Timer Power Source Power Output Power Consumption Outside Dimensions Oven Cavity Dimensions Shipping Dumensions Net/Gross Weight MW1030WA/BA/SA 1.0cuft 10 power levels, including defrost...

Owners Manual
Page 29
... on products purchased and used in the United States, for , inhome or on-site services, minimum or maximum repair times, exchanges or replacements, accessories, options, upgrades, or consumables. Conditions covered are rendered. All warranty repairs or part replacements must be performed by a SECA Authorized Service Center. (To find the nearest SECA Service Center, call 1-800-SAMSUNG.) Obligation to the Original Owner The original dated sales...
... on products purchased and used in the United States, for , inhome or on-site services, minimum or maximum repair times, exchanges or replacements, accessories, options, upgrades, or consumables. Conditions covered are rendered. All warranty repairs or part replacements must be performed by a SECA Authorized Service Center. (To find the nearest SECA Service Center, call 1-800-SAMSUNG.) Obligation to the Original Owner The original dated sales...
Owners Manual
Page 30
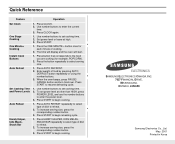
Quick Reference Feature Operation Set Clock One Stage Cooking One Minute+ Cooking Instant Cook Buttons Auto Defrost Set Cooking Time and Power Levels Auto Reheat Handy Helper, kids Meals, Snack Bar 1. Use number buttons to enter the current time. 3. Press AUTO DEFROST. 2. When the oven beeps, press PAUSE/ CANCEL button and turn food over. Press START to begin reheating cycle 1. Press HANDY HELPER, KIDS MELAS, SNACK BAR repeatedly to begin cooking. 1. ELECTRONICS SAMSUNG ELECTRONICS CANADA, INC. 7037 FINANCIAL DRIVE, MISSISSAUGA, ONTARIO...
Quick Reference Feature Operation Set Clock One Stage Cooking One Minute+ Cooking Instant Cook Buttons Auto Defrost Set Cooking Time and Power Levels Auto Reheat Handy Helper, kids Meals, Snack Bar 1. Use number buttons to enter the current time. 3. Press AUTO DEFROST. 2. When the oven beeps, press PAUSE/ CANCEL button and turn food over. Press START to begin reheating cycle 1. Press HANDY HELPER, KIDS MELAS, SNACK BAR repeatedly to begin cooking. 1. ELECTRONICS SAMSUNG ELECTRONICS CANADA, INC. 7037 FINANCIAL DRIVE, MISSISSAUGA, ONTARIO...


