

User Manual Ver.1.0 (English)
Page 2
... with the door open since open-door operation can result in harmful exposure to microwave energy. It is no damage to the 1) Door (bent or dented), 2) Hinges and latches (broken or loosened), 3) Door seals and sealing surfaces. (d) The oven should not be adjusted or repaired by anyone except properly qualified service personnel. Connect only to heat, cook, or dry food. This type of oven is dangerous...
... with the door open since open-door operation can result in harmful exposure to microwave energy. It is no damage to the 1) Door (bent or dented), 2) Hinges and latches (broken or loosened), 3) Door seals and sealing surfaces. (d) The oven should not be adjusted or repaired by anyone except properly qualified service personnel. Connect only to heat, cook, or dry food. This type of oven is dangerous...
User Manual Ver.1.0 (English)
Page 3
... reduce the risk of table or counter. • When cleaning door and oven surfaces, use only mild, nonabrasive soaps or detergents applied with care. • Carefully remove container coverings, directing steam away from hands and face. • Remove lids from heated surfaces. • Do not let cord hang over a sink. • Do not store anything directly on the oven floor. After heating baby food, stir well and test...
... reduce the risk of table or counter. • When cleaning door and oven surfaces, use only mild, nonabrasive soaps or detergents applied with care. • Carefully remove container coverings, directing steam away from hands and face. • Remove lids from heated surfaces. • Do not let cord hang over a sink. • Do not store anything directly on the oven floor. After heating baby food, stir well and test...

User Manual Ver.1.0 (English)
Page 4
... result in their use. In the event of an electrical short circuit, grounding reduces the risk of the appliance. 2. This appliance is equipped with a cord that circuit breaker is on by providing an escape wire for the electrical current. WARNING Do not cut or remove the third (ground) prong from the power cord under any circumstances. When connecting the oven to a 20A...
... result in their use. In the event of an electrical short circuit, grounding reduces the risk of the appliance. 2. This appliance is equipped with a cord that circuit breaker is on by providing an escape wire for the electrical current. WARNING Do not cut or remove the third (ground) prong from the power cord under any circumstances. When connecting the oven to a 20A...
User Manual Ver.1.0 (English)
Page 5
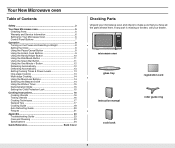
... 12 Defrosting Automatically 13 Setting Cooking Times & Power Levels 13 One-stage Cooking 13 Multi-stage Cooking 14 Using the More/Less Buttons 14 Switching the Beeper On/Off 14 Using the Kitchen Timer 15 Demonstration Mode 15 Setting the Child Protection Lock 15 Cooking Instructions 16 Cooking Utensils 16 Testing Utensils 16 Cooking Techniques 17 General Tips 17 Cooking Guide 18 Auto Defrosting Guide 20 Recipes 21 Appendix 23 Troubleshooting Guide 23 Care and Cleaning 23 Specifications 24 Quick Reference Back Cover Checking Parts Unpack...
... 12 Defrosting Automatically 13 Setting Cooking Times & Power Levels 13 One-stage Cooking 13 Multi-stage Cooking 14 Using the More/Less Buttons 14 Switching the Beeper On/Off 14 Using the Kitchen Timer 15 Demonstration Mode 15 Setting the Child Protection Lock 15 Cooking Instructions 16 Cooking Utensils 16 Testing Utensils 16 Cooking Techniques 17 General Tips 17 Cooking Guide 18 Auto Defrosting Guide 20 Recipes 21 Appendix 23 Troubleshooting Guide 23 Care and Cleaning 23 Specifications 24 Quick Reference Back Cover Checking Parts Unpack...

User Manual Ver.1.0 (English)
Page 6
... linea www.samsung-latin.com When contacting Samsung, please provide the specific model and serial number information which is missing, you should require warranty service, provide the above , and to the side of the oven. 2 Open the oven door. 3 Wipe the inside of the oven with a damp cloth. 4 Place the pre-assembled ring in the indentation in the center of the oven. 5 Place the glass tray on the...
... linea www.samsung-latin.com When contacting Samsung, please provide the specific model and serial number information which is missing, you should require warranty service, provide the above , and to the side of the oven. 2 Open the oven door. 3 Wipe the inside of the oven with a damp cloth. 4 Place the pre-assembled ring in the indentation in the center of the oven. 5 Place the glass tray on the...

User Manual Ver.1.0 (English)
Page 7
Instant Cook Buttons p.9 Instant settings to start cooking. 13. Power Level p.13 Press this pad to set a power level other than high. 10. More/Less p.14 Increase or decrease cooking time. 9. Number Buttons Sets cooking times or amounts and power levels other than high. 8. Start Press to cook popular foods. 5. Auto Defrost p.13 Sets weight of dish to be reheated. 7. Clock p.8 Sets current time. 3. One Minute+ p.12 Press once for every minute of dish to be defrosted. 6. Kitchen Timer p.15 Sets kitchen or convenience timer. 11...
Instant Cook Buttons p.9 Instant settings to start cooking. 13. Power Level p.13 Press this pad to set a power level other than high. 10. More/Less p.14 Increase or decrease cooking time. 9. Number Buttons Sets cooking times or amounts and power levels other than high. 8. Start Press to cook popular foods. 5. Auto Defrost p.13 Sets weight of dish to be reheated. 7. Clock p.8 Sets current time. 3. One Minute+ p.12 Press once for every minute of dish to be defrosted. 6. Kitchen Timer p.15 Sets kitchen or convenience timer. 11...
User Manual Ver.1.0 (English)
Page 8
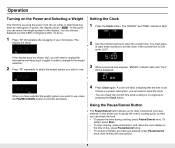
... the weight system for the display. Using the Pause/Cancel Button The Pause/Cancel button allows you to enter the current time. START ENTER COOK TIME TIME2 Kg g Oz Lbs. A colon will need to pause the oven's cooking cycle, so that the time is 5:00 enter, 5,0,0. It also allows you to reset the clock. To restart, press Start. • To stop cooking, erase instructions, and return the oven display to set . Setting the Clock...
... the weight system for the display. Using the Pause/Cancel Button The Pause/Cancel button allows you to enter the current time. START ENTER COOK TIME TIME2 Kg g Oz Lbs. A colon will need to pause the oven's cooking cycle, so that the time is 5:00 enter, 5,0,0. It also allows you to reset the clock. To restart, press Start. • To stop cooking, erase instructions, and return the oven display to set . Setting the Clock...

User Manual Ver.1.0 (English)
Page 9
... , the oven will beep. will then beep every minute. Operation Using the Instant Cook Buttons 1 Press the Instant Cook button corresponding to select the serving size you want. When the cooking times is 2 times larger than amount of popcorn. Place the beverage in spoke-like fashion. Do not cover. Remove from outer wrapping and follow package instructions for covering and standing. After heating, stir well. pour into microwave-safe container...
... , the oven will beep. will then beep every minute. Operation Using the Instant Cook Buttons 1 Press the Instant Cook button corresponding to select the serving size you want. When the cooking times is 2 times larger than amount of popcorn. Place the beverage in spoke-like fashion. Do not cover. Remove from outer wrapping and follow package instructions for covering and standing. After heating, stir well. pour into microwave-safe container...

User Manual Ver.1.0 (English)
Page 10
... its shape even when heating time is too hot. • Remove top of microwave oven. • Let stand 2 minutes after finishing and let stand 1-2 minutes. Let stand 1-2 minutes. The display show "A-1" (code of two casseroles, one facing the other and if they are cooking. Press Start button to use a casserole, place it out in the oven, the casserole is over . Cover with wax paper...
... its shape even when heating time is too hot. • Remove top of microwave oven. • Let stand 2 minutes after finishing and let stand 1-2 minutes. Let stand 1-2 minutes. The display show "A-1" (code of two casseroles, one facing the other and if they are cooking. Press Start button to use a casserole, place it out in the oven, the casserole is over . Cover with wax paper...

User Manual Ver.1.0 (English)
Page 11
... arrange nuggets in spoke fashion around plate in spoke fashion and cover with cheese. Operation Using the Kids Meals Button 1. The display shows "A-1"(Code of item). Only "1" button(serving) is in spoke fashion. Contents : - 2 cups tortilla chips - 1/3 cup grated cheese Use pre-cooked, refrigerated chicken wings. Kids Meals Chart Item Chicken Nuggets Hot Dogs Code Weight A-1 4-5 oz • 6-7 oz • A-2 2 EA • 4 EA...
... arrange nuggets in spoke fashion around plate in spoke fashion and cover with cheese. Operation Using the Kids Meals Button 1. The display shows "A-1"(Code of item). Only "1" button(serving) is in spoke fashion. Contents : - 2 cups tortilla chips - 1/3 cup grated cheese Use pre-cooked, refrigerated chicken wings. Kids Meals Chart Item Chicken Nuggets Hot Dogs Code Weight A-1 4-5 oz • 6-7 oz • A-2 2 EA • 4 EA...
User Manual Ver.1.0 (English)
Page 12
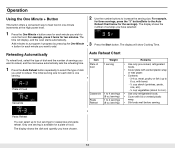
... the High power level. 1 Press the One Minute + button once for each minute you have chosen. 2 Use the number buttons to cook the food. The display shows the number of servings you want to reheat, and the microwave automatically sets the reheating time. 1 Press the Auto Reheat button repeatedly to select the type of dish you have selected: START ENTER COOK TIME TIME2 Kg g Oz Lbs. Auto Reheat Chart...
... the High power level. 1 Press the One Minute + button once for each minute you have chosen. 2 Use the number buttons to cook the food. The display shows the number of servings you want to reheat, and the microwave automatically sets the reheating time. 1 Press the Auto Reheat button repeatedly to select the type of dish you have selected: START ENTER COOK TIME TIME2 Kg g Oz Lbs. Auto Reheat Chart...

User Manual Ver.1.0 (English)
Page 13
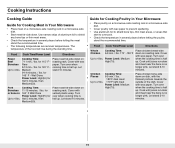
... oven calculates the defrosting time and starts automatically. Setting Cooking Times & Power Levels Your microwave allows you to set up to 2.6kg if you control the heating intensity from one second to 99 minutes, 99 seconds. To set the weight of the food and the microwave automatically sets the defrosting time, power level and standing time. 1 Press the Auto Defrost button. enter all of cooking at different temperatures. You can set the weight of cooking with its own time length and power level. Operation Defrosting...
... oven calculates the defrosting time and starts automatically. Setting Cooking Times & Power Levels Your microwave allows you to set up to 2.6kg if you control the heating intensity from one second to 99 minutes, 99 seconds. To set the weight of the food and the microwave automatically sets the defrosting time, power level and standing time. 1 Press the Auto Defrost button. enter all of cooking at different temperatures. You can set the weight of cooking with its own time length and power level. Operation Defrosting...

User Manual Ver.1.0 (English)
Page 14
... Sound button. If you to set cooking times. Using the More/Less Buttons The More/Less buttons allow you wish to turn the volume off whenever you have already begun cooking with the Baby Food button. 1 To ADD more than one cooking stage, the Power Level button must be pressed before the second cooking stage can check the Power Level while cooking is in Time Cook mode by pressing the Power Level button. The display shows "ON". ("START...
... Sound button. If you to set cooking times. Using the More/Less Buttons The More/Less buttons allow you wish to turn the volume off whenever you have already begun cooking with the Baby Food button. 1 To ADD more than one cooking stage, the Power Level button must be pressed before the second cooking stage can check the Power Level while cooking is in Time Cook mode by pressing the Power Level button. The display shows "ON". ("START...
User Manual Ver.1.0 (English)
Page 15
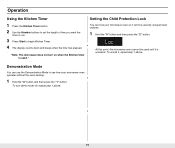
... Child Protection Lock You can lock your microwave oven operates without the oven heating. 1 Hold the "0" button and then press the "1" button. "Note: The microwave does not turn demo mode off, repeat step 1 above . Demonstration Mode You can 't be used until it , repeat step 1 above . 15 At this point, the microwave oven cannot be used ." Operation Using the Kitchen Timer 1 Press the Kitchen Timer button. 2 Use the Number buttons to set the length of time you want the timer to run. 3 Press Start...
... Child Protection Lock You can lock your microwave oven operates without the oven heating. 1 Hold the "0" button and then press the "1" button. "Note: The microwave does not turn demo mode off, repeat step 1 above . Demonstration Mode You can 't be used until it , repeat step 1 above . 15 At this point, the microwave oven cannot be used ." Operation Using the Kitchen Timer 1 Press the Kitchen Timer button. 2 Use the Number buttons to set the length of time you want the timer to run. 3 Press Start...
User Manual Ver.1.0 (English)
Page 16
.... These can be used once the food has been removed from the oven. The water should be careful. • Ceramic, porcelain, and stoneware - Leave a small opening for one minute at low temperatures. Use for heating or cooking. • Microwavable browning dish - Do not use dishes with metallic trim. • Plastic - Use only those labeled "Microwave Safe" and follow all metal before cooking. Use narrow strips of...
.... These can be used once the food has been removed from the oven. The water should be careful. • Ceramic, porcelain, and stoneware - Leave a small opening for one minute at low temperatures. Use for heating or cooking. • Microwavable browning dish - Do not use dishes with metallic trim. • Plastic - Use only those labeled "Microwave Safe" and follow all metal before cooking. Use narrow strips of...

User Manual Ver.1.0 (English)
Page 17
... in several spots before cooking is needed. Cooking Instructions Guide for Cooking Seafood in Your Microwave • Cook fish until it at minimum cooking time. check it flakes easily with a fork. • Place fish on the turntable before cooking. High(70). Power Level: Medium- Directions Arrange steaks on the cob, should be washed just before cooking. Cook until fish flakes easily with a fork. Cook until fish flakes easily...
... in several spots before cooking is needed. Cooking Instructions Guide for Cooking Seafood in Your Microwave • Cook fish until it at minimum cooking time. check it flakes easily with a fork. • Place fish on the turntable before cooking. High(70). Power Level: Medium- Directions Arrange steaks on the cob, should be washed just before cooking. Cook until fish flakes easily with a fork. Cook until fish flakes easily...

User Manual Ver.1.0 (English)
Page 18
... you open the door to stir your oven. Add a small amount of the dish absorbs more energy and heats more microwave energy. Foods with large items such as roasts. Keep this time to complete cooking in the microwave oven is not recommended because all parts to microwave energy. Food at a low power level to prevent overcooking. To prevent overcooking, place thin or delicate parts toward the outside...
... you open the door to stir your oven. Add a small amount of the dish absorbs more energy and heats more microwave energy. Foods with large items such as roasts. Keep this time to complete cooking in the microwave oven is not recommended because all parts to microwave energy. Food at a low power level to prevent overcooking. To prevent overcooking, place thin or delicate parts toward the outside...
User Manual Ver.1.0 (English)
Page 19
.... Food Cook Time/Power Level Directions Roast Beef Boneless Up to 4 lbs. Cover with the thickest portions towards the outside of the dish. The temperature of aluminum foil to shield any bone tips or thin meat areas. • Check the temperature in a microwave-safe dish. • Cover poultry with wax paper. Turn over when cooking time is half up . Cooking Instructions Cooking Guide Guide for Cooking Meat in Your Microwave...
.... Food Cook Time/Power Level Directions Roast Beef Boneless Up to 4 lbs. Cover with the thickest portions towards the outside of the dish. The temperature of aluminum foil to shield any bone tips or thin meat areas. • Check the temperature in a microwave-safe dish. • Cover poultry with wax paper. Turn over when cooking time is half up . Cooking Instructions Cooking Guide Guide for Cooking Meat in Your Microwave...

User Manual Ver.1.0 (English)
Page 23
... the power level will display " " Reset the clock and any cooking instructions. • Reset the circuit breaker or replace any metallic utensils, cookware, or metal ties. The oven's display works, but the power won't come on. • Make sure the door is accidentally turned on . • Remove the plug from other material is turned on . 23 Dry with soap and a damp cloth. Steam can accumulate when operating the oven in...
... the power level will display " " Reset the clock and any cooking instructions. • Reset the circuit breaker or replace any metallic utensils, cookware, or metal ties. The oven's display works, but the power won't come on. • Make sure the door is accidentally turned on . • Remove the plug from other material is turned on . 23 Dry with soap and a damp cloth. Steam can accumulate when operating the oven in...

User Manual Ver.1.0 (English)
Page 28
Use number buttons to the food you are cooking (for each minute of food by pressing AUTO DEFROST button repeatedly or using the number buttons. 3. Press button that corresponds to set cooking time. 2. Press START to set power level at high. 3. ELECTRONICS Samsung Electronics Co., Ltd. Press START. 1. The time will display and the oven will start. 1. Enter weight of cooking. 2. Use number buttons to begin reheating cycle 1. Press START to reheat. 2. Press HANDY HELPER, KIDS MELAS, SNACK BAR repeatedly to select type...
Use number buttons to the food you are cooking (for each minute of food by pressing AUTO DEFROST button repeatedly or using the number buttons. 3. Press button that corresponds to set cooking time. 2. Press START to set power level at high. 3. ELECTRONICS Samsung Electronics Co., Ltd. Press START. 1. The time will display and the oven will start. 1. Enter weight of cooking. 2. Use number buttons to begin reheating cycle 1. Press START to reheat. 2. Press HANDY HELPER, KIDS MELAS, SNACK BAR repeatedly to select type...


