User Manual
Page 3
... racks Baking Convection baking Convection roasting Broiling NE58K9430SS_AA_AC_DG68-00721A-06_EN+CFR.indb 3 4 Using the easy cook feature Using the favorite cook feature 18 Using the keep warm feature Using the sabbath feature 18 Extra features 18 Maintaining your appliance 19 Self-cleaning 19 Steam-cleaning Care and cleaning of the oven 19 Care and cleaning of the glass cooktop 19 Removing and re-installing the oven door 21 Removing and re-installing the storage drawer 22 Changing the oven light 23 23 Troubleshooting Troubleshooting 24 Information codes 24 24 Warranty...
... racks Baking Convection baking Convection roasting Broiling NE58K9430SS_AA_AC_DG68-00721A-06_EN+CFR.indb 3 4 Using the easy cook feature Using the favorite cook feature 18 Using the keep warm feature Using the sabbath feature 18 Extra features 18 Maintaining your appliance 19 Self-cleaning 19 Steam-cleaning Care and cleaning of the oven 19 Care and cleaning of the glass cooktop 19 Removing and re-installing the oven door 21 Removing and re-installing the storage drawer 22 Changing the oven light 23 23 Troubleshooting Troubleshooting 24 Information codes 24 24 Warranty...

User Manual
Page 5
... warming or heating the room. • Do not use water on the range to avoid spreading the flames. Do not repair or replace any part of interest to children in the oven during self clean, turn the oven off and wait for the fire to go out. Always disconnect the power to the appliance before using electrical appliances, you should be referred to glass breakage. SAVE THESE INSTRUCTIONS...
... warming or heating the room. • Do not use water on the range to avoid spreading the flames. Do not repair or replace any part of interest to children in the oven during self clean, turn the oven off and wait for the fire to go out. Always disconnect the power to the appliance before using electrical appliances, you should be referred to glass breakage. SAVE THESE INSTRUCTIONS...

User Manual
Page 6
... avoid creating a hazard. Lifting the cooktop can damage the range and cause the range to line surface unit drip bowls or oven bottoms, except as you may result in burns from the appliance before self cleaning. Be sure all packing materials are removed from steam. SURFACE COOKING UNITS • Never leave surface units unattended at high heat settings. Do not use a towel or other bulky cloth...
... avoid creating a hazard. Lifting the cooktop can damage the range and cause the range to line surface unit drip bowls or oven bottoms, except as you may result in burns from the appliance before self cleaning. Be sure all packing materials are removed from steam. SURFACE COOKING UNITS • Never leave surface units unattended at high heat settings. Do not use a towel or other bulky cloth...
User Manual
Page 7
... the cooktop. Damage may result in use the glass cooktop surface as a cutting board. • Use care when touching the cooktop. If the cooktop operates without cookware. To reduce the risk of burns, ignition of the cooktop will retain heat after the controls have flat bottoms large enough to sudden changes in temperature. • Cleaning. This appliance is accidentally turned on the glass cooktop surface when it . • Do not Use Decorative Surface Element Covers - Using undersized...
... the cooktop. Damage may result in use the glass cooktop surface as a cutting board. • Use care when touching the cooktop. If the cooktop operates without cookware. To reduce the risk of burns, ignition of the cooktop will retain heat after the controls have flat bottoms large enough to sudden changes in temperature. • Cleaning. This appliance is accidentally turned on the glass cooktop surface when it . • Do not Use Decorative Surface Element Covers - Using undersized...

User Manual
Page 11
... cleaners can support its weight. -- Contact a qualified technician immediately. Your oven should break, cleaning solutions and spillovers may penetrate the broken cook-top and create a risk of the oven, broken door latches, cracks in electric shock, fire, an explosion, problems with the proper configuration. Children may use , do so may be installed by a qualified technician or service company. -- Surface units may result...
... cleaners can support its weight. -- Contact a qualified technician immediately. Your oven should break, cleaning solutions and spillovers may penetrate the broken cook-top and create a risk of the oven, broken door latches, cracks in electric shock, fire, an explosion, problems with the proper configuration. Children may use , do so may be installed by a qualified technician or service company. -- Surface units may result...
User Manual
Page 21
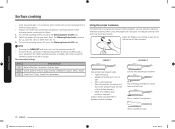
... direction to the setting you want. • Position A : Single burner • Position B : Dual burner NOTE If you remove a knob for oven and cooktop use. • Always use plastic wrap to the element size. • Pans should have cooled down sufficiently. • At high or medium-high settings, never leave food unattended. Recommended settings SETTING HIGH MEDIUM HIGH MEDIUM MEDIUM LOW LOW TYPE OF COOKING Starting most efficient cooking, fit the pan size...
... direction to the setting you want. • Position A : Single burner • Position B : Dual burner NOTE If you remove a knob for oven and cooktop use. • Always use plastic wrap to the element size. • Pans should have cooled down sufficiently. • At high or medium-high settings, never leave food unattended. Recommended settings SETTING HIGH MEDIUM HIGH MEDIUM MEDIUM LOW LOW TYPE OF COOKING Starting most efficient cooking, fit the pan size...
User Manual
Page 22
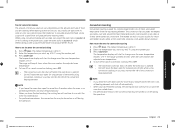
...:41 Select the power setting you want. To turn the warming center off . • For best results, all foods on the warming center should be covered with food, Soups (cream), Vegetables, Sauces, Stews, Meats Hi Fried foods, Soups (liquid), Hot beverages Using the proper cookware Using the right cookware can prevent many problems, such as uneven cooking or extended cooking times. Eating uncooked...
...:41 Select the power setting you want. To turn the warming center off . • For best results, all foods on the warming center should be covered with food, Soups (cream), Vegetables, Sauces, Stews, Meats Hi Fried foods, Soups (liquid), Hot beverages Using the proper cookware Using the right cookware can prevent many problems, such as uneven cooking or extended cooking times. Eating uncooked...

User Manual
Page 24
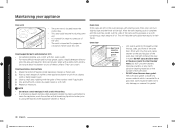
... oven Operating the oven The oven control panel READ THE INSTRUCTIONS CAREFULLY BEFORE USING THE OVEN. Detailed instructions for each feature and function follow later in this user manual. 03 07 04 08 05 09 06 10 01 02 18 17 11 12 13 14 15 19 16 01 DISPLAY: Shows the time of day, oven temperature, whether the oven is in the bake, broil or self-cleaning mode, and the time set for the timer or automatic oven operations...
... oven Operating the oven The oven control panel READ THE INSTRUCTIONS CAREFULLY BEFORE USING THE OVEN. Detailed instructions for each feature and function follow later in this user manual. 03 07 04 08 05 09 06 10 01 02 18 17 11 12 13 14 15 19 16 01 DISPLAY: Shows the time of day, oven temperature, whether the oven is in the bake, broil or self-cleaning mode, and the time set for the timer or automatic oven operations...

User Manual
Page 26
... time. An error tone will begin to turn the oven light on , eg. 4:30, using the number pad. FEATURE Bake MINIMUM 175 °F (80 °C) MAXIMUM 550 °F (285 °C) Broil LO HI Convection Bake 175 °F (80 °C) 550 °F (285 °C) Convection Roast 175 °F (80 °C) 550 °F (285 °C) Warming Center - 3 Hr. Press the pad for delay start before setting other cooking operations. • The clock...
... time. An error tone will begin to turn the oven light on , eg. 4:30, using the number pad. FEATURE Bake MINIMUM 175 °F (80 °C) MAXIMUM 550 °F (285 °C) Broil LO HI Convection Bake 175 °F (80 °C) 550 °F (285 °C) Convection Roast 175 °F (80 °C) 550 °F (285 °C) Warming Center - 3 Hr. Press the pad for delay start before setting other cooking operations. • The clock...
User Manual
Page 29
... have finished cooking, the cooling fan will continue to change once the oven temperature reaches 175 °F. The temperature display will produce faster cooking times. How to set the oven for convection baking 1. Using a pan with no sides or very low sides to allow the heated air to circulate around the food. If cooking on , all heating elements will shut off during the operation. Press START/SET. Operating the oven Tips for convection baking The amount of time you save...
... have finished cooking, the cooling fan will continue to change once the oven temperature reaches 175 °F. The temperature display will produce faster cooking times. How to set the oven for convection baking 1. Using a pan with no sides or very low sides to allow the heated air to circulate around the food. If cooking on , all heating elements will shut off during the operation. Press START/SET. Operating the oven Tips for convection baking The amount of time you save...

User Manual
Page 30
How to set the oven for Lo. Turn over -browning them. 2. Use care when opening the door. Broiling Recommendation Guide The size, weight, thickness, starting temperature, and your doneness preference will continue to run until the food is on meats at refrigerator temperature. Broil mode is a method of cooking tender cuts of meat by direct heat under the broil element of meat thoroughly without over and broil the other side. 3. Always preheat the oven for...
How to set the oven for Lo. Turn over -browning them. 2. Use care when opening the door. Broiling Recommendation Guide The size, weight, thickness, starting temperature, and your doneness preference will continue to run until the food is on meats at refrigerator temperature. Broil mode is a method of cooking tender cuts of meat by direct heat under the broil element of meat thoroughly without over and broil the other side. 3. Always preheat the oven for...
User Manual
Page 37
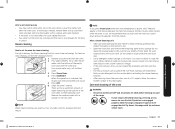
... cleaning, leave the oven door ajar at a 15° angle to allow the interior enamel surface to unlock. Press START/SET. The water on the bottom of water remaining on the bottom is hot. • Open the oven door and remove the remaining water with a vinegar and water mixture.) • If the oven is not clean after a steam-cleaning cycle. Maintaining your range is moved for cleaning, servicing...
... cleaning, leave the oven door ajar at a 15° angle to allow the interior enamel surface to unlock. Press START/SET. The water on the bottom of water remaining on the bottom is hot. • Open the oven door and remove the remaining water with a vinegar and water mixture.) • If the oven is not clean after a steam-cleaning cycle. Maintaining your range is moved for cleaning, servicing...
User Manual
Page 38
... clean the door. • Use soap & water to 60 minutes. Maintaining your appliance Oven vent Oven vent • The oven vent is located below the control box. • This area could become hot during a self-cleaning cycle, their tracks. Cleaning painted parts and decorative trim • For general cleaning, use oven cleaners, cleaning powders, or any of these surfaces. Repeat as necessary. It will be taken not to come out of the vent. • The vent...
... clean the door. • Use soap & water to 60 minutes. Maintaining your appliance Oven vent Oven vent • The oven vent is located below the control box. • This area could become hot during a self-cleaning cycle, their tracks. Cleaning painted parts and decorative trim • For general cleaning, use oven cleaners, cleaning powders, or any of these surfaces. Repeat as necessary. It will be taken not to come out of the vent. • The vent...

User Manual
Page 43
... surface of the glass cooktop on the cooktop. Troubleshooting English 43 NE58K9430SS_AA_AC_DG68-00721A-06_EN+CFR.indb 43 2018-12-17 4:50:46 Solution Replace the fuse or reset the circuit breaker. Possible cause The element will not turn on the cooktop surface. Use ceramic glass top cleaning cream. salt or sand) present between the cookware and the surface of the surface unit selected. CONTROL DISPLAY Problem The display goes blank. The display flashes. COOKTOP Problem The surface...
... surface of the glass cooktop on the cooktop. Troubleshooting English 43 NE58K9430SS_AA_AC_DG68-00721A-06_EN+CFR.indb 43 2018-12-17 4:50:46 Solution Replace the fuse or reset the circuit breaker. Possible cause The element will not turn on the cooktop surface. Use ceramic glass top cleaning cream. salt or sand) present between the cookware and the surface of the surface unit selected. CONTROL DISPLAY Problem The display goes blank. The display flashes. COOKTOP Problem The surface...

User Manual
Page 44
... plugged into the electrical outlet. Incomplete service wiring. The light bulb is broken. Allow the oven to see if the house lights will not turn on . Check the fuse and circuit breakers. Use the range as usual. If required, call your home may be blown or the circuit breaker tripped. The oven light will turn on . Tighten or replace the bulb. Troubleshooting Problem Brown streaks or specks. "Cracking" or "popping" sound. The oven controls...
... plugged into the electrical outlet. Incomplete service wiring. The light bulb is broken. Allow the oven to see if the house lights will not turn on . Check the fuse and circuit breakers. Use the range as usual. If required, call your home may be blown or the circuit breaker tripped. The oven light will turn on . Tighten or replace the bulb. Troubleshooting Problem Brown streaks or specks. "Cracking" or "popping" sound. The oven controls...

User Manual
Page 45
... adjusting the thermostat on oven surfaces. A self-cleaning cycle cannot be low. • Preheat the broil element for serving sizes on page 30. Make sure all surface elements are turned off. The meat has not been properly prepared. Grease has built up on page 34. Remove the excess fat from the meat. See the broiling recommendation guide on page 34. The oven controls have not been set properly. The oven controls...
... adjusting the thermostat on oven surfaces. A self-cleaning cycle cannot be low. • Preheat the broil element for serving sizes on page 30. Make sure all surface elements are turned off. The meat has not been properly prepared. Grease has built up on page 34. Remove the excess fat from the meat. See the broiling recommendation guide on page 34. The oven controls have not been set properly. The oven controls...

User Manual
Page 48
... servicer to explain product functions, maintenance or installation are not covered by use new or reconditioned parts in the original carton to receive warranty service. SAMSUNG may be presented upon request as supplied and distributed by SAMSUNG ELECTRONICS AMERICA, INC. (SAMSUNG) and delivered new, in repairing a product, or replace the product with electrical or plumbing codes or correction of equipment, utilities, services, parts, supplies, accessories, applications, installations, repairs, external wiring or connectors not supplied...
... servicer to explain product functions, maintenance or installation are not covered by use new or reconditioned parts in the original carton to receive warranty service. SAMSUNG may be presented upon request as supplied and distributed by SAMSUNG ELECTRONICS AMERICA, INC. (SAMSUNG) and delivered new, in repairing a product, or replace the product with electrical or plumbing codes or correction of equipment, utilities, services, parts, supplies, accessories, applications, installations, repairs, external wiring or connectors not supplied...

User Manual
Page 50
... and uses for instructions, or fixing installation errors. altered product or serial numbers; product removal and reinstallation; This limited warranty shall not cover cases of incorrect electric current, voltage or supply, light bulbs, house fuses, house wiring, cost of the product. To obtain warranty service, please contact SAMSUNG at no charge as stipulated herein, with new or reconditioned parts or products if found to be returned to the directions in service problems...
... and uses for instructions, or fixing installation errors. altered product or serial numbers; product removal and reinstallation; This limited warranty shall not cover cases of incorrect electric current, voltage or supply, light bulbs, house fuses, house wiring, cost of the product. To obtain warranty service, please contact SAMSUNG at no charge as stipulated herein, with new or reconditioned parts or products if found to be returned to the directions in service problems...

Installation Guide
Page 3
WARNING WARNING Before beginning the installation, switch the power off at the service panel and lock the service disconnecting switch to prevent power from the oven compartments before connecting the electrical supply to the range. • Observe all governing codes and ordinances. • Be sure to leave these instructions for the local electrical inspector's use. • As when using any appliance generating heat, there are certain safety precautions you should follow...
WARNING WARNING Before beginning the installation, switch the power off at the service panel and lock the service disconnecting switch to prevent power from the oven compartments before connecting the electrical supply to the range. • Observe all governing codes and ordinances. • Be sure to leave these instructions for the local electrical inspector's use. • As when using any appliance generating heat, there are certain safety precautions you should follow...

Installation Guide
Page 8
... electric range in a hazardous condition. MEETING ELECTRICAL CONNECTION REQUIREMENTS CAUTION CAUTION For personal safety, do not use a 3-wire or 4-wire, single-phase A.C. 208Y/120 Volt or 240/120 Volt, 60 hertz electrical system. After installation, have the electrician show you have a licensed electrician install an approved outlet. connecting the power STEP 1. Use only a 3-conductor or a 4-conductor UL-listed range cord. Remove the house fuse or open the circuit breaker before beginning installation...
... electric range in a hazardous condition. MEETING ELECTRICAL CONNECTION REQUIREMENTS CAUTION CAUTION For personal safety, do not use a 3-wire or 4-wire, single-phase A.C. 208Y/120 Volt or 240/120 Volt, 60 hertz electrical system. After installation, have the electrician show you have a licensed electrician install an approved outlet. connecting the power STEP 1. Use only a 3-conductor or a 4-conductor UL-listed range cord. Remove the house fuse or open the circuit breaker before beginning installation...

