
Installation Guide
Page 1
... anti-tip device by a qualified installer or service technician. • For the range to prevent power from the oven compartments before connecting the electrical supply to the range. • Observe all governing codes and ordinances. • Save for the local electrical inspector's use. • Be sure to leave these instructions for the local electrical inspector's use. • As when using any appliance generating heat, there are not blocked or covered...
... anti-tip device by a qualified installer or service technician. • For the range to prevent power from the oven compartments before connecting the electrical supply to the range. • Observe all governing codes and ordinances. • Save for the local electrical inspector's use. • Be sure to leave these instructions for the local electrical inspector's use. • As when using any appliance generating heat, there are not blocked or covered...

Installation Guide
Page 4
... the drawer on the display. • LCD, PMOLED : Wire installation fail • LED : bAd LinE Reconnect the power connection properly, and the message disappears. Care should be wired and fused to keep the edge from damaging the cable. • Because range terminals are no local codes, your area. Meeting electrical connection requirements CAUTION For personal safety, do not use an extension cord with your local utilities for electrical codes...
... the drawer on the display. • LCD, PMOLED : Wire installation fail • LED : bAd LinE Reconnect the power connection properly, and the message disappears. Care should be wired and fused to keep the edge from damaging the cable. • Because range terminals are no local codes, your area. Meeting electrical connection requirements CAUTION For personal safety, do not use an extension cord with your local utilities for electrical codes...
Installation Guide
Page 7
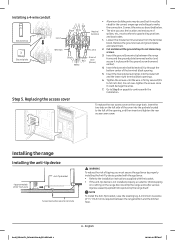
... properly installing the Anti-Tip device packed with the appliance. • Refer to the installation instructions supplied with the bracket. • If the anti-tip device is firmly secured (35 to make the connection. A minimum clearance of the opening . 5. Insert the two tabs on the range back. NOTE To install the Anti-Tip bracket, raise the leveling leg. Insert the ground bare wire tip between the range bottom and the kitchen...
... properly installing the Anti-Tip device packed with the appliance. • Refer to the installation instructions supplied with the bracket. • If the anti-tip device is firmly secured (35 to make the connection. A minimum clearance of the opening . 5. Insert the two tabs on the range back. NOTE To install the Anti-Tip bracket, raise the leveling leg. Insert the ground bare wire tip between the range bottom and the kitchen...

Installation Guide
Page 8
... slides under the Anti-Tip bracket. • Carefully tip the range forward to prevent accidental tipping. B. Check direction 2. Ground Finalizing the installation Anti-Tip bracket Leveling leg • Move range close enough to the opening to plug into the receptacle. • Slide the range into position ensuring that the range is not level, adjust the leveling legs with a wrench. Install the bracket using the template The Anti-Tip bracket is level in the user manual. Read and follow the instructions on the oven rack or surface cooktop...
... slides under the Anti-Tip bracket. • Carefully tip the range forward to prevent accidental tipping. B. Check direction 2. Ground Finalizing the installation Anti-Tip bracket Leveling leg • Move range close enough to the opening to plug into the receptacle. • Slide the range into position ensuring that the range is not level, adjust the leveling legs with a wrench. Install the bracket using the template The Anti-Tip bracket is level in the user manual. Read and follow the instructions on the oven rack or surface cooktop...
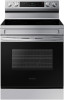
User Manual
Page 2
... tilting forward more than a few inches. Never completely remove the leveling legs. The Anti-Tip device should prevent the range from the wall for instructions. b) Verify that the Anti-Tip device has been properly installed and engaged at the right or left ) of the range bottom. WARNING Do not step, lean, or sit on the open door. You can result in place and...
... tilting forward more than a few inches. Never completely remove the leveling legs. The Anti-Tip device should prevent the range from the wall for instructions. b) Verify that the Anti-Tip device has been properly installed and engaged at the right or left ) of the range bottom. WARNING Do not step, lean, or sit on the open door. You can result in place and...

User Manual
Page 5
... cooktop Operating the oven The oven control panel Oven lock Setting the clock Setting the kitchen timer Timed cooking Delay start Turning the oven light on and off Minimum and maximum settings Using the oven racks Baking Broiling Using the bread proof function Using the keep warm feature 6 Using the smart control feature Using the voice control 21 Using the options function 21 Using the Sabbath feature 21 Maintaining your appliance 22 Steam-cleaning 22 Care and cleaning of the oven Care and cleaning of the glass cooktop 22 Removing and reinstalling the oven door 22 Removing...
... cooktop Operating the oven The oven control panel Oven lock Setting the clock Setting the kitchen timer Timed cooking Delay start Turning the oven light on and off Minimum and maximum settings Using the oven racks Baking Broiling Using the bread proof function Using the keep warm feature 6 Using the smart control feature Using the voice control 21 Using the options function 21 Using the Sabbath feature 21 Maintaining your appliance 22 Steam-cleaning 22 Care and cleaning of the oven Care and cleaning of the glass cooktop 22 Removing and reinstalling the oven door 22 Removing...
User Manual
Page 7
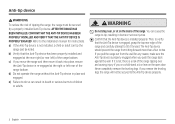
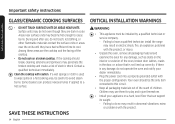
... the flames. Important safety instructions FOR YOUR SAFETY When using electrical appliances, you should follow basic safety precautions, including the following: CAUTION • Use this appliance only for warming or heating the room. • Do not use a dry chemical, baking soda, or foam-type extinguisher. • Avoid scratching or striking the glass doors, the cooktop, or the control panel. Doing so may occur. Turn off...
... the flames. Important safety instructions FOR YOUR SAFETY When using electrical appliances, you should follow basic safety precautions, including the following: CAUTION • Use this appliance only for warming or heating the room. • Do not use a dry chemical, baking soda, or foam-type extinguisher. • Avoid scratching or striking the glass doors, the cooktop, or the control panel. Doing so may occur. Turn off...

User Manual
Page 8
... with the controls or any part of the range. • If the power cord is damaged, it . Keep plastics, clothes, and paper away from parts of flame from the oven. SAVE THESE INSTRUCTIONS 8 English Do not let the potholder touch hot heating elements. Placing moist or damp potholders on hot surfaces may result in burns from the appliance before operating it must be replaced by persons...
... with the controls or any part of the range. • If the power cord is damaged, it . Keep plastics, clothes, and paper away from parts of flame from the oven. SAVE THESE INSTRUCTIONS 8 English Do not let the potholder touch hot heating elements. Placing moist or damp potholders on hot surfaces may result in burns from the appliance before operating it must be replaced by persons...

User Manual
Page 9
... rangetop service without cookware. Using undersized cookware will also improve efficiency. • Cookware Handles Should Be Turned Inward and Not Extend Over Adjacent Surface Units. SURFACE COOKING UNITS • Never leave surface units unattended at high heat settings. If the cooktop operates without cookware, the control knobs will retain heat after the controls have been turned off. • Do not move the container and bowl in temperature. • Cleaning...
... rangetop service without cookware. Using undersized cookware will also improve efficiency. • Cookware Handles Should Be Turned Inward and Not Extend Over Adjacent Surface Units. SURFACE COOKING UNITS • Never leave surface units unattended at high heat settings. If the cooktop operates without cookware, the control knobs will retain heat after the controls have been turned off. • Do not move the container and bowl in temperature. • Cleaning...

User Manual
Page 10
... preparing flaming foods under the hood, turn the surface units off before replacing the lamp to the relevant standards. Do not use decorative surface element covers - If your appliance malfunctions or if fractures, cracks, or splits appear: - switch off all cooking zones. - ELECTRICAL SAFETY • Proper Installation - Important safety instructions Important safety instructions • Be sure you turned on the correct surface unit. • Always turn the fan on...
... preparing flaming foods under the hood, turn the surface units off before replacing the lamp to the relevant standards. Do not use decorative surface element covers - If your appliance malfunctions or if fractures, cracks, or splits appear: - switch off all cooking zones. - ELECTRICAL SAFETY • Proper Installation - Important safety instructions Important safety instructions • Be sure you turned on the correct surface unit. • Always turn the fan on...
User Manual
Page 14
... may use , do not operate the oven and notify your appliance on a broken cooktop. Some cleaners can support its weight. - SAVE THESE INSTRUCTIONS 14 English CRITICAL INSTALLATION WARNINGS WARNING • This appliance must be careful to this circuit. • Keep all packaging material and examine the oven for play and injure themselves. • Install your dealer immediately. • Plug the power cord into...
... may use , do not operate the oven and notify your appliance on a broken cooktop. Some cleaners can support its weight. - SAVE THESE INSTRUCTIONS 14 English CRITICAL INSTALLATION WARNINGS WARNING • This appliance must be careful to this circuit. • Keep all packaging material and examine the oven for play and injure themselves. • Install your dealer immediately. • Plug the power cord into...

User Manual
Page 24
... lamp turns off when the surface control knobs are identified by permanent circles on the glass cooking surface. Do not touch the surface elements until the unit is cooled to the dual burner (B) setting. 24 English Dual surface unit control knob (Left Front, Right Front) 1. Cooking areas • The cooking areas on your range are in either direction to the setting you can occur. Single surface unit control knob (Left Rear, Right Rear) 1. Surface cooking Surface cooking Hot surface indicator • Comes on when...
... lamp turns off when the surface control knobs are identified by permanent circles on the glass cooking surface. Do not touch the surface elements until the unit is cooled to the dual burner (B) setting. 24 English Dual surface unit control knob (Left Front, Right Front) 1. Cooking areas • The cooking areas on your range are in either direction to the setting you can occur. Single surface unit control knob (Left Rear, Right Rear) 1. Surface cooking Surface cooking Hot surface indicator • Comes on when...

User Manual
Page 25
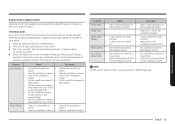
... pans will reduce cooking times and cook food more than element. Curved and warped pan bottoms. Pan overhangs element by rotating a ruler across the bottom of a material that conducts heat well. Pan is smaller than one-half inch. Heavy handle tilts pan. Recommended settings SETTING HIGH MEDIUM HIGH MEDIUM MEDIUM LOW LOW TYPE OF COOKING Starting most foods, bringing water to element surface diameter. Surface cooking NOTE If you remove the knob for cleaning...
... pans will reduce cooking times and cook food more than element. Curved and warped pan bottoms. Pan overhangs element by rotating a ruler across the bottom of a material that conducts heat well. Pan is smaller than one-half inch. Heavy handle tilts pan. Recommended settings SETTING HIGH MEDIUM HIGH MEDIUM MEDIUM LOW LOW TYPE OF COOKING Starting most foods, bringing water to element surface diameter. Surface cooking NOTE If you remove the knob for cleaning...
User Manual
Page 27
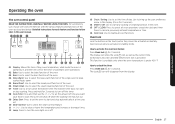
... oven. 07 Timer: Use to set or cancel the kitchen timer. Use to bring up the user preference menu in the display. (Press for 3 seconds. Operating the oven Operating the oven The oven control panel READ THE INSTRUCTIONS CAREFULLY BEFORE USING THE OVEN. How to activate the oven lock feature Press Oven lock for 3 seconds.) 14 START / SET: Use to cancel all oven functions. The kitchen timer does not start any cooking or cleaning function in the oven. 15 OFF / CLEAR: Press to start or stop automatically at a time...
... oven. 07 Timer: Use to set or cancel the kitchen timer. Use to bring up the user preference menu in the display. (Press for 3 seconds. Operating the oven Operating the oven The oven control panel READ THE INSTRUCTIONS CAREFULLY BEFORE USING THE OVEN. How to activate the oven lock feature Press Oven lock for 3 seconds.) 14 START / SET: Use to cancel all oven functions. The kitchen timer does not start any cooking or cleaning function in the oven. 15 OFF / CLEAR: Press to start or stop automatically at a time...

User Manual
Page 32
... the fire or use a broiler pan and its grid when broiling. This guide is based on meats at the broil stop position Leave the door open by direct heat under the broil element of the oven. Press OFF/CLEAR once you have finished cooking or if you want to spread and cause personal injury. The door will affect broiling times. Operating the oven Broiling Broiling is a method of cooking tender cuts of meat...
... the fire or use a broiler pan and its grid when broiling. This guide is based on meats at the broil stop position Leave the door open by direct heat under the broil element of the oven. Press OFF/CLEAR once you have finished cooking or if you want to spread and cause personal injury. The door will affect broiling times. Operating the oven Broiling Broiling is a method of cooking tender cuts of meat...

User Manual
Page 34
... (Oven, Cooktop), Oven off Monitoring (Oven, Cooktop), Oven start, Oven off, Error check How to the oven. • Remotely start the oven remotely 1. Oven remote control • Transfer the oven setting (mode, time, temperature) from the device to connect the oven 1. Increase the temp of the range(oven) to reconnect. Turn on the range oven light. Operating the oven Operating the oven Using the smart control feature Functions that can be operated from the app. To start the oven (Only available for all available functions. NOTE • Opening the oven door or...
... (Oven, Cooktop), Oven off Monitoring (Oven, Cooktop), Oven start, Oven off, Error check How to the oven. • Remotely start the oven remotely 1. Oven remote control • Transfer the oven setting (mode, time, temperature) from the device to connect the oven 1. Increase the temp of the range(oven) to reconnect. Turn on the range oven light. Operating the oven Operating the oven Using the smart control feature Functions that can be operated from the app. To start the oven (Only available for all available functions. NOTE • Opening the oven door or...
User Manual
Page 35
... SmartThings. 2. Start the oven[Device name]. Setup the supported devices to 3 hours[Time]. Then account linking is the temperature of the oven[Device name]? Function Check Temp • Check Time Check Mode • (States) • Temp Control • Oven Timer • (Cook Time) • "Alexa" What is complete.) Function Start/Preheat • • • Turn Off/Stop • • "Alexa" Preheat the oven[Device • name]. Installation Guide Here's how to 3 • hours[Time]. Set oven[Device name...
... SmartThings. 2. Start the oven[Device name]. Setup the supported devices to 3 hours[Time]. Then account linking is the temperature of the oven[Device name]? Function Check Temp • Check Time Check Mode • (States) • Temp Control • Oven Timer • (Cook Time) • "Alexa" What is complete.) Function Start/Preheat • • • Turn Off/Stop • • "Alexa" Preheat the oven[Device • name]. Installation Guide Here's how to 3 • hours[Time]. Set oven[Device name...
User Manual
Page 46
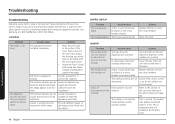
... a power failure. If you run into unexpected trouble, look first for the surface unit you are using inappropriate cookware. The cooktop controls are set for a solution in the center of the glass cooktop on . Cover the pan with your new electric range. Refer to the section on the care and cleaning of the oven. If you're still having trouble after trying the suggested solution, call Samsung at...
... a power failure. If you run into unexpected trouble, look first for the surface unit you are using inappropriate cookware. The cooktop controls are set for a solution in the center of the glass cooktop on . Cover the pan with your new electric range. Refer to the section on the care and cleaning of the oven. If you're still having trouble after trying the suggested solution, call Samsung at...

User Manual
Page 51
... SUCH DAMAGES. damage caused by SAMSUNG; product where the original factory serial numbers have been removed, defaced, changed in the use your product; damage caused by this product shall be binding on how to state. In addition, damage to the glass cooktop caused by (i) use of equipment, utilities, services, parts, supplies, accessories, applications, installations, repairs, external wiring or connectors not supplied or authorized by unauthorized modification...
... SUCH DAMAGES. damage caused by SAMSUNG; product where the original factory serial numbers have been removed, defaced, changed in the use your product; damage caused by this product shall be binding on how to state. In addition, damage to the glass cooktop caused by (i) use of equipment, utilities, services, parts, supplies, accessories, applications, installations, repairs, external wiring or connectors not supplied or authorized by unauthorized modification...
User Manual
Page 52
..., services, parts, supplies, accessories, applications, installations, repairs, external wiring or connectors not supplied or authorized by SAMSUNG ELECTRONICS CANADA, INC. (SAMSUNG) and delivered new, in the use and care guide are not cleaned according to the following: damage which occurs in -home service during the limited warranty period specified above. incorrect electrical line voltage, fluctuations and surges; customer adjustments and failure to the service agent. SAMSUNG does not warrant uninterrupted or error-free operation of a service...
..., services, parts, supplies, accessories, applications, installations, repairs, external wiring or connectors not supplied or authorized by SAMSUNG ELECTRONICS CANADA, INC. (SAMSUNG) and delivered new, in the use and care guide are not cleaned according to the following: damage which occurs in -home service during the limited warranty period specified above. incorrect electrical line voltage, fluctuations and surges; customer adjustments and failure to the service agent. SAMSUNG does not warrant uninterrupted or error-free operation of a service...

