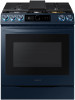
Samsung NE63A8711QN/AA Support and Manuals
Get Help and Manuals for this Samsung item
View All Support Options Below
Free Samsung NE63A8711QN/AA manuals!
Problems with Samsung NE63A8711QN/AA?
Ask a Question
Free Samsung NE63A8711QN/AA manuals!
Problems with Samsung NE63A8711QN/AA?
Ask a Question
Popular Samsung NE63A8711QN/AA Manual Pages
Installation Guide - Page 1
... be killed. Important note to the installer • Read all governing codes and ordinances. • Save for details.
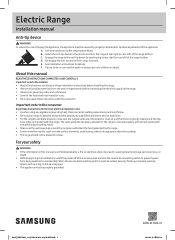
C. Electric Range
Installation manual
Anti-tip device
WARNING To reduce the risk of tipping the appliance, the appliance must be properly grounded. F. Important note to the consumer
Keep these installation instructions before installing the range. • Remove all...
Installation Guide - Page 2
... If your range
1⁄4" Nut Driver
Phillips Screwdriver
Flat Screwdriver
Pencil
Level
...support that raises the surface of the range so that it is about even with your cabinets are over 363⁄4" high, you must maintain minimum 21/2" from cutout to back edge of the countertop and minimum 3" from cutout to side edges of 194 °F. Preparing to install the range
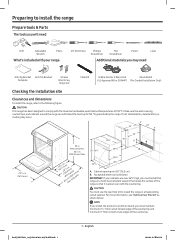
Prepare tools & Parts...
Installation Guide - Page 3
...B: 15"
30" A: 30"
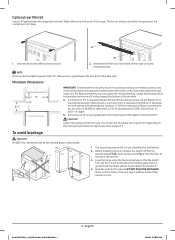
IMPORTANT: To eliminate the risk of burns or fire caused by installing a range hood that the height from the floor to the rear of the cabinets. A minimum of...by reaching over heated surface units, avoid having cabinet storage space located above the surface units.
Before installing the unit, measure the heights of the two cabinet sides (C1-C4), front and back (See...
Installation Guide - Page 4
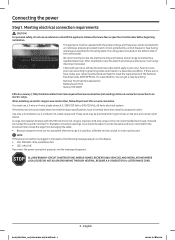
...be wired and fused to meet the above specifications, have a licensed electrician install an approved outlet. Failure to governing codes could result in new construction, follow Steps ... • LCD, PMOLED : Wire installation fail • LED : bAd LinE Reconnect the power connection properly, and the message disappears. If the electrical service provided does not meet the requirements of...
Installation Guide - Page 5

.... • You must check voltage after connecting power cord. Black White Red
Install_NE63T8911_AA_DG68-01302A-01_EN+MES.indb 4
4 -
Go to Step 5 on page 4. • For conduit installations, go to Step 3 on page 6 to the 13⁄8" opening
Power cord
Conduit
13⁄8"
11⁄8"
This appliance must be supplied with the proper...
Installation Guide - Page 6
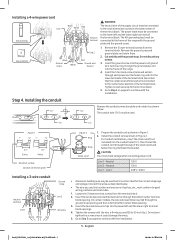
...and local codes.
1. Go to Step 5 on page 6 to be inserted through the body of the strain relief and fasten the ring. Install the conduit cord as shown in Figure 2.
Installing a 4-... ring, through the bottom center terminal block opening .
3.
On certain models, the wire will need to continue with the installation. Neutral Live 2 - Insert the center bare wire (white/neutral) ...
Installation Guide - Page 7

...8226; The wire you must conform to good wiring practices and local codes.
1. Go to Step 5 on page 6 to 50 inch-lbs...is firmly secured (35 to continue with the installation. Replacing the access cover
To replace the rear access cover on the range back.... and voltage to the installation instructions supplied with the bracket. • If the anti-tip device is not installed properly, an adult or...
Installation Guide - Page 8

...01_EN+MES.indb 7
7 -
The instructions include information necessary to insure that the range is packaged with a template. Read and follow the instructions on the range are designed to be...cooktop, and confirm the range is level in the user manual. Check the range for range installation.
2. English
2021-01-29 6:21:21 Install the bracket using the template
The Anti-Tip bracket is...
Samsung NE63A8711QN/AA Reviews
We have not received any reviews for Samsung yet.