
User Manual
Page 2
... card) tray (LTE models only) 26 Cellular data (LTE models only) 27 Fingerprint recognition 29 Memory card slot 32 External display 34 Wireless LAN 36 Bluetooth 38 Thunderbolt™ 4 Applications 40 Using applications 41 Samsung Settings 42 Samsung Security 45 Samsung Update 46 Online Support (S Service) 47 Samsung PC Cleaner 48 Screen Recorder 49 Quick Search 50 Samsung Flow 50 Samsung Studio Plus 51 Samsung Voice Note 51 Samsung Gallery Settings & Upgrade 52 Display brightness 54 Volume 55 BIOS (Setup utility) 61 Battery Troubleshooting 64 Samsung Recovery 69 Windows recovery function...
... card) tray (LTE models only) 26 Cellular data (LTE models only) 27 Fingerprint recognition 29 Memory card slot 32 External display 34 Wireless LAN 36 Bluetooth 38 Thunderbolt™ 4 Applications 40 Using applications 41 Samsung Settings 42 Samsung Security 45 Samsung Update 46 Online Support (S Service) 47 Samsung PC Cleaner 48 Screen Recorder 49 Quick Search 50 Samsung Flow 50 Samsung Studio Plus 51 Samsung Voice Note 51 Samsung Gallery Settings & Upgrade 52 Display brightness 54 Volume 55 BIOS (Setup utility) 61 Battery Troubleshooting 64 Samsung Recovery 69 Windows recovery function...
User Manual
Page 3
... read this manual before using the touchpad, mouse and touch screen. Available features and additional services may vary depending on the computer or operating system. • This user manual describes procedures for models with the computer may vary depending on the computer's default settings and the Windows 10 operating system. Note that the computer environment referred to the Samsung website, www.samsung.com. 3 Getting started About this manual may...
... read this manual before using the touchpad, mouse and touch screen. Available features and additional services may vary depending on the computer or operating system. • This user manual describes procedures for models with the computer may vary depending on the computer's default settings and the Windows 10 operating system. Note that the computer environment referred to the Samsung website, www.samsung.com. 3 Getting started About this manual may...
User Manual
Page 4
... to carry out an instruction. No part of the computer's functions. 4 Getting started Instructional icons and expressions Warning: situations that could cause injury to yourself or others Caution: situations that you should select Settings and then Devices. Computer specifications or the contents of this manual may be changed without prior notice due to an upgrade of this manual may be reproduced, distributed...
... to carry out an instruction. No part of the computer's functions. 4 Getting started Instructional icons and expressions Warning: situations that could cause injury to yourself or others Caution: situations that you should select Settings and then Devices. Computer specifications or the contents of this manual may be changed without prior notice due to an upgrade of this manual may be reproduced, distributed...
User Manual
Page 11
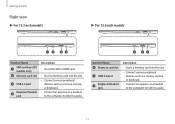
Getting started Right view ► For 13.3 inch models ► For 15.6 inch models 12 34 Number/Name SIM card tray (LTE models only) Memory card slot USB 3.2 port Earpiece/Headset jack Description • Insert the SIM or USIM card. • Insert a memory card into the slot. • Connect various peripheral devices, such as a mouse, camera, or keyboard. • Connect an earpiece or a headset to the computer to listen to audio. 1 23 Number/Name Memory card slot USB 3.2 port Earpiece...
Getting started Right view ► For 13.3 inch models ► For 15.6 inch models 12 34 Number/Name SIM card tray (LTE models only) Memory card slot USB 3.2 port Earpiece/Headset jack Description • Insert the SIM or USIM card. • Insert a memory card into the slot. • Connect various peripheral devices, such as a mouse, camera, or keyboard. • Connect an earpiece or a headset to the computer to listen to audio. 1 23 Number/Name Memory card slot USB 3.2 port Earpiece...
User Manual
Page 12
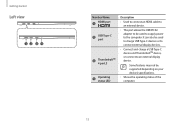
... used to supply power to an external display device. Getting started Left view 12 34 Number/Name HDMI port USB Type-C port Thunderbolt™ 4 port Operating status LED Description • Used to connect an HDMI cable to an external device. • This port allows the USB PD AC adapter to be used to charge USB Type-C devices or to connect external display devices. • Connect and charge a USB Type-C device and Thunderbolt™ device, or connect to the computer. Some features may not be supported depending on your device's specifications. • Shows the operating...
... used to supply power to an external display device. Getting started Left view 12 34 Number/Name HDMI port USB Type-C port Thunderbolt™ 4 port Operating status LED Description • Used to connect an HDMI cable to an external device. • This port allows the USB PD AC adapter to be used to charge USB Type-C devices or to connect external display devices. • Connect and charge a USB Type-C device and Thunderbolt™ device, or connect to the computer. Some features may not be supported depending on your device's specifications. • Shows the operating...

User Manual
Page 13
... mode or is powered by connecting it to the computer. • It may take longer to charge the battery when charging a connected device. • The battery power level may be reduced when charging a connected device while the computer is turned off, connect to use it as the auxiliary power or charge the computer. Use an external power supply (sold separately) to the USB Type-C port or Thunderbolt™ 4 port to the USB Type-C port or Thunderbolt™ 4 port. 13 Charging a USB Type-C device...
... mode or is powered by connecting it to the computer. • It may take longer to charge the battery when charging a connected device. • The battery power level may be reduced when charging a connected device while the computer is turned off, connect to use it as the auxiliary power or charge the computer. Use an external power supply (sold separately) to the USB Type-C port or Thunderbolt™ 4 port to the USB Type-C port or Thunderbolt™ 4 port. 13 Charging a USB Type-C device...
User Manual
Page 14
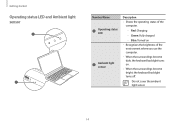
Getting started Operating status LED and Ambient light sensor 2 1 Number/Name Operating status LED Ambient light sensor Description • Shows the operating status of the environment where you use the computer. • When the surroundings become bright, the keyboard backlight turns off. Green: Fully charged - Do not cover the ambient light sensor. 14 Blue: Turned on . • When the surroundings become dark, the keyboard backlight turns on • Recognizes the brightness of the computer. - Red: Charging -
Getting started Operating status LED and Ambient light sensor 2 1 Number/Name Operating status LED Ambient light sensor Description • Shows the operating status of the environment where you use the computer. • When the surroundings become bright, the keyboard backlight turns off. Green: Fully charged - Do not cover the ambient light sensor. 14 Blue: Turned on . • When the surroundings become dark, the keyboard backlight turns on • Recognizes the brightness of the computer. - Red: Charging -
User Manual
Page 15
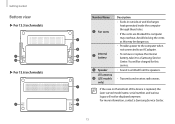
... models 3 Number/Name Description • Sucks in outside air and discharges heat generated inside the computer Fan vents through these holes. • If the vents are blocked the computer may be dangerous. • Provides power to the computer when 2 not connected to a Samsung Service 4 Center. Internal • To remove or replace the internal 3 battery battery, take it to an AC adapter. LTE antenna (LTE models...
... models 3 Number/Name Description • Sucks in outside air and discharges heat generated inside the computer Fan vents through these holes. • If the vents are blocked the computer may be dangerous. • Provides power to the computer when 2 not connected to a Samsung Service 4 Center. Internal • To remove or replace the internal 3 battery battery, take it to an AC adapter. LTE antenna (LTE models...

User Manual
Page 19
... an option you can also configure the settings from the Control Panel like previous OS versions. You can select wireless network options or adjust the volume and screen brightness via quick actions in the action center by selecting the Start button System → Notifications & actions. • Select Expand or Collapse to expand or minimize the action center menu and select the feature you to use. 19 For...
... an option you can also configure the settings from the Control Panel like previous OS versions. You can select wireless network options or adjust the volume and screen brightness via quick actions in the action center by selecting the Start button System → Notifications & actions. • Select Expand or Collapse to expand or minimize the action center menu and select the feature you to use. 19 For...
User Manual
Page 21
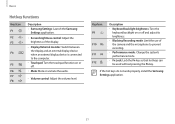
...; Volume control: Adjust the volume level. If the hot keys do not work properly, install the Samsung Settings application. 21 Key/Icon F9 F10 F11 F12 Description • Keyboard backlight brightness: Turn the keyboard backlight on or off and adjust its brightness. • Blocking Recording mode: Limit the use of the display. • Display/External monitor: Switch between the display and an external display device when an external display device is connected to prevent recording. • Performance mode: Change the system's performance mode. • Fn Lock: Lock...
...; Volume control: Adjust the volume level. If the hot keys do not work properly, install the Samsung Settings application. 21 Key/Icon F9 F10 F11 F12 Description • Keyboard backlight brightness: Turn the keyboard backlight on or off and adjust its brightness. • Blocking Recording mode: Limit the use of the display. • Display/External monitor: Switch between the display and an external display device when an external display device is connected to prevent recording. • Performance mode: Change the system's performance mode. • Fn Lock: Lock...
User Manual
Page 27
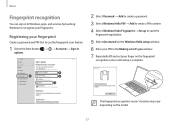
... the Start button Accounts → Sign-in options. 2 Select Password → Add to create a password. 3 Select Windows Hello PIN → Add to create a PIN number. 4 Select Windows Hello Fingerprint → Set up to start the fingerprint registration. 5 Select Get started on the Windows Hello setup window. 6 Enter your PIN in to Windows, apps, and services by teaching Windows to recognize your finger on the model. 27 The fingerprint recognition sensor's location may...
... the Start button Accounts → Sign-in options. 2 Select Password → Add to create a password. 3 Select Windows Hello PIN → Add to create a PIN number. 4 Select Windows Hello Fingerprint → Set up to start the fingerprint registration. 5 Select Get started on the Windows Hello setup window. 6 Enter your PIN in to Windows, apps, and services by teaching Windows to recognize your finger on the model. 27 The fingerprint recognition sensor's location may...
User Manual
Page 33
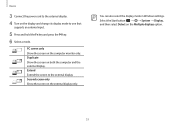
... Windows settings. Second screen only Show the screen on both the computer and the external display. Extend Extend the screen to one that supports an external input. 5 Press and hold the Fn key and press the F4 key. 6 Select a mode. PC screen only Show the screen on the Multiple displays option. 33 Select the Start button System → Display, and then select Detect on the computer monitor only. Basics 3 Connect the power...
... Windows settings. Second screen only Show the screen on both the computer and the external display. Extend Extend the screen to one that supports an external input. 5 Press and hold the Fn key and press the F4 key. 6 Select a mode. PC screen only Show the screen on the Multiple displays option. 33 Select the Start button System → Display, and then select Detect on the computer monitor only. Basics 3 Connect the power...
User Manual
Page 38
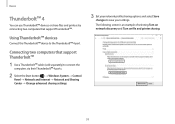
... use Thunderbolt™ devices or share files and printers by connecting two computers that support Thunderbolt™ 1 Use a Thunderbolt™ cable (sold separately) to connect the computers via their Thunderbolt™ 4 ports. 2 Select the Start button ( ) → Windows System → Control Panel → Network and Internet → Network and Sharing Center → Change advanced sharing settings. 3 Set your network profile sharing options and select Save changes to the Thunderbolt™ 4 port. Using Thunderbolt™ devices Connect...
... use Thunderbolt™ devices or share files and printers by connecting two computers that support Thunderbolt™ 1 Use a Thunderbolt™ cable (sold separately) to connect the computers via their Thunderbolt™ 4 ports. 2 Select the Start button ( ) → Windows System → Control Panel → Network and Internet → Network and Sharing Center → Change advanced sharing settings. 3 Set your network profile sharing options and select Save changes to the Thunderbolt™ 4 port. Using Thunderbolt™ devices Connect...
User Manual
Page 40
Applications Using applications • Images and features may differ depending on the model and the application version. • Some applications may not work depending on the model. • Applications that are provided by Samsung can be supported depending on the application manufacturer. 40 Some troubleshooting actions in response to service requests may not be installed from Samsung Update. • Third-party software related services For descriptions about and service requests for third-party applications, please contact the relevant manufacturer.
Applications Using applications • Images and features may differ depending on the model and the application version. • Some applications may not work depending on the model. • Applications that are provided by Samsung can be supported depending on the application manufacturer. 40 Some troubleshooting actions in response to service requests may not be installed from Samsung Update. • Third-party software related services For descriptions about and service requests for third-party applications, please contact the relevant manufacturer.
User Manual
Page 45
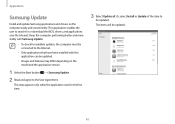
... be connected to the Internet. • Only applications that have been installed with this application can be updated. • Images and features may differ depending on the computer easily and conveniently. Applications Samsung Update Install and update Samsung applications and drivers on the model and the application version. 1 Select the Start button ( ) → Samsung Update. 2 Read and agree to the User Agreement. This application enables the user to...
... be connected to the Internet. • Only applications that have been installed with this application can be updated. • Images and features may differ depending on the computer easily and conveniently. Applications Samsung Update Install and update Samsung applications and drivers on the model and the application version. 1 Select the Start button ( ) → Samsung Update. 2 Read and agree to the User Agreement. This application enables the user to...
User Manual
Page 56
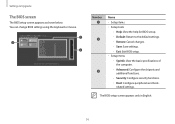
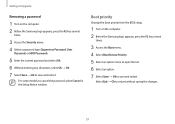
...Restore: Cancel changes. - Exit: Exit BIOS setup. • Setup menu - Security: Configure security functions. - The BIOS setup screen appears only in English. 56 Number Name • Setup items • Setup tools - Save: Save settings. - Boot: Configure peripherals and boot- You can change BIOS settings using the keyboard or mouse. Default: Return to the default settings. - related settings. Advanced: Configure the chipsets and additional functions. - SysInfo: View the basic specifications of the computer. - Settings & Upgrade The BIOS screen The BIOS setup screen...
...Restore: Cancel changes. - Exit: Exit BIOS setup. • Setup menu - Security: Configure security functions. - The BIOS setup screen appears only in English. 56 Number Name • Setup items • Setup tools - Save: Save settings. - Boot: Configure peripherals and boot- You can change BIOS settings using the keyboard or mouse. Default: Return to the default settings. - related settings. Advanced: Configure the chipsets and additional functions. - SysInfo: View the basic specifications of the computer. - Settings & Upgrade The BIOS screen The BIOS setup screen...
User Manual
Page 59
Settings & Upgrade Removing a password 1 Turn on the computer. 2 Before the Samsung logo appears, press the F2 key several times. 3 Access the Security menu. 4 Select a password type (Supervisor Password, User Password, or HDD Password). 5 Enter the current password and select Ok. 6 Without entering any characters, select Ok → Ok. 7 Select Save → Ok to save and restart. For some models, to restart without saving the changes. 59 Select Exit → Ok to cancel...
Settings & Upgrade Removing a password 1 Turn on the computer. 2 Before the Samsung logo appears, press the F2 key several times. 3 Access the Security menu. 4 Select a password type (Supervisor Password, User Password, or HDD Password). 5 Enter the current password and select Ok. 6 Without entering any characters, select Ok → Ok. 7 Select Save → Ok to save and restart. For some models, to restart without saving the changes. 59 Select Exit → Ok to cancel...
User Manual
Page 88
... if the CMOS battery is a danger of batteries according to avoid spills is turned off, a small amount of the casing are clear at all power cables, remove the battery and modem cables from surrounding light and bright surfaces. Do not place the computer on a soft surface, doing so will block the bottom vents. • When using an extension cord with this system, make sure...
... if the CMOS battery is a danger of batteries according to avoid spills is turned off, a small amount of the casing are clear at all power cables, remove the battery and modem cables from surrounding light and bright surfaces. Do not place the computer on a soft surface, doing so will block the bottom vents. • When using an extension cord with this system, make sure...
User Manual
Page 89
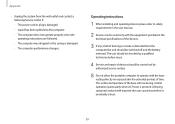
... be used only with the base resting directly on exposed skin for extended periods of time. Operating instructions 1 When installing and operating devices please refer to operate with the equipment specified in the technical specifications of the devices. 3 If any smell of the base will rise during normal operation (particularly when AC Power is detected from the wall outlet and contact a Samsung Service...
... be used only with the base resting directly on exposed skin for extended periods of time. Operating instructions 1 When installing and operating devices please refer to operate with the equipment specified in the technical specifications of the devices. 3 If any smell of the base will rise during normal operation (particularly when AC Power is detected from the wall outlet and contact a Samsung Service...
User Manual
Page 105
www.samsung.com English. 04/2021. Some content may differ from the computer depending on the region, service provider, software version, or computer model, and is subject to change without prior notice. Rev. 1.1
www.samsung.com English. 04/2021. Some content may differ from the computer depending on the region, service provider, software version, or computer model, and is subject to change without prior notice. Rev. 1.1

