
User Manual
Page 2
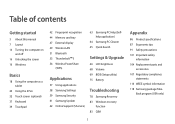
... as a tablet 20 Using the S Pen 32 Touch screen (optional) 37 Keyboard 39 Touchpad 42 Fingerprint recognition 44 Memory card tray 47 External display 49 Wireless LAN 51 Bluetooth 53 Thunderbolt™ 3 54 Wireless PowerShare (WPS) Applications 57 Using applications 58 Samsung Settings 59 Samsung Security 61 Samsung Update 62 Online Support (S Service) 63 Samsung PC Help (Selfhelp application) 64 Samsung PC Cleaner 65 Quick Search Settings & Upgrade 66 LCD brightness 68 Volume 69 BIOS (Setup utility) 75 Battery Troubleshooting 78 Samsung Recovery 83 Windows recovery function 83 Q&A Appendix...
... as a tablet 20 Using the S Pen 32 Touch screen (optional) 37 Keyboard 39 Touchpad 42 Fingerprint recognition 44 Memory card tray 47 External display 49 Wireless LAN 51 Bluetooth 53 Thunderbolt™ 3 54 Wireless PowerShare (WPS) Applications 57 Using applications 58 Samsung Settings 59 Samsung Security 61 Samsung Update 62 Online Support (S Service) 63 Samsung PC Help (Selfhelp application) 64 Samsung PC Cleaner 65 Quick Search Settings & Upgrade 66 LCD brightness 68 Volume 69 BIOS (Setup utility) 75 Battery Troubleshooting 78 Samsung Recovery 83 Windows recovery function 83 Q&A Appendix...
User Manual
Page 3
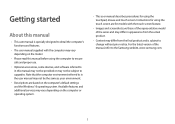
... read this manual before using the touchpad, mouse and touch screen. Instructions for using the touch screen are those of the representative model of the manual, refer to the Samsung website, www.samsung.com. 3 For the latest version of the series and may differ in this manual may not be provided or may not be subject to upgrades. Getting started About this manual • This user manual is subject to change without...
... read this manual before using the touchpad, mouse and touch screen. Instructions for using the touch screen are those of the representative model of the manual, refer to the Samsung website, www.samsung.com. 3 For the latest version of the series and may differ in this manual may not be provided or may not be subject to upgrades. Getting started About this manual • This user manual is subject to change without...

User Manual
Page 4
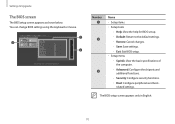
Copyright Copyright © 2020 Samsung Electronics This manual is protected under international copyright laws. Computer specifications or the contents of the computer's functions. 4 Select Click the mouse or tap the touchpad or touch screen. Getting started Instructional icons and expressions Warning: ...instruction. For example, "select Settings → Devices" indicates that could cause injury to yourself or others Caution: situations that you should select Settings and then Devices. No part of this manual may be changed without prior notice due to an upgrade of this manual...
Copyright Copyright © 2020 Samsung Electronics This manual is protected under international copyright laws. Computer specifications or the contents of the computer's functions. 4 Select Click the mouse or tap the touchpad or touch screen. Getting started Instructional icons and expressions Warning: ...instruction. For example, "select Settings → Devices" indicates that could cause injury to yourself or others Caution: situations that you should select Settings and then Devices. No part of this manual may be changed without prior notice due to an upgrade of this manual...
User Manual
Page 9
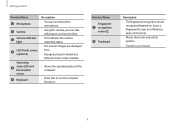
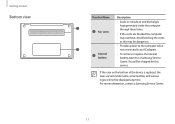
... and record video. • This indicates the camera operating status. • The screen's images are displayed here. • Recognizes touch interactions (Only for touch screen models). • Shows the operating status of the computer. • Enter text or control computer functions. Number/Name Fingerprint recognition sensor Touchpad Description • The fingerprint recognition sensor recognizes fingerprints. Getting started Number/Name Microphone Camera Camera indicator light LCD/Touch screen (optional) Operating status LED and Illumination sensor Keyboard Description •...
... and record video. • This indicates the camera operating status. • The screen's images are displayed here. • Recognizes touch interactions (Only for touch screen models). • Shows the operating status of the computer. • Enter text or control computer functions. Number/Name Fingerprint recognition sensor Touchpad Description • The fingerprint recognition sensor recognizes fingerprints. Getting started Number/Name Microphone Camera Camera indicator light LCD/Touch screen (optional) Operating status LED and Illumination sensor Keyboard Description •...
User Manual
Page 11
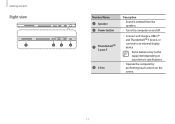
Some features may not be supported depending on your device's specifications. • Operate the computer by performing touch actions on and off. • Connect and charge a USB-C® and Thunderbolt™ 3 device, or connect to an external display device. Getting started Right view 1 2 3 4 Number/Name Speaker Power button Thunderbolt™ 3 port S Pen Description • Sound is emitted from the speakers. • Turns the computer on the screen. 11
Some features may not be supported depending on your device's specifications. • Operate the computer by performing touch actions on and off. • Connect and charge a USB-C® and Thunderbolt™ 3 device, or connect to an external display device. Getting started Right view 1 2 3 4 Number/Name Speaker Power button Thunderbolt™ 3 port S Pen Description • Sound is emitted from the speakers. • Turns the computer on the screen. 11

User Manual
Page 12
... the USB-C® port or Thunderbolt™ 3 port to use it as the auxiliary power or charge the computer. Getting started Left view 12 3 4 Number/Name Earpiece/Headset jack USB-C® port Memory card tray Speaker Description • Connect an earpiece or a headset to the computer to listen to audio. • This port allows the USB PD AC adapter to be used to charge USB-C® devices or to connect external display devices. • Insert a memory card. • Sound...
... the USB-C® port or Thunderbolt™ 3 port to use it as the auxiliary power or charge the computer. Getting started Left view 12 3 4 Number/Name Earpiece/Headset jack USB-C® port Memory card tray Speaker Description • Connect an earpiece or a headset to the computer to listen to audio. • This port allows the USB PD AC adapter to be used to charge USB-C® devices or to connect external display devices. • Insert a memory card. • Sound...
User Manual
Page 13
... connected to a Samsung Service Center. You will not be charged for this may overheat. Internal battery • To remove or replace the internal battery, take it to an AC adapter. For more information, contact a Samsung Service Center. 13 Avoid blocking the vents as this service. If the case on the bottom of the device is replaced, the laser-carved model name, serial number, and various logos will be displayed anymore...
... connected to a Samsung Service Center. You will not be charged for this may overheat. Internal battery • To remove or replace the internal battery, take it to an AC adapter. For more information, contact a Samsung Service Center. 13 Avoid blocking the vents as this service. If the case on the bottom of the device is replaced, the laser-carved model name, serial number, and various logos will be displayed anymore...
User Manual
Page 17
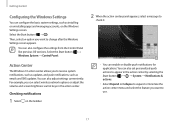
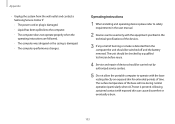
You can also adjust settings conveniently. Action Center The Windows 10 action center allows you want to use. 17 You can also set personalized quick actions to appear in the action center. Select the Start button ( ) → . Then, select an option you can select wireless network options or adjust the volume and screen brightness via hot keys in the action center by selecting the Start button System → Notifications & actions. •...
You can also adjust settings conveniently. Action Center The Windows 10 action center allows you want to use. 17 You can also set personalized quick actions to appear in the action center. Select the Start button ( ) → . Then, select an option you can select wireless network options or adjust the volume and screen brightness via hot keys in the action center by selecting the Start button System → Notifications & actions. •...
User Manual
Page 26
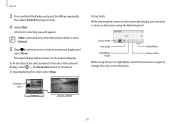
... the Fn key and press the F4 key repeatedly, then select Extend for selecting area will be shown on the screen using the pen or highlighter, select the desired icon again to change the color or line thickness. Using tools While showing the screen on the connected display, you can write or draw on the external display. A frame for project mode. 4 Select Start.
... the Fn key and press the F4 key repeatedly, then select Extend for selecting area will be shown on the screen using the pen or highlighter, select the desired icon again to change the color or line thickness. Using tools While showing the screen on the connected display, you can write or draw on the external display. A frame for project mode. 4 Select Start.
User Manual
Page 38
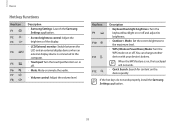
...; WPS (Wireless PowerShare) Mode: Turn the WPS mode on or off . • Mute: Mute or unmute the audio. • Volume control: Adjust the volume level. Basics Hot key functions Key/Icon F1 F2 F3 F4 F5 F6 F7 F8 Description • Samsung Settings: Launch the Samsung Settings application. • Screen brightness control: Adjust the brightness of the display. • LCD/External monitor: Switch between the LCD and an external display device when an external display device is on, the touchpad will not work properly, install the Samsung Settings application...
...; WPS (Wireless PowerShare) Mode: Turn the WPS mode on or off . • Mute: Mute or unmute the audio. • Volume control: Adjust the volume level. Basics Hot key functions Key/Icon F1 F2 F3 F4 F5 F6 F7 F8 Description • Samsung Settings: Launch the Samsung Settings application. • Screen brightness control: Adjust the brightness of the display. • LCD/External monitor: Switch between the LCD and an external display device when an external display device is on, the touchpad will not work properly, install the Samsung Settings application...
User Manual
Page 42
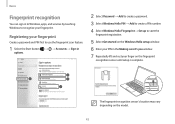
... services by teaching Windows to start the fingerprint registration. 5 Select Get started on the Windows Hello setup window. 6 Enter your PIN in options. 2 Select Password → Add to create a password. 3 Select Windows Hello PIN → Add to create a PIN number. 4 Select Windows Hello Fingerprint → Set up to recognize your finger on the model. 42 Registering your fingerprint Create a password and PIN first to use the fingerprint scan feature. 1 Select the Start button...
... services by teaching Windows to start the fingerprint registration. 5 Select Get started on the Windows Hello setup window. 6 Enter your PIN in options. 2 Select Password → Add to create a password. 3 Select Windows Hello PIN → Add to create a PIN number. 4 Select Windows Hello Fingerprint → Set up to recognize your finger on the model. 42 Registering your fingerprint Create a password and PIN first to use the fingerprint scan feature. 1 Select the Start button...
User Manual
Page 50
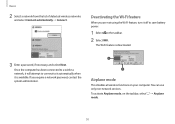
..., turn it is deactivated. 3 Enter a password, if necessary, and select Next. To activate Airplane mode, on your computer. Once the computer has been connected to a wireless network, it will attempt to connect to it automatically when it off to save battery power. 1 Select on the taskbar. 2 Select WiFi. Airplane mode This disables all wireless functions on the taskbar, select → Airplane mode. 50 You can use only non-network services...
..., turn it is deactivated. 3 Enter a password, if necessary, and select Next. To activate Airplane mode, on your computer. Once the computer has been connected to a wireless network, it will attempt to connect to it automatically when it off to save battery power. 1 Select on the taskbar. 2 Select WiFi. Airplane mode This disables all wireless functions on the taskbar, select → Airplane mode. 50 You can use only non-network services...
User Manual
Page 53
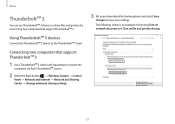
... computers that support Thunderbolt™ 3 1 Use a Thunderbolt™ 3 cable (sold separately) to connect the computers via their Thunderbolt™ 3 ports. 2 Select the Start button ( ) → Windows System → Control Panel → Network and Internet → Network and Sharing Center → Change advanced sharing settings. 3 Set your settings. The following screen is an example of selecting Turn on network discovery and Turn on file and printer sharing. 53 Using Thunderbolt™ 3 devices Connect the Thunderbolt...
... computers that support Thunderbolt™ 3 1 Use a Thunderbolt™ 3 cable (sold separately) to connect the computers via their Thunderbolt™ 3 ports. 2 Select the Start button ( ) → Windows System → Control Panel → Network and Internet → Network and Sharing Center → Change advanced sharing settings. 3 Set your settings. The following screen is an example of selecting Turn on network discovery and Turn on file and printer sharing. 53 Using Thunderbolt™ 3 devices Connect the Thunderbolt...

User Manual
Page 57
Some troubleshooting actions in response to service requests may not be supported depending on the application manufacturer. 57 Applications Using applications • Images and features may differ depending on the model and the application version. • Some applications may not work depending on the model. • Applications that are provided by Samsung can be installed from Samsung Update. • Third-party software related services For descriptions about and service requests for third-party applications, please contact the relevant manufacturer.
Some troubleshooting actions in response to service requests may not be supported depending on the application manufacturer. 57 Applications Using applications • Images and features may differ depending on the model and the application version. • Some applications may not work depending on the model. • Applications that are provided by Samsung can be installed from Samsung Update. • Third-party software related services For descriptions about and service requests for third-party applications, please contact the relevant manufacturer.
User Manual
Page 61
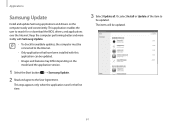
... the computer easily and conveniently. This application enables the user to the User Agreement. This step appears only when the application runs for or download the BIOS, drivers, and applications over the Internet. The items will be updated. 61 Applications Samsung Update Install and update Samsung applications and drivers on the model and the application version. 1 Select the Start button ( ) → Samsung Update. 2 Read and agree to search for...
... the computer easily and conveniently. This application enables the user to the User Agreement. This step appears only when the application runs for or download the BIOS, drivers, and applications over the Internet. The items will be updated. 61 Applications Samsung Update Install and update Samsung applications and drivers on the model and the application version. 1 Select the Start button ( ) → Samsung Update. 2 Read and agree to search for...
User Manual
Page 70
... change BIOS settings using the keyboard or mouse. The BIOS setup screen appears only in English. 70 Number Name • Setup items • Setup tools - -Help: View the help for BIOS set up. - -Default: Return to the default settings. - -Restore: Cancel changes. - -Save: Save settings. - -Exit: Exit BIOS setup. • Setup menu - -SysInfo: View the basic specifications of the computer. - -Advanced: Configure the chipsets and additional functions. - -Security: Configure security functions. - -Boot: Configure peripherals and boot- Settings & Upgrade The BIOS screen The BIOS setup...
... change BIOS settings using the keyboard or mouse. The BIOS setup screen appears only in English. 70 Number Name • Setup items • Setup tools - -Help: View the help for BIOS set up. - -Default: Return to the default settings. - -Restore: Cancel changes. - -Save: Save settings. - -Exit: Exit BIOS setup. • Setup menu - -SysInfo: View the basic specifications of the computer. - -Advanced: Configure the chipsets and additional functions. - -Security: Configure security functions. - -Boot: Configure peripherals and boot- Settings & Upgrade The BIOS screen The BIOS setup...

User Manual
Page 73
... BIOS setup. 1 Turn on the computer. 2 Before the Samsung logo appears, press the F2 key several times. 3 Access the Boot menu. 4 Select Boot Device Priority. 5 Select an option menu to open the list. 6 Select an option. 7 Select Save → Ok to restart without saving the changes. 73 Settings & Upgrade Removing a password 1 Turn on the computer. 2 Before the Samsung logo appears, press the F2 key several times. 3 Access the Security menu. 4 Select a password type (Supervisor Password, User Password, or HDD Password). 5 Enter the current password...
... BIOS setup. 1 Turn on the computer. 2 Before the Samsung logo appears, press the F2 key several times. 3 Access the Boot menu. 4 Select Boot Device Priority. 5 Select an option menu to open the list. 6 Select an option. 7 Select Save → Ok to restart without saving the changes. 73 Settings & Upgrade Removing a password 1 Turn on the computer. 2 Before the Samsung logo appears, press the F2 key several times. 3 Access the Security menu. 4 Select a password type (Supervisor Password, User Password, or HDD Password). 5 Enter the current password...
User Manual
Page 102
... system, make sure that a qualified technician performs the task. • When the computer is turned off, a small amount of electrical current still flows through the computer. Appendix • Ensure that the fan vents on the bottom of the casing are clear at all power cables, remove the battery and modem cables from surrounding light and bright surfaces. If the CMOS battery requires replacement ensure...
... system, make sure that a qualified technician performs the task. • When the computer is turned off, a small amount of electrical current still flows through the computer. Appendix • Ensure that the fan vents on the bottom of the casing are clear at all power cables, remove the battery and modem cables from surrounding light and bright surfaces. If the CMOS battery requires replacement ensure...
User Manual
Page 103
... the battery removed. Operating instructions 1 When installing and operating devices please refer to safety requirements in the technical specifications of the devices. 3 If any smell of the base will rise during normal operation (particularly when AC Power is present). The unit should be checked by authorized service centers. 5 Do not allow the portable computer to operate with the equipment specified in the user manual. 2 Devices can...
... the battery removed. Operating instructions 1 When installing and operating devices please refer to safety requirements in the technical specifications of the devices. 3 If any smell of the base will rise during normal operation (particularly when AC Power is present). The unit should be checked by authorized service centers. 5 Do not allow the portable computer to operate with the equipment specified in the user manual. 2 Devices can...
User Manual
Page 119
Rev. 1.2 www.samsung.com English. 03/2020. Some content may differ from the computer depending on the region, service provider, software version, or computer model, and is subject to change without prior notice.
Rev. 1.2 www.samsung.com English. 03/2020. Some content may differ from the computer depending on the region, service provider, software version, or computer model, and is subject to change without prior notice.


