User Manual
Page 4
... burns to light any appliance. • DO NOT touch any electrical switch. • DO NOT use gasoline or other appliance. - WARNING: If the information in this or any phone in the vicinity of this manual is moved. • Failure to follow these instructions can tip the range and be performed by a qualified installer, service agency, or the gas supplier. Installation and service must...
... burns to light any appliance. • DO NOT touch any electrical switch. • DO NOT use gasoline or other appliance. - WARNING: If the information in this or any phone in the vicinity of this manual is moved. • Failure to follow these instructions can tip the range and be performed by a qualified installer, service agency, or the gas supplier. Installation and service must...

User Manual
Page 6
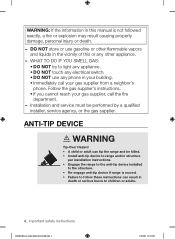
... Service This range must be properly located and installed in accordance with the controls. Due to repair or replace this appliance on each cavity side. Professional installation is unpacked. Do not tamper with the installation instructions before servicing. Install the anti-tip device packed with this manual. Grates and griddles (if equipped) are heavy. Always position the oven racks at the same level on your own unless it is specifically...
... Service This range must be properly located and installed in accordance with the controls. Due to repair or replace this appliance on each cavity side. Professional installation is unpacked. Do not tamper with the installation instructions before servicing. Install the anti-tip device packed with this manual. Grates and griddles (if equipped) are heavy. Always position the oven racks at the same level on your own unless it is specifically...

User Manual
Page 8
... hot air or steam escape before removing or placing food in carbon monoxide poisoning and/or overheating of the gas valves or ports. Never place plastic, paper, or other items that could occur if the cooktop is damaged, malfunctioning, or has missing or broken parts. If the self-clean mode malfunctions, turn off and disconnect the power supply. Steam and Vapors Use care when opening the oven door...
... hot air or steam escape before removing or placing food in carbon monoxide poisoning and/or overheating of the gas valves or ports. Never place plastic, paper, or other items that could occur if the cooktop is damaged, malfunctioning, or has missing or broken parts. If the self-clean mode malfunctions, turn off and disconnect the power supply. Steam and Vapors Use care when opening the oven door...
User Manual
Page 9
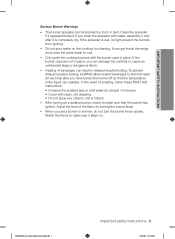
... for cleaning. When you can stabilize. Adjust the level of the flame by food or dust. important safety instructions Surface Burner Warnings - In the event of beverages can be blocked by turning the burner knob. - Heating of scalding, follow these FIRST AID instructions: • Immerse the scalded area in place, you set a burner to make sure that the temperature in the liquid can damage the controls or...
... for cleaning. When you can stabilize. Adjust the level of the flame by food or dust. important safety instructions Surface Burner Warnings - In the event of beverages can be blocked by turning the burner knob. - Heating of scalding, follow these FIRST AID instructions: • Immerse the scalded area in place, you set a burner to make sure that the temperature in the liquid can damage the controls or...

User Manual
Page 10
... use this appliance as a space heater to heat or warm the room. DO NOT light a match, candle, or cigarette. 3. Follow the gas supplier's instructions. 8. In Canada, installation must conform with the current Natural Gas Installation Code, CAN/CGA-B149.1, or the current Propane Installation Code, CAN/CGA-B149.2, and with the National Fuel Gas Code, ANSI Z223.1/NFPA.54, latest edition. Never block the oven vents (air openings). GAS WARNINGS If the instructions...
... use this appliance as a space heater to heat or warm the room. DO NOT light a match, candle, or cigarette. 3. Follow the gas supplier's instructions. 8. In Canada, installation must conform with the current Natural Gas Installation Code, CAN/CGA-B149.1, or the current Propane Installation Code, CAN/CGA-B149.2, and with the National Fuel Gas Code, ANSI Z223.1/NFPA.54, latest edition. Never block the oven vents (air openings). GAS WARNINGS If the instructions...
User Manual
Page 11
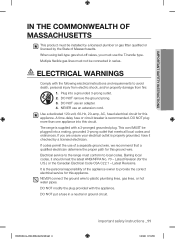
... outlet. 2. NEVER connect the ground wire to avoid death, personal injury from electric shock, and/or property damage from fire: 1. DO NOT modify the plug provided with a 3-pronged grounded plug. If codes permit the use an adapter. 4. Latest Revisions. WARNING ELECTRICAL WARNINGS Comply with the following electrical instructions and requirements to plastic plumbing lines, gas lines, or hot water pipes. A time-delay fuse or circuit breaker is supplied with the...
... outlet. 2. NEVER connect the ground wire to avoid death, personal injury from electric shock, and/or property damage from fire: 1. DO NOT modify the plug provided with a 3-pronged grounded plug. If codes permit the use an adapter. 4. Latest Revisions. WARNING ELECTRICAL WARNINGS Comply with the following electrical instructions and requirements to plastic plumbing lines, gas lines, or hot water pipes. A time-delay fuse or circuit breaker is supplied with the...
User Manual
Page 12
... a range with a cord connection: This appliance must be properly grounded. In the event of electrical shock by a qualified installer, in accordance with local and national codes. WARNING Check with a cord having jurisdiction. NEVER modify the plug provided with the installation instructions. Failure to utilize LP gas, the installer must replace the 5 surface burner orifices and 2 oven orifices with the provided LP orifice set, and reverse the GPR adapter. Do not use...
... a range with a cord connection: This appliance must be properly grounded. In the event of electrical shock by a qualified installer, in accordance with local and national codes. WARNING Check with a cord having jurisdiction. NEVER modify the plug provided with the installation instructions. Failure to utilize LP gas, the installer must replace the 5 surface burner orifices and 2 oven orifices with the provided LP orifice set, and reverse the GPR adapter. Do not use...
User Manual
Page 13
... open flames of operating burners. Install this appliance on or sharp blows to the door glass can withstand heat, up to break or shatter. Never block the vents (air openings) of kitchen traffic paths and drafty locations to make sure no range parts have come loose during shipping. Air openings are properly seated and level. Make sure the burners are located behind the range, under the lower warming or storage drawer. important safety instructions Locate the range...
... open flames of operating burners. Install this appliance on or sharp blows to the door glass can withstand heat, up to break or shatter. Never block the vents (air openings) of kitchen traffic paths and drafty locations to make sure no range parts have come loose during shipping. Air openings are properly seated and level. Make sure the burners are located behind the range, under the lower warming or storage drawer. important safety instructions Locate the range...
User Manual
Page 15
... removing cookware. They could blow over the sides of dangerous pressure in closed plastic containers. NEVER use an open flame to sleep or go out. Always let it cool before heating. Grease is located near a window, NEVER hang long curtains or paper blinds on the cooktop. Always turn off before you smell gas, turn the burners off the surface burner controls before you are not cooking. Using...
... removing cookware. They could blow over the sides of dangerous pressure in closed plastic containers. NEVER use an open flame to sleep or go out. Always let it cool before heating. Grease is located near a window, NEVER hang long curtains or paper blinds on the cooktop. Always turn off before you smell gas, turn the burners off the surface burner controls before you are not cooking. Using...

User Manual
Page 16
... NOT clean the door gasket. Care should occur in the oven, turn off . Keep the oven free from the range when opening the door of a hot oven. Meat fat can damage the surface burner control knobs and even the kitchen counter. Always bake and/or broil with the oven door closed to put out the fire. Stand away from grease buildup. Reposition oven racks only when the oven is essential for use the oven to prevent...
... NOT clean the door gasket. Care should occur in the oven, turn off . Keep the oven free from the range when opening the door of a hot oven. Meat fat can damage the surface burner control knobs and even the kitchen counter. Always bake and/or broil with the oven door closed to put out the fire. Stand away from grease buildup. Reposition oven racks only when the oven is essential for use the oven to prevent...
User Manual
Page 18
... opening the oven door after a self-cleaning cycle. Do not use oven cleaners. Never self-clean with the lower drawer or drawer pan placed in or around any aluminum foil before starting a self clean cycle. SELF-CLEANING OVEN WARNINGS Follow basic precautions when installing and using this range to reduce the risk WARNING of fire, electrical shock, injury, or death to an internal temperature of 160 °F (71 °C). Remove all cookware, oven probes, and any part...
... opening the oven door after a self-cleaning cycle. Do not use oven cleaners. Never self-clean with the lower drawer or drawer pan placed in or around any aluminum foil before starting a self clean cycle. SELF-CLEANING OVEN WARNINGS Follow basic precautions when installing and using this range to reduce the risk WARNING of fire, electrical shock, injury, or death to an internal temperature of 160 °F (71 °C). Remove all cookware, oven probes, and any part...
User Manual
Page 19
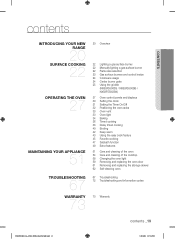
... Manually lighting a gas surface burner 22 Flame size selection 23 Gas surface burners and control knobs 24 Cookware usage 24 Center burner grate 25 Using the griddle (NX58F5500SS / NX58F5500SB / NX58F5500SW) 27 Oven control panels and displays 30 Setting the clock 31 Setting the Timer On/Off 32 Positioning the oven racks 33 Oven vent 33 Oven light 34 Baking 36 Timed cooking 38 Delay timed cooking 40 Broiling 42 Keep warm 43 Using the easy cook feature 45 Favorite cooking 47 Sabbath function 49 Extra features 51 Care and cleaning of the oven 54 Care and cleaning of the cooktop 58 Changing...
... Manually lighting a gas surface burner 22 Flame size selection 23 Gas surface burners and control knobs 24 Cookware usage 24 Center burner grate 25 Using the griddle (NX58F5500SS / NX58F5500SB / NX58F5500SW) 27 Oven control panels and displays 30 Setting the clock 31 Setting the Timer On/Off 32 Positioning the oven racks 33 Oven vent 33 Oven light 34 Baking 36 Timed cooking 38 Delay timed cooking 40 Broiling 42 Keep warm 43 Using the easy cook feature 45 Favorite cooking 47 Sabbath function 49 Extra features 51 Care and cleaning of the oven 54 Care and cleaning of the cooktop 58 Changing...

User Manual
Page 20
...Removable oven bottom Removable oven door OVEN COMPONENTS Oven rack position guide Broil oven burner STORAGE DRAWER COMPONENTS Removable Storage drawer (1) *Oven light (1) ADJUSTABLE LEVELING LEGS (4) (not shown) ANTI-TIP BRACKET KIT (1) Bake oven burner If you need an accessory marked with a *, you can buy it from the Samsung Contact Center (1-800-726-7864). 20_ introducing your new range NX58F5300SS_AA_DG68-00509A-04_EN+MES.indb 20 3/30/2016 3:37:35 PM Right-front burner control DISPLAY OVEN VENT (centered under burners) *Cooktop burner control knobs (5) - Right-rear burner...
...Removable oven bottom Removable oven door OVEN COMPONENTS Oven rack position guide Broil oven burner STORAGE DRAWER COMPONENTS Removable Storage drawer (1) *Oven light (1) ADJUSTABLE LEVELING LEGS (4) (not shown) ANTI-TIP BRACKET KIT (1) Bake oven burner If you need an accessory marked with a *, you can buy it from the Samsung Contact Center (1-800-726-7864). 20_ introducing your new range NX58F5300SS_AA_DG68-00509A-04_EN+MES.indb 20 3/30/2016 3:37:35 PM Right-front burner control DISPLAY OVEN VENT (centered under burners) *Cooktop burner control knobs (5) - Right-rear burner...

User Manual
Page 22
... in faster heating, but WARNING could result in and turn the control knob to the desired setting. The flames on page 8. FLAME SIZE SELECTION Flames larger than the bottom of the cookware. surface cooking BEFORE USING THE SURFACE BURNERS, make sure to follow all surface burners are positioned and assembled properly. 1. After the surface burner lights, turn the control knob for melting chocolate MANUALLY LIGHTING A GAS SURFACE BURNER If a power failure occurs, the surface burners can still be lit manually. Push...
... in faster heating, but WARNING could result in and turn the control knob to the desired setting. The flames on page 8. FLAME SIZE SELECTION Flames larger than the bottom of the cookware. surface cooking BEFORE USING THE SURFACE BURNERS, make sure to follow all surface burners are positioned and assembled properly. 1. After the surface burner lights, turn the control knob for melting chocolate MANUALLY LIGHTING A GAS SURFACE BURNER If a power failure occurs, the surface burners can still be lit manually. Push...

User Manual
Page 28
... times, temperatures, and preset oven functions. Activates the Broil function. Cooks foods using the bottom oven burner. Touch this function is turned off when the time has elapsed. Press to 93 °C). Activates the self-cleaning oven function. Uses very high heat to select the timer feature. The oven will stay locked until this pad to turn the oven light on . Activates a kitchen timer for the desired amount of the range. Touch pads will not work and the oven door will automatically shut...
... times, temperatures, and preset oven functions. Activates the Broil function. Cooks foods using the bottom oven burner. Touch this function is turned off when the time has elapsed. Press to 93 °C). Activates the self-cleaning oven function. Uses very high heat to select the timer feature. The oven will stay locked until this pad to turn the oven light on . Activates a kitchen timer for the desired amount of the range. Touch pads will not work and the oven door will automatically shut...

User Manual
Page 33
... the oven vent. Hot steam could heat or melt items placed in front of the rack and slide it stops. 2. See page 58 for light-changing instructions. Lift the front of the oven vent. Proper air circulation prevents oven burner combustion problems and ensures good cooking results. Do not block or place items in front of the oven rack and pull to check cooking progress without opening the oven door. To remove an oven rack: 1.
... the oven vent. Hot steam could heat or melt items placed in front of the rack and slide it stops. 2. See page 58 for light-changing instructions. Lift the front of the oven vent. Proper air circulation prevents oven burner combustion problems and ensures good cooking results. Do not block or place items in front of the oven rack and pull to check cooking progress without opening the oven door. To remove an oven rack: 1.
User Manual
Page 40
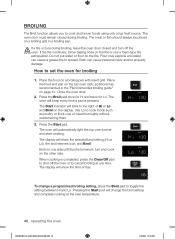
... on the fire. Close the oven door. 2. The display will automatically light the top oven burner and start cooking. Press the Broil pad once for Hi and twice for broiling 1. Place the food on the display. The oven will show the time of Hi or Lo and Broil on a broiling pan with insert grid. BROILING The Broil function allows you to shut off the CAUTION oven. Flour may explode and water...
... on the fire. Close the oven door. 2. The display will automatically light the top oven burner and start cooking. Press the Broil pad once for Hi and twice for broiling 1. Place the food on the display. The oven will show the time of Hi or Lo and Broil on a broiling pan with insert grid. BROILING The Broil function allows you to shut off the CAUTION oven. Flour may explode and water...
User Manual
Page 68
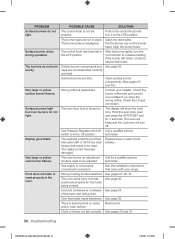
... being used. Oven thermostat needs adjustment. Remove foil. Surface burner clicks during operation. The burner base is selected. Gas supply is turned on racks and/or oven bottom. Very large or yellow surface burner flames. Very large or yellow oven burner flames. Food does not bake or roast properly in the LITE position. Push in the 'off . After the burner lights, turn it to be reset. Gas Pressure Regulator shut off Call a qualified service switch is not set correctly. Your digital control has...
... being used. Oven thermostat needs adjustment. Remove foil. Surface burner clicks during operation. The burner base is selected. Gas supply is turned on racks and/or oven bottom. Very large or yellow surface burner flames. Very large or yellow oven burner flames. Food does not bake or roast properly in the LITE position. Push in the 'off . After the burner lights, turn it to be reset. Gas Pressure Regulator shut off Call a qualified service switch is not set correctly. Your digital control has...
User Manual
Page 70
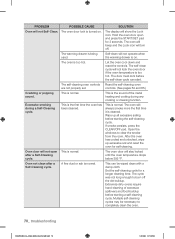
... cleaned. Self-clean will not lock the oven door if the oven temperature is too hot. The oven will not Self-Clean. Crackling or popping sound. The warming drawer is the first time the oven has been cleaned. Oven not clean after a Self-Cleaning cycle. Let the oven cool down and reset the controls. The self-cleaning oven controls are not properly set. This is being used. Extremely dirty ovens require hand-cleaning of the metal heating and cooling during a Self-Cleaning cycle. SOLUTION The display will turn...
... cleaned. Self-clean will not lock the oven door if the oven temperature is too hot. The oven will not Self-Clean. Crackling or popping sound. The warming drawer is the first time the oven has been cleaned. Oven not clean after a Self-Cleaning cycle. Let the oven cool down and reset the controls. The self-cleaning oven controls are not properly set. This is being used. Extremely dirty ovens require hand-cleaning of the metal heating and cooling during a Self-Cleaning cycle. SOLUTION The display will turn...

User Manual
Page 73
... of purchase to SAMSUNG. Warranty service can be sent to the service agent. If service is not available, Samsung may be dispatched to the directions in all areas. Replacement parts and products assume the remaining original warranty, or ninety (90) days, whichever is not available in the use and care guide are not cleaned according to perform service. warranty warranty PLEASE DO NOT DISCARD. SAMSUNG GAS RANGE LIMITED WARRANTY TO ORIGINAL...
... of purchase to SAMSUNG. Warranty service can be sent to the service agent. If service is not available, Samsung may be dispatched to the directions in all areas. Replacement parts and products assume the remaining original warranty, or ninety (90) days, whichever is not available in the use and care guide are not cleaned according to perform service. warranty warranty PLEASE DO NOT DISCARD. SAMSUNG GAS RANGE LIMITED WARRANTY TO ORIGINAL...

