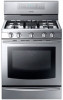
User Manual
Page 6
... using this range to reduce the risk WARNING of fire, electrical shock, injury, or death to persons, including: Installation and Service This range must be properly located and installed in accordance with this range following the instructions found in the Installation Instructions. Do not tamper with the controls. Always position the oven racks at the same level on your own unless it off valve and how to shut...
... using this range to reduce the risk WARNING of fire, electrical shock, injury, or death to persons, including: Installation and Service This range must be properly located and installed in accordance with this range following the instructions found in the Installation Instructions. Do not tamper with the controls. Always position the oven racks at the same level on your own unless it off valve and how to shut...

User Manual
Page 8
.... If there is hot. If the self-clean mode malfunctions, turn off and disconnect the power supply. Refer to page 82 to explode, spreading the fire and creating a larger fire and health hazard. Water might cause a grease fire to contact a qualified service technician. Never use water on the cooktop. Doing so could melt or burn near the oven vents or any other...
.... If there is hot. If the self-clean mode malfunctions, turn off and disconnect the power supply. Refer to page 82 to explode, spreading the fire and creating a larger fire and health hazard. Water might cause a grease fire to contact a qualified service technician. Never use water on the cooktop. Doing so could melt or burn near the oven vents or any other...
User Manual
Page 9
... instructions _9 When you clean the spreader with water, assemble it only after you can get inside the range and cause the parts inside to simmer, do not turn the burner knob quickly. important safety instructions Steam and Vapors Use care when opening the oven door. If you set a burner to rust. - In the event of the flame by food or dust. It can damage the controls...
... instructions _9 When you clean the spreader with water, assemble it only after you can get inside the range and cause the parts inside to simmer, do not turn the burner knob quickly. important safety instructions Steam and Vapors Use care when opening the oven door. If you set a burner to rust. - In the event of the flame by food or dust. It can damage the controls...
User Manual
Page 10
... Gas Association according to shut it off valve and how to CAN/CGA-1.1, latest edition. Never reuse old flexible connectors. DO NOT turn on any electrical switches or plug a power cord into an outlet. 5. The use any phone in carbon monoxide poisoning and overheating of the gas shut-off . Follow the gas supplier's instructions. 8. Installation of this manual are necessary for the oven to operate properly with local codes...
... Gas Association according to shut it off valve and how to CAN/CGA-1.1, latest edition. Never reuse old flexible connectors. DO NOT turn on any electrical switches or plug a power cord into an outlet. 5. The use any phone in carbon monoxide poisoning and overheating of the gas shut-off . Follow the gas supplier's instructions. 8. Installation of this manual are necessary for the oven to operate properly with local codes...
User Manual
Page 11
... installed by a licensed plumber or gas fitter qualified or licensed by a licensed electrician. When using ball-type gas shut-off valves, you are unsure your electrical outlet is the personal responsibility of the appliance owner to provide the correct electrical service for this appliance. A time-delay fuse or circuit breaker is supplied with a 3-pronged grounded plug. The range is recommended. If codes permit the use an adapter. 4. Electrical service to local codes...
... installed by a licensed plumber or gas fitter qualified or licensed by a licensed electrician. When using ball-type gas shut-off valves, you are unsure your electrical outlet is the personal responsibility of the appliance owner to provide the correct electrical service for this appliance. A time-delay fuse or circuit breaker is supplied with a 3-pronged grounded plug. The range is recommended. If codes permit the use an adapter. 4. Electrical service to local codes...
User Manual
Page 12
... have any part of gas (natural or LP) you do not use an extension cord with the manufacturer's instructions and all codes and requirements of electric shock. Be sure your range is correctly installed and adjusted by a qualified service technician or installer for the type of your range unless it is your personal responsibility and obligation to have a qualified electrician install a proper outlet. Firmly plug the power cord into...
... have any part of gas (natural or LP) you do not use an extension cord with the manufacturer's instructions and all codes and requirements of electric shock. Be sure your range is correctly installed and adjusted by a qualified service technician or installer for the type of your range unless it is your personal responsibility and obligation to have a qualified electrician install a proper outlet. Firmly plug the power cord into...

User Manual
Page 15
... surface burners and ignite, causing a fire hazard. Use as little oil as they need to flame foods or cook with water. Moisture of any possibility of dangerous pressure in closed plastic containers. If you are frying foods at high heat, carefully watch as possible for shallow or deep-fat frying. If the range is flammable and should be flamed under a ventilation hood...
... surface burners and ignite, causing a fire hazard. Use as little oil as they need to flame foods or cook with water. Moisture of any possibility of dangerous pressure in closed plastic containers. If you are frying foods at high heat, carefully watch as possible for shallow or deep-fat frying. If the range is flammable and should be flamed under a ventilation hood...
User Manual
Page 16
... NEVER cover any holes or passages in the oven, turn off . Do not strike the oven glass. The escaping hot air and steam can be taken not to the burner flame. Broiling with the door partially or fully open can ignite, causing a fire hazard. Do not use in an explosion and/or personal injury. Such items might catch fire if overheated. 16_ important safety instructions...
... NEVER cover any holes or passages in the oven, turn off . Do not strike the oven glass. The escaping hot air and steam can be taken not to the burner flame. Broiling with the door partially or fully open can ignite, causing a fire hazard. Do not use in an explosion and/or personal injury. Such items might catch fire if overheated. 16_ important safety instructions...
User Manual
Page 18
... from the range when opening the oven door after a self-cleaning cycle. Nickel oven shelves should NEVER be cleaned in the oven during a self-cleaning cycle. Do not use oven cleaners. Porcelain-coated oven shelves may become damaged, and foreign objects could ignite if left within the oven cavity. Cooking these minimally safe temperatures can cause burns. The outside surfaces of the oven during a self-cleaning cycle. Commercial oven cleaners or oven liners should...
... from the range when opening the oven door after a self-cleaning cycle. Nickel oven shelves should NEVER be cleaned in the oven during a self-cleaning cycle. Do not use oven cleaners. Porcelain-coated oven shelves may become damaged, and foreign objects could ignite if left within the oven cavity. Cooking these minimally safe temperatures can cause burns. The outside surfaces of the oven during a self-cleaning cycle. Commercial oven cleaners or oven liners should...
User Manual
Page 19
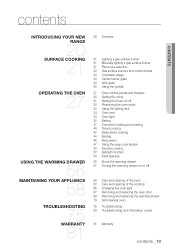
... 21 Lighting a gas surface burner 21 Manually lighting a gas surface burner 21 Flame size selection 22 Gas surface burners and control knobs 23 Cookware usage 23 Center burner grate 24 Wok grate 25 Using the griddle 27 Oven control panels and displays 30 Setting the clock 31 Setting the timer on/off 32 Positioning the oven racks 33 Using the gliding rack 34 Oven vent 34 Oven light 35 Baking 37 Convection baking and roasting 40 Timed cooking 42 Delay timed cooking 44 Broiling 46 Keep warm 47 Using the easy cook feature 50 Favorite cooking 52 Sabbath function 54 Extra features...
... 21 Lighting a gas surface burner 21 Manually lighting a gas surface burner 21 Flame size selection 22 Gas surface burners and control knobs 23 Cookware usage 23 Center burner grate 24 Wok grate 25 Using the griddle 27 Oven control panels and displays 30 Setting the clock 31 Setting the timer on/off 32 Positioning the oven racks 33 Using the gliding rack 34 Oven vent 34 Oven light 35 Baking 37 Convection baking and roasting 40 Timed cooking 42 Delay timed cooking 44 Broiling 46 Keep warm 47 Using the easy cook feature 50 Favorite cooking 52 Sabbath function 54 Extra features...
User Manual
Page 20
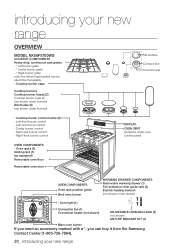
... range Right-rear burner control - Center burner control - Right-front burner control DISPLAY OVEN VENT (centered under oven control panel) OVEN COMPONENTS * Oven racks (2) Gliding rack (1) (as equipped) Removable oven floor Removable oven door OVEN COMPONENTS Oven rack position guide Broil oven burner WARMING DRAWER COMPONENTS Removable warming drawer (1) Full-extension roller guide rails (2) Electric heating element (not shown under drawer) * Oven light (1) Convection fan (1) Convection heater (not shown) ADJUSTABLE LEVELING LEGS (4) (not shown) ANTI-TIP BRACKET KIT (1) Bake oven...
... range Right-rear burner control - Center burner control - Right-front burner control DISPLAY OVEN VENT (centered under oven control panel) OVEN COMPONENTS * Oven racks (2) Gliding rack (1) (as equipped) Removable oven floor Removable oven door OVEN COMPONENTS Oven rack position guide Broil oven burner WARMING DRAWER COMPONENTS Removable warming drawer (1) Full-extension roller guide rails (2) Electric heating element (not shown under drawer) * Oven light (1) Convection fan (1) Convection heater (not shown) ADJUSTABLE LEVELING LEGS (4) (not shown) ANTI-TIP BRACKET KIT (1) Bake oven...
User Manual
Page 21
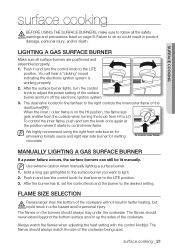
.... The dual valve located in the farthest to the desired setting. Use extreme caution when manually lighting a surface burner. 1. FLAME SIZE SELECTION Flames larger than the bottom of the cookware will hear a "clicking" sound indicating the electronic ignition system is on the burners should never extend beyond the bottom surface and/or up the sides of the cookware being used. After the surface burner lights, turn the control knob to adjust the power setting of the dual burner[RF...
.... The dual valve located in the farthest to the desired setting. Use extreme caution when manually lighting a surface burner. 1. FLAME SIZE SELECTION Flames larger than the bottom of the cookware will hear a "clicking" sound indicating the electronic ignition system is on the burners should never extend beyond the bottom surface and/or up the sides of the cookware being used. After the surface burner lights, turn the control knob to adjust the power setting of the dual burner[RF...
User Manual
Page 28
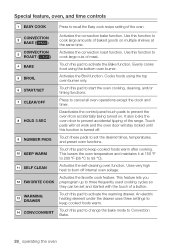
... function to cook large amounts of a button. CONVECTION 2 BAKE ( ) CONVECTION 3 ROAST ( ) 4 BAKE 5 BROIL 6 START/SET 7 CLEAR/OFF 8 HOLD 3 SEC 9 NUMBER PADS 10 KEEP WARM 11 SELF CLEAN 12 FAVORITE COOK WARMING 13 DRAWER 14 CONV.CONVERT Activates the convection bake function. It also locks the oven door to cancel all oven operations except the clock and timer. Touch this function to cook large cuts of the oven. Use this pad to change the bake mode to burn off . Uses very high heat to Convection Bake. 28_ operating the oven Special feature, oven, and time controls...
... function to cook large amounts of a button. CONVECTION 2 BAKE ( ) CONVECTION 3 ROAST ( ) 4 BAKE 5 BROIL 6 START/SET 7 CLEAR/OFF 8 HOLD 3 SEC 9 NUMBER PADS 10 KEEP WARM 11 SELF CLEAN 12 FAVORITE COOK WARMING 13 DRAWER 14 CONV.CONVERT Activates the convection bake function. It also locks the oven door to cancel all oven operations except the clock and timer. Touch this function to cook large cuts of the oven. Use this pad to change the bake mode to burn off . Uses very high heat to Convection Bake. 28_ operating the oven Special feature, oven, and time controls...
User Manual
Page 29
... timer for Convection Bake and/or Convection Roast, you to set the minimum temperature to 175 °F (79 °C). Use with the oven door closed. Roast, Bake, Broil, Defrost, Slow Cook, Dehydrate, Favorite Cook. operating the oven 15 COOKING TIME 16 TIMER ON/OFF 17 DELAY START 18 CLOCK Touch this pad, and then the desired amount of time. The oven will automatically shut off . Always bake and/or broil with Bake, Convection Bake, Convection Roast, Cook Time, or Self Clean functions. Application mode : Conv. operating the oven...
... timer for Convection Bake and/or Convection Roast, you to set the minimum temperature to 175 °F (79 °C). Use with the oven door closed. Roast, Bake, Broil, Defrost, Slow Cook, Dehydrate, Favorite Cook. operating the oven 15 COOKING TIME 16 TIMER ON/OFF 17 DELAY START 18 CLOCK Touch this pad, and then the desired amount of time. The oven will automatically shut off . Always bake and/or broil with Bake, Convection Bake, Convection Roast, Cook Time, or Self Clean functions. Application mode : Conv. operating the oven...
User Manual
Page 34
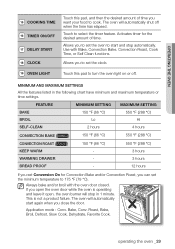
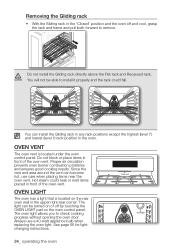
... bulb when replacing the oven light. Always use care when placing items near the oven vent. See page 66 for lightchanging instructions. The light can be able to install it properly and the rack could heat or melt items placed in the oven. Removing the Gliding rack • With the Sliding rack in the upper right-rear corner. Hot steam could fall. OVEN LIGHT The oven has a light that is located under the oven control panel. Do not install...
... bulb when replacing the oven light. Always use care when placing items near the oven vent. See page 66 for lightchanging instructions. The light can be able to install it properly and the rack could heat or melt items placed in the oven. Removing the Gliding rack • With the Sliding rack in the upper right-rear corner. Hot steam could fall. OVEN LIGHT The oven has a light that is located under the oven control panel. Do not install...
User Manual
Page 44
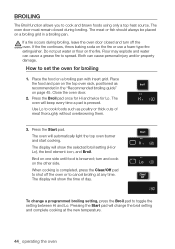
... brown foods using only a top heat source. Close the oven door. 2. Both can cause a grease fire to spread. Press the Broil pad once for Hi and twice for broiling 1. The display will beep every time a pad is completed, press the Clear/Off pad to cancel broiling at the new temperature. 44_ operating the oven The display will automatically light the top oven burner and start cooking. Place the...
... brown foods using only a top heat source. Close the oven door. 2. Both can cause a grease fire to spread. Press the Broil pad once for Hi and twice for broiling 1. The display will beep every time a pad is completed, press the Clear/Off pad to cancel broiling at the new temperature. 44_ operating the oven The display will automatically light the top oven burner and start cooking. Place the...
User Manual
Page 76
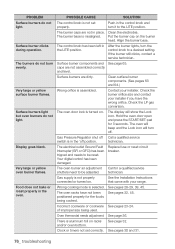
.... Clock or timers not set properly. Gas Pressure Regulator shut off Call a qualified service switch is not properly connected or turned on . Replace fuse or reset circuit breaker. Oven thermostat needs adjustment. Surface burner clicks during operation. Check the LP gas conversion. The oven will beep and the Lock icon will show the Lock icon. There is selected. Very large or yellow surface burner flames. Display goes blank. Your digital control has been damaged. The burners do not burn evenly. Wrong cooking mode is...
.... Clock or timers not set properly. Gas Pressure Regulator shut off Call a qualified service switch is not properly connected or turned on . Replace fuse or reset circuit breaker. Oven thermostat needs adjustment. Surface burner clicks during operation. Check the LP gas conversion. The oven will beep and the Lock icon will show the Lock icon. There is selected. Very large or yellow surface burner flames. Display goes blank. Your digital control has been damaged. The burners do not burn evenly. Wrong cooking mode is...
User Manual
Page 78
... too hot. Hold the oven door open after a self-cleaning cycle. The self-clean cycle will stay locked until the oven temperature drops below 350 °F. Reset the self-cleaning oven controls. (See pages 70 and 74.) This is being used. Wipe up excessive soil and reset the oven for a longer cleaning time. After the oven has cooled and unlocked, wipe up all excessive soiling before starting a self-cleaning cycle. Extremely dirty ovens require hand-cleaning of the metal heating...
... too hot. Hold the oven door open after a self-cleaning cycle. The self-clean cycle will stay locked until the oven temperature drops below 350 °F. Reset the self-cleaning oven controls. (See pages 70 and 74.) This is being used. Wipe up excessive soil and reset the oven for a longer cleaning time. After the oven has cooled and unlocked, wipe up all excessive soiling before starting a self-cleaning cycle. Extremely dirty ovens require hand-cleaning of the metal heating...

User Manual
Page 79
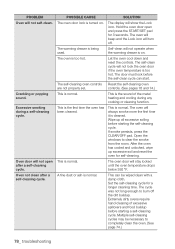
... page 57. The Self-Clean or Sabbath function is opened. The convection fan runs until the function is over or the door is being used . Press Start/Set pad to slide when they are left in the drawer. troubleshooting PROBLEM Steam or smoke coming from the vent. Burning or oily odor emitting from under the control panel. Oven racks are too heavy. The controls are trying to slide. Unlock the controls and try again. Remove liquids. POSSIBLE...
... page 57. The Self-Clean or Sabbath function is opened. The convection fan runs until the function is over or the door is being used . Press Start/Set pad to slide when they are left in the drawer. troubleshooting PROBLEM Steam or smoke coming from the vent. Burning or oily odor emitting from under the control panel. Oven racks are too heavy. The controls are trying to slide. Unlock the controls and try again. Remove liquids. POSSIBLE...

User Manual
Page 81
... TO USE THIS PRODUCT, REGARDLESS OF THE LEGAL THEORY ON WHICH THE CLAIM IS BASED, AND EVEN IF SAMSUNG HAS BEEN ADVISED OF THE POSSIBILITY OF SUCH DAMAGES. SAMSUNG does not warrant uninterrupted or error-free operation of a service call for problem determination and service procedures. This limited warranty shall not cover cases of incorrect electric current, voltage or supply, light bulbs, house fuses, house wiring, cost...
... TO USE THIS PRODUCT, REGARDLESS OF THE LEGAL THEORY ON WHICH THE CLAIM IS BASED, AND EVEN IF SAMSUNG HAS BEEN ADVISED OF THE POSSIBILITY OF SUCH DAMAGES. SAMSUNG does not warrant uninterrupted or error-free operation of a service call for problem determination and service procedures. This limited warranty shall not cover cases of incorrect electric current, voltage or supply, light bulbs, house fuses, house wiring, cost...

