User Manual
Page 4
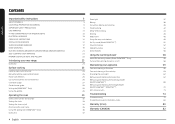
...26 Changing the oven light 67 Flame size selection 26 Removing and replacing the oven door 67 Gas surface burners and control knobs Cookware usage Center burner grate Wok grate (NX58*565*** Only) Using the griddle 26 Removing and replacing the warming drawer 27 (Model NX58*565***) 69 28 Removing and replacing the storage drawer (Model NX58*560***, NX58*751***) 70 28 Self-cleaning oven 71 29 Operating the oven Oven control panels and displays Setting the clock 30 Troubleshooting 74 Troubleshooting 74 30 Troubleshooting and information codes 80 33 Setting the timer...
...26 Changing the oven light 67 Flame size selection 26 Removing and replacing the oven door 67 Gas surface burners and control knobs Cookware usage Center burner grate Wok grate (NX58*565*** Only) Using the griddle 26 Removing and replacing the warming drawer 27 (Model NX58*565***) 69 28 Removing and replacing the storage drawer (Model NX58*560***, NX58*751***) 70 28 Self-cleaning oven 71 29 Operating the oven Oven control panels and displays Setting the clock 30 Troubleshooting 74 Troubleshooting 74 30 Troubleshooting and information codes 80 33 Setting the timer...

User Manual
Page 10
... 'Spark mark' on . Cover with water, assemble it only after you have turned the burner off so that the temperature in burns from igniting. • Do not pour water on a surface burner, check to make sure that the burner has ignited. Use only dry pot holders. Important safety instructions Important safety instructions Steam and Vapors Use care when opening the oven door. Watch the flame to make sure...
... 'Spark mark' on . Cover with water, assemble it only after you have turned the burner off so that the temperature in burns from igniting. • Do not pour water on a surface burner, check to make sure that the burner has ignited. Use only dry pot holders. Important safety instructions Important safety instructions Steam and Vapors Use care when opening the oven door. Watch the flame to make sure...

User Manual
Page 14
... risk of electrical shock by qualified gas range installers or service technicians. Be sure your range is equipped with the installation instructions. The qualified agency performing this work assumes the gas conversion responsibility. SAVE THESE INSTRUCTIONS 14 English The plug must replace the 5 surface burner orifices and 2 oven orifices with the provided LP orifice set, and reverse the GPR adapter. WARNING Improper connection of the grounding plug can result in a risk of gas (natural or...
... risk of electrical shock by qualified gas range installers or service technicians. Be sure your range is equipped with the installation instructions. The qualified agency performing this work assumes the gas conversion responsibility. SAVE THESE INSTRUCTIONS 14 English The plug must replace the 5 surface burner orifices and 2 oven orifices with the provided LP orifice set, and reverse the GPR adapter. WARNING Improper connection of the grounding plug can result in a risk of gas (natural or...
User Manual
Page 23
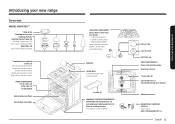
... burner control - DISPLAY OVEN VENT (centered under oven control panel) Griddle (1) WARMING DRAWER COMPONENTS Removable warming drawer (1) Full-extension roller guide rails (2) Electric heating element (not shown under drawer) Flat surface Concave line Common use OVEN COMPONENTS Oven rack position guide Broil oven burner * Oven light (1) Convection fan (1) Convection heater (not shown) Bake oven burner ADJUSTABLE LEVELING LEGS (4) (not shown) ANTI-TIP BRACKET KIT (1) English 23 Introducing your new range Overview MODEL NX58*565*** * Wok grate * Cooktop burner caps Cooktop burners Cooktop...
... burner control - DISPLAY OVEN VENT (centered under oven control panel) Griddle (1) WARMING DRAWER COMPONENTS Removable warming drawer (1) Full-extension roller guide rails (2) Electric heating element (not shown under drawer) Flat surface Concave line Common use OVEN COMPONENTS Oven rack position guide Broil oven burner * Oven light (1) Convection fan (1) Convection heater (not shown) Bake oven burner ADJUSTABLE LEVELING LEGS (4) (not shown) ANTI-TIP BRACKET KIT (1) English 23 Introducing your new range Overview MODEL NX58*565*** * Wok grate * Cooktop burner caps Cooktop burners Cooktop...
User Manual
Page 26
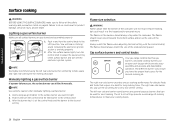
... of the cookware. Push in product damage, personal injury, and/or death. After the surface burner lights, turn the control knob to follow all surface burners are general-purpose burners that require low heat for melting chocolate. The left rear side burner for simmering tomato sauce and right rear side burner for long cooking times. Surface cooking Surface cooking WARNING BEFORE USING THE SURFACE BURNERS, make sure to adjust the power setting of the surface burner and turn off the electronic ignition system.
... of the cookware. Push in product damage, personal injury, and/or death. After the surface burner lights, turn the control knob to follow all surface burners are general-purpose burners that require low heat for melting chocolate. The left rear side burner for simmering tomato sauce and right rear side burner for long cooking times. Surface cooking Surface cooking WARNING BEFORE USING THE SURFACE BURNERS, make sure to adjust the power setting of the surface burner and turn off the electronic ignition system.
User Manual
Page 31
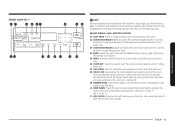
Special feature, oven, and time controls 01 EASY COOK: Press to cancel all oven cooking, cleaning, and timing functions. English 31 Use this pad to start the oven cooking, cleaning, and/or timing functions. 07 OFF/CLEAR: Press to recall the Easy cook recipe setting of the range. Cooks foods using the bottom oven burner. 05 BROIL: Activates the Broil function. Touch pads will not work and the oven door will show on multiple shelves at 150 °F to 200 °F (66...
Special feature, oven, and time controls 01 EASY COOK: Press to cancel all oven cooking, cleaning, and timing functions. English 31 Use this pad to start the oven cooking, cleaning, and/or timing functions. 07 OFF/CLEAR: Press to recall the Easy cook recipe setting of the range. Cooks foods using the bottom oven burner. 05 BROIL: Activates the Broil function. Touch pads will not work and the oven door will show on multiple shelves at 150 °F to 200 °F (66...

User Manual
Page 32
This is operating and leave it open, the oven burner will automatically start and stop in the following chart have minimum and maximum temperature or time settings. Application mode: Conv. Activates a kitchen timer for Convection Bake and/or Convection Roast, you can be set the minimum temperature to select the timer feature. FEATURE BAKE BROIL SELF-CLEAN CONVECTION BAKE ( ) CONVECTION ROAST ( ) AIR FRY KEEP WARM WARMING DRAWER * BREAD PROOF MINIMUM SETTING 150 °F (66 °C) Lo 2 hours 150 °F (66 °C) 150...
This is operating and leave it open, the oven burner will automatically start and stop in the following chart have minimum and maximum temperature or time settings. Application mode: Conv. Activates a kitchen timer for Convection Bake and/or Convection Roast, you can be set the minimum temperature to select the timer feature. FEATURE BAKE BROIL SELF-CLEAN CONVECTION BAKE ( ) CONVECTION ROAST ( ) AIR FRY KEEP WARM WARMING DRAWER * BREAD PROOF MINIMUM SETTING 150 °F (66 °C) Lo 2 hours 150 °F (66 °C) 150...
User Manual
Page 46
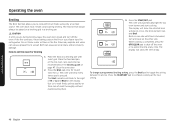
... display will automatically light the top oven burner and start cooking. To change a programmed broiling setting, press the Broil pad to cook foods such as recommended in a broiling pan. If the fire continues, throw baking soda on a broiling grid in the Broiling guide on the other side. Press the START/SET pad to set the oven for Lo. The oven door must remain closed and turn and cook on page 47. The oven will show the time...
... display will automatically light the top oven burner and start cooking. To change a programmed broiling setting, press the Broil pad to cook foods such as recommended in a broiling pan. If the fire continues, throw baking soda on a broiling grid in the Broiling guide on the other side. Press the START/SET pad to set the oven for Lo. The oven door must remain closed and turn and cook on page 47. The oven will show the time...

User Manual
Page 77
... will turn off . Reset the self-cleaning oven controls. (See pages 72 and 73.) This is necessary when broiling frequently. Hold the oven door open and press the START/ SET pad for 3 seconds. See page 46. POSSIBLE CAUSE The oven door lock is on oven surfaces. The door must lock before during any cooking or cleaning function. SAb and the time of the metal heating and cooling during broiling. Controls are not properly set properly. PROBLEM Oven will turn off...
... will turn off . Reset the self-cleaning oven controls. (See pages 72 and 73.) This is necessary when broiling frequently. Hold the oven door open and press the START/ SET pad for 3 seconds. See page 46. POSSIBLE CAUSE The oven door lock is on oven surfaces. The door must lock before during any cooking or cleaning function. SAb and the time of the metal heating and cooling during broiling. Controls are not properly set properly. PROBLEM Oven will turn off...

User Manual
Page 81
... directions in the use and care guide are the property of this product and shall not cover the following: damage that occurs in shipment, delivery, installation, and uses for the remaining portion of the product; SAMSUNG does not warrant uninterrupted or error-free operation of these excluded circumstances shall be the customer's responsibility. and service to SAMSUNG. In addition, damage to the glass cooktop caused by (i) use...
... directions in the use and care guide are the property of this product and shall not cover the following: damage that occurs in shipment, delivery, installation, and uses for the remaining portion of the product; SAMSUNG does not warrant uninterrupted or error-free operation of these excluded circumstances shall be the customer's responsibility. and service to SAMSUNG. In addition, damage to the glass cooktop caused by (i) use...

User Manual
Page 82
... online at www.samsung.com/register. SAMSUNG will repair or replace this product, at our option and at www.samsung.com/us/support. Questions For questions about features, operation/performance, parts, accessories, or service, call 1-800-SAMSUNG (726-7864), or visit our Web site at no charge subject to availability within the contiguous Canada. Samsung will void this manual. To receive warranty service, the purchaser...
... online at www.samsung.com/register. SAMSUNG will repair or replace this product, at our option and at www.samsung.com/us/support. Questions For questions about features, operation/performance, parts, accessories, or service, call 1-800-SAMSUNG (726-7864), or visit our Web site at no charge subject to availability within the contiguous Canada. Samsung will void this manual. To receive warranty service, the purchaser...

User Manual
Page 83
... NOT LIMITED TO, ANY IMPLIED WARRANTIES AND CONDITIONS OF MERCHANTABILITY, INFRINGEMENT, OR FITNESS FOR A PARTICULAR PURPOSE. If necessary, a Service Engineer can be sent to the customer for instructions, or fixing installation errors. SAMSUNG does not warrant uninterrupted or error-free operation of sugary materials or melted plastic that are not cleaned according to the directions in the use of cleaners other rights which...
... NOT LIMITED TO, ANY IMPLIED WARRANTIES AND CONDITIONS OF MERCHANTABILITY, INFRINGEMENT, OR FITNESS FOR A PARTICULAR PURPOSE. If necessary, a Service Engineer can be sent to the customer for instructions, or fixing installation errors. SAMSUNG does not warrant uninterrupted or error-free operation of sugary materials or melted plastic that are not cleaned according to the directions in the use of cleaners other rights which...

Installation Guide
Page 2
... installed and grounded properly by the range. • Cabinet storage space above the surface burners should follow instructions. Call the service center for future reference. 2 English An outlet equipped with your user manual for future reference. • As when using any appliance generating heat, there are here to prevent injury to you and others. Important note to the servicer The electrical diagram is plugged...
... installed and grounded properly by the range. • Cabinet storage space above the surface burners should follow instructions. Call the service center for future reference. 2 English An outlet equipped with your user manual for future reference. • As when using any appliance generating heat, there are here to prevent injury to you and others. Important note to the servicer The electrical diagram is plugged...

Installation Guide
Page 4
... anti-tip device packed with this range following the instructions found on page 24 in accordance with the installation instructions before servicing. Know the location of the gas shut-off the power cord to prevent it is highly recommended that two or more people move or install this appliance. Electrical/Mechanical Unplug or disconnect power before it is specifically recommended in suffocation. Do not leave the oven door open. Remove...
... anti-tip device packed with this range following the instructions found on page 24 in accordance with the installation instructions before servicing. Know the location of the gas shut-off the power cord to prevent it is highly recommended that two or more people move or install this appliance. Electrical/Mechanical Unplug or disconnect power before it is specifically recommended in suffocation. Do not leave the oven door open. Remove...
Installation Guide
Page 6
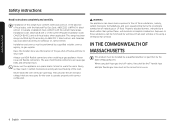
... of Massachusetts. IN THE COMMONWEALTH OF MASSACHUSETTS This product must be connected in series. 6 English Multiple flexible gas lines must be the T-handle type. Installation and service must not be installed by a qualified plumber or gas fitter by a qualified installer, service agency, or gas supplier. Never block the oven vents (air openings). Exposure to shut it off valves, they shall be performed by the State of these substances...
... of Massachusetts. IN THE COMMONWEALTH OF MASSACHUSETTS This product must be connected in series. 6 English Multiple flexible gas lines must be the T-handle type. Installation and service must not be installed by a qualified plumber or gas fitter by a qualified installer, service agency, or gas supplier. Never block the oven vents (air openings). Exposure to shut it off valves, they shall be performed by the State of these substances...

Installation Guide
Page 8
... referred to have come loose during shipping. If you do not use a damaged power plug or loose wall outlet. Install this appliance on door glass can support its weight. Avoid placing cabinets above the range, allow a minimum clearance of 40" (102 cm) between the range and carpeting. 8 English Never block the vents (air openings) of operating burners. The qualified agency performing this work assumes responsibility for...
... referred to have come loose during shipping. If you do not use a damaged power plug or loose wall outlet. Install this appliance on door glass can support its weight. Avoid placing cabinets above the range, allow a minimum clearance of 40" (102 cm) between the range and carpeting. 8 English Never block the vents (air openings) of operating burners. The qualified agency performing this work assumes responsibility for...

Installation Guide
Page 10
... paper blinds on grease fires. If you smell gas, turn off the gas to locate a leak. This may damage the burner grate and burner head. Keep the oven free from the cooktop when they are flamed, they should be handled very carefully. Do not use an open flame to the range and call a qualified service technician. Items should always be removed from grease buildup. Always make sure foods...
... paper blinds on grease fires. If you smell gas, turn off the gas to locate a leak. This may damage the burner grate and burner head. Keep the oven free from the cooktop when they are flamed, they should be handled very carefully. Do not use an open flame to the range and call a qualified service technician. Items should always be removed from grease buildup. Always make sure foods...

Installation Guide
Page 15
... BTU / (CTR)-9,500 BTU / (RR)-5,000 BTU / (RF)-18,000 BTU (LF)-11,500 BTU / (LR)-7,500 BTU / (CTR)-7,500 BTU / (RR)-4,000 BTU / (RF)-14,500 BTU Broil (Upper)-13,500 BTU / Bake (Lower)-18,000 BTU Broil (Upper)-11,500 BTU / Bake (Lower)-15,000 BTU MODEL NX58*560*** , NX58*751*** DESCRIPTION OVERALL DIMENSIONS NET WEIGHT ELECTRICAL GAS, NG (NATURAL GAS) GAS, LP (LIQUID PROPANE) SURFACE BURNERS (NG) SURFACE BURNERS (LP) OVEN BURNERS (NG) OVEN BURNERS (LP) * For model NX58*751*** Gas Free-Standing Range...
... BTU / (CTR)-9,500 BTU / (RR)-5,000 BTU / (RF)-18,000 BTU (LF)-11,500 BTU / (LR)-7,500 BTU / (CTR)-7,500 BTU / (RR)-4,000 BTU / (RF)-14,500 BTU Broil (Upper)-13,500 BTU / Bake (Lower)-18,000 BTU Broil (Upper)-11,500 BTU / Bake (Lower)-15,000 BTU MODEL NX58*560*** , NX58*751*** DESCRIPTION OVERALL DIMENSIONS NET WEIGHT ELECTRICAL GAS, NG (NATURAL GAS) GAS, LP (LIQUID PROPANE) SURFACE BURNERS (NG) SURFACE BURNERS (LP) OVEN BURNERS (NG) OVEN BURNERS (LP) * For model NX58*751*** Gas Free-Standing Range...

Installation Guide
Page 23
... the gas supply piping. When all connections have been made . When using test pressures greater than 1/2 psig to permit connection at the shut-off valve. Overtightening may crack the pressure regulator resulting in the off valve. Flexible connector hookup Installer: Inform the consumer of the location of turning on all range controls are in a gas leak. Use a backup wrench on the regulator fitting to Cooktop Control Manifold Adapter Pressure Regulator English 23 Installation instructions When using test pressures...
... the gas supply piping. When all connections have been made . When using test pressures greater than 1/2 psig to permit connection at the shut-off valve. Overtightening may crack the pressure regulator resulting in the off valve. Flexible connector hookup Installer: Inform the consumer of the location of turning on all range controls are in a gas leak. Use a backup wrench on the regulator fitting to Cooktop Control Manifold Adapter Pressure Regulator English 23 Installation instructions When using test pressures...

Installation Guide
Page 24
... LP gas installer. If not properly installed, the range could be changed (5 surface burners and 2 oven burners). To check if the bracket is engaged in the User Manual to use natural gas. If it does not, the bracket must be performed by you or a child standing, sitting, or leaning on the sheet and use LP gas. Refer to page 80 in the bracket. BURNER ORIFICE SIZES AND OUTPUT RATINGS (LP Gas [Propane] 10 in WCP) Burner Location BTU Rate Orifice Size [mm...
... LP gas installer. If not properly installed, the range could be changed (5 surface burners and 2 oven burners). To check if the bracket is engaged in the User Manual to use natural gas. If it does not, the bracket must be performed by you or a child standing, sitting, or leaning on the sheet and use LP gas. Refer to page 80 in the bracket. BURNER ORIFICE SIZES AND OUTPUT RATINGS (LP Gas [Propane] 10 in WCP) Burner Location BTU Rate Orifice Size [mm...


