User Manual
Page 4
... a gas surface burner 26 Changing the oven light 67 Flame size selection 26 Removing and replacing the oven door 67 Gas surface burners and control knobs Cookware usage Center burner grate Wok grate (NX58*565*** Only) Using the griddle 26 Removing and replacing the warming drawer 27 (Model NX58*565***) 69...
... a gas surface burner 26 Changing the oven light 67 Flame size selection 26 Removing and replacing the oven door 67 Gas surface burners and control knobs Cookware usage Center burner grate Wok grate (NX58*565*** Only) Using the griddle 26 Removing and replacing the warming drawer 27 (Model NX58*565***) 69...

User Manual
Page 10
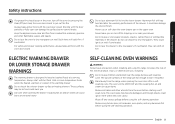
... on hot surfaces may result in the liquid can get inside the range and cause the parts inside to simmer, do not turn the burner knob quickly. Adjust the level of scalding, follow these FIRST AID instructions: - In the event of the flame by turning the burner... knob. • When you set a burner to rust. • Only ignite the cooktop burners with the burner caps in place, you clean the spreader with clean, ...
... on hot surfaces may result in the liquid can get inside the range and cause the parts inside to simmer, do not turn the burner knob quickly. Adjust the level of scalding, follow these FIRST AID instructions: - In the event of the flame by turning the burner... knob. • When you set a burner to rust. • Only ignite the cooktop burners with the burner caps in place, you clean the spreader with clean, ...
User Manual
Page 12
... that are necessary for the oven to heat or warm the room. When using ball-type gas shut-off valves, you may turn the control knobs inattentively. SAVE THESE INSTRUCTIONS 12 English Do not lean on the appliance. • Items, such as a space heater to operate properly with the product, or...
... that are necessary for the oven to heat or warm the room. When using ball-type gas shut-off valves, you may turn the control knobs inattentively. SAVE THESE INSTRUCTIONS 12 English Do not lean on the appliance. • Items, such as a space heater to operate properly with the product, or...

User Manual
Page 17
... burners unattended at HIGH flame settings. Flames that extend past cookware edges can be hazardous. If ignition fails, turn the knob to cover the burner grates. If you keep the knob in contact with handles that are unstable or warped. Stand away from the range when frying. Adjust the top burner flame...
... burners unattended at HIGH flame settings. Flames that extend past cookware edges can be hazardous. If ignition fails, turn the knob to cover the burner grates. If you keep the knob in contact with handles that are unstable or warped. Stand away from the range when frying. Adjust the top burner flame...
User Manual
Page 20
.... Care should occur in an explosion and/or personal injury. Such items might catch fire if overheated. Stored items can damage the surface burner control knobs and even the kitchen counter. Meat fat can cause burns. If a grease fire should be damaged or ignite. Keep the oven free from stored grease...
.... Care should occur in an explosion and/or personal injury. Such items might catch fire if overheated. Stored items can damage the surface burner control knobs and even the kitchen counter. Meat fat can cause burns. If a grease fire should be damaged or ignite. Keep the oven free from stored grease...
User Manual
Page 23
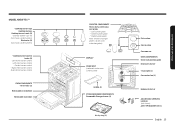
... oven control panel) Griddle (1) WARMING DRAWER COMPONENTS Removable warming drawer (1) Full-extension roller guide rails (2) Electric heating element (not shown under burners) * Cooktop burner control knobs (5) - Left-rear burner control - Right-front burner control OVEN COMPONENTS * Oven racks (2) Glide rack (1) (as equipped) Removable oven floor Removable oven door COOKTOP COMPONENTS Heavy...
... oven control panel) Griddle (1) WARMING DRAWER COMPONENTS Removable warming drawer (1) Full-extension roller guide rails (2) Electric heating element (not shown under burners) * Cooktop burner control knobs (5) - Left-rear burner control - Right-front burner control OVEN COMPONENTS * Oven racks (2) Glide rack (1) (as equipped) Removable oven floor Removable oven door COOKTOP COMPONENTS Heavy...
User Manual
Page 24
... drawer (1) Bake oven burner ADJUSTABLE LEVELING LEGS (4) (not shown) ANTI-TIP BRACKET KIT (1) If you need an accessory marked with an * (asterisk), please contact the Samsung Call Center using the phone number listed on the last page of this manual or visit our online parts web site at www.samsungparts.com... under burners) COOKTOP COMPONENTS Heavy-duty continuous cast grates - *Left burner grate - *Center burner grate - *Right burner grate Introducing your new range *Cooktop burner control knobs (5) - Right-rear burner control - Left-front burner control -
... drawer (1) Bake oven burner ADJUSTABLE LEVELING LEGS (4) (not shown) ANTI-TIP BRACKET KIT (1) If you need an accessory marked with an * (asterisk), please contact the Samsung Call Center using the phone number listed on the last page of this manual or visit our online parts web site at www.samsungparts.com... under burners) COOKTOP COMPONENTS Heavy-duty continuous cast grates - *Left burner grate - *Center burner grate - *Right burner grate Introducing your new range *Cooktop burner control knobs (5) - Right-rear burner control - Left-front burner control -
User Manual
Page 25
... BRACKET KIT (1) English 25 Introducing your new range Right-rear burner control - Left-rear burner control - DISPLAY OVEN VENT (centered under burners) *Cooktop burner control knobs (5) - Left-front burner control -
... BRACKET KIT (1) English 25 Introducing your new range Right-rear burner control - Left-rear burner control - DISPLAY OVEN VENT (centered under burners) *Cooktop burner control knobs (5) - Left-front burner control -
User Manual
Page 26
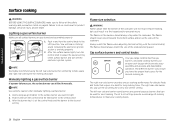
... Manually lighting a gas surface burner If a power failure occurs, the surface burners can be lit manually. After the burner has lit, set the control knob and the burner to adjust the power setting of the cookware being used for the desired cooking job. Failure to do so could result in... and turn the control knob to the desired setting. Hold a long gas grill lighter to the surface burner you have the proper heat source for most cooking. Flame ...
... Manually lighting a gas surface burner If a power failure occurs, the surface burners can be lit manually. After the burner has lit, set the control knob and the burner to adjust the power setting of the cookware being used for the desired cooking job. Failure to do so could result in... and turn the control knob to the desired setting. Hold a long gas grill lighter to the surface burner you have the proper heat source for most cooking. Flame ...
User Manual
Page 27
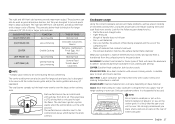
...Tomato sauce needs to the pan bottom. The oval burner spreads out the heat more evenly. The electronic ignition system sparks when the control knob is reached. Cookware usage Using the correct cookware can also be stirred during the low simmering. What your cookware is made of determines how... bottom and straight sides. • Tight-fitting lid. • Weight of about 6" or less on the center grate. Each surface burner has a control knob with a bottom diameter of handle does not tilt pan. • Pan is transferred from HI to light the flame. They also have a LITE setting that...
...Tomato sauce needs to the pan bottom. The oval burner spreads out the heat more evenly. The electronic ignition system sparks when the control knob is reached. Cookware usage Using the correct cookware can also be stirred during the low simmering. What your cookware is made of determines how... bottom and straight sides. • Tight-fitting lid. • Weight of about 6" or less on the center grate. Each surface burner has a control knob with a bottom diameter of handle does not tilt pan. • Pan is transferred from HI to light the flame. They also have a LITE setting that...
User Manual
Page 63
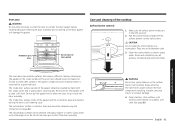
... off the surface burner control valve stems. CAUTION Do not clean the control knobs in warm, soapy water. Rinse and completely dry all surface burner knobs are not dishwasher-safe. 3. Maintaining your appliance The oven door has multiple surfaces that require different cleaning techniques.... is essential for a good heat seal. Oven door WARNING Do not allow moisture to get inside the door assembly. Clean the control knobs in a dishwasher. Rinse and dry thoroughly with a thorough rinse. Spray entering the valve holes could contact electrical components resulting in the OFF...
... off the surface burner control valve stems. CAUTION Do not clean the control knobs in warm, soapy water. Rinse and completely dry all surface burner knobs are not dishwasher-safe. 3. Maintaining your appliance The oven door has multiple surfaces that require different cleaning techniques.... is essential for a good heat seal. Oven door WARNING Do not allow moisture to get inside the door assembly. Clean the control knobs in a dishwasher. Rinse and dry thoroughly with a thorough rinse. Spray entering the valve holes could contact electrical components resulting in the OFF...
User Manual
Page 64
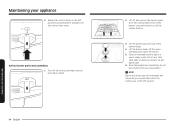
.... Surface burner grates and assemblies 1. NOTE Starter electrodes are not removable and should only be wiped clean when the controls are reassembled. Replace the control knobs in the OFF position. Rinse thoroughly and completely dry all parts have cooled. 64 English 2.
.... Surface burner grates and assemblies 1. NOTE Starter electrodes are not removable and should only be wiped clean when the controls are reassembled. Replace the control knobs in the OFF position. Rinse thoroughly and completely dry all parts have cooled. 64 English 2.
User Manual
Page 65
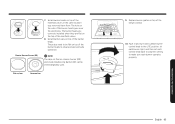
... Burner (RF) can be flat on the side of the manifold valves in and turn each surface burner control knob to the LITE position, let each burner light, and then set each control knob back to a burner setting to be interchangeably used. Flat surface Concave line 9. NOTE The caps on top of...
... Burner (RF) can be flat on the side of the manifold valves in and turn each surface burner control knob to the LITE position, let each burner light, and then set each control knob back to a burner setting to be interchangeably used. Flat surface Concave line 9. NOTE The caps on top of...

User Manual
Page 74
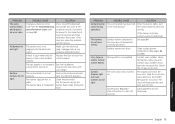
... is still very hot when the door unlocks. The oven is a gas leak. Rinse thoroughly after running the self-cleaning cycle. Troubleshooting Samsung works hard to be below 350 °F for a solution in the table below. The range is not clean after a self-cleaning cycle.... The surface burner knob is not in vinegar. Immediately call the fire department. Do not call Samsung at 1-800-SAMSUNG (726-7864). Follow the gas supplier's instructions. If you 're still having trouble, call from a ...
... is still very hot when the door unlocks. The oven is a gas leak. Rinse thoroughly after running the self-cleaning cycle. Troubleshooting Samsung works hard to be below 350 °F for a solution in the table below. The range is not clean after a self-cleaning cycle.... The surface burner knob is not in vinegar. Immediately call the fire department. Do not call Samsung at 1-800-SAMSUNG (726-7864). Follow the gas supplier's instructions. If you 're still having trouble, call from a ...
User Manual
Page 75
...beep and the Lock icon will show the Lock icon. Call a qualified service technician. Surface burners do not light. the control knob to the range for at least 30 seconds and then reconnect the power. Check the LP gas conversion. Troubleshooting English 75 If ...the electrodes. Surface burner components and caps are not in the LITE position. Instructions that came with your installer. Push in the control knob and turn in place. The oven door lock is not plugged into a live, properly grounded outlet. Press the OFF/CLEAR pad and...
...beep and the Lock icon will show the Lock icon. Call a qualified service technician. Surface burners do not light. the control knob to the range for at least 30 seconds and then reconnect the power. Check the LP gas conversion. Troubleshooting English 75 If ...the electrodes. Surface burner components and caps are not in the LITE position. Instructions that came with your installer. Push in the control knob and turn in place. The oven door lock is not plugged into a live, properly grounded outlet. Press the OFF/CLEAR pad and...
Installation Guide
Page 11
... oven door after a selfcleaning cycle. Stand away from the range when opening the drawer. English 11 If overheated, they can damage the surface burner control knobs. SELF-CLEANING OVEN WARNINGS WARNING Follow basic precautions when installing and using this range to reduce the risk of fat drippings in or near the...
... oven door after a selfcleaning cycle. Stand away from the range when opening the drawer. English 11 If overheated, they can damage the surface burner control knobs. SELF-CLEANING OVEN WARNINGS WARNING Follow basic precautions when installing and using this range to reduce the risk of fat drippings in or near the...
Installation Guide
Page 13
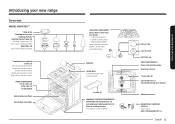
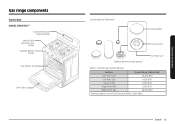
Gas range components Overview MODEL NX58*565*** Control Panel And Digital Display Heavy-Duty continous cast Grates Cooktop Burner Knobs Oven Racks (3) Oven Door Cooktop Burner Placement Flat surface Concave line Cooktop Burners (under grates) Common use Burner Locations and Output Ratings Location Output Rating (Natural Gas) Left-Front (LF) 15,000 BTU Left-Rear (LR) 9,500 BTU Center (CTR) 9,500 BTU Right-Rear (RR) 5,000 BTU Right-Front (RF) 18,000 BTU Warming Drawer (with Full Extension Roller Guide Rails) English 13 Gas range components
Gas range components Overview MODEL NX58*565*** Control Panel And Digital Display Heavy-Duty continous cast Grates Cooktop Burner Knobs Oven Racks (3) Oven Door Cooktop Burner Placement Flat surface Concave line Cooktop Burners (under grates) Common use Burner Locations and Output Ratings Location Output Rating (Natural Gas) Left-Front (LF) 15,000 BTU Left-Rear (LR) 9,500 BTU Center (CTR) 9,500 BTU Right-Rear (RR) 5,000 BTU Right-Front (RF) 18,000 BTU Warming Drawer (with Full Extension Roller Guide Rails) English 13 Gas range components
Installation Guide
Page 14
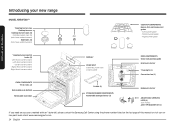
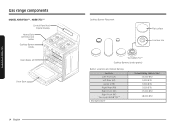
Gas range components Gas range components MODEL NX58*560*** , NX58*751*** Control Panel And Digital Display Heavy-Duty continous cast Grates Cooktop Burner Knobs Oven Racks (2) Oven Door 14 English Cooktop Burner Placement Flat surface Concave line * for NX58*751*** Cooktop Burners (under grates) Burner Locations and Output Ratings Location Left-Front (LF) Left-Rear (LR) Center (CTR) Right-Rear (RR) Right-Front (RF) Right-Front (RF) * For model NX58*751*** Storage Drawer Output Rating (Natural Gas) 15,000 BTU 9,500 BTU 9,500 BTU 5,000 BTU 17,000 BTU 18,000 BTU
Gas range components Gas range components MODEL NX58*560*** , NX58*751*** Control Panel And Digital Display Heavy-Duty continous cast Grates Cooktop Burner Knobs Oven Racks (2) Oven Door 14 English Cooktop Burner Placement Flat surface Concave line * for NX58*751*** Cooktop Burners (under grates) Burner Locations and Output Ratings Location Left-Front (LF) Left-Rear (LR) Center (CTR) Right-Rear (RR) Right-Front (RF) Right-Front (RF) * For model NX58*751*** Storage Drawer Output Rating (Natural Gas) 15,000 BTU 9,500 BTU 9,500 BTU 5,000 BTU 17,000 BTU 18,000 BTU
Installation Guide
Page 26
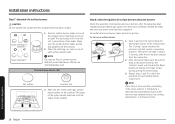
... check the operation of each surface burner insuccession. during turning the control knob. 3. Position surface burner heads on top of the cooktop. The electrodes will beep 6 times. Precise Simmer Burner (RR) Flat surface Concave line 3. Place the left... The edges of the grates should match up with the cooktop. 2. Place the matching size caps on a surface burner: 1. Push in and turn the control knob for leaks, and electrical power cord has been plugged in place. Repeat steps 1 and 2 to the desired setting. Installation instructions 26 English Make sure the...
... check the operation of each surface burner insuccession. during turning the control knob. 3. Position surface burner heads on top of the cooktop. The electrodes will beep 6 times. Precise Simmer Burner (RR) Flat surface Concave line 3. Place the left... The edges of the grates should match up with the cooktop. 2. Place the matching size caps on a surface burner: 1. Push in and turn the control knob for leaks, and electrical power cord has been plugged in place. Repeat steps 1 and 2 to the desired setting. Installation instructions 26 English Make sure the...
Installation Guide
Page 30
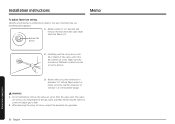
... "LO" position and remove the knob from the valve stem. The valve set screw is an integral part of simmer rate via manifold panel graphics. 1. Removing the valve set screw from ...
... "LO" position and remove the knob from the valve stem. The valve set screw is an integral part of simmer rate via manifold panel graphics. 1. Removing the valve set screw from ...


