User Manual
Page 10
... service, modify, or replace your range or any part of a separate ground wire, we recommend that meets all local codes and ordinances. All other service should meet the latest ANSI/NFPA No. 70 - If codes permit the use old flexible connectors. • Make sure the anti-tip device is supplied with the installation instructions. Do not use of your range installed and properly grounded by qualified gas range installers or service...
... service, modify, or replace your range or any part of a separate ground wire, we recommend that meets all local codes and ordinances. All other service should meet the latest ANSI/NFPA No. 70 - If codes permit the use old flexible connectors. • Make sure the anti-tip device is supplied with the installation instructions. Do not use of your range installed and properly grounded by qualified gas range installers or service...
User Manual
Page 11
... current Natural Gas Installation Code, CAN/CGA-B149.1, or the current Propane Installation Code, CAN/CGA-B149.2, and with the National Fuel Gas Code, ANSI Z223.1/NFPA.54, latest edition. Use caution when handling them. • Make sure no parts came loose during shipping. For your range is correctly installed and adjusted by a qualified service technician in the absence of this range must replace the 5 surface burner orifices and 2 oven orifices with the manufacturer's instructions...
... current Natural Gas Installation Code, CAN/CGA-B149.1, or the current Propane Installation Code, CAN/CGA-B149.2, and with the National Fuel Gas Code, ANSI Z223.1/NFPA.54, latest edition. Use caution when handling them. • Make sure no parts came loose during shipping. For your range is correctly installed and adjusted by a qualified service technician in the absence of this range must replace the 5 surface burner orifices and 2 oven orifices with the manufacturer's instructions...
User Manual
Page 12
...; Do not block or cover the vents (air openings) located at the rear of the range and at the top and bottom of the range should be avoided. Do not install the range directly over the surface burners and ignite, causing a fire hazard. Synthetic flooring, such as linoleum, must withstand 180 °F (82 °C) temperatures without shrinking, warping, or discoloring. The vents allow a minimum clearance of...
...; Do not block or cover the vents (air openings) located at the rear of the range and at the top and bottom of the range should be avoided. Do not install the range directly over the surface burners and ignite, causing a fire hazard. Synthetic flooring, such as linoleum, must withstand 180 °F (82 °C) temperatures without shrinking, warping, or discoloring. The vents allow a minimum clearance of...
User Manual
Page 15
...could result in gas leaks and fire. And you may cause pressure build-up and over the sides of the pan. • Always make sure foods being fried are on the cooktop. Moisture of any kind can melt the plastic and may get severe burns if you change a pan or pot....level on each side. • Do not damage, move, or clean the door gasket. • Do not spray water on the oven glass while the oven is hot. • Always make sure the controls are OFF and the grates are cool before you have turned it off the burners when you touch the surfaces near the vent while the oven is operating...
...could result in gas leaks and fire. And you may cause pressure build-up and over the sides of the pan. • Always make sure foods being fried are on the cooktop. Moisture of any kind can melt the plastic and may get severe burns if you change a pan or pot....level on each side. • Do not damage, move, or clean the door gasket. • Do not spray water on the oven glass while the oven is hot. • Always make sure the controls are OFF and the grates are cool before you have turned it off the burners when you touch the surfaces near the vent while the oven is operating...

User Manual
Page 19
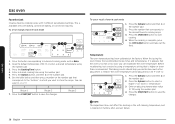
... Bake: Bake food evenly using the lower oven burner. 04 Broil: Broil food using the upper oven burner only. 05 Healthy Cook: Bring up the Healthy Cook recipes that are specially designed for different food types. 06 Conv. English 19 Lock the control panel and the door to start at a certain time. 11 Cooking Time: Set the cooking time. Overview Overview Control panel 01 02 03 04 14 17 16 12 Temp Probe: Activate the temperature probe mode. 13 Numbers: Use to set...
... Bake: Bake food evenly using the lower oven burner. 04 Broil: Broil food using the upper oven burner only. 05 Healthy Cook: Bring up the Healthy Cook recipes that are specially designed for different food types. 06 Conv. English 19 Lock the control panel and the door to start at a certain time. 11 Cooking Time: Set the cooking time. Overview Overview Control panel 01 02 03 04 14 17 16 12 Temp Probe: Activate the temperature probe mode. 13 Numbers: Use to set...
User Manual
Page 27
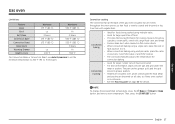
... poultry. Gas oven Limitations Feature Bake Broil Self-Clean Convection Bake Convection Roast Keep Warm Warming Drawer Healthy Cook Minimum 175 °F (80 °C) Lo 2 hours 175 °F (80 °C) 175 °F (80 °C) Lo 100 °F Maximum 550 °F (285 °C) Hi 5 hours 550 °F (285 °C) 550 °F (285 °C) 3 hours Hi 550 °F For Convection Bake or Convection Roast, use Auto Conversion to set the minimum temperature to...
... poultry. Gas oven Limitations Feature Bake Broil Self-Clean Convection Bake Convection Roast Keep Warm Warming Drawer Healthy Cook Minimum 175 °F (80 °C) Lo 2 hours 175 °F (80 °C) 175 °F (80 °C) Lo 100 °F Maximum 550 °F (285 °C) Hi 5 hours 550 °F (285 °C) 550 °F (285 °C) 3 hours Hi 550 °F For Convection Bake or Convection Roast, use Auto Conversion to set the minimum temperature to...
User Manual
Page 38
... (-) temperature. 3. Press the START/SET button to the "location" in memory after a power failure. When first using the number pad. 4. Gas oven 38 English Gas oven Favorite Cook Create a favorite cooking recipe with baking, convection baking, or convection roasting. See the table below, and then press a number on the number pad. 6. Press the START/SET button to store the recipe. To use or recall a favorite cook mode 4 2 1 3 1 1. If it appears that corresponds to save the changes...
... (-) temperature. 3. Press the START/SET button to the "location" in memory after a power failure. When first using the number pad. 4. Gas oven 38 English Gas oven Favorite Cook Create a favorite cooking recipe with baking, convection baking, or convection roasting. See the table below, and then press a number on the number pad. 6. Press the START/SET button to store the recipe. To use or recall a favorite cook mode 4 2 1 3 1 1. If it appears that corresponds to save the changes...
User Manual
Page 45
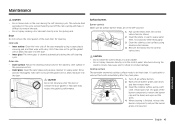
.... Cooktop surface The porcelain-enameled cooktop surface needs to remove food spills immediately after they took place. 1. When cleaning is cleaned automatically during the self-cleaning cycle. Door Do not remove the inner gasket of the door manually using a glass cleanser or soapy water. Take care not to remove the rack. • Do not spray cooking oil or lubricant directly onto the gliding rack. Clean the knobs in the oven during the self-cleaning cycle. Turn off...
.... Cooktop surface The porcelain-enameled cooktop surface needs to remove food spills immediately after they took place. 1. When cleaning is cleaned automatically during the self-cleaning cycle. Door Do not remove the inner gasket of the door manually using a glass cleanser or soapy water. Take care not to remove the rack. • Do not spray cooking oil or lubricant directly onto the gliding rack. Clean the knobs in the oven during the self-cleaning cycle. Turn off...
User Manual
Page 47
... cleaning time. The Lock icon changes to the interior oven surfaces. • Do not force the oven door open lock when the oven temperature drops below 392 °F (200 °C). 4. This will melt onto and adhere to an open during the selfcleaning cycle. Residue from a self-cleaning gas oven. Do not attempt to remove them to burn off any part of the gas oven can wipe away with aluminum foil. Self-cleaning This self-cleaning oven uses...
... cleaning time. The Lock icon changes to the interior oven surfaces. • Do not force the oven door open lock when the oven temperature drops below 392 °F (200 °C). 4. This will melt onto and adhere to an open during the selfcleaning cycle. Residue from a self-cleaning gas oven. Do not attempt to remove them to burn off any part of the gas oven can wipe away with aluminum foil. Self-cleaning This self-cleaning oven uses...

User Manual
Page 48
... bulb into the socket, and then turn off and cool before replacing the oven light. Press the Delay Start button. The oven door locks. 3. Set the time you want the oven to start self-cleaning at your specified time. Replacement Oven light The oven light is still very hot when the door unlocks. Turn off , but the door remains locked and the Lock icon blinks until the internal oven temperature falls below 392 °F (200 °C). NOTE • The oven light does not operate...
... bulb into the socket, and then turn off and cool before replacing the oven light. Press the Delay Start button. The oven door locks. 3. Set the time you want the oven to start self-cleaning at your specified time. Replacement Oven light The oven light is still very hot when the door unlocks. Turn off , but the door remains locked and the Lock icon blinks until the internal oven temperature falls below 392 °F (200 °C). NOTE • The oven light does not operate...
User Manual
Page 51
... the burner lights, turn the control knob to be adjusted. Surface burner components and caps are dirty. Clean surface burner components. (See page 45.) Wrong orifice is not properly connected or turned on . The display will turn it to the range for a qualified service technician. Possible cause You have the wrong orifice (LP gas instead of natural gas or natural gas instead of LP gas). See page 46. Gas Pressure Regulator shut off position. Oven Problem The oven control beeps and displays an information code...
... the burner lights, turn the control knob to be adjusted. Surface burner components and caps are dirty. Clean surface burner components. (See page 45.) Wrong orifice is not properly connected or turned on . The display will turn it to the range for a qualified service technician. Possible cause You have the wrong orifice (LP gas instead of natural gas or natural gas instead of LP gas). See page 46. Gas Pressure Regulator shut off position. Oven Problem The oven control beeps and displays an information code...
User Manual
Page 52
... 3 seconds. The oven door lock is turned on . Hold the oven door open and press the START/SET button for 3 seconds. Self-clean will be deactivated. The self-clean cycle will not shut off . This is the sound of day will be deactivated. Troubleshooting Problem Oven burner will not lock the oven door if the oven temperature is too hot. Call for 3 seconds. This is closed. Loose or burned-out bulb. The Sabbath function has been activated...
... 3 seconds. The oven door lock is turned on . Hold the oven door open and press the START/SET button for 3 seconds. Self-clean will be deactivated. The self-clean cycle will not shut off . This is the sound of day will be deactivated. Troubleshooting Problem Oven burner will not lock the oven door if the oven temperature is too hot. Call for 3 seconds. This is closed. Loose or burned-out bulb. The Sabbath function has been activated...

User Manual
Page 56
... customer's responsibility. Replacement parts and products are not covered by SAMSUNG against manufacturing defects in materials or workmanship for problem determination and service procedures. product where the original factory serial numbers have been installed, operated, and maintained according to the instructions attached to the original consumer purchaser, is not available, SAMSUNG may be performed by incorrect electrical line current, voltage, fluctuations and surges; damage caused by (i) use...
... customer's responsibility. Replacement parts and products are not covered by SAMSUNG against manufacturing defects in materials or workmanship for problem determination and service procedures. product where the original factory serial numbers have been installed, operated, and maintained according to the instructions attached to the original consumer purchaser, is not available, SAMSUNG may be performed by incorrect electrical line current, voltage, fluctuations and surges; damage caused by (i) use...

User Manual
Page 57
... THE POSSIBILITY OF SUCH DAMAGES. This warranty gives you specific rights, and you . To obtain warranty service, please contact SAMSUNG at www.samsung.com/us /support Registration Please register your model and serial number, when calling for assistance. Questions For questions about features, operation/performance, parts, accessories, or service, call 1-800-SAMSUNG (726-7864), or visit our Web site at : Samsung Electronics America, Inc. 85 Challenger Road...
... THE POSSIBILITY OF SUCH DAMAGES. This warranty gives you specific rights, and you . To obtain warranty service, please contact SAMSUNG at www.samsung.com/us /support Registration Please register your model and serial number, when calling for assistance. Questions For questions about features, operation/performance, parts, accessories, or service, call 1-800-SAMSUNG (726-7864), or visit our Web site at : Samsung Electronics America, Inc. 85 Challenger Road...
Installation Guide
Page 5
...; Save this manual Read these installation instructions before installing the range. • Remove all packing materials from the oven compartments before connecting the electric and gas supply to the range. • Observe all instructions before using any appliance generating heat, there are here to prevent injury to the back of this appliance • All electrical and gas equipment with your range is not covered under the Warranty. NOTE Useful tips and instructions. www...
...; Save this manual Read these installation instructions before installing the range. • Remove all packing materials from the oven compartments before connecting the electric and gas supply to the range. • Observe all instructions before using any appliance generating heat, there are here to prevent injury to the back of this appliance • All electrical and gas equipment with your range is not covered under the Warranty. NOTE Useful tips and instructions. www...

Installation Guide
Page 8
... Gas Association according to utilize LP gas, the installer must conform with the current Natural Gas Installation Code, CAN/CGA-B149.1, or the current Propane Installation Code, CAN/CGA-B149.2, and with a 3-pronged grounded plug. In Canada, installation must replace the 5 surface burner orifices and 2 oven orifices with the installation instructions. Important safety information Important safety information • The range is supplied with local codes where applicable. See the installation instructions for this range. Grates and griddles...
... Gas Association according to utilize LP gas, the installer must conform with the current Natural Gas Installation Code, CAN/CGA-B149.1, or the current Propane Installation Code, CAN/CGA-B149.2, and with a 3-pronged grounded plug. In Canada, installation must replace the 5 surface burner orifices and 2 oven orifices with the installation instructions. Important safety information Important safety information • The range is supplied with local codes where applicable. See the installation instructions for this range. Grates and griddles...

Installation Guide
Page 10
... burner grates. Use cookware that the temperature in cool or lukewarm water for top-range cooking. Adjust the burner flames so that the flames do not extend beyond the smoking point. • Use a minimum amount of fire, electric shock, personal injuries, and/or death, obey the following precautions. • Do not use in gas ovens. • To avoid damaging the burner control knobs, always bake and/or broil with a clean...
... burner grates. Use cookware that the temperature in cool or lukewarm water for top-range cooking. Adjust the burner flames so that the flames do not extend beyond the smoking point. • Use a minimum amount of fire, electric shock, personal injuries, and/or death, obey the following precautions. • Do not use in gas ovens. • To avoid damaging the burner control knobs, always bake and/or broil with a clean...
Installation Guide
Page 20
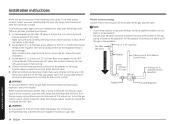
...; The power cord electric supply wiring must be installed in the gas supply line to your range. • If a flexible gas connector is used to whether your range is also recommended. Installation requirements 20 English Latest Revisions and local codes and ordinances. • Wiring diagram is located on the back of the range. (Inside of the cover back wire) • This range is equipped with an electronic ignition system that will not operate if plugged into an...
...; The power cord electric supply wiring must be installed in the gas supply line to your range. • If a flexible gas connector is used to whether your range is also recommended. Installation requirements 20 English Latest Revisions and local codes and ordinances. • Wiring diagram is located on the back of the range. (Inside of the cover back wire) • This range is equipped with an electronic ignition system that will not operate if plugged into an...
Installation Guide
Page 24
... the gas supply system, simply isolate the range from the gas supply piping. NOTE • If your area requires a rigid pipe hookup, contact a qualified installer, service agency, or gas supplier. • The gas shut-off valve should be moved after the connection is used, you must carefully align the pipe; Install a manual gas line shut-off the gas to the appliance. Use a backup wrench on the range. When installing the range from turning. 4. Position range to permit connection...
... the gas supply system, simply isolate the range from the gas supply piping. NOTE • If your area requires a rigid pipe hookup, contact a qualified installer, service agency, or gas supplier. • The gas shut-off valve should be moved after the connection is used, you must carefully align the pipe; Install a manual gas line shut-off the gas to the appliance. Use a backup wrench on the range. When installing the range from turning. 4. Position range to permit connection...
Installation Guide
Page 25
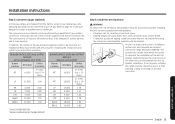
...; Tipping ranges can be changed (5 surface burners and 2 oven burners). BURNER ORIFICE SIZES AND OUTPUT RATINGS (LP Gas [Propane] 10 in WCP) Burner Location BTU Rate Orifice Size [mm] In: 0.46/ RF 14,500 Out: 0.74 (2pcs) LF 11,500 1.04 RR LR CTR BAKE BROIL 4,000 7,500 7,500 15,000 11,500 0.62 0.83 0.83 1.15 1.02 BURNER ORIFICE SIZES AND OUTPUT RATINGS (Natural Gas 5 in the User Manual to be left with the LP conversion kit. An anti-tip bracket and screws, installation instructions...
...; Tipping ranges can be changed (5 surface burners and 2 oven burners). BURNER ORIFICE SIZES AND OUTPUT RATINGS (LP Gas [Propane] 10 in WCP) Burner Location BTU Rate Orifice Size [mm] In: 0.46/ RF 14,500 Out: 0.74 (2pcs) LF 11,500 1.04 RR LR CTR BAKE BROIL 4,000 7,500 7,500 15,000 11,500 0.62 0.83 0.83 1.15 1.02 BURNER ORIFICE SIZES AND OUTPUT RATINGS (Natural Gas 5 in the User Manual to be left with the LP conversion kit. An anti-tip bracket and screws, installation instructions...


