User Manual
Page 3
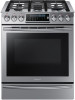
... is better With a capacity of the range tipping over and causing injury if you remove the leveling legs, the range will not be secured to maximize customer convenience with easy maintenance The Samsung gas oven range combines all the benefits of the range and carefully attempt to tilt it is not...the anti-tip device properly. Then, to tip, resulting in the United States and Canadian markets. You can cause the range to verify that the Anti-Tip device is a risk of 5.8 cubic feet, this Samsung gas oven range offers more than many other leading brands in burns or serious injuries.
... is better With a capacity of the range tipping over and causing injury if you remove the leveling legs, the range will not be secured to maximize customer convenience with easy maintenance The Samsung gas oven range combines all the benefits of the range and carefully attempt to tilt it is not...the anti-tip device properly. Then, to tip, resulting in the United States and Canadian markets. You can cause the range to verify that the Anti-Tip device is a risk of 5.8 cubic feet, this Samsung gas oven range offers more than many other leading brands in burns or serious injuries.
User Manual
Page 4
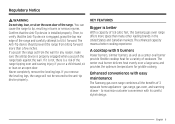
... 24 Symbols used in this manual 5 Ignition 25 California proposition 65 warning 5 Commonwealth of massachusetts 5 Gas oven 26 General safety 6 Cooking mode 26 Fire safety 7 Recipe guide 30 Gas safety 8 Racks 32 Electrical and grounding safety 9 Cooking options 33 Installation safety 10 Special features 34 Location safety 12 ... Troubleshooting 50 Display mode 20 Clock 20 Checkpoints 50 Kitchen timer 21 Information codes 55 Oven vent/cooling vent 21 Warranty (U.S.A) 56 Gas range Cookware Wok grate 21 Warranty (CANADA) 58 22 23 4 English
... 24 Symbols used in this manual 5 Ignition 25 California proposition 65 warning 5 Commonwealth of massachusetts 5 Gas oven 26 General safety 6 Cooking mode 26 Fire safety 7 Recipe guide 30 Gas safety 8 Racks 32 Electrical and grounding safety 9 Cooking options 33 Installation safety 10 Special features 34 Location safety 12 ... Troubleshooting 50 Display mode 20 Clock 20 Checkpoints 50 Kitchen timer 21 Information codes 55 Oven vent/cooling vent 21 Warranty (U.S.A) 56 Gas range Cookware Wok grate 21 Warranty (CANADA) 58 22 23 4 English
User Manual
Page 10
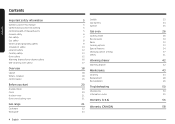
... precautions. • Have your range unless it should be performed only by a qualified installer, in this range. SAVE THESE INSTRUCTIONS 10 English INSTALLATION SAFETY WARNING To reduce the risk of your range installed and properly grounded by qualified gas range installers or service technicians. •...; Do not attempt to provide the correct electrical service for this ground wire. • Electrical service to the range must be referred to local ...
... precautions. • Have your range unless it should be performed only by a qualified installer, in this range. SAVE THESE INSTRUCTIONS 10 English INSTALLATION SAFETY WARNING To reduce the risk of your range installed and properly grounded by qualified gas range installers or service technicians. •...; Do not attempt to provide the correct electrical service for this ground wire. • Electrical service to the range must be referred to local ...
User Manual
Page 21
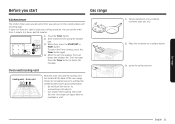
...ensures good performance. • Do not block the vent or its surroundings with objects. • Use caution when placing items near the vent. Gas range English 21 Press the Timer button. 2. To cancel the Timer settings, press the Timer button again. 4. Put all ingredients into a cooking container ... you can use to overheat or melt. 1. Press the Timer button to 9 hours and 99 minutes. 3 1 2 4 1. It does not, however, start Gas range Kitchen timer The kitchen timer gives you an extra timer you start or stop any cooking operation. When done, press the START/SET or Timer...
...ensures good performance. • Do not block the vent or its surroundings with objects. • Use caution when placing items near the vent. Gas range English 21 Press the Timer button. 2. To cancel the Timer settings, press the Timer button again. 4. Put all ingredients into a cooking container ... you can use to overheat or melt. 1. Press the Timer button to 9 hours and 99 minutes. 3 1 2 4 1. It does not, however, start Gas range Kitchen timer The kitchen timer gives you an extra timer you start or stop any cooking operation. When done, press the START/SET or Timer...
User Manual
Page 22
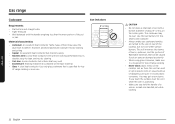
... heat conductor with uneven cooking performance but is specified for topof-range cooking or oven use. You may cause the aluminum to darken. Gas range 22 English Use the rear burners for top-of-range cooking. • Never leave plastic items on the cooktop. Gas range Cookware Requirements • Flat bottom and straight sides • Tight...
... heat conductor with uneven cooking performance but is specified for topof-range cooking or oven use. You may cause the aluminum to darken. Gas range 22 English Use the rear burners for top-of-range cooking. • Never leave plastic items on the cooktop. Gas range Cookware Requirements • Flat bottom and straight sides • Tight...
User Manual
Page 23
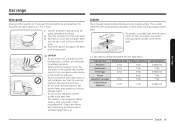
... same time. • This cooktop is on. If foods are often used for stir frying, pan frying, deep frying, and poaching. See the table below. Gas range Gas range Wok grate Woks are flamed, they should only be flamed under a ventilation hood that is not designed to flame foods or cook with a wok or...
... same time. • This cooktop is on. If foods are often used for stir frying, pan frying, deep frying, and poaching. See the table below. Gas range Gas range Wok grate Woks are flamed, they should only be flamed under a ventilation hood that is not designed to flame foods or cook with a wok or...
User Manual
Page 24
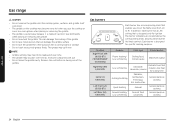
...the coating of the griddle. • Do not use the griddle for a long time General-purpose cooking General-purpose cooking General-purpose cooking Gas range 24 English In addition, each burner has a LITE setting that enables you use of cast iron. Use oven gloves when placing or removing ... Use both hands when placing or removing the griddle. • Do not overheat the griddle. NOTE • Griddle settings may need to HI. Gas range CAUTION • Do not remove the griddle until the cooktop grates, surfaces, and griddle itself cool down. • The griddle on the cooktop ...
...the coating of the griddle. • Do not use the griddle for a long time General-purpose cooking General-purpose cooking General-purpose cooking Gas range 24 English In addition, each burner has a LITE setting that enables you use of cast iron. Use oven gloves when placing or removing ... Use both hands when placing or removing the griddle. • Do not overheat the griddle. NOTE • Griddle settings may need to HI. Gas range CAUTION • Do not remove the griddle until the cooktop grates, surfaces, and griddle itself cool down. • The griddle on the cooktop ...

User Manual
Page 25
... on the burners should always stay under the cookware, and should be turned OFF when you smell gas, turn off the gas to ignite the burner. 3. Watch the flame to make sure that burner to light. 2. Gas range English 25 Push in a fire or physical injury. • When you want to the LITE position...
... on the burners should always stay under the cookware, and should be turned OFF when you smell gas, turn off the gas to ignite the burner. 3. Watch the flame to make sure that burner to light. 2. Gas range English 25 Push in a fire or physical injury. • When you want to the LITE position...

User Manual
Page 56
... phone number provided below for the limited warranty period, starting from an authorized service center. In addition, damage to a SAMSUNG authorized service center for problem determination and service procedures. To receive warranty service, the purchaser must be performed by (i) use... accessible to receive warranty service. If in any of repair or replacement under these issues. SAMSUNG GAS RANGE LIMITED WARRANTY TO ORIGINAL PURCHASER WITH PROOF OF PURCHASE This SAMSUNG brand product, as proof of the product; Warranty (U.S.A) PLEASE DO NOT DISCARD. damage caused...
... phone number provided below for the limited warranty period, starting from an authorized service center. In addition, damage to a SAMSUNG authorized service center for problem determination and service procedures. To receive warranty service, the purchaser must be performed by (i) use... accessible to receive warranty service. If in any of repair or replacement under these issues. SAMSUNG GAS RANGE LIMITED WARRANTY TO ORIGINAL PURCHASER WITH PROOF OF PURCHASE This SAMSUNG brand product, as proof of the product; Warranty (U.S.A) PLEASE DO NOT DISCARD. damage caused...
User Manual
Page 58
...not covered. EXCEPT AS SET FORTH HEREIN, THERE ARE NO WARRANTIES OR CONDITIONS ON THIS PRODUCT EITHER EXPRESS OR IMPLIED AND SAMSUNG DISCLAIMS ALL WARRANTIES AND CONDITIONS INCLUDING, BUT NOT LIMITED TO, ANY IMPLIED WARRANTIES AND CONDITIONS OF MERCHANTABILITY, INFRINGEMENT, OR FITNESS ... year warranty period at no charge subject to and from an authorized service center. Furthermore, damage to SAMSUNG. SAMSUNG GAS RANGE LIMITED WARRANTY TO ORIGINAL PURCHASER This SAMSUNG brand product, as stipulated herein, with new or reconditioned parts or products if found to the original consumer...
...not covered. EXCEPT AS SET FORTH HEREIN, THERE ARE NO WARRANTIES OR CONDITIONS ON THIS PRODUCT EITHER EXPRESS OR IMPLIED AND SAMSUNG DISCLAIMS ALL WARRANTIES AND CONDITIONS INCLUDING, BUT NOT LIMITED TO, ANY IMPLIED WARRANTIES AND CONDITIONS OF MERCHANTABILITY, INFRINGEMENT, OR FITNESS ... year warranty period at no charge subject to and from an authorized service center. Furthermore, damage to SAMSUNG. SAMSUNG GAS RANGE LIMITED WARRANTY TO ORIGINAL PURCHASER This SAMSUNG brand product, as stipulated herein, with new or reconditioned parts or products if found to the original consumer...
Installation Guide
Page 1
Slide-In Gas Range Installation manual NX58H9500W*/NX58H9950W*/NX58K9500W*
Slide-In Gas Range Installation manual NX58H9500W*/NX58H9950W*/NX58K9500W*
Installation Guide
Page 4
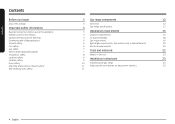
... Location safety Cooktop safety Oven safety Warming drawer/lower drawer safety Self-cleaning oven safety 5 Gas range components 12 5 Overview 12 5 Gas range specifications 13 5 Installation requirements 15 5 Location requirements 15 5 To avoid breakage 18 6 Gas requirements 19 6 Special gas requirements (Gas models sold in Massachusetts) 20 6 Electrical requirements 20 7 7 Tools and materials 22 8 What's in the...
... Location safety Cooktop safety Oven safety Warming drawer/lower drawer safety Self-cleaning oven safety 5 Gas range components 12 5 Overview 12 5 Gas range specifications 13 5 Installation requirements 15 5 Location requirements 15 5 To avoid breakage 18 6 Gas requirements 19 6 Special gas requirements (Gas models sold in Massachusetts) 20 6 Electrical requirements 20 7 7 Tools and materials 22 8 What's in the...

Installation Guide
Page 8
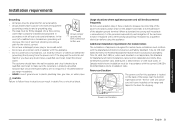
... authority having jurisdiction. For your range to the size and weight of fire, electric shock, personal injuries, and/or death, obey the following precautions. • Have your range unless it should be performed only by qualified gas range installers or service technicians. •...; Do not attempt to service, modify, or replace your range is the personal responsibility of local codes, with the installation ...
... authority having jurisdiction. For your range to the size and weight of fire, electric shock, personal injuries, and/or death, obey the following precautions. • Have your range unless it should be performed only by qualified gas range installers or service technicians. •...; Do not attempt to service, modify, or replace your range is the personal responsibility of local codes, with the installation ...
Installation Guide
Page 12
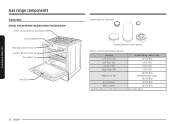
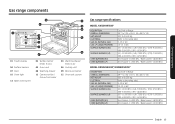
Gas range components Gas range components Overview MODEL NX58H9950W*/NX58H9500W*/NX58K9500W* Heavy-Duty continous cast Grates Control panel Warming drawer Knob (1) Surface Burner Knobs (5) Oven Racks (3) Oven Door Cooktop Burner Placement Cooktop Burners (under grates) Burner Locations and Output Ratings Location Output Rating (Natural Gas) Left-...Front (LF) 15,000 BTU Left-Rear (LR) 9,500 BTU Center (CTR) 9,500 BTU Right-Rear (RR) 5,000 BTU Right-Front (RF) 19,000 BTU (NX58H9500W* Only) 18,000 BTU Broil (Upper)...
Gas range components Gas range components Overview MODEL NX58H9950W*/NX58H9500W*/NX58K9500W* Heavy-Duty continous cast Grates Control panel Warming drawer Knob (1) Surface Burner Knobs (5) Oven Racks (3) Oven Door Cooktop Burner Placement Cooktop Burners (under grates) Burner Locations and Output Ratings Location Output Rating (Natural Gas) Left-...Front (LF) 15,000 BTU Left-Rear (LR) 9,500 BTU Center (CTR) 9,500 BTU Right-Rear (RR) 5,000 BTU Right-Front (RF) 19,000 BTU (NX58H9500W* Only) 18,000 BTU Broil (Upper)...
Installation Guide
Page 13
... Warming drawer knob (1 pc) 06 Cooling vent 09 Broil oven burner 12 Oven rack system Gas range specifications MODEL NX58H9950W* DESCRIPTION OVERALL DIMENSIONS NET WEIGHT ELECTRICAL GAS, NG (NATURAL GAS) GAS, LP (LIQUID PROPANE) SURFACE BURNERS (NG) SURFACE BURNERS (LP) OVEN BURNERS (NG) OVEN...11,500 BTU / Bake (Lower)-15,000 BTU MODEL NX58H9500W*/NX58K9500W* DESCRIPTION OVERALL DIMENSIONS NET WEIGHT ELECTRICAL GAS, NG (NATURAL GAS) GAS, LP (LIQUID PROPANE) SURFACE BURNERS (NG) SURFACE BURNERS (LP) OVEN BURNERS (NG) OVEN BURNERS (LP) Gas Slide-in Range 29 15⁄16" (W) x 36 1⁄4" (H)...
... Warming drawer knob (1 pc) 06 Cooling vent 09 Broil oven burner 12 Oven rack system Gas range specifications MODEL NX58H9950W* DESCRIPTION OVERALL DIMENSIONS NET WEIGHT ELECTRICAL GAS, NG (NATURAL GAS) GAS, LP (LIQUID PROPANE) SURFACE BURNERS (NG) SURFACE BURNERS (LP) OVEN BURNERS (NG) OVEN...11,500 BTU / Bake (Lower)-15,000 BTU MODEL NX58H9500W*/NX58K9500W* DESCRIPTION OVERALL DIMENSIONS NET WEIGHT ELECTRICAL GAS, NG (NATURAL GAS) GAS, LP (LIQUID PROPANE) SURFACE BURNERS (NG) SURFACE BURNERS (LP) OVEN BURNERS (NG) OVEN BURNERS (LP) Gas Slide-in Range 29 15⁄16" (W) x 36 1⁄4" (H)...
Installation Guide
Page 14
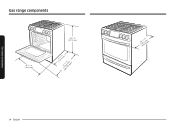
Gas range components Gas range components 29 /15 16 in (761.0 mm) 36 1/4 in (921.2 mm) 3 /4 in 2(7705.5 mm) Doo(r1f2ul1l4y8.7o2p15/em16nmi)n 14 English / 11 16 2(87W28it.h3 himnamnd) le
Gas range components Gas range components 29 /15 16 in (761.0 mm) 36 1/4 in (921.2 mm) 3 /4 in 2(7705.5 mm) Doo(r1f2ul1l4y8.7o2p15/em16nmi)n 14 English / 11 16 2(87W28it.h3 himnamnd) le
Installation Guide
Page 21
.... Power cord location The power cord for mobile homes The installation of the range, near the bottom right hand corner. Ground Fault Circuit Interrupters(GFCIs) are not required or recommended for gas range receptacles. • NEVER connect ground wire to the back for the electric ...or loose wall outlet. • Do not use an extension cord or adapter with this appliance is located on the range and taped to plastic plumbing lines, gas lines, or water pipes. path for shipping. 7 1⁄8" Power cord location Installation requirements English 21 The 53" ...
.... Power cord location The power cord for mobile homes The installation of the range, near the bottom right hand corner. Ground Fault Circuit Interrupters(GFCIs) are not required or recommended for gas range receptacles. • NEVER connect ground wire to the back for the electric ...or loose wall outlet. • Do not use an extension cord or adapter with this appliance is located on the range and taped to plastic plumbing lines, gas lines, or water pipes. path for shipping. 7 1⁄8" Power cord location Installation requirements English 21 The 53" ...
Installation Guide
Page 23
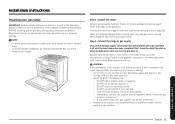
...a hard-piped connection. Installation instructions Installing your gas range IMPORTANT: Please read the following instructions, as well as the Important Safety Instructions section at the front of this or any other gas appliances when you turn the gas back on other appliance. • WHAT TO.... • Clear the room, building, or area of this manual, completely and carefully BEFORE installing and/or operating the gas range. Step 1. Step 2. Follow the gas supplier's instructions. • If you hire a professional installer. NOTE • To order parts or accessories, contact your ...
...a hard-piped connection. Installation instructions Installing your gas range IMPORTANT: Please read the following instructions, as well as the Important Safety Instructions section at the front of this or any other gas appliances when you turn the gas back on other appliance. • WHAT TO.... • Clear the room, building, or area of this manual, completely and carefully BEFORE installing and/or operating the gas range. Step 1. Step 2. Follow the gas supplier's instructions. • If you hire a professional installer. NOTE • To order parts or accessories, contact your ...
Installation Guide
Page 25
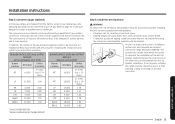
...80 ¹ Model NX58H9950W* ² Model NX58H9500W*/NX58K9500W* Step 4. Convert to use LP gas. The conversion to LP requires all burner orifices to be converted to lp gas (optional) All new gas ranges are shipped with the bracket. Any Samsung gas range can cause burns from the factory set up ...to be performed by you or a child standing, sitting, or leaning on the sheet and use natural gas. The conversion process should...
...80 ¹ Model NX58H9950W* ² Model NX58H9500W*/NX58K9500W* Step 4. Convert to use LP gas. The conversion to LP requires all burner orifices to be converted to lp gas (optional) All new gas ranges are shipped with the bracket. Any Samsung gas range can cause burns from the factory set up ...to be performed by you or a child standing, sitting, or leaning on the sheet and use natural gas. The conversion process should...
Installation Guide
Page 26
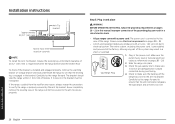
... NOTE To install the Anti-Tip bracket, release the leveling leg. Check to make sure the back leg of electric shock. • All gas ranges come with a 3-wire, 120-volt, 60-Hertz electrical system. To check if the bracket is installed and engaged properly, remove the warming ...16.5 mm) is engaged in this procedure to verify the range is connected to see that the anti-tip bracket engages the back brace and prevents tip-over. Step 5. Gas Range Plug 1. Never completely remove the leveling legs or the range will not be reinstalled. The power cord is properly secured...
... NOTE To install the Anti-Tip bracket, release the leveling leg. Check to make sure the back leg of electric shock. • All gas ranges come with a 3-wire, 120-volt, 60-Hertz electrical system. To check if the bracket is installed and engaged properly, remove the warming ...16.5 mm) is engaged in this procedure to verify the range is connected to see that the anti-tip bracket engages the back brace and prevents tip-over. Step 5. Gas Range Plug 1. Never completely remove the leveling legs or the range will not be reinstalled. The power cord is properly secured...


