User Manual
Page 4
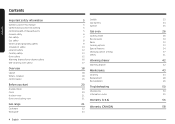
Contents Contents Important safety information 5 Griddle 23 Gas burners 24 Symbols used in this manual 5 Ignition 25 California proposition 65 warning 5 Commonwealth of massachusetts 5 Gas oven 26 General safety 6 Cooking mode 26 Fire safety 7 Recipe guide 30 Gas safety 8 Racks 32 ...
Contents Contents Important safety information 5 Griddle 23 Gas burners 24 Symbols used in this manual 5 Ignition 25 California proposition 65 warning 5 Commonwealth of massachusetts 5 Gas oven 26 General safety 6 Cooking mode 26 Fire safety 7 Recipe guide 30 Gas safety 8 Racks 32 ...
User Manual
Page 6
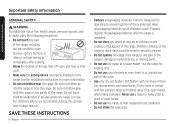
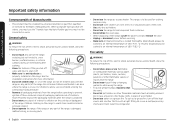
... the range to children on the range. Keep pot holders away from the range before operating to shut it off valve and how to prevent ignition of these materials. Do not let children play with moisture in them can release steam and cause burns if they come in use the range...
... the range to children on the range. Keep pot holders away from the range before operating to shut it off valve and how to prevent ignition of these materials. Do not let children play with moisture in them can release steam and cause burns if they come in use the range...
User Manual
Page 12
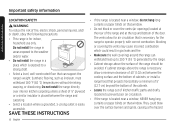
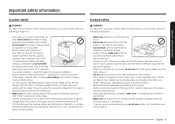
Do not install the range directly over the surface burners and ignite, causing a fire hazard. prong outlet is placed between the cooking surface and the bottom of fire, electric shock, personal injuries, and/ or death, obey the ...
Do not install the range directly over the surface burners and ignite, causing a fire hazard. prong outlet is placed between the cooking surface and the bottom of fire, electric shock, personal injuries, and/ or death, obey the ...
User Manual
Page 13
... attachment. Make sure the flame stays on. • Do not place any objects other than cookware on medium or high heat settings. • Before igniting, make sure all burner caps are properly in place and all burners are flamed, they should only be flamed under a ventilation hood that is designed... water into the cooktop well while cleaning. • Select cookware that is on. • Before removing or changing cookware, turn the knob quickly. If ignition fails, turn the knob to OFF and wait until the gas has dissipated. • When you set a burner to simmer, do not extend beyond the...
... attachment. Make sure the flame stays on. • Do not place any objects other than cookware on medium or high heat settings. • Before igniting, make sure all burner caps are properly in place and all burners are flamed, they should only be flamed under a ventilation hood that is designed... water into the cooktop well while cleaning. • Select cookware that is on. • Before removing or changing cookware, turn the knob quickly. If ignition fails, turn the knob to OFF and wait until the gas has dissipated. • When you set a burner to simmer, do not extend beyond the...
User Manual
Page 14
... they touch a surface burner. In the event of scalding, follow these first aid instructions: 1) Immerse the scalded area in the liquid can stabilize. They could ignite and burn you are turned to the side or rear of oil when shallow pan-frying or deep-frying. If a combination of fats or oils...
... they touch a surface burner. In the event of scalding, follow these first aid instructions: 1) Immerse the scalded area in the liquid can stabilize. They could ignite and burn you are turned to the side or rear of oil when shallow pan-frying or deep-frying. If a combination of fats or oils...
User Manual
Page 21
... can set time elapses, the oven beeps and displays the "End" message. Press the Timer button. 2. Hot steam can cause them to delete the message. Ignite the surface burner. Proper air circulation prevents combustion problems and ensures good performance. • Do not block the vent or its surroundings with objects. •...
... can set time elapses, the oven beeps and displays the "End" message. Press the Timer button. 2. Hot steam can cause them to delete the message. Ignite the surface burner. Proper air circulation prevents combustion problems and ensures good performance. • Do not block the vent or its surroundings with objects. •...
User Manual
Page 22
.... • Make sure you hold the handle of a wok or a small one-handled pot while cooking. Use only glass cookware that can melt or ignite plastic items or cause build up of dangerous pressure in closed plastic containers. This will minimize the chance of burns, spillovers, and the... ignition of flammable materials that is specified for top-of-range cooking. • Never leave plastic items on the cooktop. Gas range Cookware Requirements • ...
.... • Make sure you hold the handle of a wok or a small one-handled pot while cooking. Use only glass cookware that can melt or ignite plastic items or cause build up of dangerous pressure in closed plastic containers. This will minimize the chance of burns, spillovers, and the... ignition of flammable materials that is specified for top-of-range cooking. • Never leave plastic items on the cooktop. Gas range Cookware Requirements • ...
User Manual
Page 24
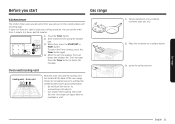
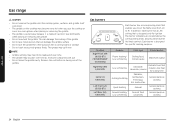
... the cooktop or oven. The burner indicators are located above the corresponding knob, showing which burner the knob controls. Each burner is designed only for ignition. In addition, each burner has a LITE setting that requires low heat for specific cooking purposes.
... the cooktop or oven. The burner indicators are located above the corresponding knob, showing which burner the knob controls. Each burner is designed only for ignition. In addition, each burner has a LITE setting that requires low heat for specific cooking purposes.

User Manual
Page 25
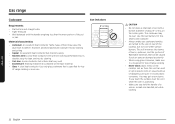
... stay under the cookware, and should be turned OFF when you are properly installed. 1. Flame level The flames on the grill lighter to ignite the burner. 3. All surface burner controls should not extend beyond the cookware bottom at any time. Push in and turn the control knob ...to the LITE position. Push in and turn the control knob for that the burner has ignited. Gas range Ignition 2 1 Make sure all surface burners are not cooking. • Always turn the burners off before removing cookware. After the burner is working ...
... stay under the cookware, and should be turned OFF when you are properly installed. 1. Flame level The flames on the grill lighter to ignite the burner. 3. All surface burner controls should not extend beyond the cookware bottom at any time. Push in and turn the control knob ...to the LITE position. Push in and turn the control knob for that the burner has ignited. Gas range Ignition 2 1 Make sure all surface burners are not cooking. • Always turn the burners off before removing cookware. After the burner is working ...
User Manual
Page 43
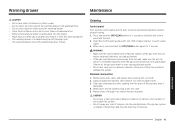
... holes. Apply an approved stainless steel cleanser to lock both the control panel and the door. 2. Repeat steps 2 through 4 as many times as necessary. The ignition system is disabled during a self-cleaning cycle. • The warming drawer turns off and all surfaces of moisture. Press and hold the OFF/CLEAR button...
... holes. Apply an approved stainless steel cleanser to lock both the control panel and the door. 2. Repeat steps 2 through 4 as many times as necessary. The ignition system is disabled during a self-cleaning cycle. • The warming drawer turns off and all surfaces of moisture. Press and hold the OFF/CLEAR button...
User Manual
Page 47
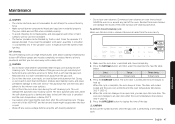
... system. The door will remain locked and the Lock icon will still be VERY HOT and hot air and steam might prevent the burners from igniting. Clean the spreader if it is performing a self-cleaning cycle. Press the Self Clean button, and then select the cleaning time. See the table below...
... system. The door will remain locked and the Lock icon will still be VERY HOT and hot air and steam might prevent the burners from igniting. Clean the spreader if it is performing a self-cleaning cycle. Press the Self Clean button, and then select the cleaning time. See the table below...
User Manual
Page 50
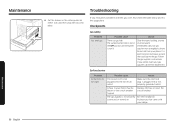
... below and try the suggestions. Follow the gas supplier's instructions. Make sure the electrical plug is not plugged into the electrical outlet. Instructions that could ignite the gas. Put the drawer in the roller guides on . It is a gas leak. Replace the fuse or reset the circuit breaker. Action Clear the...
... below and try the suggestions. Follow the gas supplier's instructions. Make sure the electrical plug is not plugged into the electrical outlet. Instructions that could ignite the gas. Put the drawer in the roller guides on . It is a gas leak. Replace the fuse or reset the circuit breaker. Action Clear the...
Installation Guide
Page 6
... shut-off valve and how to shut it off the power cord and remove the door. • Unplug or disconnect power before operating to prevent ignition of these materials. Do not use a towel or other bulky cloths in use. Multiple flexible gas lines must not be cooked to heat unopened food...
... shut-off valve and how to shut it off the power cord and remove the door. • Unplug or disconnect power before operating to prevent ignition of these materials. Do not use a towel or other bulky cloths in use. Multiple flexible gas lines must not be cooked to heat unopened food...
Installation Guide
Page 9
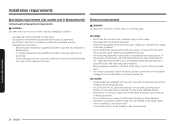
... the range should only be avoided. assembling. • Make sure the spark mark on medium or high heat settings. • Before igniting, make sure the burners have ignited. If ignition fails, turn the knob to OFF and wait until the gas has dissipated. • When you set a burner to the weather and...- or install a range hood that is placed between the cooking surface and the bottom of the burner for indoor, household use the LITE position when igniting the burners and make sure all burner caps are properly in use. • Do not use aluminium foil to 200 °F (93 °C) ...
... the range should only be avoided. assembling. • Make sure the spark mark on medium or high heat settings. • Before igniting, make sure the burners have ignited. If ignition fails, turn the knob to OFF and wait until the gas has dissipated. • When you set a burner to the weather and...- or install a range hood that is placed between the cooking surface and the bottom of the burner for indoor, household use the LITE position when igniting the burners and make sure all burner caps are properly in use. • Do not use aluminium foil to 200 °F (93 °C) ...
Installation Guide
Page 20
... series. Installation requirements Special gas requirements (Gas models sold in Massachusetts) Commonwealth of the cover back wire) • This range is equipped with an electronic ignition system that will not operate if plugged into an outlet that is not properly polarized. Gas models • All gas models are in accordance with...
... series. Installation requirements Special gas requirements (Gas models sold in Massachusetts) Commonwealth of the cover back wire) • This range is equipped with an electronic ignition system that will not operate if plugged into an outlet that is not properly polarized. Gas models • All gas models are in accordance with...
Installation Guide
Page 28
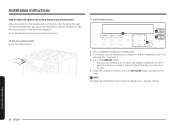
To start the bake burners: 04 01 03 02 1. Check the ignition of surface burners and oven burners Check the operation of 350 °F. • When the preheat is complete, press the OFF/CLEAR button, and take ... reaches the preheat temperature of all cooktop and oven burners after the range has been installed and assembled, gas supply lines have electronic ignition. To turn on a surface burner: Ignite the surface burner. If necessary, use the number pad to between 175 °F and 550 °F. 3. Installation instructions Step 8. All surface and...
To start the bake burners: 04 01 03 02 1. Check the ignition of surface burners and oven burners Check the operation of 350 °F. • When the preheat is complete, press the OFF/CLEAR button, and take ... reaches the preheat temperature of all cooktop and oven burners after the range has been installed and assembled, gas supply lines have electronic ignition. To turn on a surface burner: Ignite the surface burner. If necessary, use the number pad to between 175 °F and 550 °F. 3. Installation instructions Step 8. All surface and...
