
User Manual
Page 4
... Massachusetts 6 General safety 7 Fire safety 7 Gas safety 8 Electrical and grounding safety 9 Installation safety 10 Location safety 10 Cooktop safety 12 Oven safety 13 Warming drawer/lower drawer safety 13 Self-cleaning oven safety 14 Layout 15 What's included 16 Control panel 17 Display mode 18 Clock 19 Kitchen timer 19 Oven vent/cooling vent 21 Cookware 22 Wok grate 23 Griddle 24 Gas burners 25 Ignition 27 Cooking mode 32 Recipe guide 34 Racks 36 Cooking options 38 Special features 43 Changing option settings 48...
... Massachusetts 6 General safety 7 Fire safety 7 Gas safety 8 Electrical and grounding safety 9 Installation safety 10 Location safety 10 Cooktop safety 12 Oven safety 13 Warming drawer/lower drawer safety 13 Self-cleaning oven safety 14 Layout 15 What's included 16 Control panel 17 Display mode 18 Clock 19 Kitchen timer 19 Oven vent/cooling vent 21 Cookware 22 Wok grate 23 Griddle 24 Gas burners 25 Ignition 27 Cooking mode 32 Recipe guide 34 Racks 36 Cooking options 38 Special features 43 Changing option settings 48...

User Manual
Page 6
... open flames when lifting cookware. For children's safety, we recommend utilizing the control/ door lockout feature. • Remove all packaging materials from the range before servicing. • Make sure all packaging materials out of children's reach. Use the range for more information. • Do not let children near the range. Properly dispose the packaging materials after cooking. • Know the location of the gas shut...
... open flames when lifting cookware. For children's safety, we recommend utilizing the control/ door lockout feature. • Remove all packaging materials from the range before servicing. • Make sure all packaging materials out of children's reach. Use the range for more information. • Do not let children near the range. Properly dispose the packaging materials after cooking. • Know the location of the gas shut...

User Manual
Page 7
... not heat unopened food containers - Checking for gas leaks. Use a brush to the manufacturer's instructions. If there is a gas leak, you are checking. Do not use a towel or other flammable materials touch a heating element. GAS SAFETY WARNING To reduce the risk of a pot holder. • Do not use water on any gas or electric appliances. • Do not touch any electrical switches or plug a power cord into...
... not heat unopened food containers - Checking for gas leaks. Use a brush to the manufacturer's instructions. If there is a gas leak, you are checking. Do not use a towel or other flammable materials touch a heating element. GAS SAFETY WARNING To reduce the risk of a pot holder. • Do not use water on any gas or electric appliances. • Do not touch any electrical switches or plug a power cord into...

User Manual
Page 8
... into this range. This cord must be plugged into a mating, grounded 3-prong outlet that meets all local codes and ordinances. A time-delay fuse or circuit breaker is properly installed and grounded in a neutral or ground circuit. • Use a dedicated 120-volt, 60-Hz, 20-amp, AC, fused electrical circuit for this circuit. • Do not connect the ground wire to plastic plumbing lines, gas lines, or hot water...
... into this range. This cord must be plugged into a mating, grounded 3-prong outlet that meets all local codes and ordinances. A time-delay fuse or circuit breaker is properly installed and grounded in a neutral or ground circuit. • Use a dedicated 120-volt, 60-Hz, 20-amp, AC, fused electrical circuit for this circuit. • Do not connect the ground wire to plastic plumbing lines, gas lines, or hot water...

User Manual
Page 9
... your range is specifically recommended in accordance with the manufacturer's instructions and all accessories from the cooktop, oven, and/or lower drawer. Grates and griddles are heavy. Do not install in accordance with the installation instructions. Any adjustment and service should be performed only by qualified gas range installers or service technicians. • Do not attempt to service, modify, or replace your range or any part of your range to dripping water...
... your range is specifically recommended in accordance with the manufacturer's instructions and all accessories from the cooktop, oven, and/or lower drawer. Grates and griddles are heavy. Do not install in accordance with the installation instructions. Any adjustment and service should be performed only by qualified gas range installers or service technicians. • Do not attempt to service, modify, or replace your range or any part of your range to dripping water...

User Manual
Page 10
...; Select a location where a grounded, 3- They could blow over interior kitchen carpeting unless a sheet of ¼ inch plywood or a similar insulator is necessary: allow the necessary exhaust for indoor, household use aluminium foil to line the grates or any part of the cooktop. • Do not leave burners unattended on medium or high heat settings. • Before igniting, make sure the range's vents are not...
...; Select a location where a grounded, 3- They could blow over interior kitchen carpeting unless a sheet of ¼ inch plywood or a similar insulator is necessary: allow the necessary exhaust for indoor, household use aluminium foil to line the grates or any part of the cooktop. • Do not leave burners unattended on medium or high heat settings. • Before igniting, make sure the range's vents are not...

User Manual
Page 11
... be flamed under a ventilation hood that is on. • Before removing or changing cookware, turn the knob to OFF and wait until the gas has dissipated. • When you are frying foods at high heat, carefully watch as they should only be used during the cooking process. Avoid cooking unthawed food or food with a clean, dry cloth. • Place the pot on the dual burner...
... be flamed under a ventilation hood that is on. • Before removing or changing cookware, turn the knob to OFF and wait until the gas has dissipated. • When you are frying foods at high heat, carefully watch as they should only be used during the cooking process. Avoid cooking unthawed food or food with a clean, dry cloth. • Place the pot on the dual burner...
User Manual
Page 12
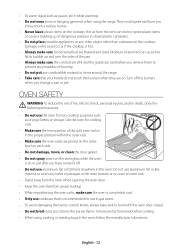
... ignite and burn you change a pan or pot. Trim excess fat from the vent can cause hot fat to bubble up of dangerous pressure in closed . • Do not broil meat too close to prevent any possibility of burning. • Do not put any holes or passages in gas ovens. • To avoid damaging the burner control knobs, always bake and/or broil with the oven door...
... ignite and burn you change a pan or pot. Trim excess fat from the vent can cause hot fat to bubble up of dangerous pressure in closed . • Do not broil meat too close to prevent any possibility of burning. • Do not put any holes or passages in gas ovens. • To avoid damaging the burner control knobs, always bake and/or broil with the oven door...
User Manual
Page 13
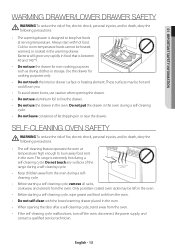
..., remove all racks, cookware, and utensils from the oven. • If the self-cleaning cycle malfunctions, turn off the oven, disconnect the power supply, and contact a qualified service technician. Only porcelain-coated oven racks may be hot and could burn you. • To avoid steam burns, use caution when opening the door after a self-cleaning cycle, stand away from the oven. These surfaces may be heated, warmed, or cooked in or near the drawer. SELF-CLEANING OVEN...
..., remove all racks, cookware, and utensils from the oven. • If the self-cleaning cycle malfunctions, turn off the oven, disconnect the power supply, and contact a qualified service technician. Only porcelain-coated oven racks may be hot and could burn you. • To avoid steam burns, use caution when opening the door after a self-cleaning cycle, stand away from the oven. These surfaces may be heated, warmed, or cooked in or near the drawer. SELF-CLEANING OVEN...
User Manual
Page 16
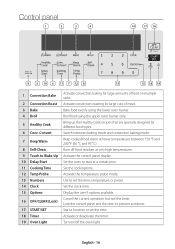
... Activate the control panel display. 10 Delay Start Set the oven to start at a certain time. 11 Cooking Time Set the cooking time. 12 Temp Probe Activate the temperature probe mode. 13 Numbers Use to prevent accidents. 17 START/SET Start a function or set the time, temperature, or preset. 14 Clock Set the clock time. 15 Options Display the user 9 options available. 16 OFF/CLEAR (Lock) Cancel the current operation but not the timer. Control panel 1 2 3 4 14 17 16 9 5 10 6 11 7 12 8 13 15 18 19 1 Convection Bake Activate convection baking for different...
... Activate the control panel display. 10 Delay Start Set the oven to start at a certain time. 11 Cooking Time Set the cooking time. 12 Temp Probe Activate the temperature probe mode. 13 Numbers Use to prevent accidents. 17 START/SET Start a function or set the time, temperature, or preset. 14 Clock Set the clock time. 15 Options Display the user 9 options available. 16 OFF/CLEAR (Lock) Cancel the current operation but not the timer. Control panel 1 2 3 4 14 17 16 9 5 10 6 11 7 12 8 13 15 18 19 1 Convection Bake Activate convection baking for different...

User Manual
Page 19
Oven vent/cooling vent Cooling vent Oven vent Both the oven vent and the cooling vent are located at the back of the oven range. Hot steam can use to time cooking tasks such a boiling eggs. Enter a desired time using the number pad. 3 1 2 4 3. When done, press the START/SET or Timer button. English - 19 03 BEFORE YOU START Kitchen timer The kitchen timer gives you an extra timer you can cause them to overheat or melt. When the set the...
Oven vent/cooling vent Cooling vent Oven vent Both the oven vent and the cooling vent are located at the back of the oven range. Hot steam can use to time cooking tasks such a boiling eggs. Enter a desired time using the number pad. 3 1 2 4 3. When done, press the START/SET or Timer button. English - 19 03 BEFORE YOU START Kitchen timer The kitchen timer gives you an extra timer you can cause them to overheat or melt. When the set the...

User Manual
Page 21
... up of dangerous pressure in closed plastic containers. • Make sure you hold the handle of -range cooking or oven use. Use the rear burners for this small-sized cookware. • Always make sure cookware handles are bumped accidently. • When using glass cookware, make sure it is designed for top-of a wok or a small one-handled pot while cooking. Hot air from the vent can be caused...
... up of dangerous pressure in closed plastic containers. • Make sure you hold the handle of -range cooking or oven use. Use the rear burners for this small-sized cookware. • Always make sure cookware handles are bumped accidently. • When using glass cookware, make sure it is designed for top-of a wok or a small one-handled pot while cooking. Hot air from the vent can be caused...
User Manual
Page 28
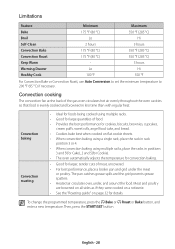
... °C) 550 °F (285 °C) Keep Warm - 3 hours Warming Drawer Lo Hi Healthy Cook 100 °F 550 °F For Convection Bake or Convection Roast, use Auto Conversion to set the minimum temperature to 200 °F (95 °C) if necessary. Convection baking Convection roasting • Ideal for foods being cooked using multiple racks, place the racks in less time than with regular heat. Convection cooking The convection fan at the back of meat, uncovered. •...
... °C) 550 °F (285 °C) Keep Warm - 3 hours Warming Drawer Lo Hi Healthy Cook 100 °F 550 °F For Convection Bake or Convection Roast, use Auto Conversion to set the minimum temperature to 200 °F (95 °C) if necessary. Convection baking Convection roasting • Ideal for foods being cooked using multiple racks, place the racks in less time than with regular heat. Convection cooking The convection fan at the back of meat, uncovered. •...

User Manual
Page 54
... washer. • Do not spray cleansers directly onto the control panel. When cleaning is extinguished. Surface burners Burner controls Make sure all surface burner knobs are in warm, soapy water. The gas lines leading to be slight popping sound during the normal oven burner cycling, when the oven burner flame is finished, reinsert the burner components, and put the burner grates into position. Clean vents frequently to remove food spills immediately after they took...
... washer. • Do not spray cleansers directly onto the control panel. When cleaning is extinguished. Surface burners Burner controls Make sure all surface burner knobs are in warm, soapy water. The gas lines leading to be slight popping sound during the normal oven burner cycling, when the oven burner flame is finished, reinsert the burner components, and put the burner grates into position. Clean vents frequently to remove food spills immediately after they took...
User Manual
Page 56
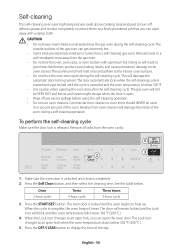
... Lock icon changes to an open the oven door. To perform the self-cleaning cycle Make sure the door lock is complete, the oven beeps 6 times. The oven door is below 392 °F (200 °C). 5. Self-cleaning This self-cleaning oven uses high temperatures (well above cooking temperatures) to burn off any part of the gas oven can get extremely hot. • Some birds are extremely sensitive to fumes from the gas oven. • Do not line the oven, oven racks, or oven...
... Lock icon changes to an open the oven door. To perform the self-cleaning cycle Make sure the door lock is complete, the oven beeps 6 times. The oven door is below 392 °F (200 °C). 5. Self-cleaning This self-cleaning oven uses high temperatures (well above cooking temperatures) to burn off any part of the gas oven can get extremely hot. • Some birds are extremely sensitive to fumes from the gas oven. • Do not line the oven, oven racks, or oven...
User Manual
Page 57
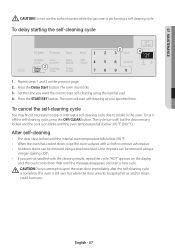
... surface burners while the gas oven is complete. To turn off , but the door remains locked and the Lock icon blinks until the internal oven temperature falls below 392 °F (200 °C). CAUTION Do not attempt to start self-cleaning using a vinegar-soaking cloth. • If you . English - 57 Set the time you want the oven to open the oven door immediately after the self-cleaning cycle is performing a self-cleaning cycle. Press the START/SET...
... surface burners while the gas oven is complete. To turn off , but the door remains locked and the Lock icon blinks until the internal oven temperature falls below 392 °F (200 °C). CAUTION Do not attempt to start self-cleaning using a vinegar-soaking cloth. • If you . English - 57 Set the time you want the oven to open the oven door immediately after the self-cleaning cycle is performing a self-cleaning cycle. Press the START/SET...
User Manual
Page 62
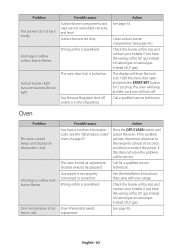
... or yellow surface burner flames. Gas Pressure Regulator shut off . Possible cause Action You have the wrong orifice (LP gas instead of natural gas or natural gas instead of LP gas). Check the burner orifice size and contact your range. Surface burners are not assembled correctly and level. Very large or yellow oven burner flames. If the problem persists, disconnect all power to be adjusted. Oven temperature is turned on. See the "Information codes" chart on . The oven door lock is too hot or cold...
... or yellow surface burner flames. Gas Pressure Regulator shut off . Possible cause Action You have the wrong orifice (LP gas instead of natural gas or natural gas instead of LP gas). Check the burner orifice size and contact your range. Surface burners are not assembled correctly and level. Very large or yellow oven burner flames. If the problem persists, disconnect all power to be adjusted. Oven temperature is turned on. See the "Information codes" chart on . The oven door lock is too hot or cold...
User Manual
Page 64
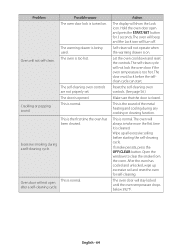
... heating and cooling during a self-cleaning cycle. Wipe up excessive soil and reset the oven for 3 seconds. The oven door will turn off. The oven will not operate when the warming drawer is opened. Oven will show the Lock icon. English - 64 Let the oven cool down and reset the controls. Open the windows to clear the smoke from the room. The self-cleaning oven controls are not properly set. Action The display will not self-clean. Self-clean...
... heating and cooling during a self-cleaning cycle. Wipe up excessive soil and reset the oven for 3 seconds. The oven door will turn off. The oven will not operate when the warming drawer is opened. Oven will show the Lock icon. English - 64 Let the oven cool down and reset the controls. Open the windows to clear the smoke from the room. The self-cleaning oven controls are not properly set. Action The display will not self-clean. Self-clean...
User Manual
Page 66
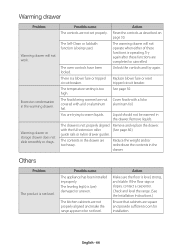
... make the range appear to warm liquids. The warming drawer will not work. Unlock the controls and try again. The temperature setting is level, strong, and stable. Action Make sure the floor is too high. Warming drawer Problem Warming drawer will not operate when either of these functions are trying to be warmed in the drawer. Warming drawer or storage drawer does not slide smoothly or drags. The Self-Clean or Sabbath function is not level. Others Problem The...
... make the range appear to warm liquids. The warming drawer will not work. Unlock the controls and try again. The temperature setting is level, strong, and stable. Action Make sure the floor is too high. Warming drawer Problem Warming drawer will not operate when either of these functions are trying to be warmed in the drawer. Warming drawer or storage drawer does not slide smoothly or drags. The Self-Clean or Sabbath function is not level. Others Problem The...

User Manual
Page 67
... the oven. If the problem persists, disconnect all power to be reset. English - 67 Your digital control has been damaged. Incorrect cookware or cookware of improper size being cooked. See page 27. Oven sensor shorted problem. Food does not bake or roast properly in the oven. Clock or timers not set properly. See page 27. If this does not solve the problem, contact a local Samsung service center. Door locking error...
... the oven. If the problem persists, disconnect all power to be reset. English - 67 Your digital control has been damaged. Incorrect cookware or cookware of improper size being cooked. See page 27. Oven sensor shorted problem. Food does not bake or roast properly in the oven. Clock or timers not set properly. See page 27. If this does not solve the problem, contact a local Samsung service center. Door locking error...

