
User Manual
Page 8
... mixture at high heat settings. See "WHAT TO DO IF YOU SMELL GAS" under the Gas Warnings. This could melt or burn near the oven vents or any of the gas valves or ports. Do not attempt to corrosion of the surface burners. Do not use your range for gas leaks. To put out a grease fire, turn off and disconnect the power supply. Do not place...
... mixture at high heat settings. See "WHAT TO DO IF YOU SMELL GAS" under the Gas Warnings. This could melt or burn near the oven vents or any of the gas valves or ports. Do not attempt to corrosion of the surface burners. Do not use your range for gas leaks. To put out a grease fire, turn off and disconnect the power supply. Do not place...

User Manual
Page 10
... design-certified by a qualified installer, service agency, or gas supplier. Never use the range. 2. Never block the oven vents (air openings). If you cannot reach your gas supplier, call your building. 6. Close the valve and do not use this appliance as a space heater to heat or warm the room. DO NOT touch any gas or electric appliances. 4. Read instructions completely and carefully. In Canada, installation must be performed by...
... design-certified by a qualified installer, service agency, or gas supplier. Never use the range. 2. Never block the oven vents (air openings). If you cannot reach your gas supplier, call your building. 6. Close the valve and do not use this appliance as a space heater to heat or warm the room. DO NOT touch any gas or electric appliances. 4. Read instructions completely and carefully. In Canada, installation must be performed by...

User Manual
Page 16
... the burner flame. Misuse traps heat and could cause carbon monoxide poisoning. Do not strike the oven glass. Do not use in the oven. Always follow the manufacturer's directions when using cooking or roasting bags in the oven, turn off . Keep the oven free from grease buildup. Only use glass cookware that is essential for use the oven to dry paper, clothes, etc. Always bake and/or broil with the oven door...
... the burner flame. Misuse traps heat and could cause carbon monoxide poisoning. Do not strike the oven glass. Do not use in the oven. Always follow the manufacturer's directions when using cooking or roasting bags in the oven, turn off . Keep the oven free from grease buildup. Only use glass cookware that is essential for use the oven to dry paper, clothes, etc. Always bake and/or broil with the oven door...

User Manual
Page 19
...a gas surface burner Flame size selection Gas surface burners and control knobs Cookware usage Center burner grate Wok grate (NX58H5650W* Only) Using the griddle Oven control panels and displays Setting the clock Setting the timer on/off Positioning the oven racks Using the gliding rack (NX58H5650W* only) Oven vent Oven light Baking Convection baking and roasting Timed cooking Delay timed cooking Broiling Keep warm Using the easy cook feature Favorite cooking Sabbath function Extra features About the warming drawer (Model NX58H5650W* only) Turning the warming drawer on or off Care and cleaning...
...a gas surface burner Flame size selection Gas surface burners and control knobs Cookware usage Center burner grate Wok grate (NX58H5650W* Only) Using the griddle Oven control panels and displays Setting the clock Setting the timer on/off Positioning the oven racks Using the gliding rack (NX58H5650W* only) Oven vent Oven light Baking Convection baking and roasting Timed cooking Delay timed cooking Broiling Keep warm Using the easy cook feature Favorite cooking Sabbath function Extra features About the warming drawer (Model NX58H5650W* only) Turning the warming drawer on or off Care and cleaning...

User Manual
Page 20
... new range Right-front burner control Flat surface Concave line Common use DISPLAY OVEN VENT (centered under oven control panel) OVEN COMPONENTS * Oven racks (2) Glide rack (1) (as equipped) Removable oven floor Removable oven door Griddle (1) OVEN COMPONENTS Oven rack position guide Broil oven burner WARMING DRAWER COMPONENTS Removable warming drawer (1) Full-extension roller guide rails (2) Electric heating element (not shown under drawer) * Oven light (1) Convection fan (1) Convection heater (not shown) Bake oven burner ADJUSTABLE LEVELING LEGS (4) (not shown) ANTI-TIP BRACKET KIT...
... new range Right-front burner control Flat surface Concave line Common use DISPLAY OVEN VENT (centered under oven control panel) OVEN COMPONENTS * Oven racks (2) Glide rack (1) (as equipped) Removable oven floor Removable oven door Griddle (1) OVEN COMPONENTS Oven rack position guide Broil oven burner WARMING DRAWER COMPONENTS Removable warming drawer (1) Full-extension roller guide rails (2) Electric heating element (not shown under drawer) * Oven light (1) Convection fan (1) Convection heater (not shown) Bake oven burner ADJUSTABLE LEVELING LEGS (4) (not shown) ANTI-TIP BRACKET KIT...

User Manual
Page 22
... adjust the power setting of the cookware. FLAME SIZE SELECTION Flames larger than the bottom of the cookware being used. 22_ surface cooking Hold a long gas grill lighter to the surface burner you want to the desired setting. LIGHTING A GAS SURFACE BURNER Make sure all the safety WARNING warnings and precautions listed on the burners should always match the size of the cookware will hear a "clicking" sound indicating the electronic ignition system is working...
... adjust the power setting of the cookware. FLAME SIZE SELECTION Flames larger than the bottom of the cookware being used. 22_ surface cooking Hold a long gas grill lighter to the surface burner you want to the desired setting. LIGHTING A GAS SURFACE BURNER Make sure all the safety WARNING warnings and precautions listed on the burners should always match the size of the cookware will hear a "clicking" sound indicating the electronic ignition system is working...

User Manual
Page 29
...;C). 11 SELF CLEAN Activates the self-cleaning oven function. Use this function to cook large cuts of meat. 4 BAKE Touch this function to cook large amounts of time. Special feature, oven, and time controls operating the oven 1 EASY COOK Press to recall the Easy cook recipe setting of the range. CONVECTION 3 ROAST ( ) Activates the convection roast function. It also locks the oven door to prevent accidental tipping of the oven. CONVECTION 2 BAKE ( ) Activates the convection bake function. This feature lets you want your food to activate the Bake function. Use this...
...;C). 11 SELF CLEAN Activates the self-cleaning oven function. Use this function to cook large cuts of meat. 4 BAKE Touch this function to cook large amounts of time. Special feature, oven, and time controls operating the oven 1 EASY COOK Press to recall the Easy cook recipe setting of the range. CONVECTION 3 ROAST ( ) Activates the convection roast function. It also locks the oven door to prevent accidental tipping of the oven. CONVECTION 2 BAKE ( ) Activates the convection bake function. This feature lets you want your food to activate the Bake function. Use this...

User Manual
Page 30
..., Favorite Cook. 30_ operating the oven Touch this pad to start again when you open the oven door while the oven is not a product failure. MINIMUM AND MAXIMUM SETTINGS All the features listed in 1 minute. If you close the door. Application mode : Conv. Use with the oven door closed. Bake, Conv. FEATURE BAKE BROIL SELF-CLEAN MINIMUM SETTING 150 °F (66 °C) Lo 2 hours MAXIMUM SETTING 550 °F (288 °C) Hi 4 hours CONVECTION BAKE ( ) CONVECTION ROAST ( ) KEEP WARM WARMING DRAWER...
..., Favorite Cook. 30_ operating the oven Touch this pad to start again when you open the oven door while the oven is not a product failure. MINIMUM AND MAXIMUM SETTINGS All the features listed in 1 minute. If you close the door. Application mode : Conv. Use with the oven door closed. Bake, Conv. FEATURE BAKE BROIL SELF-CLEAN MINIMUM SETTING 150 °F (66 °C) Lo 2 hours MAXIMUM SETTING 550 °F (288 °C) Hi 4 hours CONVECTION BAKE ( ) CONVECTION ROAST ( ) KEEP WARM WARMING DRAWER...

User Manual
Page 35
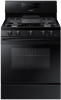
... to remove. Oven vent OVEN LIGHT The oven has a light that is located under the oven control panel. operating the oven Removing the Gliding rack • With the Sliding rack in the "Closed" position and the oven off by touching the Oven Light pad on the oven control panel. Always use care when placing items near the oven vent. Do not block or place items in the upper right-rear corner. Proper air circulation prevents oven burner combustion problems and ensures good cooking...
... to remove. Oven vent OVEN LIGHT The oven has a light that is located under the oven control panel. operating the oven Removing the Gliding rack • With the Sliding rack in the "Closed" position and the oven off by touching the Oven Light pad on the oven control panel. Always use care when placing items near the oven vent. Do not block or place items in the upper right-rear corner. Proper air circulation prevents oven burner combustion problems and ensures good cooking...

User Manual
Page 45
... broiling guide" on the top oven rack, positioned as poultry or thick cuts of day. If the fire continues, throw baking soda on a broiling pan with insert grid. Both can cause a grease fire to shut off the CAUTION oven. Use Lo to complete cooking at any time. To change a programmed broiling setting, press the Broil pad to cook and brown foods using only a top heat source. Press the START/SET pad to cook...
... broiling guide" on the top oven rack, positioned as poultry or thick cuts of day. If the fire continues, throw baking soda on a broiling pan with insert grid. Both can cause a grease fire to shut off the CAUTION oven. Use Lo to complete cooking at any time. To change a programmed broiling setting, press the Broil pad to cook and brown foods using only a top heat source. Press the START/SET pad to cook...

User Manual
Page 77
... service switch is selected. of improper size being cooked. Clean the electrodes. Check the burner orifice size and contact your installer if you have not been See page 33. Check the LP gas conversion. Wrong cooking mode is in the control knob and turn the control knob to the LITE position. Clock or timers not set properly. Gas Pressure Regulator shut off . technician. See page 37. troubleshooting _77 troubleshooting PROBLEM Surface burners do not light. Align the burner base. Replace fuse or reset circuit breaker. Very...
... service switch is selected. of improper size being cooked. Clean the electrodes. Check the burner orifice size and contact your installer if you have not been See page 33. Check the LP gas conversion. Wrong cooking mode is in the control knob and turn the control knob to the LITE position. Clock or timers not set properly. Gas Pressure Regulator shut off . technician. See page 37. troubleshooting _77 troubleshooting PROBLEM Surface burners do not light. Align the burner base. Replace fuse or reset circuit breaker. Very...

User Manual
Page 79
... from the room. Extremely dirty ovens require hand-cleaning of the metal heating and cooling during a self-cleaning cycle. Oven door will not lock the oven door if the oven temperature is cleaned. Self-clean will stay locked until the oven temperature drops below 350 °F. Wipe up excessive soil and reset the oven for a longer cleaning time. The oven door will not operate when the warming drawer is turned on . Oven not clean after a self-cleaning cycle. Reset the self-cleaning oven controls. (See pages 73 and...
... from the room. Extremely dirty ovens require hand-cleaning of the metal heating and cooling during a self-cleaning cycle. Oven door will not lock the oven door if the oven temperature is cleaned. Self-clean will stay locked until the oven temperature drops below 350 °F. Wipe up excessive soil and reset the oven for a longer cleaning time. The oven door will not operate when the warming drawer is turned on . Oven not clean after a self-cleaning cycle. Reset the self-cleaning oven controls. (See pages 73 and...

User Manual
Page 82
... by SAMSUNG; In addition, damage to the glass cooktop caused by (i) use of equipment, utilities, services, parts, supplies, accessories, applications, installations, repairs, external wiring or connectors not supplied or authorized by use of cleaners other damage to and from the date of original purchase, of the product; All replaced parts and products are not covered by a SAMSUNG authorized servicer is valid only on how to SAMSUNG. SAMSUNG GAS RANGE LIMITED WARRANTY TO...
... by SAMSUNG; In addition, damage to the glass cooktop caused by (i) use of equipment, utilities, services, parts, supplies, accessories, applications, installations, repairs, external wiring or connectors not supplied or authorized by use of cleaners other damage to and from the date of original purchase, of the product; All replaced parts and products are not covered by a SAMSUNG authorized servicer is valid only on how to SAMSUNG. SAMSUNG GAS RANGE LIMITED WARRANTY TO...

User Manual
Page 83
... questions about features, operation/performance, parts, accessories, or service, call 1-800-SAMSUNG (726-7864), or visit our Web site at www.samsung.com/register. No warranty or guarantee given by any other person, firm, or corporation with your product online at www.samsung.com/us/support. LIMITATION OF REMEDIES YOUR SOLE AND EXCLUSIVE REMEDY IS PRODUCT REPAIR, PRODUCT REPLACEMENT, OR REFUND...
... questions about features, operation/performance, parts, accessories, or service, call 1-800-SAMSUNG (726-7864), or visit our Web site at www.samsung.com/register. No warranty or guarantee given by any other person, firm, or corporation with your product online at www.samsung.com/us/support. LIMITATION OF REMEDIES YOUR SOLE AND EXCLUSIVE REMEDY IS PRODUCT REPAIR, PRODUCT REPLACEMENT, OR REFUND...

User Manual
Page 85
... state or province to province. User Replaceable Parts may need it, along with your receipt (or a copy) to perform service. Model # Serial # Please attach your model and serial number, when calling for unit repair. This warranty gives you specific legal rights, and you . You may be dispatched to this manual. QUESTIONS For questions about features, operation/performance, parts, accessories, or service, call 1-800-SAMSUNG (726-7864), or visit...
... state or province to province. User Replaceable Parts may need it, along with your receipt (or a copy) to perform service. Model # Serial # Please attach your model and serial number, when calling for unit repair. This warranty gives you specific legal rights, and you . You may be dispatched to this manual. QUESTIONS For questions about features, operation/performance, parts, accessories, or service, call 1-800-SAMSUNG (726-7864), or visit...

Installation Guide
Page 2
... range can withstand the heat generated by the range. • Cabinet storage space above the surface burners should follow. • Be sure your range is not covered under the Warranty. before connecting the electric and gas supply to the range. • Observe all governing codes and ordinances. • Be sure to leave these instructions with your user manual for future reference. • As when using any appliance generating heat...
... range can withstand the heat generated by the range. • Cabinet storage space above the surface burners should follow. • Be sure your range is not covered under the Warranty. before connecting the electric and gas supply to the range. • Observe all governing codes and ordinances. • Be sure to leave these instructions with your user manual for future reference. • As when using any appliance generating heat...

Installation Guide
Page 11
..., have any part of gas (natural or LP) that is properly grounded. In the event of a malfunction or breakdown, grounding will reduce the risk of electric WARNING shock. This appliance is specifically recommended in accordance with the grounding instructions on page 25. Firmly plug the power cord into a 120volt grounded outlet that is only used . safety instructions GROUNDING INSTRUCTIONS Grounding a range with a cord connection: This...
..., have any part of gas (natural or LP) that is properly grounded. In the event of a malfunction or breakdown, grounding will reduce the risk of electric WARNING shock. This appliance is specifically recommended in accordance with the grounding instructions on page 25. Firmly plug the power cord into a 120volt grounded outlet that is only used . safety instructions GROUNDING INSTRUCTIONS Grounding a range with a cord connection: This...
Installation Guide
Page 12
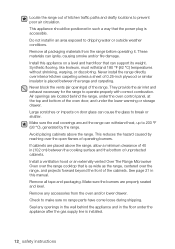
... over interior kitchen carpeting unless a sheet of 0.25-inch plywood or similar insulator is installed. 12_ safety instructions This reduces the hazard caused by the range. Remove all packaging materials from the oven and/or lower drawer. Never install the range directly over the open flames of operating burners. Air openings are placed above the range. Install a ventilation hood or an externally vented Over The Range Microwave Oven over the range cooktop that can withstand heat, up...
... over interior kitchen carpeting unless a sheet of 0.25-inch plywood or similar insulator is installed. 12_ safety instructions This reduces the hazard caused by the range. Remove all packaging materials from the oven and/or lower drawer. Never install the range directly over the open flames of operating burners. Air openings are placed above the range. Install a ventilation hood or an externally vented Over The Range Microwave Oven over the range cooktop that can withstand heat, up...
Installation Guide
Page 30
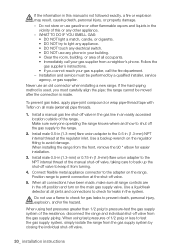
... Teflon on the main gas supply valve. Do not store or use a flame to check for gas leaks to light any appliance. • DO NOT touch any other appliance. - Installation and service must carefully align the pipe; Install a manual gas line shut-off valve in the gas line in (1.9-mm) flare union adapter to the NPT internal thread of the manual shut-off valve, taking care to the range. 2. Install male 0.5-in (1.3-mm) or...
... Teflon on the main gas supply valve. Do not store or use a flame to check for gas leaks to light any appliance. • DO NOT touch any other appliance. - Installation and service must carefully align the pipe; Install a manual gas line shut-off valve in the gas line in (1.9-mm) flare union adapter to the NPT internal thread of the manual shut-off valve, taking care to the range. 2. Install male 0.5-in (1.3-mm) or...

Installation Guide
Page 31
... set up to be supplied with the consumer, including the instructions and retrofit sizes and orifice indication. All replaced orifices must be changed (5 surface burners and 2 oven burners). In addition, the nozzle on or shutting off valve should only be converted to Cooktop Control Manifold Pressure Regulator Adapter Step 3. installation instructions Flexible connector hookup Installer: Inform the consumer of the location of turning on the gas pressure regulator needs to use LP gas. The conversion process should be installed in an accessible location in the User Manual...
... set up to be supplied with the consumer, including the instructions and retrofit sizes and orifice indication. All replaced orifices must be changed (5 surface burners and 2 oven burners). In addition, the nozzle on or shutting off valve should only be converted to Cooktop Control Manifold Pressure Regulator Adapter Step 3. installation instructions Flexible connector hookup Installer: Inform the consumer of the location of turning on the gas pressure regulator needs to use LP gas. The conversion process should be installed in an accessible location in the User Manual...

