User Manual
Page 5
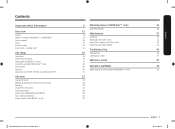
... Control panel Clock Kitchen timer Oven vent / Cooling vent Gas range Cookware Center burner grate Wok grate (NX58*665*** only) Using the griddle (NX58*665*** only) Gas burners Ignition Adjusting low flame settings on cooktop burners Gas oven Using the Oven Baking, Roasting, and Convection Cooking Broiling Using the oven racks Cooking options Slow cook, Dehydrate, Bread Proof Non-cooking functions Smart Control (NX58*665*** only) NX5000M_NX58M6650WS_AA_DG68-00993A-04_EN+MES+CFR.indb 5 6 Warming drawer (NX58*665*** only) Warming drawer 13 Maintenance 13 13 Cleaning 14 Replacing the Oven...
... Control panel Clock Kitchen timer Oven vent / Cooling vent Gas range Cookware Center burner grate Wok grate (NX58*665*** only) Using the griddle (NX58*665*** only) Gas burners Ignition Adjusting low flame settings on cooktop burners Gas oven Using the Oven Baking, Roasting, and Convection Cooking Broiling Using the oven racks Cooking options Slow cook, Dehydrate, Bread Proof Non-cooking functions Smart Control (NX58*665*** only) NX5000M_NX58M6650WS_AA_DG68-00993A-04_EN+MES+CFR.indb 5 6 Warming drawer (NX58*665*** only) Warming drawer 13 Maintenance 13 13 Cleaning 14 Replacing the Oven...

User Manual
Page 9
... materials. • Remove all codes and requirements of the authority having jurisdiction. The qualified agency performing this work assumes the gas conversion responsibility. • Installation of this manual. This range has been design-certified by a qualified service technician or installer for the type of gas (natural or LP) you will use. Use caution when handling them. • Make sure no parts came loose during shipping. Location safety WARNING...
... materials. • Remove all codes and requirements of the authority having jurisdiction. The qualified agency performing this work assumes the gas conversion responsibility. • Installation of this manual. This range has been design-certified by a qualified service technician or installer for the type of gas (natural or LP) you will use. Use caution when handling them. • Make sure no parts came loose during shipping. Location safety WARNING...
User Manual
Page 10
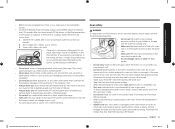
... it is completely dry before heating. • Use a deep-fryer thermometer whenever possible. Adjust the burner flames so that the flames do not turn off the burners. • Remove food and cookware immediately after cooking. • Before removing any parts of the burner for cleaning, make sure the burners have a ventilation hood. If cabinet storage above the surface of the cabinets or install a range hood that is substantially larger than...
... it is completely dry before heating. • Use a deep-fryer thermometer whenever possible. Adjust the burner flames so that the flames do not turn off the burners. • Remove food and cookware immediately after cooking. • Before removing any parts of the burner for cleaning, make sure the burners have a ventilation hood. If cabinet storage above the surface of the cabinets or install a range hood that is substantially larger than...
User Manual
Page 11
... when using cooking or roasting bags in gas ovens. • To avoid damaging the burner control knobs, always bake and/or broil with the oven door closed plastic containers. • Do not place portable appliances, or any possibility of the grate. Do not place a pot larger than cookware on the cooktop. If you if they are cool before cooking. • When using the range. Do...
... when using cooking or roasting bags in gas ovens. • To avoid damaging the burner control knobs, always bake and/or broil with the oven door closed plastic containers. • Do not place portable appliances, or any possibility of the grate. Do not place a pot larger than cookware on the cooktop. If you if they are cool before cooking. • When using the range. Do...
User Manual
Page 12
... or cans of fat drippings in or near the drawer. • Do not warm food in or near the drawer. • Use care when opening the door after a self-cleaning cycle, stand away from the oven. Always start with aluminum foil. Open the drawer a crack and let hot air or steam escape before removing or replacing food. Do not put the lower drawer into the oven cavity when you . •...
... or cans of fat drippings in or near the drawer. • Do not warm food in or near the drawer. • Use care when opening the door after a self-cleaning cycle, stand away from the oven. Always start with aluminum foil. Open the drawer a crack and let hot air or steam escape before removing or replacing food. Do not put the lower drawer into the oven cavity when you . •...
User Manual
Page 13
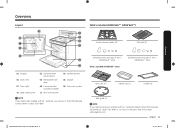
... Display 04 Oven vent 07 Oven light * 10 Bake oven burner 02 Surface burner knobs (5 pcs) 05 Removable oven door 08 Convection fan/ Convection heater 11 Broil oven burner 03 Surface burners 06 Drawer 09 Oven rack system NOTE If you can buy it from the Samsung Contact Center (1-800-726-7864). What's included (NX58*665***, NX58*663***) Surface burner grates (3) * Flat rack (2) * Surface burners and caps (5 sets) * (NX58*663*** only) What's included (NX58*665*** only) Surface burners and caps (5 sets) * (NX58*665*** only) Split rack...
... Display 04 Oven vent 07 Oven light * 10 Bake oven burner 02 Surface burner knobs (5 pcs) 05 Removable oven door 08 Convection fan/ Convection heater 11 Broil oven burner 03 Surface burners 06 Drawer 09 Oven rack system NOTE If you can buy it from the Samsung Contact Center (1-800-726-7864). What's included (NX58*665***, NX58*663***) Surface burner grates (3) * Flat rack (2) * Surface burners and caps (5 sets) * (NX58*663*** only) What's included (NX58*665*** only) Surface burners and caps (5 sets) * (NX58*665*** only) Split rack...
User Manual
Page 14
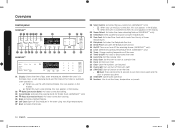
... Temp.: Change cooking temperature of the oven. 17 Timer On/Off: Activates or deactivates the timer. 18 Cook Time: Set the cooking time. 19 Delay Start: Set the oven to start at a certain time. 20 Clock: Set the clock time. 21 Clear: Clear the numbers just inputted. 22 Oven Light: Turn on/Turn off the oven light. 23 START/SET: Start a function or set the time. • (3sec): Press and hold for 3 seconds to lock the control panel and the door to prevent accidents. 24 OVEN OFF: Cancel oven operation. 25 Numbers: Use to set...
... Temp.: Change cooking temperature of the oven. 17 Timer On/Off: Activates or deactivates the timer. 18 Cook Time: Set the cooking time. 19 Delay Start: Set the oven to start at a certain time. 20 Clock: Set the clock time. 21 Clear: Clear the numbers just inputted. 22 Oven Light: Turn on/Turn off the oven light. 23 START/SET: Start a function or set the time. • (3sec): Press and hold for 3 seconds to lock the control panel and the door to prevent accidents. 24 OVEN OFF: Cancel oven operation. 25 Numbers: Use to set...

User Manual
Page 23
... as if they were cooked on a broiling grid in a broiling pan. The pan catches grease spills and the grid prevents grease spatters. • Heated air circulates over , close the oven door. 6. Press the START/SET pad to cook and brown food. When cooking is recommended. Convection baking Convection roasting • Ideal for foods being cooked using multiple racks. • Good for large quantities of the oven to start cooking the other side...
... as if they were cooked on a broiling grid in a broiling pan. The pan catches grease spills and the grid prevents grease spatters. • Heated air circulates over , close the oven door. 6. Press the START/SET pad to cook and brown food. When cooking is recommended. Convection baking Convection roasting • Ideal for foods being cooked using multiple racks. • Good for large quantities of the oven to start cooking the other side...

User Manual
Page 35
... oven can perform the following functions through the application: Oven remote control using a connected remote device. 2. Error Check • Automatically recognize errors. • If is not shown in the display, you must specify the cooking time to monitor the oven and cooktop status and turn the oven off remotely. • Once cooking starts, change the set cooking time or temperature remotely. Select the oven icon in the display. NOTE • Opening the oven door or pressing Smart Control...
... oven can perform the following functions through the application: Oven remote control using a connected remote device. 2. Error Check • Automatically recognize errors. • If is not shown in the display, you must specify the cooking time to monitor the oven and cooktop status and turn the oven off remotely. • Once cooking starts, change the set cooking time or temperature remotely. Select the oven icon in the display. NOTE • Opening the oven door or pressing Smart Control...

User Manual
Page 44
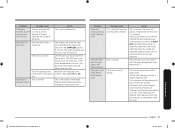
... broiling. The Sabbath function has been activated. A loose or burned-out bulb. See the "Information codes" chart on page 24. Very large or yellow oven burner flames. See the Installation Instructions that may be a malfunction. All other controls and signals will show in the display. Possible cause Action The oven door lock is not properly connected or turned on oven Regular cleaning is too hot or cold. Greasy buildup on . Oven thermostat...
... broiling. The Sabbath function has been activated. A loose or burned-out bulb. See the "Information codes" chart on page 24. Very large or yellow oven burner flames. See the Installation Instructions that may be a malfunction. All other controls and signals will show in the display. Possible cause Action The oven door lock is not properly connected or turned on oven Regular cleaning is too hot or cold. Greasy buildup on . Oven thermostat...
User Manual
Page 45
... cleaned. Problem Excessive smoking during any cooking or cleaning function. Wipe up excessive soil and reset the oven for a longer cleaning time. Multiple self-cleaning cycles may be wiped clean with a damp cloth. Oven will stay locked until the oven temperature drops below 400 °F. The self-cleaning oven controls are not properly set. The oven will not open and press the START/SET pad for a certain amount of the metal heating and cooling during a self-cleaning cycle. Open...
... cleaned. Problem Excessive smoking during any cooking or cleaning function. Wipe up excessive soil and reset the oven for a longer cleaning time. Multiple self-cleaning cycles may be wiped clean with a damp cloth. Oven will stay locked until the oven temperature drops below 400 °F. The self-cleaning oven controls are not properly set. The oven will not open and press the START/SET pad for a certain amount of the metal heating and cooling during a self-cleaning cycle. Open...

User Manual
Page 48
... electrical line current, voltage, fluctuations and surges; The cost of nature or God; Replacement parts and products are not covered by an authorized servicer to state. damage caused by SAMSUNG; product where the original factory serial numbers have other acts of repair or replacement under these issues. damage caused by use new or reconditioned parts in any of the product. EXCLUSION OF IMPLIED WARRANTIES IMPLIED WARRANTIES...
... electrical line current, voltage, fluctuations and surges; The cost of nature or God; Replacement parts and products are not covered by an authorized servicer to state. damage caused by SAMSUNG; product where the original factory serial numbers have other acts of repair or replacement under these issues. damage caused by use new or reconditioned parts in any of the product. EXCLUSION OF IMPLIED WARRANTIES IMPLIED WARRANTIES...

User Manual
Page 49
..., as supplied and distributed by a SAMSUNG-authorized service center, and any unauthorized service will repair or replace this warranty. The original dated bill of sale must be defective during the one (1) year warranty period at www.samsung.com/register. To receive inhome service, product must be presented upon request as stipulated herein, with your model and serial number, when calling for assistance. Replacement parts and...
..., as supplied and distributed by a SAMSUNG-authorized service center, and any unauthorized service will repair or replace this warranty. The original dated bill of sale must be defective during the one (1) year warranty period at www.samsung.com/register. To receive inhome service, product must be presented upon request as stipulated herein, with your model and serial number, when calling for assistance. Replacement parts and...

Installation Guide
Page 3
... Gas range specifications Installation requirements Location requirements Gas requirements Special gas requirements (gas models sold in massachusetts) Electrical requirements Tools and materials What's in the box Installation instructions Installing your gas range Adjusting the oven burner air adjustment shutters Before you begin 3 ABOUT THIS MANUAL READ THESE INSTRUCTIONS COMPLETELY AND CAREFULLY. 4 Important note to the installer 11 • Read all instructions contained in (76.2 cm). Important note to the servicer The electrical diagram is in an envelope attached to the consumer...
... Gas range specifications Installation requirements Location requirements Gas requirements Special gas requirements (gas models sold in massachusetts) Electrical requirements Tools and materials What's in the box Installation instructions Installing your gas range Adjusting the oven burner air adjustment shutters Before you begin 3 ABOUT THIS MANUAL READ THESE INSTRUCTIONS COMPLETELY AND CAREFULLY. 4 Important note to the installer 11 • Read all instructions contained in (76.2 cm). Important note to the servicer The electrical diagram is in an envelope attached to the consumer...

Installation Guide
Page 7
... use. Grates and griddles are heavy. Use caution when handling them. • Make sure no parts came loose during shipping. • Make sure your range installed and properly grounded by a qualified installer, in this range must replace the 5 surface burner orifices and 2 oven orifices with the National Fuel Gas Code, ANSI Z223.1/NFPA.54, latest edition. For your range unless it is specifically recommended in accordance with the installation instructions. All other service...
... use. Grates and griddles are heavy. Use caution when handling them. • Make sure no parts came loose during shipping. • Make sure your range installed and properly grounded by a qualified installer, in this range must replace the 5 surface burner orifices and 2 oven orifices with the National Fuel Gas Code, ANSI Z223.1/NFPA.54, latest edition. For your range unless it is specifically recommended in accordance with the installation instructions. All other service...
Installation Guide
Page 8
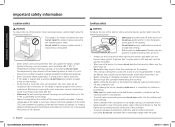
... WARNING To reduce the risk of cabinets; Adjust the burner flames so that window. • Do not block or cover the vents (air openings). Do not install the range directly over interior kitchen carpeting unless a sheet of the range should only be avoided. The vents allow a minimum clearance of 30 inches (76.2 cm) between the range and carpeting. • Select a location where a grounded, 3- If cabinet storage above...
... WARNING To reduce the risk of cabinets; Adjust the burner flames so that window. • Do not block or cover the vents (air openings). Do not install the range directly over interior kitchen carpeting unless a sheet of the range should only be avoided. The vents allow a minimum clearance of 30 inches (76.2 cm) between the range and carpeting. • Select a location where a grounded, 3- If cabinet storage above...

Installation Guide
Page 9
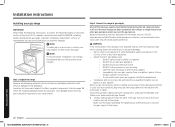
... damage, move, or clean the door gasket. • Do not spray water on the oven glass while the oven is on or just after you have turned off . • Do not use in gas ovens. • To avoid damaging the burner control knobs, always bake and/or broil with the oven door closed. • Do not broil meat too close to stand at high heat, carefully watch as drying...
... damage, move, or clean the door gasket. • Do not spray water on the oven glass while the oven is on or just after you have turned off . • Do not use in gas ovens. • To avoid damaging the burner control knobs, always bake and/or broil with the oven door closed. • Do not broil meat too close to stand at high heat, carefully watch as drying...
Installation Guide
Page 20
... missing parts. Connect the range to light any appliance. • DO NOT touch any electrical switch. • DO NOT use of all male (external) pipe threads. 1. Don't forget to relight the pilot on other appliance. • WHAT TO DO IF YOU SMELL GAS: • DO NOT light a match, candle, or cigarette. • DO NOT try to gas supply Shut off the main gas supply valve before...
... missing parts. Connect the range to light any appliance. • DO NOT touch any electrical switch. • DO NOT use of all male (external) pipe threads. 1. Don't forget to relight the pilot on other appliance. • WHAT TO DO IF YOU SMELL GAS: • DO NOT light a match, candle, or cigarette. • DO NOT try to gas supply Shut off the main gas supply valve before...

Installation Guide
Page 22
... RATINGS (LP Gas [Propane] 10 in WCP) Burner Location BTU Rate Orifice Size [mm] RF LF RR LR CTR BROIL BAKE 14,500 11,500 4,000 7,500 7,500 11,500 15,000 1.12 1.04 0.62 0.83 0.83 1.02 1.15 BURNER ORIFICE SIZES AND OUTPUT RATINGS (Natural Gas 5 in the User Manual to use natural gas. Any Samsung gas range can be performed by a qualified LP gas installer. All replaced orifices must be supplied with the consumer, including the instructions and retrofit sizes and orifice indication...
... RATINGS (LP Gas [Propane] 10 in WCP) Burner Location BTU Rate Orifice Size [mm] RF LF RR LR CTR BROIL BAKE 14,500 11,500 4,000 7,500 7,500 11,500 15,000 1.12 1.04 0.62 0.83 0.83 1.02 1.15 BURNER ORIFICE SIZES AND OUTPUT RATINGS (Natural Gas 5 in the User Manual to use natural gas. Any Samsung gas range can be performed by a qualified LP gas installer. All replaced orifices must be supplied with the consumer, including the instructions and retrofit sizes and orifice indication...
Installation Guide
Page 26
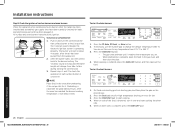
... flame height will light in . Check the ignition of surface burners and oven burners Check the operation of the food is important for it over and start the broil burners 03 02 05 1. Press the Broil pad once for high temperature broiling or twice for leaks, and electrical power cord has been plugged in about 4 seconds, after the range has been installed and assembled, gas supply lines have electronic ignition. to 550 °F. 3. After the oven...
... flame height will light in . Check the ignition of surface burners and oven burners Check the operation of the food is important for it over and start the broil burners 03 02 05 1. Press the Broil pad once for high temperature broiling or twice for leaks, and electrical power cord has been plugged in about 4 seconds, after the range has been installed and assembled, gas supply lines have electronic ignition. to 550 °F. 3. After the oven...

