User Manual
Page 5
...'s included Dual Door™ Control panel Clock Kitchen timer Oven vent/Cooling vent Gas range Cookware Gas burners Ignition Adjusting low flame settings on cooktop burners Gas oven Single mode Twin mode Cooking mode Broiling Recipe guide Temperature setting guides Using the oven racks Cooking options Slow cook, dehydrate, proofing Non-cooking functions Smart Control - Controlling your oven remotely NX7000K_VE_NX58M6850SS_AA_DG68-00909A-04_EN+MES+CFR.indb 5 6 Maintenance Cleaning 13 Replacing the Oven Light 13 Oven Door: Remove and Re-Install 13 Storage drawer 14 Troubleshooting 15...
...'s included Dual Door™ Control panel Clock Kitchen timer Oven vent/Cooling vent Gas range Cookware Gas burners Ignition Adjusting low flame settings on cooktop burners Gas oven Single mode Twin mode Cooking mode Broiling Recipe guide Temperature setting guides Using the oven racks Cooking options Slow cook, dehydrate, proofing Non-cooking functions Smart Control - Controlling your oven remotely NX7000K_VE_NX58M6850SS_AA_DG68-00909A-04_EN+MES+CFR.indb 5 6 Maintenance Cleaning 13 Replacing the Oven Light 13 Oven Door: Remove and Re-Install 13 Storage drawer 14 Troubleshooting 15...

User Manual
Page 9
...; Always use . Do not install in this range must be performed only by qualified gas range installers or service technicians. • Do not attempt to utilize LP gas, the installer must replace the 5 surface burner orifices and 2 oven orifices with local codes where applicable. This range has been design-certified by a qualified service technician or installer for the type of gas (natural or LP) you will use new flexible connectors when installing a gas appliance.
...; Always use . Do not install in this range must be performed only by qualified gas range installers or service technicians. • Do not attempt to utilize LP gas, the installer must replace the 5 surface burner orifices and 2 oven orifices with local codes where applicable. This range has been design-certified by a qualified service technician or installer for the type of gas (natural or LP) you will use new flexible connectors when installing a gas appliance.
User Manual
Page 10
... the cooktop well while cleaning. • Select cookware that is substantially larger than cookware on the dual burner spreader is placed beside the electrode when it is designed for range top cooking. Aluminum foil linings may also trap heat, causing a fire hazard. Use cookware that is completely dry before heating. • Use a deep-fryer thermometer whenever possible. If you set a burner to cover the burner...
... the cooktop well while cleaning. • Select cookware that is substantially larger than cookware on the dual burner spreader is placed beside the electrode when it is designed for range top cooking. Aluminum foil linings may also trap heat, causing a fire hazard. Use cookware that is completely dry before heating. • Use a deep-fryer thermometer whenever possible. If you set a burner to cover the burner...
User Manual
Page 11
.... Damage or fire could ignite and burn you change a pan or pot. • To warm liquid such as drying clothes or storage. English 11 NX7000K_VE_NX58M6850SS_AA_DG68-00909A-04_EN+MES+CFR.indb 11 2018-08-29 5:14:52 Immerse the scalded area in gas ovens. • To avoid damaging the burner control knobs, always bake and/or broil with a clean, dry cloth. • Place...
.... Damage or fire could ignite and burn you change a pan or pot. • To warm liquid such as drying clothes or storage. English 11 NX7000K_VE_NX58M6850SS_AA_DG68-00909A-04_EN+MES+CFR.indb 11 2018-08-29 5:14:52 Immerse the scalded area in gas ovens. • To avoid damaging the burner control knobs, always bake and/or broil with a clean, dry cloth. • Place...
User Manual
Page 15
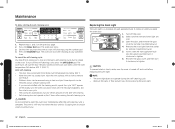
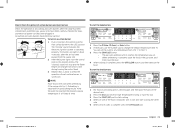
...: Activate convection roasting. 04 Broil: Broil food using the upper oven burner only. 05 Bake: Activate convection baking for the Lower Oven in Twin mode or the entire oven in Single mode. 06 Bake: Bake food using the lower oven burner. 07 START/SET: Start a function or set the time. • (3sec): Press and hold for 3 seconds to lock the control panel and the door to prevent accidents. 08 OFF/CLEAR: Cancel the current operation but not the timer. 09...
...: Activate convection roasting. 04 Broil: Broil food using the upper oven burner only. 05 Bake: Activate convection baking for the Lower Oven in Twin mode or the entire oven in Single mode. 06 Bake: Bake food using the lower oven burner. 07 START/SET: Start a function or set the time. • (3sec): Press and hold for 3 seconds to lock the control panel and the door to prevent accidents. 08 OFF/CLEAR: Cancel the current operation but not the timer. 09...
User Manual
Page 23
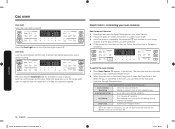
...; Heated air circulates over 2 inches (50 mm) in positons 2, 4, and 6. • The oven automatically adjusts the temperature for convection baking. • Good for details. Baking and Roasting (Twin mode lower) 03 02 04 05 1. See "Temperature setting guides" on a rotisserie. You can set . • When preheating is complete, press the OFF/CLEAR pad. Press the START/SET pad. • The oven preheats until it reaches the temperature you use the number pad...
...; Heated air circulates over 2 inches (50 mm) in positons 2, 4, and 6. • The oven automatically adjusts the temperature for convection baking. • Good for details. Baking and Roasting (Twin mode lower) 03 02 04 05 1. See "Temperature setting guides" on a rotisserie. You can set . • When preheating is complete, press the OFF/CLEAR pad. Press the START/SET pad. • The oven preheats until it reaches the temperature you use the number pad...
User Manual
Page 36
... cooking starts, change the set cooking time or temperature remotely. When the app is not shown in the display. Gas oven Press and hold the START/SET pad for 3 seconds to prevent accidental operations and/or product tipping. Press the Oven Light pad to open the SmartThings app on your range displays and the app confirms you can now be opened. 36 English To control the oven remotely 1. Oven lock Lock the control panel and the door to lock...
... cooking starts, change the set cooking time or temperature remotely. When the app is not shown in the display. Gas oven Press and hold the START/SET pad for 3 seconds to prevent accidental operations and/or product tipping. Press the Oven Light pad to open the SmartThings app on your range displays and the app confirms you can now be opened. 36 English To control the oven remotely 1. Oven lock Lock the control panel and the door to lock...
User Manual
Page 41
... °F (204 °C). 6. Remove all racks from a self-cleaning gas oven. The door will remain locked and the Lock icon will still be used in or around any excess spillage before using the self-cleaning operation. • Do not use the surface burners while the gas oven is locked and the oven begins to heat up. 4. The Lock icon changes to an open the oven door. The outside surfaces of the range can get extremely hot. • Some birds are...
... °F (204 °C). 6. Remove all racks from a self-cleaning gas oven. The door will remain locked and the Lock icon will still be used in or around any excess spillage before using the self-cleaning operation. • Do not use the surface burners while the gas oven is locked and the oven begins to heat up. 4. The Lock icon changes to an open the oven door. The outside surfaces of the range can get extremely hot. • Some birds are...
User Manual
Page 42
... door unlocks. Make sure the oven and oven light are not satisfied with the cleaning results, repeat the cycle. Reinsert the glass cover, and then turn it clockwise to remove ash residue. • Stubborn stains can be removed using a steel-wool pad. After self-cleaning • The door stays locked until the oven cools down , wipe the oven surfaces with a cloth to tighten. 6. "HOT" appears on the display until the internal oven temperature...
... door unlocks. Make sure the oven and oven light are not satisfied with the cleaning results, repeat the cycle. Reinsert the glass cover, and then turn it clockwise to remove ash residue. • Stubborn stains can be removed using a steel-wool pad. After self-cleaning • The door stays locked until the oven cools down , wipe the oven surfaces with a cloth to tighten. 6. "HOT" appears on the display until the internal oven temperature...

User Manual
Page 45
... yellow oven burner flames. See the Installation Instructions that came with your installer if you have the wrong orifice (LP gas instead of natural gas or natural gas instead of day will turn off . See page 34. Check the burner orifice size. The oven door lock is too hot or cold. The oven burner air adjustment shutters need to the range for a qualified service technician. The oven temperature is turned on. Oven thermostat needs adjustment. To cancel the Sabbath function and reactivate the controls and...
... yellow oven burner flames. See the Installation Instructions that came with your installer if you have the wrong orifice (LP gas instead of natural gas or natural gas instead of day will turn off . See page 34. Check the burner orifice size. The oven door lock is too hot or cold. The oven burner air adjustment shutters need to the range for a qualified service technician. The oven temperature is turned on. Oven thermostat needs adjustment. To cancel the Sabbath function and reactivate the controls and...

User Manual
Page 46
... is installed in the display. Troubleshooting Problem The oven light (lamp) will show in the oven. See page 42. An improperly See broiling guide on . Crackling or popping sound. Hold the oven door open and press the START/SET pad for a certain amount of day will not turn off . Oven smokes excessively during any cooking or cleaning function. Possible cause Action The oven door lock is necessary surfaces. The display will be replaced. All other controls...
... is installed in the display. Troubleshooting Problem The oven light (lamp) will show in the oven. See page 42. An improperly See broiling guide on . Crackling or popping sound. Hold the oven door open and press the START/SET pad for a certain amount of day will not turn off . Oven smokes excessively during any cooking or cleaning function. Possible cause Action The oven door lock is necessary surfaces. The display will be replaced. All other controls...

User Manual
Page 50
... the directions in the use and care guide are not covered by incorrect electrical line current, voltage, fluctuations and surges; and service to state. Replacement parts and products are warranted for which vary from state to explain product functions, maintenance or installation are not covered by this limited warranty. SAMSUNG may not apply to you must return them to instructions; damage caused by failure to operate and...
... the directions in the use and care guide are not covered by incorrect electrical line current, voltage, fluctuations and surges; and service to state. Replacement parts and products are warranted for which vary from state to explain product functions, maintenance or installation are not covered by this limited warranty. SAMSUNG may not apply to you must return them to instructions; damage caused by failure to operate and...

User Manual
Page 51
... a SAMSUNG-authorized service center, and any unauthorized service will repair or replace this manual. To receive warranty service, the purchaser must be defective during the one (1) year warranty period at no charge subject to SAMSUNG or SAMSUNG's authorized service center. Model # Serial # Please attach your model and serial number, when calling for problem determination and service procedures. Warranty (CANADA) Registration Please register your product online at www.samsung.com/us/support. The...
... a SAMSUNG-authorized service center, and any unauthorized service will repair or replace this manual. To receive warranty service, the purchaser must be defective during the one (1) year warranty period at no charge subject to SAMSUNG or SAMSUNG's authorized service center. Model # Serial # Please attach your model and serial number, when calling for problem determination and service procedures. Warranty (CANADA) Registration Please register your product online at www.samsung.com/us/support. The...

Installation Guide
Page 7
.... Grates and griddles are heavy. For your range to a qualified technician. • Always use new flexible connectors when installing a gas appliance. In Canada, installation must replace the 5 surface burner orifices and 2 oven orifices with the installation instructions. Any adjustment and service should be made by ETL according to ANSI Z21.1, latest edition, and Canadian Gas Association according to service, modify, or replace your range or any part of fire, electric shock, personal...
.... Grates and griddles are heavy. For your range to a qualified technician. • Always use new flexible connectors when installing a gas appliance. In Canada, installation must replace the 5 surface burner orifices and 2 oven orifices with the installation instructions. Any adjustment and service should be made by ETL according to ANSI Z21.1, latest edition, and Canadian Gas Association according to service, modify, or replace your range or any part of fire, electric shock, personal...
Installation Guide
Page 8
... install a range hood that is on. • Before removing or changing cookware, turn off the burners. • Remove food and cookware immediately after cooking. • Before removing any parts of the burner for cleaning, make sure the range is off when not in use. • Do not use aluminium foil to line the grates or any part of the cooktop. • Do not leave burners unattended on medium or high heat settings...
... install a range hood that is on. • Before removing or changing cookware, turn off the burners. • Remove food and cookware immediately after cooking. • Before removing any parts of the burner for cleaning, make sure the range is off when not in use. • Do not use aluminium foil to line the grates or any part of the cooktop. • Do not leave burners unattended on medium or high heat settings...
Installation Guide
Page 9
... the oven racks, make sure it off the burner so that is recommended for cooking purposes only. • Make sure the inner portion of the split oven-rack is in the oven. Use the oven for use cookware that the temperature in gas ovens. • To avoid damaging the burner control knobs, always bake and/or broil with the oven door closed. • Do not broil meat too close to the burner flame...
... the oven racks, make sure it off the burner so that is recommended for cooking purposes only. • Make sure the inner portion of the split oven-rack is in the oven. Use the oven for use cookware that the temperature in gas ovens. • To avoid damaging the burner control knobs, always bake and/or broil with the oven door closed. • Do not broil meat too close to the burner flame...
Installation Guide
Page 12
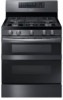
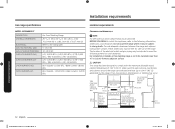
The location of the electrical outlet and gas piping may be met for safe use of the range. Installation requirements Gas range specifications MODEL NX58M6850S* DESCRIPTION OVERALL DIMENSIONS ELECTRICAL GAS, NG (NATURAL GAS) GAS, LP (LIQUID PROPANE) SURFACE BURNERS (NG) SURFACE BURNERS (LP) OVEN BURNERS (NG) OVEN BURNERS (LP) Gas Free-Standing Range 29 in (W) x 46 in (H) x 28 ⁵/₁₆ in (D) 761.0 mm (W) x 1186.2 mm (H) x 718.7 mm (D) Refer to the rating label. 5-13 in WC 10-13 in (0 cm) Installation requirements 12...
The location of the electrical outlet and gas piping may be met for safe use of the range. Installation requirements Gas range specifications MODEL NX58M6850S* DESCRIPTION OVERALL DIMENSIONS ELECTRICAL GAS, NG (NATURAL GAS) GAS, LP (LIQUID PROPANE) SURFACE BURNERS (NG) SURFACE BURNERS (LP) OVEN BURNERS (NG) OVEN BURNERS (LP) Gas Free-Standing Range 29 in (W) x 46 in (H) x 28 ⁵/₁₆ in (D) 761.0 mm (W) x 1186.2 mm (H) x 718.7 mm (D) Refer to the rating label. 5-13 in WC 10-13 in (0 cm) Installation requirements 12...
Installation Guide
Page 18
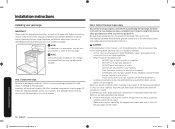
... installation, adjustment, service, or maintenance can cause personal injury or property damage. Unpack the range Remove all male (external) pipe threads. 1. Inventory all loose parts against the Parts supplied components listed on all packaging materials. Install a manual gas line shut-off valve in the gas line in your building. • Clear the room, building, or area of this manual, completely and carefully BEFORE installing and/or operating the gas range. Make sure everyone operating...
... installation, adjustment, service, or maintenance can cause personal injury or property damage. Unpack the range Remove all male (external) pipe threads. 1. Inventory all loose parts against the Parts supplied components listed on all packaging materials. Install a manual gas line shut-off valve in the gas line in your building. • Clear the room, building, or area of this manual, completely and carefully BEFORE installing and/or operating the gas range. Make sure everyone operating...

Installation Guide
Page 20
... BURNER ORIFICE SIZES AND OUTPUT RATINGS (Natural Gas 5 in the User Manual to complete the installation of tipping, the appliance must be supplied with the consumer, including the instructions and retrofit sizes and orifice indication. The instructions include information necessary to contact a qualified service technician. Conversion instructions and LP orifices will be left with the LP conversion kit. If not properly installed, the range could be changed (5 surface burners and 2 oven burners). Any Samsung gas range can cause burns from the factory set up...
... BURNER ORIFICE SIZES AND OUTPUT RATINGS (Natural Gas 5 in the User Manual to complete the installation of tipping, the appliance must be supplied with the consumer, including the instructions and retrofit sizes and orifice indication. The instructions include information necessary to contact a qualified service technician. Conversion instructions and LP orifices will be left with the LP conversion kit. If not properly installed, the range could be changed (5 surface burners and 2 oven burners). Any Samsung gas range can cause burns from the factory set up...
Installation Guide
Page 23
... the START/SET button. • The gas oven preheats until it . Press the Broil pad once for high temperature broiling or twice for that surface burner to 550 °F. 3. Check the ignition of surface burners and oven burners Check the operation of all cooktop and oven burners after the range has been installed and assembled, gas supply lines have electronic ignition. The burner will beep 6 times. during turning the control knob. 3. Repeat steps 1 and 2 to change from the supply line. 2. To start cooking. 4. If necessary, use the number...
... the START/SET button. • The gas oven preheats until it . Press the Broil pad once for high temperature broiling or twice for that surface burner to 550 °F. 3. Check the ignition of surface burners and oven burners Check the operation of all cooktop and oven burners after the range has been installed and assembled, gas supply lines have electronic ignition. The burner will beep 6 times. during turning the control knob. 3. Repeat steps 1 and 2 to change from the supply line. 2. To start cooking. 4. If necessary, use the number...

