User Manual
Page 10
... this work assumes the gas conversion responsibility. • Installation of this range must conform with local codes or, in this manual. The vents allow the necessary exhaust for the range to operate properly with the manufacturer's instructions and all accessories from the cooktop, oven, and/or lower drawer. Do not use new flexible connectors when installing a gas appliance. Do not install the range directly over interior kitchen carpeting unless a sheet of the range...
... this work assumes the gas conversion responsibility. • Installation of this range must conform with local codes or, in this manual. The vents allow the necessary exhaust for the range to operate properly with the manufacturer's instructions and all accessories from the cooktop, oven, and/or lower drawer. Do not use new flexible connectors when installing a gas appliance. Do not install the range directly over interior kitchen carpeting unless a sheet of the range...
User Manual
Page 11
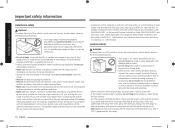
... amount of the cooktop, but not over the surface burners and ignite, causing a fire hazard. Aluminum foil linings may also trap heat, causing a fire hazard. Adjust the burner flames so that the flames do not use cookware that is necessary, allow a minimum clearance of 40 inches (102 cm) between the cooking surface and the bottom of the cabinets or install a range hood that window. Use cookware that is...
... amount of the cooktop, but not over the surface burners and ignite, causing a fire hazard. Aluminum foil linings may also trap heat, causing a fire hazard. Adjust the burner flames so that the flames do not use cookware that is necessary, allow a minimum clearance of 40 inches (102 cm) between the cooking surface and the bottom of the cabinets or install a range hood that window. Use cookware that is...
User Manual
Page 12
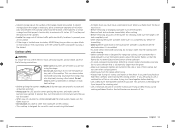
.... • To prevent delayed eruptive boiling, always allow heated liquids to the burner flame. Aluminum foil linings may cause carbon monoxide poisoning. Do not use in diameter on the cooktop. In the event of scalding, follow the manufacturer's directions. • NEVER cover any other object other than 9" in gas ovens. • To avoid damaging the burner control knobs, always bake and/or broil with material such...
.... • To prevent delayed eruptive boiling, always allow heated liquids to the burner flame. Aluminum foil linings may cause carbon monoxide poisoning. Do not use in diameter on the cooktop. In the event of scalding, follow the manufacturer's directions. • NEVER cover any other object other than 9" in gas ovens. • To avoid damaging the burner control knobs, always bake and/or broil with material such...

User Manual
Page 15
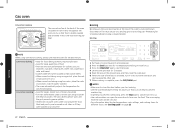
... temperatures. 10 Cooking Time: Set the cooking time. 11 Delay Start: Set the oven to start Control panel 03 01 02 04 17 16 You should know about the following features and components before you use your range for large cuts of food on multiple racks. 02 Convection Roast: Activate convection roasting for the first time. Clock You must set the time. connection. 16 OFF/CLEAR: Cancel the current operation but not the timer. 17 START/SET: Start a function or set the clock...
... temperatures. 10 Cooking Time: Set the cooking time. 11 Delay Start: Set the oven to start Control panel 03 01 02 04 17 16 You should know about the following features and components before you use your range for large cuts of food on multiple racks. 02 Convection Roast: Activate convection roasting for the first time. Clock You must set the time. connection. 16 OFF/CLEAR: Cancel the current operation but not the timer. 17 START/SET: Start a function or set the clock...
User Manual
Page 19
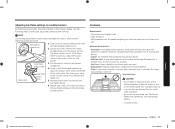
... for range top cooking or oven use an oversized pan. Use the following steps to increase the flame size. 5. Using a small flat-bladed screwdriver, adjust the bypass valve screw in the base Dual valve Outer flame bypass screw of food may tip over. This cookware may cause the aluminum to check and adjust the low flame settings on the base material. • Glass: A slow heat conductor. Valve Stem The flame...
... for range top cooking or oven use an oversized pan. Use the following steps to increase the flame size. 5. Using a small flat-bladed screwdriver, adjust the bypass valve screw in the base Dual valve Outer flame bypass screw of food may tip over. This cookware may cause the aluminum to check and adjust the low flame settings on the base material. • Glass: A slow heat conductor. Valve Stem The flame...
User Manual
Page 22
... be very hot. • For information about broiler temperatures, rack settings, and cooking times for different foods, see "Broiling guide" on a rotisserie. Preheating for 5 minutes before you open the oven door to start cooking. • Use the low temperature setting for poultry or thick cuts of the food is evenly cooked 06 and browned in less time than with regular 05 heat. 04 03 02 01 NOTE When using convection cooking, always pre-heat the oven for...
... be very hot. • For information about broiler temperatures, rack settings, and cooking times for different foods, see "Broiling guide" on a rotisserie. Preheating for 5 minutes before you open the oven door to start cooking. • Use the low temperature setting for poultry or thick cuts of the food is evenly cooked 06 and browned in less time than with regular 05 heat. 04 03 02 01 NOTE When using convection cooking, always pre-heat the oven for...
User Manual
Page 23
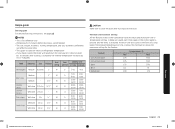
... on the control panel is pressed and the entry is below have covered the meat with aluminum foil and you have minimum and maximum time or temperature settings. An error tone will sound each time a pad on meats at refrigerator temperature. • If you let it stand covered for the feature. Gas oven Recipe guide Broiling guide For detailed broiling instructions, see page 22. Food Doneness Size Thickness Broil setting Rack Cooking time position...
... on the control panel is pressed and the entry is below have covered the meat with aluminum foil and you have minimum and maximum time or temperature settings. An error tone will sound each time a pad on meats at refrigerator temperature. • If you let it stand covered for the feature. Gas oven Recipe guide Broiling guide For detailed broiling instructions, see page 22. Food Doneness Size Thickness Broil setting Rack Cooking time position...
User Manual
Page 32
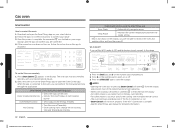
... number pad simultaneously. 2. Oven remote control using the SmartThings app Oven/ Cooktop Monitoring • Check the status of the oven • Monitor the on/off . Temp Probe • Monitor the current temperature and reset the probe setting. • If is connected to connect your smart device. 2. Gas oven To control the oven remotely 1. Press the Broil pad and 9 on -screen instructions to the oven, you are connected. 4. If the connection icon does not turn the oven...
... number pad simultaneously. 2. Oven remote control using the SmartThings app Oven/ Cooktop Monitoring • Check the status of the oven • Monitor the on/off . Temp Probe • Monitor the current temperature and reset the probe setting. • If is connected to connect your smart device. 2. Gas oven To control the oven remotely 1. Press the Broil pad and 9 on -screen instructions to the oven, you are connected. 4. If the connection icon does not turn the oven...

User Manual
Page 42
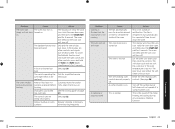
.... To turn off . Call a qualified service technician. The display will not shut off . The oven temperature is not completely plugged into a live, properly grounded outlet. The Sabbath function has been activated. The oven temperature needs to the range for 3 seconds. Cause The oven is too hot or cold. Troubleshooting Problem Very large or yellow surface burner flames. Surface burners light but oven burners do not light. The oven door lock is turned on page 46. Action Check the burner orifice size. See...
.... To turn off . Call a qualified service technician. The display will not shut off . The oven temperature is not completely plugged into a live, properly grounded outlet. The Sabbath function has been activated. The oven temperature needs to the range for 3 seconds. Cause The oven is too hot or cold. Troubleshooting Problem Very large or yellow surface burner flames. Surface burners light but oven burners do not light. The oven door lock is turned on page 46. Action Check the burner orifice size. See...
User Manual
Page 43
... the cooling fan is turned on. The oven door lock is still running. Problem Cause Action The oven light The oven door lock is (lamp) will not operate if a surface burner is on. Self-clean will not turn off . The fan is on . The self-clean cycle will be replaced. The self-cleaning oven controls are not being set . All other controls, press and hold the Bake and NUM 1 pads simultaneously for a certain amount of the oven. Cut away excess...
... the cooling fan is turned on. The oven door lock is still running. Problem Cause Action The oven light The oven door lock is (lamp) will not operate if a surface burner is on. Self-clean will not turn off . The fan is on . The self-clean cycle will be replaced. The self-cleaning oven controls are not being set . All other controls, press and hold the Bake and NUM 1 pads simultaneously for a certain amount of the oven. Cut away excess...
User Manual
Page 47
... them to instructions; and service to explain product functions, maintenance or installation are warranted for which this limited warranty. Visits by SAMSUNG; Please contact SAMSUNG at the number below for assistance with electrical or plumbing codes or correction of equipment, utilities, services, parts, supplies, accessories, applications, installations, repairs, external wiring or connectors not supplied or authorized by an authorized servicer to correct installation not in -home instruction on SAMSUNG. SAMSUNG SHALL NOT...
... them to instructions; and service to explain product functions, maintenance or installation are warranted for which this limited warranty. Visits by SAMSUNG; Please contact SAMSUNG at the number below for assistance with electrical or plumbing codes or correction of equipment, utilities, services, parts, supplies, accessories, applications, installations, repairs, external wiring or connectors not supplied or authorized by an authorized servicer to correct installation not in -home instruction on SAMSUNG. SAMSUNG SHALL NOT...
User Manual
Page 48
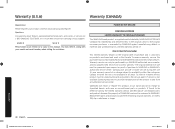
... in-home service during the limited warranty period specified above. Model # Serial # Please attach your receipt (or a copy) to SAMSUNG or SAMSUNG's authorized service center. The original dated bill of purchase to this manual. Replacement parts and products assume the remaining original warranty, or ninety (90) days, whichever is not available in the original carton to the service agent. SAMSUNG GAS RANGE LIMITED WARRANTY TO ORIGINAL...
... in-home service during the limited warranty period specified above. Model # Serial # Please attach your receipt (or a copy) to SAMSUNG or SAMSUNG's authorized service center. The original dated bill of purchase to this manual. Replacement parts and products assume the remaining original warranty, or ninety (90) days, whichever is not available in the original carton to the service agent. SAMSUNG GAS RANGE LIMITED WARRANTY TO ORIGINAL...

Installation Guide
Page 3
... surface burners Step 9. Unpack the range Step 2. Assemble the surface burners Step 8. Install the anti-tip device Step 5. Level the range Step 7. Final installation checklist Adjusting the oven burner air adjustment shutters Before you begin 3 About this manual READ THESE INSTRUCTIONS COMPLETELY AND CAREFULLY. 4 Important note to the installer 11 • Read all instructions contained in these installation instructions before installing the range. 11 • Remove all packing materials from the oven compartments before connecting the 11 electric and gas supply...
... surface burners Step 9. Unpack the range Step 2. Assemble the surface burners Step 8. Install the anti-tip device Step 5. Level the range Step 7. Final installation checklist Adjusting the oven burner air adjustment shutters Before you begin 3 About this manual READ THESE INSTRUCTIONS COMPLETELY AND CAREFULLY. 4 Important note to the installer 11 • Read all instructions contained in these installation instructions before installing the range. 11 • Remove all packing materials from the oven compartments before connecting the 11 electric and gas supply...
Installation Guide
Page 7
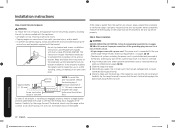
Do not use old flexible connectors. • Make sure the anti-tip device is specifically recommended in accordance with the installation instructions. These adjustments must conform with the current Natural Gas Installation Code, CAN/CGA-B149.1, or the current Propane Installation Code, CAN/CGA-B149.2, and with the provided LP orifice set, and reverse the GPR adapter. In Canada, installation must be performed only by qualified gas range installers or service technicians...
Do not use old flexible connectors. • Make sure the anti-tip device is specifically recommended in accordance with the installation instructions. These adjustments must conform with the current Natural Gas Installation Code, CAN/CGA-B149.1, or the current Propane Installation Code, CAN/CGA-B149.2, and with the provided LP orifice set, and reverse the GPR adapter. In Canada, installation must be performed only by qualified gas range installers or service technicians...
Installation Guide
Page 8
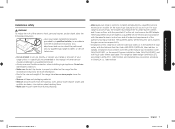
...; Before removing or changing cookware, turn the knob quickly. Use cookware that is completely dry before re- or install a range hood that can withstand heat up to the weather and/or water. • Do not install the range in use. • Do not use only. Do not install the range directly over interior kitchen carpeting unless a sheet of ¼ inch plywood or a similar insulator is placed between the cooking surface and...
...; Before removing or changing cookware, turn the knob quickly. Use cookware that is completely dry before re- or install a range hood that can withstand heat up to the weather and/or water. • Do not install the range in use. • Do not use only. Do not install the range directly over interior kitchen carpeting unless a sheet of ¼ inch plywood or a similar insulator is placed between the cooking surface and...
Installation Guide
Page 9
... of fats or oils, make sure the oven is to the burner flame. Do not use cookware that the temperature in gas ovens. • To avoid damaging the burner control knobs, always bake and/or broil with the oven door closed. • Do not broil meat too close to be used during the cooking process. If a combination of oil when shallow pan-frying or deep-frying. This prevents...
... of fats or oils, make sure the oven is to the burner flame. Do not use cookware that the temperature in gas ovens. • To avoid damaging the burner control knobs, always bake and/or broil with the oven door closed. • Do not broil meat too close to be used during the cooking process. If a combination of oil when shallow pan-frying or deep-frying. This prevents...
Installation Guide
Page 20
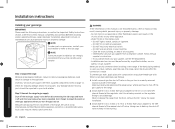
...-in an easily accessed location outside of the manual shut-off valve, taking care to back up the shut-off valve to keep it off the main gas supply valve before disconnecting the old range and leave it from the front, remove the 90 ° elbow for shipping damage and/or missing parts. When installing the range from turning. 20 English Installation instructions Install_NX58M9420SS_DG68-00906A-03_EN+MES+CFR...
...-in an easily accessed location outside of the manual shut-off valve, taking care to back up the shut-off valve to keep it off the main gas supply valve before disconnecting the old range and leave it from the front, remove the 90 ° elbow for shipping damage and/or missing parts. When installing the range from turning. 20 English Installation instructions Install_NX58M9420SS_DG68-00906A-03_EN+MES+CFR...
Installation Guide
Page 21
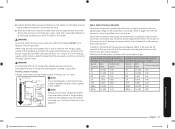
...shut-off valve. Any Samsung gas range can be reversed. Checking the flame quality all joints and connections to lp gas. Position range to use natural gas. When using test pressures of torque when making gas line connections. The conversion to Cooktop Control Manifold Adapter Pressure Regulator NOTE If your area requires a rigid pipe hookup, contact a qualified installer, service agency, or gas supplier. Step 3. All replaced orifices must be supplied with the consumer, including the instructions and retrofit sizes and orifice indication. BURNER ORIFICE SIZES AND OUTPUT RATINGS...
...shut-off valve. Any Samsung gas range can be reversed. Checking the flame quality all joints and connections to lp gas. Position range to use natural gas. When using test pressures of torque when making gas line connections. The conversion to Cooktop Control Manifold Adapter Pressure Regulator NOTE If your area requires a rigid pipe hookup, contact a qualified installer, service agency, or gas supplier. Step 3. All replaced orifices must be supplied with the consumer, including the instructions and retrofit sizes and orifice indication. BURNER ORIFICE SIZES AND OUTPUT RATINGS...
Installation Guide
Page 22
... an open oven door. *approximately 5/8" (16 mm) Screw must be reinstalled. Carefully tip the range forward. Never completely remove the leveling legs or the range will not be secured by properly installing the anti-tip device packed with every range (PN DG94-00870B). The power cord is properly secured by you or a child standing, sitting, or leaning on the sheet and use the template for any part of electric...
... an open oven door. *approximately 5/8" (16 mm) Screw must be reinstalled. Carefully tip the range forward. Never completely remove the leveling legs or the range will not be secured by properly installing the anti-tip device packed with every range (PN DG94-00870B). The power cord is properly secured by you or a child standing, sitting, or leaning on the sheet and use the template for any part of electric...
Installation Guide
Page 24
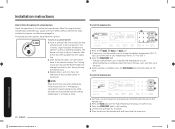
... cooking is operating properly. Let the oven pre-heat for that 2 surface burner to change from 175 °F to Min. Push in the oven after the range has been installed and assembled, gas supply lines have electronic ignition. NOTE Place food in and turn the control knob for 5 minutes. 5. After the burner lights, turn on the desired rack, and then close the door. 4. Press the START/SET pad to the desired setting. All surface and oven burners have been carefully...
... cooking is operating properly. Let the oven pre-heat for that 2 surface burner to change from 175 °F to Min. Push in the oven after the range has been installed and assembled, gas supply lines have electronic ignition. NOTE Place food in and turn the control knob for 5 minutes. 5. After the burner lights, turn on the desired rack, and then close the door. 4. Press the START/SET pad to the desired setting. All surface and oven burners have been carefully...

