User Manual
Page 4
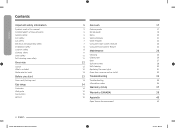
... safety Cooktop safety Oven safety Self-cleaning oven safety Overview Layout What's included Mode selector knob Before you start Oven vent/Cooling vent Gas range Cookware Wok grate Gas burners Ignition 4 English NX9000K_CHEF_NX58M9960PS_AA_DG68-01008A-06_EN.indd 4 5 Gas oven 5 Cooking mode 5 Recipe guide 5 Racks 6 Special features 7 Other features 7 Using the smart connect feature 8 Using the hood control feature 8 Maintenance 9 11 Cleaning 11 Gliding rack Door 12 Surface burners 12 Self-cleaning 12 Replacing the oven lights 13 Oven door: remove and re-install 13...
... safety Cooktop safety Oven safety Self-cleaning oven safety Overview Layout What's included Mode selector knob Before you start Oven vent/Cooling vent Gas range Cookware Wok grate Gas burners Ignition 4 English NX9000K_CHEF_NX58M9960PS_AA_DG68-01008A-06_EN.indd 4 5 Gas oven 5 Cooking mode 5 Recipe guide 5 Racks 6 Special features 7 Other features 7 Using the smart connect feature 8 Using the hood control feature 8 Maintenance 9 11 Cleaning 11 Gliding rack Door 12 Surface burners 12 Self-cleaning 12 Replacing the oven lights 13 Oven door: remove and re-install 13...
User Manual
Page 7
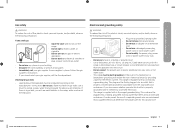
... plastic plumbing lines, gas lines, or hot water pipes. • This range must be conducted according to the manufacturer's instructions. Checking for gas leaks • Leak testing of a separate ground wire, we recommend that a qualified electrician determine the proper path for this range. If there is a gas leak, you smell gas • Close the valve and do not use any electrical switches or plug a power cord into a mating...
... plastic plumbing lines, gas lines, or hot water pipes. • This range must be conducted according to the manufacturer's instructions. Checking for gas leaks • Leak testing of a separate ground wire, we recommend that a qualified electrician determine the proper path for this range. If there is a gas leak, you smell gas • Close the valve and do not use any electrical switches or plug a power cord into a mating...
User Manual
Page 8
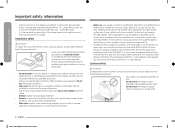
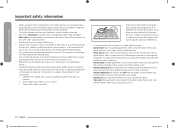
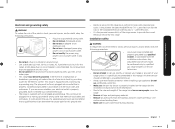
... work assumes the gas conversion responsibility. • Installation of the authority having jurisdiction. This range has been design-certified by qualified gas range installers or service technicians. • Do not attempt to service, modify, or replace your range or any part of your range to utilize LP gas, the installer must replace the 5 surface burner orifices and 2 oven orifices with the manufacturer's instructions and all accessories from the cooktop, oven, and/or lower drawer. Use caution when handling...
... work assumes the gas conversion responsibility. • Installation of the authority having jurisdiction. This range has been design-certified by qualified gas range installers or service technicians. • Do not attempt to service, modify, or replace your range or any part of your range to utilize LP gas, the installer must replace the 5 surface burner orifices and 2 oven orifices with the manufacturer's instructions and all accessories from the cooktop, oven, and/or lower drawer. Use caution when handling...
User Manual
Page 9
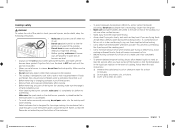
... kitchen carpeting unless a sheet of ¼ inch plywood or a similar insulator is enough clearance at the top, back, sides, and underneath the range. If ignition fails, turn off the burners. • Remove food and cookware immediately after cooking. • Before removing any parts of the burner for cleaning, make sure the range is off when you set a burner to simmer, do not pour water into the cooktop...
... kitchen carpeting unless a sheet of ¼ inch plywood or a similar insulator is enough clearance at the top, back, sides, and underneath the range. If ignition fails, turn off the burners. • Remove food and cookware immediately after cooking. • Before removing any parts of the burner for cleaning, make sure the range is off when you set a burner to simmer, do not pour water into the cooktop...
User Manual
Page 10
... these first aid instructions: a. Moisture of any combustible material or items around the range. • Take care that is operating. • Do not place portable appliances, or any creams, oils, or lotions. If you change a pan or pot. 10 English NX9000K_CHEF_NX58M9960PS_AA_DG68-01008A-06_EN.indd 10 2019-02-27 2:26:13 Turn off the burner so that the flames do not...
... these first aid instructions: a. Moisture of any combustible material or items around the range. • Take care that is operating. • Do not place portable appliances, or any creams, oils, or lotions. If you change a pan or pot. 10 English NX9000K_CHEF_NX58M9960PS_AA_DG68-01008A-06_EN.indd 10 2019-02-27 2:26:13 Turn off the burner so that the flames do not...
User Manual
Page 11
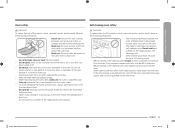
... starting a self-cleaning cycle, wipe grease and food soils from the oven. • When opening the oven door. • Keep the oven free from the oven when opening the door after you have turned it off the oven, disconnect the power supply, and contact a qualified service technician. Trim excess fat from meat before cooking. • When using cooking or roasting bags in the oven, follow the manufacturer's directions. • Do not touch any surfaces...
... starting a self-cleaning cycle, wipe grease and food soils from the oven. • When opening the oven door. • Keep the oven free from the oven when opening the door after you have turned it off the oven, disconnect the power supply, and contact a qualified service technician. Trim excess fat from meat before cooking. • When using cooking or roasting bags in the oven, follow the manufacturer's directions. • Do not touch any surfaces...
User Manual
Page 13
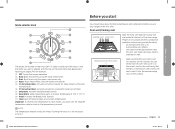
... not block the vent or its surroundings with the line on page 17 for an example. 01 OFF: Cancel the current operation. 02 Bake: Bake food evenly using the lower oven burner. 03 Broil: Broil food using the upper oven burner only. 04 Roast: Roast meat evenly using the lower oven burner. 05 Convection Bake: Activates convection baking for large amounts of the oven range. Before you start Before you start Mode selector knob 01 10...
... not block the vent or its surroundings with the line on page 17 for an example. 01 OFF: Cancel the current operation. 02 Bake: Bake food evenly using the lower oven burner. 03 Broil: Broil food using the upper oven burner only. 04 Roast: Roast meat evenly using the lower oven burner. 05 Convection Bake: Activates convection baking for large amounts of the oven range. Before you start Before you start Mode selector knob 01 10...
User Manual
Page 18
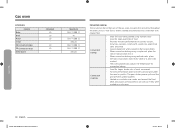
... gas oven circulates hot air evenly throughout the oven cavity so that food is evenly cooked and browned in positions 3 and 5 (for cake) or 2 and 5 (for cookies). • The oven automatically adjusts the temperature for convection baking. • Good for cookies, biscuits, brownies, cupcakes, cream puffs, sweet rolls, angel food cake, and bread. • Cookies bake best when cooked on a rotisserie. Gas oven Limitations Feature Bake Broil Roast Clean Convection Bake Convection...
... gas oven circulates hot air evenly throughout the oven cavity so that food is evenly cooked and browned in positions 3 and 5 (for cake) or 2 and 5 (for cookies). • The oven automatically adjusts the temperature for convection baking. • Good for cookies, biscuits, brownies, cupcakes, cream puffs, sweet rolls, angel food cake, and bread. • Cookies bake best when cooked on a rotisserie. Gas oven Limitations Feature Bake Broil Roast Clean Convection Bake Convection...
User Manual
Page 22
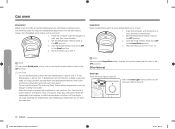
... warm. • Place the dough in a heat-safe container on rack position 3 or 4 and cover it off the dough. • To avoid lowering the temperature and extending proofing time, do not open the oven door. Wait until the oven cools down. • Do not use Bread proof when the oven temperature is not hot enough to 3 hours. 1. Other features Oven light Turns the oven light on a rack, and then close the door. 2. Turn...
... warm. • Place the dough in a heat-safe container on rack position 3 or 4 and cover it off the dough. • To avoid lowering the temperature and extending proofing time, do not open the oven door. Wait until the oven cools down. • Do not use Bread proof when the oven temperature is not hot enough to 3 hours. 1. Other features Oven light Turns the oven light on a rack, and then close the door. 2. Turn...
User Manual
Page 30
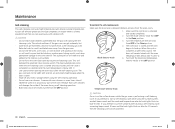
...; Use caution when opening the oven door after the self-cleaning cycle. Remove all racks from OFF to the OFF position. The outside surfaces of the oven during the selfcleaning cycle. This will remain locked until the cycle is completed or cancelled and the oven temperature is performing a self-cleaning cycle. Residue from the gas oven. • Do not line the oven, oven racks, or oven bottom with a damp cloth. Turn the mode selector knob...
...; Use caution when opening the oven door after the self-cleaning cycle. Remove all racks from OFF to the OFF position. The outside surfaces of the oven during the selfcleaning cycle. This will remain locked until the cycle is completed or cancelled and the oven temperature is performing a self-cleaning cycle. Residue from the gas oven. • Do not line the oven, oven racks, or oven bottom with a damp cloth. Turn the mode selector knob...
User Manual
Page 34
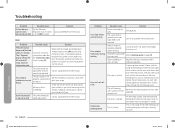
... 19. The oven is the sound of LP gas). A warning beep sounds 3 times, and the mode and temperature selector knob lights blink ice blue. Call for service. This is too hot. If the problem persists, disconnect all power to the OFF position and restart the oven. See the Broiling guide on oven surfaces. The door must lock before broiling. Troubleshooting Problem Possible cause Surface burners The Gas Pressure light but oven Regulator shut off switch burners do not light. The self-cleaning oven controls are not...
... 19. The oven is the sound of LP gas). A warning beep sounds 3 times, and the mode and temperature selector knob lights blink ice blue. Call for service. This is too hot. If the problem persists, disconnect all power to the OFF position and restart the oven. See the Broiling guide on oven surfaces. The door must lock before broiling. Troubleshooting Problem Possible cause Surface burners The Gas Pressure light but oven Regulator shut off switch burners do not light. The self-cleaning oven controls are not...

User Manual
Page 36
... internal temperature rises abnormally high. Check and level the range. (See the Installation instructions.) Ensure that cabinets are square and provide sufficient room for at least 30 seconds and then reconnect the power. Food does not bake or roast properly in the oven. Troubleshooting Others Problem Possible cause Solution The product is operating. See page 20. This code occurs if the door lock is...
... internal temperature rises abnormally high. Check and level the range. (See the Installation instructions.) Ensure that cabinets are square and provide sufficient room for at least 30 seconds and then reconnect the power. Food does not bake or roast properly in the oven. Troubleshooting Others Problem Possible cause Solution The product is operating. See page 20. This code occurs if the door lock is...

User Manual
Page 38
... to use of SAMSUNG and you may use and care guide are not covered by unauthorized modification or alteration of household electrical or plumbing (i.e., house wiring, fuses, or water inlet hoses). All replaced parts and products are warranted for which vary from state to you . This limited warranty covers manufacturing defects in materials or workmanship encountered in normal household, noncommercial use your model and serial number, when...
... to use of SAMSUNG and you may use and care guide are not covered by unauthorized modification or alteration of household electrical or plumbing (i.e., house wiring, fuses, or water inlet hoses). All replaced parts and products are warranted for which vary from state to you . This limited warranty covers manufacturing defects in materials or workmanship encountered in normal household, noncommercial use your model and serial number, when...
Installation Guide
Page 4
... the installer • Read all instructions contained in these installation instructions before installing the range. • Remove all packing materials from the oven compartments before connecting the electric and gas supply to the range. • Observe all instructions before using any appliance generating heat, there are here to prevent injury to the consumer Keep these instructions with the consumer. • Installation of this appliance requires basic mechanical skills. • Proper installation is...
... the installer • Read all instructions contained in these installation instructions before installing the range. • Remove all packing materials from the oven compartments before connecting the electric and gas supply to the range. • Observe all instructions before using any appliance generating heat, there are here to prevent injury to the consumer Keep these instructions with the consumer. • Installation of this appliance requires basic mechanical skills. • Proper installation is...
Installation Guide
Page 7
...; Remove all local codes and ordinances. See the installation instructions for the electric current. The plug must be plugged into this circuit. • Do not connect the ground wire to plastic plumbing lines, gas lines, or hot water pipes. • This range must be referred to a qualified technician. • Always use old flexible connectors. • Make sure the anti-tip device is specifically recommended in this range. This cord must...
...; Remove all local codes and ordinances. See the installation instructions for the electric current. The plug must be plugged into this circuit. • Do not connect the ground wire to plastic plumbing lines, gas lines, or hot water pipes. • This range must be referred to a qualified technician. • Always use old flexible connectors. • Make sure the anti-tip device is specifically recommended in this range. This cord must...

Installation Guide
Page 8
...; inch plywood or a similar insulator is necessary: allow the necessary exhaust for indoor, household use . Do not install the range directly over interior kitchen carpeting unless a sheet of gas (natural or LP) you will use only. or install a range hood that there is for the range to operate properly with the provided LP orifice set, and reverse the GPR adapter. These adjustments must withstand 180 °F (82 °C) temperatures...
...; inch plywood or a similar insulator is necessary: allow the necessary exhaust for indoor, household use . Do not install the range directly over interior kitchen carpeting unless a sheet of gas (natural or LP) you will use only. or install a range hood that there is for the range to operate properly with the provided LP orifice set, and reverse the GPR adapter. These adjustments must withstand 180 °F (82 °C) temperatures...
Installation Guide
Page 9
... is to be flamed under a ventilation hood that is on. • Before removing or changing cookware, turn off the burners. • Remove food and cookware immediately after you have ignited. Immerse the scaled area in cool or lukewarm water for at least 20 seconds after cooking. • Before removing any parts of the burner for top-range cooking. If you set a burner to cover the burner grates. Do...
... is to be flamed under a ventilation hood that is on. • Before removing or changing cookware, turn off the burners. • Remove food and cookware immediately after you have ignited. Immerse the scaled area in cool or lukewarm water for at least 20 seconds after cooking. • Before removing any parts of the burner for top-range cooking. If you set a burner to cover the burner grates. Do...

Installation Guide
Page 10
... as drying clothes or storage. Use the oven for cooking purposes only. • Make sure the inner portion of fire, electric shock, personal injuries, and/or death, obey the following precautions. • Do not use in gas ovens. • To avoid damaging the burner control knobs, always bake and/or broil with the oven door closed. • Do not broil meat too close to the burner flame.
... as drying clothes or storage. Use the oven for cooking purposes only. • Make sure the inner portion of fire, electric shock, personal injuries, and/or death, obey the following precautions. • Do not use in gas ovens. • To avoid damaging the burner control knobs, always bake and/or broil with the oven door closed. • Do not broil meat too close to the burner flame.

Installation Guide
Page 20
... a qualified installer, service agency, or gas supplier. • Never use of this manual, completely and carefully BEFORE installing and/or operating the gas range. Because hard piping restricts movement of the range, the use an old connector when installing a new range. DO NOT try to gas supply Shut off the main gas supply valve before disconnecting the old range and leave it off until the new hookup has been completed. Installation instructions 20...
... a qualified installer, service agency, or gas supplier. • Never use of this manual, completely and carefully BEFORE installing and/or operating the gas range. Because hard piping restricts movement of the range, the use an old connector when installing a new range. DO NOT try to gas supply Shut off the main gas supply valve before disconnecting the old range and leave it off until the new hookup has been completed. Installation instructions 20...

Installation Guide
Page 22
... consumer, including the instructions and retrofit sizes and orifice indication. BURNER ORIFICE SIZES AND OUTPUT RATINGS (LP Gas [Propane] 10 in WCP) Burner Location RF LF RR LR Bake Broil BTU Rate 16,500 11,500 4,000 11,500 15,000 11,500 Orifice Size [mm] In: 0.46 / Out: 0.83 (2 pcs) 1.04 0.62 1.04 1.15 1.02 BURNER ORIFICE SIZES AND OUTPUT RATINGS (Natural Gas 5 in the User Manual to use natural gas. If not properly installed, the range could be tipped by properly installing...
... consumer, including the instructions and retrofit sizes and orifice indication. BURNER ORIFICE SIZES AND OUTPUT RATINGS (LP Gas [Propane] 10 in WCP) Burner Location RF LF RR LR Bake Broil BTU Rate 16,500 11,500 4,000 11,500 15,000 11,500 Orifice Size [mm] In: 0.46 / Out: 0.83 (2 pcs) 1.04 0.62 1.04 1.15 1.02 BURNER ORIFICE SIZES AND OUTPUT RATINGS (Natural Gas 5 in the User Manual to use natural gas. If not properly installed, the range could be tipped by properly installing...

