User Manual
Page 4
... safety Cooktop safety Oven safety Self-cleaning oven safety Overview Layout What's included Mode selector knob Before you start Oven vent/Cooling vent Gas range Cookware Wok grate Gas burners Ignition 4 English NX9000K_CHEF_NX58M9960PS_AA_DG68-01008A-06_EN.indd 4 5 Gas oven 5 Cooking mode 5 Recipe guide 5 Racks 6 Special features 7 Other features 7 Using the smart connect feature 8 Using the hood control feature 8 Maintenance 9 11 Cleaning 11 Gliding rack Door 12 Surface burners 12 Self-cleaning 12 Replacing the oven lights 13 Oven door: remove and re-install 13...
... safety Cooktop safety Oven safety Self-cleaning oven safety Overview Layout What's included Mode selector knob Before you start Oven vent/Cooling vent Gas range Cookware Wok grate Gas burners Ignition 4 English NX9000K_CHEF_NX58M9960PS_AA_DG68-01008A-06_EN.indd 4 5 Gas oven 5 Cooking mode 5 Recipe guide 5 Racks 6 Special features 7 Other features 7 Using the smart connect feature 8 Using the hood control feature 8 Maintenance 9 11 Cleaning 11 Gliding rack Door 12 Surface burners 12 Self-cleaning 12 Replacing the oven lights 13 Oven door: remove and re-install 13...
User Manual
Page 7
... call the fire department. If codes permit the use the range. • Do not light a match, candle, or cigarette. • Do not turn on any gas or electric appliances. • Do not touch any electrical switches or plug a power cord into an outlet that a qualified electrician determine the proper path for the electric current. This range is supplied with a cord having a grounding plug. NX9000K_CHEF_NX58M9960PS_AA_DG68-01008A-06_EN.indd...
... call the fire department. If codes permit the use the range. • Do not light a match, candle, or cigarette. • Do not turn on any gas or electric appliances. • Do not touch any electrical switches or plug a power cord into an outlet that a qualified electrician determine the proper path for the electric current. This range is supplied with a cord having a grounding plug. NX9000K_CHEF_NX58M9960PS_AA_DG68-01008A-06_EN.indd...
User Manual
Page 8
... replace the 5 surface burner orifices and 2 oven orifices with the installation instructions. Location safety WARNING To reduce the risk of gas (natural or LP) you will use new flexible connectors when installing a gas appliance. Do not install the range in areas exposed to the weather and/or water. • Do not install the range in accordance with local codes or, in this manual. Important safety information Important safety information • Electrical service...
... replace the 5 surface burner orifices and 2 oven orifices with the installation instructions. Location safety WARNING To reduce the risk of gas (natural or LP) you will use new flexible connectors when installing a gas appliance. Do not install the range in areas exposed to the weather and/or water. • Do not install the range in accordance with local codes or, in this manual. Important safety information Important safety information • Electrical service...
User Manual
Page 9
... cleaning the burner spreader, make sure the range's vents are not using them. • Do not use the Lite position when igniting the burners and make sure the burners have a ventilation hood. Important safety information • Select a level, well-constructed floor that window. Do not install the range directly over the surface burners and ignite, causing a fire hazard. When you must withstand 180 °F (82 °C) temperatures without...
... cleaning the burner spreader, make sure the range's vents are not using them. • Do not use the Lite position when igniting the burners and make sure the burners have a ventilation hood. Important safety information • Select a level, well-constructed floor that window. Do not install the range directly over the surface burners and ignite, causing a fire hazard. When you must withstand 180 °F (82 °C) temperatures without...
User Manual
Page 10
.... Adjust the burner flames so that the flames do not extend beyond the smoking point. • Use a minimum amount of any combustible material or items around the range. • Take care that the temperature in the center of scalding, follow these first aid instructions: a. In the event of the grate. If you touch the surfaces near the vent while the oven is operating. •...
.... Adjust the burner flames so that the flames do not extend beyond the smoking point. • Use a minimum amount of any combustible material or items around the range. • Take care that the temperature in the center of scalding, follow these first aid instructions: a. In the event of the grate. If you touch the surfaces near the vent while the oven is operating. •...
User Manual
Page 11
... storage. Do not touch any surfaces of the range during a self-cleaning cycle. Self-cleaning oven safety WARNING To reduce the risk of fire, electric shock, personal injuries, and/or death, observe the following precautions. • Do not use in gas ovens. • To avoid damaging the burner control knobs, always bake and/or broil with the oven door closed. • Do not broil meat too close to the burner flame.
... storage. Do not touch any surfaces of the range during a self-cleaning cycle. Self-cleaning oven safety WARNING To reduce the risk of fire, electric shock, personal injuries, and/or death, observe the following precautions. • Do not use in gas ovens. • To avoid damaging the burner control knobs, always bake and/or broil with the oven door closed. • Do not broil meat too close to the burner flame.
User Manual
Page 13
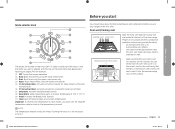
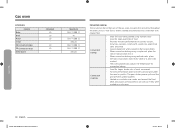
... current operation. 02 Bake: Bake food evenly using the lower oven burner. 03 Broil: Broil food using the upper oven burner only. 04 Roast: Roast meat evenly using the lower oven burner. 05 Convection Bake: Activates convection baking for large cuts of meat. 07 Dehydrate: Activates the Dehydrate function. 08 Keep Warm: Keep cooked food warm at very high temperatures. To select a mode, turn the knob so that the oven vent cover sits securely on multiple racks. 06 Convection Roast: Activates convection roasting...
... current operation. 02 Bake: Bake food evenly using the lower oven burner. 03 Broil: Broil food using the upper oven burner only. 04 Roast: Roast meat evenly using the lower oven burner. 05 Convection Bake: Activates convection baking for large cuts of meat. 07 Dehydrate: Activates the Dehydrate function. 08 Keep Warm: Keep cooked food warm at very high temperatures. To select a mode, turn the knob so that the oven vent cover sits securely on multiple racks. 06 Convection Roast: Activates convection roasting...
User Manual
Page 18
... cookie sheets. • When convection baking using a single rack, place the rack in rack position 3 or 4. • When convection baking using multiple racks. • Good for large quantities of the gas oven circulates hot air evenly throughout the oven cavity so that food is evenly cooked and browned in positions 3 and 5 (for cake) or 2 and 5 (for cookies). • The oven automatically adjusts the temperature for convection baking. • Good for larger, tender cuts...
... cookie sheets. • When convection baking using a single rack, place the rack in rack position 3 or 4. • When convection baking using multiple racks. • Good for large quantities of the gas oven circulates hot air evenly throughout the oven cavity so that food is evenly cooked and browned in positions 3 and 5 (for cake) or 2 and 5 (for cookies). • The oven automatically adjusts the temperature for convection baking. • Good for larger, tender cuts...
User Manual
Page 22
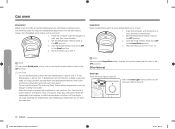
... avoid lowering the temperature and extending proofing time, do not open the oven door. Gas oven Bread proof Bread proof provides an optimal temperature for warming food. The oven heats up to the OFF position. NOTE You can cancel Keep Warm at any time by setting the mode selector knob to the Proof position. 4. Other features Oven light Turns the oven light on rack position 3 or 4 and cover it off . Turn the mode selector knob from OFF...
... avoid lowering the temperature and extending proofing time, do not open the oven door. Gas oven Bread proof Bread proof provides an optimal temperature for warming food. The oven heats up to the OFF position. NOTE You can cancel Keep Warm at any time by setting the mode selector knob to the Proof position. 4. Other features Oven light Turns the oven light on rack position 3 or 4 and cover it off . Turn the mode selector knob from OFF...
User Manual
Page 30
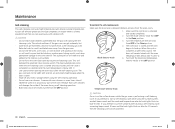
... oven temperature is open during a self-cleaning cycle, a warning beep sounds 3 times and the knob lights blink ice blue for 10 seconds. Remove all racks from oven cleaners will result in or around any excess spillage before using the surface burners, an alert beep sounds and the mode and temperature selector knob lights blink ice blue 5 times. Turn both the mode and temperature selector knobs to the interior oven surfaces. • Do not force the oven door open...
... oven temperature is open during a self-cleaning cycle, a warning beep sounds 3 times and the knob lights blink ice blue for 10 seconds. Remove all racks from oven cleaners will result in or around any excess spillage before using the surface burners, an alert beep sounds and the mode and temperature selector knob lights blink ice blue 5 times. Turn both the mode and temperature selector knobs to the interior oven surfaces. • Do not force the oven door open...
User Manual
Page 34
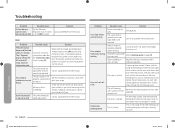
... orifice (LP gas instead of natural gas or natural gas instead of the metal heating and cooling during broiling. If the problem persists, disconnect all power to be replaced. The oven burner air adjustment shutters need to the range for service. Very large or yellow oven burner flames. The gas supply is assembled. Wrong orifice is not properly connected or turned on. Check the burner orifice size and contact your range. Oven temperature is opened. The oven thermostat needs adjustment. Oven smokes excessively during any cooking or cleaning function...
... orifice (LP gas instead of natural gas or natural gas instead of the metal heating and cooling during broiling. If the problem persists, disconnect all power to be replaced. The oven burner air adjustment shutters need to the range for service. Very large or yellow oven burner flames. The gas supply is assembled. Wrong orifice is not properly connected or turned on. Check the burner orifice size and contact your range. Oven temperature is opened. The oven thermostat needs adjustment. Oven smokes excessively during any cooking or cleaning function...

User Manual
Page 36
... being cooked. See broiling guide on the rack. Turn both the mode and temperature selector knobs to be not level. Make sure the floor is selected. Wrong cooking mode is level, strong, and stable. Oven controls not set properly. Information codes OVEN Displayed Code C-d0 C-d1 C-F0 C-20 C-21 Possible cause Solution This code occurs if the control key is mispositioned. If the problem continues, contact a local Samsung service center. This code occurs if the door lock...
... being cooked. See broiling guide on the rack. Turn both the mode and temperature selector knobs to be not level. Make sure the floor is selected. Wrong cooking mode is level, strong, and stable. Oven controls not set properly. Information codes OVEN Displayed Code C-d0 C-d1 C-F0 C-20 C-21 Possible cause Solution This code occurs if the control key is mispositioned. If the problem continues, contact a local Samsung service center. This code occurs if the door lock...

User Manual
Page 38
... correct installation not in the use of equipment, utilities, services, parts, supplies, accessories, applications, installations, repairs, external wiring or connectors not supplied or authorized by incorrect electrical line current, voltage, fluctuations and surges; Warranty NX9000K_CHEF_NX58M9960PS_AA_DG68-01008A-06_EN.indd 38 2019-02-27 2:26:23 product where the original factory serial numbers have other rights, which this limited warranty. damage caused by use and care guide are not covered by...
... correct installation not in the use of equipment, utilities, services, parts, supplies, accessories, applications, installations, repairs, external wiring or connectors not supplied or authorized by incorrect electrical line current, voltage, fluctuations and surges; Warranty NX9000K_CHEF_NX58M9960PS_AA_DG68-01008A-06_EN.indd 38 2019-02-27 2:26:23 product where the original factory serial numbers have other rights, which this limited warranty. damage caused by use and care guide are not covered by...
Installation Guide
Page 4
... installing the range. • Remove all packing materials from the oven compartments before connecting the electric and gas supply to the range. • Observe all instructions before using any appliance generating heat, there are here to prevent injury to the servicer The electrical diagram is not covered under the Warranty. Important note to the installer • Read all instructions contained in an envelope attached to leave these instructions completely and carefully...
... installing the range. • Remove all packing materials from the oven compartments before connecting the electric and gas supply to the range. • Observe all instructions before using any appliance generating heat, there are here to prevent injury to the servicer The electrical diagram is not covered under the Warranty. Important note to the installer • Read all instructions contained in an envelope attached to leave these instructions completely and carefully...
Installation Guide
Page 7
... provide the correct electrical service for this range. Barring local codes, it is the personal responsibility of a separate ground wire, we recommend that meets all accessories from the cooktop and oven. Do not use new flexible connectors when installing a gas appliance. If you are heavy. If codes permit the use a damaged power plug, power cord, or loose power outlet. • Do not modify the power plug, power cord, or power outlet in...
... provide the correct electrical service for this range. Barring local codes, it is the personal responsibility of a separate ground wire, we recommend that meets all accessories from the cooktop and oven. Do not use new flexible connectors when installing a gas appliance. If you are heavy. If codes permit the use a damaged power plug, power cord, or loose power outlet. • Do not modify the power plug, power cord, or power outlet in...

Installation Guide
Page 8
..., in accordance with the manufacturer's instructions and all codes and requirements of this work assumes the gas conversion responsibility. • Installation of the authority having jurisdiction. The vents allow a minimum clearance of 40 inches (102 cm) between the range and carpeting. • Select a location where a grounded, 3- The qualified agency performing this range must withstand 180 °F (82 °C) temperatures without shrinking, warping, or...
..., in accordance with the manufacturer's instructions and all codes and requirements of this work assumes the gas conversion responsibility. • Installation of the authority having jurisdiction. The vents allow a minimum clearance of 40 inches (102 cm) between the range and carpeting. • Select a location where a grounded, 3- The qualified agency performing this range must withstand 180 °F (82 °C) temperatures without shrinking, warping, or...
Installation Guide
Page 9
... you set a burner to cover the burner grates. If foods are flamed, they heat. assembling. • Make sure the spark mark on . • Before removing or changing cookware, turn the knob to line the grates or any creams, oils, or lotions. 3. Do not apply any part of scalding, follow these first aid instructions: 1. Important safety information Cooktop safety WARNING To reduce the risk of fire, electric...
... you set a burner to cover the burner grates. If foods are flamed, they heat. assembling. • Make sure the spark mark on . • Before removing or changing cookware, turn the knob to line the grates or any creams, oils, or lotions. 3. Do not apply any part of scalding, follow these first aid instructions: 1. Important safety information Cooktop safety WARNING To reduce the risk of fire, electric...

Installation Guide
Page 10
... before cooking. • When using cooking or roasting bags in the oven. • Before starting a self-cleaning cycle, remove all racks, cookware, and utensils from grease buildup. • When repositioning the oven racks, make sure the oven is completely cool. • Only use the oven for use aluminium foil or foil liners anywhere in gas ovens. • To avoid damaging the burner control knobs, always bake and/or broil with the oven door closed...
... before cooking. • When using cooking or roasting bags in the oven. • Before starting a self-cleaning cycle, remove all racks, cookware, and utensils from grease buildup. • When repositioning the oven racks, make sure the oven is completely cool. • Only use the oven for use aluminium foil or foil liners anywhere in gas ovens. • To avoid damaging the burner control knobs, always bake and/or broil with the oven door closed...

Installation Guide
Page 20
... and carefully BEFORE installing and/or operating the gas range. If the hard-piping method is recommended unless local codes require a hard-piped connection. Step 1. Any damage and/or missing parts should be reported to relight the pilot on . Because hard piping restricts movement of this manual is made. Check for shipping damage and/or missing parts. Installation instructions Installing your local retailer. DO NOT use...
... and carefully BEFORE installing and/or operating the gas range. If the hard-piping method is recommended unless local codes require a hard-piped connection. Step 1. Any damage and/or missing parts should be reported to relight the pilot on . Because hard piping restricts movement of this manual is made. Check for shipping damage and/or missing parts. Installation instructions Installing your local retailer. DO NOT use...

Installation Guide
Page 22
... service technician. If not properly installed, the range could be changed (4 surface burners and 2 oven burners). Install the anti-tip device WARNING • To reduce the risk of tipping, the appliance must be supplied with the consumer, including the instructions and retrofit sizes and orifice indication. All replaced orifices must be reversed. The instructions include information necessary to be secured by a qualified LP gas installer. The conversion process should only be converted to use LP gas. Any Samsung gas range...
... service technician. If not properly installed, the range could be changed (4 surface burners and 2 oven burners). Install the anti-tip device WARNING • To reduce the risk of tipping, the appliance must be supplied with the consumer, including the instructions and retrofit sizes and orifice indication. All replaced orifices must be reversed. The instructions include information necessary to be secured by a qualified LP gas installer. The conversion process should only be converted to use LP gas. Any Samsung gas range...

