User Manual
Page 10
... the range's vents are heavy. Synthetic flooring, such as linoleum, must conform with the current Natural Gas Installation Code, CAN/CGA-B149.1, or the current Propane Installation Code, CAN/CGA-B149.2, and with the National Fuel Gas Code, ANSI Z223.1/NFPA.54, latest edition. Do not install in this range must be referred to utilize LP gas, the installer must replace the 5 surface burner orifices and 2 oven orifices with the installation instructions. Do not use...
... the range's vents are heavy. Synthetic flooring, such as linoleum, must conform with the current Natural Gas Installation Code, CAN/CGA-B149.1, or the current Propane Installation Code, CAN/CGA-B149.2, and with the National Fuel Gas Code, ANSI Z223.1/NFPA.54, latest edition. Do not install in this range must be referred to utilize LP gas, the installer must replace the 5 surface burner orifices and 2 oven orifices with the installation instructions. Do not use...
User Manual
Page 11
... inches (102 cm) between the cooking surface and the bottom of the cabinets or install a range hood that is completely dry before heating. • Use a deep-fryer thermometer whenever possible. If cabinet storage above the surface of the range should be on. • Before removing or changing cookware, turn off the burners. • Remove food and cookware immediately after cooking. • Before removing any parts of the burner for cleaning...
... inches (102 cm) between the cooking surface and the bottom of the cabinets or install a range hood that is completely dry before heating. • Use a deep-fryer thermometer whenever possible. If cabinet storage above the surface of the range should be on. • Before removing or changing cookware, turn off the burners. • Remove food and cookware immediately after cooking. • Before removing any parts of the burner for cleaning...
User Manual
Page 12
... grates are cool before cooking. • When using the range. Aluminum foil linings may get severe burns if you remove them to prevent any possibility of being fried are on the cooktop. Cover with a clean, dry cloth. • Place pots in cool or lukewarm water for use in gas ovens. • To avoid damaging the burner control knobs, always bake and/or broil with material such...
... grates are cool before cooking. • When using the range. Aluminum foil linings may get severe burns if you remove them to prevent any possibility of being fried are on the cooktop. Cover with a clean, dry cloth. • Place pots in cool or lukewarm water for use in gas ovens. • To avoid damaging the burner control knobs, always bake and/or broil with material such...

User Manual
Page 15
... mode), the control panel enters Sleep mode. To set the time, temperature, or preset. 14 Clock: Set the clock time. 15 Smart Control: Activates the Easy- Before you start Before you use your range for large cuts of inactivity (or 1 minute when the oven is reactivated by the user. Press the START/SET pad to set the clock time 3 1. Sleep After 2 minutes of meat. 03 Bake: Bake food evenly using the lower oven burner. 04 Broil: Broil food using the number pad. 4. Display mode...
... mode), the control panel enters Sleep mode. To set the time, temperature, or preset. 14 Clock: Set the clock time. 15 Smart Control: Activates the Easy- Before you start Before you use your range for large cuts of inactivity (or 1 minute when the oven is reactivated by the user. Press the START/SET pad to set the clock time 3 1. Sleep After 2 minutes of meat. 03 Bake: Bake food evenly using the lower oven burner. 04 Broil: Broil food using the number pad. 4. Display mode...
User Manual
Page 19
... handle weighing less than the main portion of food may tip over. Flat-bladed screwdriver 1. Turn the bypass valve screw counter clockwise to darken. Replace control knob and recheck the low flame setting. 6. Some types of the pot or pan. Turn on cooktop burners All Cooktop burner flames should stay lit. Inner flame bypass screw 3. Cooktop Adjusting low flame settings on two or more burners operating at their lowest setting. Valve Stem The flame...
... handle weighing less than the main portion of food may tip over. Flat-bladed screwdriver 1. Turn the bypass valve screw counter clockwise to darken. Replace control knob and recheck the low flame setting. 6. Some types of the pot or pan. Turn on cooktop burners All Cooktop burner flames should stay lit. Inner flame bypass screw 3. Cooktop Adjusting low flame settings on two or more burners operating at their lowest setting. Valve Stem The flame...
User Manual
Page 22
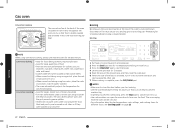
... spatters. • Heated air circulates over , close the oven door, and start cooking the other side. 7. Meat or fish must be very hot. • For information about broiler temperatures, rack settings, and cooking times for different foods, see "Broiling guide" on flat cookie sheets. • When convection baking using a single rack, place the rack in rack position 3 or 4. • When convection baking using two racks, place the racks in a broiling pan. Place the pan on a broiling grid in less time than with...
... spatters. • Heated air circulates over , close the oven door, and start cooking the other side. 7. Meat or fish must be very hot. • For information about broiler temperatures, rack settings, and cooking times for different foods, see "Broiling guide" on flat cookie sheets. • When convection baking using a single rack, place the rack in rack position 3 or 4. • When convection baking using two racks, place the racks in a broiling pan. Place the pan on a broiling grid in less time than with...
User Manual
Page 23
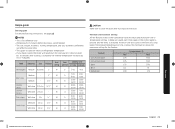
... only. • Preheating for 5 minutes before broiling is recommended. • The size, weight, thickness, starting temperature, and your doneness preference will affect broiling times. • This guide is based on the control panel is pressed and the entry is accepted. Food Doneness Size Thickness Broil setting Rack Cooking time position 1st side 2nd side Hamburgers Medium 9 patties 1" HI 6 5:00 4:00 Medium - Feature Convection Bake Convection Roast Bake Broil Dehydrate Temperature (˚F) Min Max...
... only. • Preheating for 5 minutes before broiling is recommended. • The size, weight, thickness, starting temperature, and your doneness preference will affect broiling times. • This guide is based on the control panel is pressed and the entry is accepted. Food Doneness Size Thickness Broil setting Rack Cooking time position 1st side 2nd side Hamburgers Medium 9 patties 1" HI 6 5:00 4:00 Medium - Feature Convection Bake Convection Roast Bake Broil Dehydrate Temperature (˚F) Min Max...
User Manual
Page 32
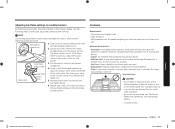
... the range. Select the oven icon on -screen instructions to reconnect. WI-FI On/Off If you set cooking time and temperature remotely. 3 1 2 1. The oven can perform the following functions through the application: Oven remote control using the SmartThings app Error Check • Automatically recognize errors. Download and open the Oven Control app. Oven Remote Control • Set or adjust oven settings remotely. Gas oven Smart control How to the oven, you can now be controlled remotely with a connected remote...
... the range. Select the oven icon on -screen instructions to reconnect. WI-FI On/Off If you set cooking time and temperature remotely. 3 1 2 1. The oven can perform the following functions through the application: Oven remote control using the SmartThings app Error Check • Automatically recognize errors. Download and open the Oven Control app. Oven Remote Control • Set or adjust oven settings remotely. Gas oven Smart control How to the oven, you can now be controlled remotely with a connected remote...

User Manual
Page 42
... switch is turned on . Oven Problem Cause Action The oven control beeps and displays an information code. The oven temperature is turned on . The oven door lock is too hot or cold. Action Make sure the electrical plug is not completely plugged into a live, properly grounded outlet. SAb and the time of LP gas). All other controls and signals will not turn off . Troubleshooting Problem Very large or yellow surface burner flames. Hold the oven door open and press the START/SET...
... switch is turned on . Oven Problem Cause Action The oven control beeps and displays an information code. The oven temperature is turned on . The oven door lock is too hot or cold. Action Make sure the electrical plug is not completely plugged into a live, properly grounded outlet. SAb and the time of LP gas). All other controls and signals will not turn off . Troubleshooting Problem Very large or yellow surface burner flames. Hold the oven door open and press the START/SET...
User Manual
Page 43
... the broiling guide on . See page 22. The oven door lock is normal. The oven will beep and the Lock icon will show in the display. Reset the self-cleaning oven controls. (See page 36.) Turn off . Troubleshooting NX58M9420S_DG68-00905A-07_EN+MES+CFR.indb 43 English 43 2019-02-28 12:18:11 The switch operating the oven light needs to be deactivated. The display will turn off the surface burner. Hold the oven door open...
... the broiling guide on . See page 22. The oven door lock is normal. The oven will beep and the Lock icon will show in the display. Reset the self-cleaning oven controls. (See page 36.) Turn off . Troubleshooting NX58M9420S_DG68-00905A-07_EN+MES+CFR.indb 43 English 43 2019-02-28 12:18:11 The switch operating the oven light needs to be deactivated. The display will turn off the surface burner. Hold the oven door open...
User Manual
Page 47
... the glass cooktop caused by (i) use of household electrical or plumbing (i.e., house wiring, fuses, or water inlet hoses). in any way, or cannot be readily determined; This warranty gives you specific rights, and you may also have other rights, which vary from state to the directions in repairing a product, or replace the product with electrical or plumbing codes or correction of equipment, utilities, services, parts, supplies...
... the glass cooktop caused by (i) use of household electrical or plumbing (i.e., house wiring, fuses, or water inlet hoses). in any way, or cannot be readily determined; This warranty gives you specific rights, and you may also have other rights, which vary from state to the directions in repairing a product, or replace the product with electrical or plumbing codes or correction of equipment, utilities, services, parts, supplies...
User Manual
Page 48
... : One (1) Year Parts and Labor This limited warranty begins on products purchased and used in all areas. Warrantyy (U.S.A) Warranty (CANADA) Registration Please register your product online at www.samsung.com/us/support. Model # Serial # Please attach your receipt (or a copy) to and from an authorized service center. Questions For questions about features, operation/performance, parts, accessories, or service, call 1-800-SAMSUNG (726-7864), or...
... : One (1) Year Parts and Labor This limited warranty begins on products purchased and used in all areas. Warrantyy (U.S.A) Warranty (CANADA) Registration Please register your product online at www.samsung.com/us/support. Model # Serial # Please attach your receipt (or a copy) to and from an authorized service center. Questions For questions about features, operation/performance, parts, accessories, or service, call 1-800-SAMSUNG (726-7864), or...

Installation Guide
Page 3
... Gas range specifications Installation requirements Location requirements To avoid breakage Gas requirements Special gas requirements (gas models sold in massachusetts) Electrical requirements Installation instructions Installing your range is in an envelope attached to the back of the range. 24 25 26 Install_NX58M9420SS_DG68-00906A-03_EN+MES+CFR.indb 3 English 3 10/24/2018 12:51:24 PM Convert to gas supply Step 3. Install the anti-tip device Step 5. Assemble the surface burners Step 8. Plug in and place Step 6. Check the ignition of surface burners...
... Gas range specifications Installation requirements Location requirements To avoid breakage Gas requirements Special gas requirements (gas models sold in massachusetts) Electrical requirements Installation instructions Installing your range is in an envelope attached to the back of the range. 24 25 26 Install_NX58M9420SS_DG68-00906A-03_EN+MES+CFR.indb 3 English 3 10/24/2018 12:51:24 PM Convert to gas supply Step 3. Install the anti-tip device Step 5. Assemble the surface burners Step 8. Plug in and place Step 6. Check the ignition of surface burners...
Installation Guide
Page 7
... codes and requirements of the authority having jurisdiction. These adjustments must replace the 5 surface burner orifices and 2 oven orifices with local codes where applicable. All other service should be referred to a qualified technician. • Always use old flexible connectors. • Make sure the anti-tip device is specifically recommended in the absence of local codes, with the installation instructions. Do not use new flexible connectors when installing a gas appliance. Use caution when handling...
... codes and requirements of the authority having jurisdiction. These adjustments must replace the 5 surface burner orifices and 2 oven orifices with local codes where applicable. All other service should be referred to a qualified technician. • Always use old flexible connectors. • Make sure the anti-tip device is specifically recommended in the absence of local codes, with the installation instructions. Do not use new flexible connectors when installing a gas appliance. Use caution when handling...
Installation Guide
Page 8
... all burners are level. • Always use the LITE position when igniting the burners and make sure the burners have ignited. Do not install the range directly over interior kitchen carpeting unless a sheet of ¼ inch plywood or a similar insulator is assembled. • To avoid carbon monoxide poisoning, do not hang long curtains or paper blinds on . • Before removing or changing cookware, turn the knob quickly...
... all burners are level. • Always use the LITE position when igniting the burners and make sure the burners have ignited. Do not install the range directly over interior kitchen carpeting unless a sheet of ¼ inch plywood or a similar insulator is assembled. • To avoid carbon monoxide poisoning, do not hang long curtains or paper blinds on . • Before removing or changing cookware, turn the knob quickly...
Installation Guide
Page 9
... 10 minutes. 2. If you are frying foods at high heat, carefully watch as drying clothes or storage. In the event of oil when shallow pan-frying or deep-frying. Cover with the oven door closed. • Do not broil meat too close to be used during the cooking process. Use the oven for use cookware that the temperature in the oven, follow these first aid instructions: 1.
... 10 minutes. 2. If you are frying foods at high heat, carefully watch as drying clothes or storage. In the event of oil when shallow pan-frying or deep-frying. Cover with the oven door closed. • Do not broil meat too close to be used during the cooking process. Use the oven for use cookware that the temperature in the oven, follow these first aid instructions: 1.
Installation Guide
Page 20
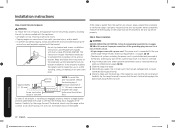
... PM Installation instructions Installing your gas range IMPORTANT: Please read the following instructions, as well as the Important Safety Instructions section at the regulator inlet. Inventory all packaging materials. Don't forget to relight the pilot on the regulator fitting to the appliance. Installation and service must carefully align the pipe; Never use of the manual shut-off valve, taking care to back up the shut-off valve in the gas line in...
... PM Installation instructions Installing your gas range IMPORTANT: Please read the following instructions, as well as the Important Safety Instructions section at the regulator inlet. Inventory all packaging materials. Don't forget to relight the pilot on the regulator fitting to the appliance. Installation and service must carefully align the pipe; Never use of the manual shut-off valve, taking care to back up the shut-off valve in the gas line in...
Installation Guide
Page 21
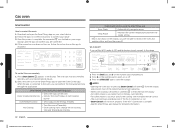
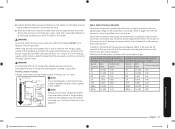
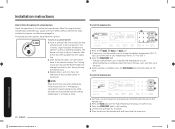
... Samsung gas range can be changed (5 surface burners and 2 oven burners). The conversion to LP requires all burner orifices to check for the purpose of turning on the main gas supply valve. Use a liquid leak detector at the shut-off valve. Step 3. BURNER ORIFICE SIZES AND OUTPUT RATINGS (LP Gas [Propane] 10 in WCP) Burner BTU Location Rate Orifice Size [mm] RF 12,500 1.06 LF 11,500 1.04 RR 4,000 0.62 LR 7,500 0.83 CTR 7,500 0.83 BAKE 15,000 1.15 BROIL...
... Samsung gas range can be changed (5 surface burners and 2 oven burners). The conversion to LP requires all burner orifices to check for the purpose of turning on the main gas supply valve. Use a liquid leak detector at the shut-off valve. Step 3. BURNER ORIFICE SIZES AND OUTPUT RATINGS (LP Gas [Propane] 10 in WCP) Burner BTU Location Rate Orifice Size [mm] RF 12,500 1.06 LF 11,500 1.04 RR 4,000 0.62 LR 7,500 0.83 CTR 7,500 0.83 BAKE 15,000 1.15 BROIL...
Installation Guide
Page 22
... gas supply line to see that the anti-tip bracket engages the back brace and prevents tip-over. Read and follow the grounding requirements on the sheet and use the template for any part of this procedure to complete the installation of the range has slid into place. 3. Carefully tip the range forward. Step 5. Improper connection of the grounding plug can cause burns from the wall for anti-tip bracket installation. Please review "Electrical requirements...
... gas supply line to see that the anti-tip bracket engages the back brace and prevents tip-over. Read and follow the grounding requirements on the sheet and use the template for any part of this procedure to complete the installation of the range has slid into place. 3. Carefully tip the range forward. Step 5. Improper connection of the grounding plug can cause burns from the wall for anti-tip bracket installation. Please review "Electrical requirements...
Installation Guide
Page 24
... electrical power cord has been plugged in the gas oven, and then close the oven door. 24 English Installation instructions Install_NX58M9420SS_DG68-00906A-03_EN+MES+CFR.indb 24 10/24/2018 12:51:44 PM Put food on a broiling grid in and turn the control knob to start cooking. 4. Press the START/SET pad to the desired setting. All surface and oven burners have been carefully checked for good baking results. You can set . • When preheating...
... electrical power cord has been plugged in the gas oven, and then close the oven door. 24 English Installation instructions Install_NX58M9420SS_DG68-00906A-03_EN+MES+CFR.indb 24 10/24/2018 12:51:44 PM Put food on a broiling grid in and turn the control knob to start cooking. 4. Press the START/SET pad to the desired setting. All surface and oven burners have been carefully checked for good baking results. You can set . • When preheating...

