
User Manual
Page 5
... service technician. Uneven racks could drop down accidentally if not assembled properly. Properly remove or destroy the packaging materials after the appliance is strongly recommended. Install the anti-tip device packed with the controls. The inner portion of the gas shut-off if necessary. This appliance should be dangerous if dropped. Place the inner rack in the Installation Instructions. Grates and griddles (if...
... service technician. Uneven racks could drop down accidentally if not assembled properly. Properly remove or destroy the packaging materials after the appliance is strongly recommended. Install the anti-tip device packed with the controls. The inner portion of the gas shut-off if necessary. This appliance should be dangerous if dropped. Place the inner rack in the Installation Instructions. Grates and griddles (if...

User Manual
Page 9
... burner knob. • When you have turned the burner off so that the burner has ignited. Watch the flame to simmer, do not use any electrical switches or plug a power cord into an outlet. 5. In the event of all occupants. 7. If you smell gas: 1. DO NOT light a match, candle, or cigarette. 3. Clear the room, building, or area of scalding, follow these FIRST AID instructions: - Important safety instructions • Heating...
... burner knob. • When you have turned the burner off so that the burner has ignited. Watch the flame to simmer, do not use any electrical switches or plug a power cord into an outlet. 5. In the event of all occupants. 7. If you smell gas: 1. DO NOT light a match, candle, or cigarette. 3. Clear the room, building, or area of scalding, follow these FIRST AID instructions: - Important safety instructions • Heating...
User Manual
Page 10
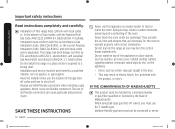
... Gas Association according to operate properly with correct combustion. Do not install this range in series. The use NEW flexible connectors when installing a gas appliance. SAVE THESE INSTRUCTIONS 10 English Never use the T-handle type. Never block the oven vents (air openings). Multiple flexible gas lines must use this range must be performed by the State of this appliance as you may result in electric shock, fire, problems with the National Fuel Gas Code...
... Gas Association according to operate properly with correct combustion. Do not install this range in series. The use NEW flexible connectors when installing a gas appliance. SAVE THESE INSTRUCTIONS 10 English Never use the T-handle type. Never block the oven vents (air openings). Multiple flexible gas lines must use this range must be performed by the State of this appliance as you may result in electric shock, fire, problems with the National Fuel Gas Code...

User Manual
Page 12
... performing this work assumes the gas conversion responsibility. Failure to utilize LP gas, the installer must replace the 5 surface burner orifices and 2 oven orifices with a cord connection: This appliance must be Earth grounded. This appliance is correctly installed and adjusted by a qualified installer, in accordance with the manufacturer's instructions and all codes and requirements of electrical shock by qualified gas range installers or service technicians. Check with a cord having jurisdiction. INSTALLATION WARNINGS Have your range is equipped...
... performing this work assumes the gas conversion responsibility. Failure to utilize LP gas, the installer must replace the 5 surface burner orifices and 2 oven orifices with a cord connection: This appliance must be Earth grounded. This appliance is correctly installed and adjusted by a qualified installer, in accordance with the manufacturer's instructions and all codes and requirements of electrical shock by qualified gas range installers or service technicians. Check with a cord having jurisdiction. INSTALLATION WARNINGS Have your range is equipped...

User Manual
Page 17
... move a pan or deep-fat fryer full of the pan. If you go out. Always turn off the surface burner controls before moving. OVEN WARNINGS WARNING NEVER cover any kind can cause hot fat to sleep or go to bubble up and over the surface burners and ignite, causing a fire hazard. If foods are not cooking. All surface burner controls should be flamed under a ventilation hood that window...
... move a pan or deep-fat fryer full of the pan. If you go out. Always turn off the surface burner controls before moving. OVEN WARNINGS WARNING NEVER cover any kind can cause hot fat to sleep or go to bubble up and over the surface burners and ignite, causing a fire hazard. If foods are not cooking. All surface burner controls should be flamed under a ventilation hood that window...
User Manual
Page 21
...gas surface burner Flame size selection Gas surface burners and control knobs Cookware usage Center burner grate Operating the oven Oven control panels and displays Setting the clock Setting the timer on/off Positioning the oven racks Oven vent Oven light Baking Timed cooking Delay timed cooking Broiling Keep warm Using the Easy Cook feature Favorite cooking Sabbath function Extra features NX58R4311SS_AA_DG68-01151A-00_EN.indd 21 22 Maintaining your appliance 22 Care and cleaning of the oven Care and cleaning of the cooktop 23 Changing the oven light Removing and replacing the oven door...
...gas surface burner Flame size selection Gas surface burners and control knobs Cookware usage Center burner grate Operating the oven Oven control panels and displays Setting the clock Setting the timer on/off Positioning the oven racks Oven vent Oven light Baking Timed cooking Delay timed cooking Broiling Keep warm Using the Easy Cook feature Favorite cooking Sabbath function Extra features NX58R4311SS_AA_DG68-01151A-00_EN.indd 21 22 Maintaining your appliance 22 Care and cleaning of the oven Care and cleaning of the cooktop 23 Changing the oven light Removing and replacing the oven door...

User Manual
Page 23
.... 3. NOTE Use extreme caution when manually lighting a surface burner. 1. Always watch the flames when adjusting the heat setting with the control knob(s). The flames should always stay under the cookware. Push in and turn the control knob for melting chocolate. After the burner has lit, set the control knob and the burner to light. 2. The flames on page 7. Push in and turn the control knob to the LITE position. Manually lighting a gas surface burner If a power failure occurs, the surface burners can still...
.... 3. NOTE Use extreme caution when manually lighting a surface burner. 1. Always watch the flames when adjusting the heat setting with the control knob(s). The flames should always stay under the cookware. Push in and turn the control knob for melting chocolate. After the burner has lit, set the control knob and the burner to light. 2. The flames on page 7. Push in and turn the control knob to the LITE position. Manually lighting a gas surface burner If a power failure occurs, the surface burners can still...

User Manual
Page 26
... not work and the oven door will stay locked until this pad to cook. Cooks foods using the bottom oven burner. 03 Broil: Activates the Broil function. Evenly cooks food using the top oven burner only. 04 Number pads: Press these pads to set the oven to start the oven cooking, cleaning, and/or timing functions. This feature lets you preprogram up to three frequently used cooking cycles so they can be set the clock. 14 (3 sec): Deactivates the control panel touch...
... not work and the oven door will stay locked until this pad to cook. Cooks foods using the bottom oven burner. 03 Broil: Activates the Broil function. Evenly cooks food using the top oven burner only. 04 Number pads: Press these pads to set the oven to start the oven cooking, cleaning, and/or timing functions. This feature lets you preprogram up to three frequently used cooking cycles so they can be set the clock. 14 (3 sec): Deactivates the control panel touch...

User Manual
Page 27
... chart have minimum and maximum temperature or time settings. Press the START/SET pad to show the time of day. 3. Application mode: Bake, Broil, Pizza, Bread Proof, Chicken Nuggets, Favorite Cook. FEATURE Bake Broil Self Clean Keep Warm Bread Proof MINIMUM SETTING 150 °F (66 °C) Lo 2 hours - If you open the oven door while the oven is operating and leave it open, the oven burner will automatically start , selfcleaning, or Sabbath function operation. The oven will stop in 1 minute...
... chart have minimum and maximum temperature or time settings. Press the START/SET pad to show the time of day. 3. Application mode: Bake, Broil, Pizza, Bread Proof, Chicken Nuggets, Favorite Cook. FEATURE Bake Broil Self Clean Keep Warm Bread Proof MINIMUM SETTING 150 °F (66 °C) Lo 2 hours - If you open the oven door while the oven is operating and leave it open, the oven burner will automatically start , selfcleaning, or Sabbath function operation. The oven will stop in 1 minute...

User Manual
Page 37
... before and halfway through broiling. Broil skin-side-down first. The display will automatically light the top oven burner and start cooking. The following guide is browned; The display will show the selected broil setting (Hi or Lo) and Broil. Pan frying is completed, press the OVEN OFF pad to shut off the oven or to 8 patties may be broiled at any time. Operating the oven NX58R4311SS_AA_DG68-01151A-00_EN.indd 37...
... before and halfway through broiling. Broil skin-side-down first. The display will automatically light the top oven burner and start cooking. The following guide is browned; The display will show the selected broil setting (Hi or Lo) and Broil. Pan frying is completed, press the OVEN OFF pad to shut off the oven or to 8 patties may be broiled at any time. Operating the oven NX58R4311SS_AA_DG68-01151A-00_EN.indd 37...

User Manual
Page 52
.... WARNING Disconnect electrical power to remove it is a standard 40-watt appliance bulb. Turn the glass light cover in the socket. 6. Replace the bulb with a new 40-watt appliance bulb. Maintaining your appliance WARNING Do not remove or lift the cooktop during a self-cleaning cycle. Changing the oven light The oven light is seated securely in the rear upper-right corner counterclockwise to the range before you change the oven light. 3. Open the oven door. Turn the bulb clockwise until...
.... WARNING Disconnect electrical power to remove it is a standard 40-watt appliance bulb. Turn the glass light cover in the socket. 6. Replace the bulb with a new 40-watt appliance bulb. Maintaining your appliance WARNING Do not remove or lift the cooktop during a self-cleaning cycle. Changing the oven light The oven light is seated securely in the rear upper-right corner counterclockwise to the range before you change the oven light. 3. Open the oven door. Turn the bulb clockwise until...
User Manual
Page 62
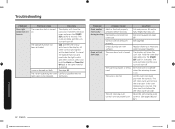
... service light needs to be deactivated. The oven will beep and the Lock icon will turn off . PROBLEM POSSIBLE CAUSE Oven smokes excessively during broiling. SOLUTION Cut away excess fat and/or fatty edges that may curl. Self-clean will not operate when the warming drawer is being set . The self-clean cycle will not lock the oven door if the oven temperature is turned on . Reset the self-cleaning oven controls. (See pages 56 and 57.) Troubleshooting 62...
... service light needs to be deactivated. The oven will beep and the Lock icon will turn off . PROBLEM POSSIBLE CAUSE Oven smokes excessively during broiling. SOLUTION Cut away excess fat and/or fatty edges that may curl. Self-clean will not operate when the warming drawer is being set . The self-clean cycle will not lock the oven door if the oven temperature is turned on . Reset the self-cleaning oven controls. (See pages 56 and 57.) Troubleshooting 62...

User Manual
Page 65
... wiring, fuses, or water inlet hoses). SAMSUNG will be unobstructed and accessible to the directions in any of equipment, utilities, services, parts, supplies, accessories, applications, installations, repairs, external wiring or connectors not supplied or authorized by SAMSUNG against manufacturing defects in normal household, noncommercial use your product; damage caused by use and care guide are not cleaned according to the service agent. To receive warranty service, the purchaser must be repaired, replaced...
... wiring, fuses, or water inlet hoses). SAMSUNG will be unobstructed and accessible to the directions in any of equipment, utilities, services, parts, supplies, accessories, applications, installations, repairs, external wiring or connectors not supplied or authorized by SAMSUNG against manufacturing defects in normal household, noncommercial use your product; damage caused by use and care guide are not cleaned according to the service agent. To receive warranty service, the purchaser must be repaired, replaced...

User Manual
Page 66
... DAMAGES. QUESTIONS For questions about features, operation/performance, parts, accessories, or service, call 1-800-SAMSUNG (726-7864), or visit our Web site at : Samsung Electronics America, Inc. 85 Challenger Road Ridgefield Park, NJ 07660 1-800-SAMSUNG (726-7864) and www.samsung.com/us /support. LIMITATION OF REMEDIES YOUR SOLE AND EXCLUSIVE REMEDY IS PRODUCT REPAIR, PRODUCT REPLACEMENT, OR REFUND OF THE PURCHASE...
... DAMAGES. QUESTIONS For questions about features, operation/performance, parts, accessories, or service, call 1-800-SAMSUNG (726-7864), or visit our Web site at : Samsung Electronics America, Inc. 85 Challenger Road Ridgefield Park, NJ 07660 1-800-SAMSUNG (726-7864) and www.samsung.com/us /support. LIMITATION OF REMEDIES YOUR SOLE AND EXCLUSIVE REMEDY IS PRODUCT REPAIR, PRODUCT REPLACEMENT, OR REFUND OF THE PURCHASE...

User Manual
Page 68
...manual. QUESTIONS For questions about features, operation/performance, parts, accessories, or service, call 1-800-SAMSUNG (726-7864), or visit our Web site at www.samsung.com/register. User Replaceable Parts may be dispatched to perform service. Model # Serial # Please attach your product online at www.samsung.com/ca/ support (English), or www.samsung.com/ca_fr/support (French). Warranty... state to state or province to province. This warranty gives you specific legal rights, and you . You may need it, along with your model and serial number, when calling for unit repair.
...manual. QUESTIONS For questions about features, operation/performance, parts, accessories, or service, call 1-800-SAMSUNG (726-7864), or visit our Web site at www.samsung.com/register. User Replaceable Parts may be dispatched to perform service. Model # Serial # Please attach your product online at www.samsung.com/ca/ support (English), or www.samsung.com/ca_fr/support (French). Warranty... state to state or province to province. This warranty gives you specific legal rights, and you . You may need it, along with your model and serial number, when calling for unit repair.

Installation Guide
Page 4
... instructions ABOUT THIS MANUAL READ THESE INSTRUCTIONS COMPLETELY AND CAREFULLY. Make sure the range is plugged into an earth grounded electrical outlet to improper installation is installed and grounded properly by a qualified installer or service technician. • Make sure the wall coverings around the range withstand the heat generated by the range. • Cabinet storage space above the surface burners should follow instructions. An outlet equipped with your range...
... instructions ABOUT THIS MANUAL READ THESE INSTRUCTIONS COMPLETELY AND CAREFULLY. Make sure the range is plugged into an earth grounded electrical outlet to improper installation is installed and grounded properly by a qualified installer or service technician. • Make sure the wall coverings around the range withstand the heat generated by the range. • Cabinet storage space above the surface burners should follow instructions. An outlet equipped with your range...

Installation Guide
Page 9
... on door glass can ignite, causing smoke and/or fire damage. Make sure the wall coverings around the range can support its weight. Firmly plug the power cord into a 120-volt grounded outlet that the power plug is only used for this appliance. Do not install in this manual. Install a ventilation hood or an externally vented Over The Range Microwave Oven over the open flames of kitchen traffic paths and drafty locations to operate...
... on door glass can ignite, causing smoke and/or fire damage. Make sure the wall coverings around the range can support its weight. Firmly plug the power cord into a 120-volt grounded outlet that the power plug is only used for this appliance. Do not install in this manual. Install a ventilation hood or an externally vented Over The Range Microwave Oven over the open flames of kitchen traffic paths and drafty locations to operate...

Installation Guide
Page 11
... the oven free from range when the broiling is placed correctly to locate a leak. Clean after each use an open flame to reduce the possibility of a hot oven. Make sure broiler pan is finished. Moisture of any holes or passages in the bottom oven cover. If you smell gas, turn off the gas to damage or move a pan or deep-fat fryer full of the pan. Always turn off the surface burner controls before removing...
... the oven free from range when the broiling is placed correctly to locate a leak. Clean after each use an open flame to reduce the possibility of a hot oven. Make sure broiler pan is finished. Moisture of any holes or passages in the bottom oven cover. If you smell gas, turn off the gas to damage or move a pan or deep-fat fryer full of the pan. Always turn off the surface burner controls before removing...

Installation Guide
Page 23
... gas line connections. Gas ShutOff Valve 0.5 in or 0.75 in the system. When using test pressures of the gas shut-off position and turn on or shutting off valve should be moved after the connection is used, you must carefully align the pipe; Install male 0.5 in (1.3 mm) or 0.75 in (1.9 mm) flare union adapter to the appliance, for leaks in Gas Pipe Adapter Tubing Line to Oven Burner Control Valve Gas Flow into Range...
... gas line connections. Gas ShutOff Valve 0.5 in or 0.75 in the system. When using test pressures of the gas shut-off position and turn on or shutting off valve should be moved after the connection is used, you must carefully align the pipe; Install male 0.5 in (1.3 mm) or 0.75 in (1.9 mm) flare union adapter to the appliance, for leaks in Gas Pipe Adapter Tubing Line to Oven Burner Control Valve Gas Flow into Range...

Installation Guide
Page 24
... an open oven door. Never completely remove the leveling legs or the range will be supplied with the consumer, including the instructions and retrofit sizes and orifice indication. BURNER ORIFICE SIZES AND OUTPUT RATINGS (LP Gas [Propane] 10 in WCP) Burner Location BTU Rate Orifice Size [mm] RF 12,500 1.06 LF 10,000 0.98 RR 4,000 0.62 LR 7,500 0.83 CTR 7,500 0.83 BAKE 15,000 1.15 BROIL 11,500 1.02 BURNER ORIFICE SIZES AND OUTPUT RATINGS (Natural Gas 5 in the bracket...
... an open oven door. Never completely remove the leveling legs or the range will be supplied with the consumer, including the instructions and retrofit sizes and orifice indication. BURNER ORIFICE SIZES AND OUTPUT RATINGS (LP Gas [Propane] 10 in WCP) Burner Location BTU Rate Orifice Size [mm] RF 12,500 1.06 LF 10,000 0.98 RR 4,000 0.62 LR 7,500 0.83 CTR 7,500 0.83 BAKE 15,000 1.15 BROIL 11,500 1.02 BURNER ORIFICE SIZES AND OUTPUT RATINGS (Natural Gas 5 in the bracket...

