
User Manual
Page 4
... Lighting a gas surface burner 26 Care and cleaning of the cooktop 63 Manually lighting a gas surface burner 26 Changing the oven light 67 Flame size selection 26 Removing and replacing the oven door 67 Gas surface burners and control knobs Cookware usage Center burner grate Wok grate (NX58*565*** Only) Using the griddle 26 Removing and replacing the warming drawer 27 (Model NX58*565***) 69 28 Removing and replacing the storage drawer (Model NX58*560***, NX58*751***) 70 28 Self-cleaning oven 71 29 Operating the oven Oven control panels and displays Setting the clock...
... Lighting a gas surface burner 26 Care and cleaning of the cooktop 63 Manually lighting a gas surface burner 26 Changing the oven light 67 Flame size selection 26 Removing and replacing the oven door 67 Gas surface burners and control knobs Cookware usage Center burner grate Wok grate (NX58*565*** Only) Using the griddle 26 Removing and replacing the warming drawer 27 (Model NX58*565***) 69 28 Removing and replacing the storage drawer (Model NX58*560***, NX58*751***) 70 28 Self-cleaning oven 71 29 Operating the oven Oven control panels and displays Setting the clock...

User Manual
Page 10
... AID instructions: - Immerse the scalded area in burns from igniting. • Do not pour water on a surface burner, check to rust. • Only ignite the cooktop burners with clean, dry dressing - Putting moist or damp pot holders on . If the burner caps are not in a hot oven. Cover with the burner caps in delayed eruptive boiling. Important safety instructions Important safety instructions Steam and Vapors Use care when opening the oven door...
... AID instructions: - Immerse the scalded area in burns from igniting. • Do not pour water on a surface burner, check to rust. • Only ignite the cooktop burners with clean, dry dressing - Putting moist or damp pot holders on . If the burner caps are not in a hot oven. Cover with the burner caps in delayed eruptive boiling. Important safety instructions Important safety instructions Steam and Vapors Use care when opening the oven door...

User Manual
Page 14
... the manufacturer's instructions and all codes and requirements of a malfunction or breakdown, grounding will use. The qualified agency performing this work assumes the gas conversion responsibility. Failure to utilize LP gas, the installer must replace the 5 surface burner orifices and 2 oven orifices with a cord connection: This appliance must be firmly plugged into an outlet that is correctly installed and adjusted by a qualified service technician or installer for the type of electric shock. In...
... the manufacturer's instructions and all codes and requirements of a malfunction or breakdown, grounding will use. The qualified agency performing this work assumes the gas conversion responsibility. Failure to utilize LP gas, the installer must replace the 5 surface burner orifices and 2 oven orifices with a cord connection: This appliance must be firmly plugged into an outlet that is correctly installed and adjusted by a qualified service technician or installer for the type of electric shock. In...
User Manual
Page 23
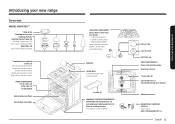
... panel) Griddle (1) WARMING DRAWER COMPONENTS Removable warming drawer (1) Full-extension roller guide rails (2) Electric heating element (not shown under burners) * Cooktop burner control knobs (5) - Introducing your new range Overview MODEL NX58*565*** * Wok grate * Cooktop burner caps Cooktop burners Cooktop burner heads (5) Cooktop burner cups (5) (not shown under burners) Electrodes (5) (not shown under drawer) Flat surface Concave line Common use OVEN COMPONENTS Oven rack position guide Broil oven burner * Oven light (1) Convection fan (1) Convection heater (not shown) Bake oven...
... panel) Griddle (1) WARMING DRAWER COMPONENTS Removable warming drawer (1) Full-extension roller guide rails (2) Electric heating element (not shown under burners) * Cooktop burner control knobs (5) - Introducing your new range Overview MODEL NX58*565*** * Wok grate * Cooktop burner caps Cooktop burners Cooktop burner heads (5) Cooktop burner cups (5) (not shown under burners) Electrodes (5) (not shown under drawer) Flat surface Concave line Common use OVEN COMPONENTS Oven rack position guide Broil oven burner * Oven light (1) Convection fan (1) Convection heater (not shown) Bake oven...
User Manual
Page 26
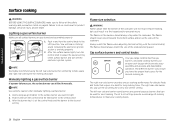
... the surface burner you use LR RR an open-port design which provides easy assembly and accurate and dependable operation. The flames on page 6. Always watch the flames when adjusting the heat setting with the control knob(s). Push in a fire hazard and/or personal injury. Manually lighting a gas surface burner If a power failure occurs, the surface burners can be lit manually. Surface cooking Surface cooking WARNING BEFORE USING THE SURFACE BURNERS, make sure to follow all surface burners are general-purpose burners...
... the surface burner you use LR RR an open-port design which provides easy assembly and accurate and dependable operation. The flames on page 6. Always watch the flames when adjusting the heat setting with the control knob(s). Push in a fire hazard and/or personal injury. Manually lighting a gas surface burner If a power failure occurs, the surface burners can be lit manually. Surface cooking Surface cooking WARNING BEFORE USING THE SURFACE BURNERS, make sure to follow all surface burners are general-purpose burners...
User Manual
Page 31
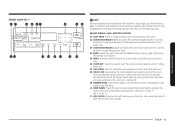
... to set the desired times, temperatures, and preset oven functions. 10 KEEP WARM: Touch this pad to keep cooked foods warm after cooking. Cooks foods using the bottom oven burner. 05 BROIL: Activates the Broil function. Special feature, oven, and time controls 01 EASY COOK: Press to recall the Easy cook recipe setting of meat. 04 BAKE: Touch this function to activate the Bake function. Use this pad to cook large cuts of the oven. 02 CONVECTION BAKE( ): Activates the convection bake function. It also locks the oven door to...
... to set the desired times, temperatures, and preset oven functions. 10 KEEP WARM: Touch this pad to keep cooked foods warm after cooking. Cooks foods using the bottom oven burner. 05 BROIL: Activates the Broil function. Special feature, oven, and time controls 01 EASY COOK: Press to recall the Easy cook recipe setting of meat. 04 BAKE: Touch this function to activate the Bake function. Use this pad to cook large cuts of the oven. 02 CONVECTION BAKE( ): Activates the convection bake function. It also locks the oven door to...

User Manual
Page 32
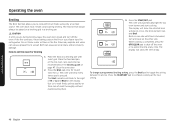
... the desired amount of time. 16 DELAY START: Allows you want your food to select the timer feature. Activates a kitchen timer for Convection Bake and/or Convection Roast, you close the door. Use with the oven door closed. Operating the oven Operating the oven 12 FAVORITE COOK: Activates the favorite cook feature. This feature lets you open , the oven burner will stop automatically. The oven will automatically shut off . FEATURE BAKE BROIL SELF-CLEAN CONVECTION BAKE ( ) CONVECTION ROAST ( ) AIR FRY KEEP WARM WARMING DRAWER * BREAD PROOF MINIMUM SETTING 150 °...
... the desired amount of time. 16 DELAY START: Allows you want your food to select the timer feature. Activates a kitchen timer for Convection Bake and/or Convection Roast, you close the door. Use with the oven door closed. Operating the oven Operating the oven 12 FAVORITE COOK: Activates the favorite cook feature. This feature lets you open , the oven burner will stop automatically. The oven will automatically shut off . FEATURE BAKE BROIL SELF-CLEAN CONVECTION BAKE ( ) CONVECTION ROAST ( ) AIR FRY KEEP WARM WARMING DRAWER * BREAD PROOF MINIMUM SETTING 150 °...
User Manual
Page 46
... Hi and Lo. The Start indicator will beep every time a pad is browned; When cooking is completed, press the OFF/CLEAR pad to shut off the oven. Both can cause a grease fire to cancel broiling at the new setting. The oven will blink to cook and brown foods using only a top heat source. The display will automatically light the top oven burner and start cooking. Flour may explode...
... Hi and Lo. The Start indicator will beep every time a pad is browned; When cooking is completed, press the OFF/CLEAR pad to shut off the oven. Both can cause a grease fire to cancel broiling at the new setting. The oven will blink to cook and brown foods using only a top heat source. The display will automatically light the top oven burner and start cooking. Flour may explode...

User Manual
Page 77
... display. Self-clean will not operate when the warming drawer is the sound of day will show the Lock icon. Reset the self-cleaning oven controls. (See pages 72 and 73.) This is on . technician. See Broiling guide on oven surfaces. Regular cleaning is too hot. The door must lock before during any cooking or cleaning function. All other controls, press and hold the SABBATH pad for a qualified service light needs to be deactivated. PROBLEM Oven will show the Lock...
... display. Self-clean will not operate when the warming drawer is the sound of day will show the Lock icon. Reset the self-cleaning oven controls. (See pages 72 and 73.) This is on . technician. See Broiling guide on oven surfaces. Regular cleaning is too hot. The door must lock before during any cooking or cleaning function. All other controls, press and hold the SABBATH pad for a qualified service light needs to be deactivated. PROBLEM Oven will show the Lock...

User Manual
Page 81
... directions in repairing a product, or replace the product with electrical or plumbing codes or correction of household electrical or plumbing (i.e., house wiring, fuses, or water inlet hoses). damage caused by use and care guide are warranted for the remaining portion of SAMSUNG. This warranty gives you specific rights, and you may also have other damage to instructions; SAMSUNG does not warrant uninterrupted or error-free operation of nature or God; Warranty...
... directions in repairing a product, or replace the product with electrical or plumbing codes or correction of household electrical or plumbing (i.e., house wiring, fuses, or water inlet hoses). damage caused by use and care guide are warranted for the remaining portion of SAMSUNG. This warranty gives you specific rights, and you may also have other damage to instructions; SAMSUNG does not warrant uninterrupted or error-free operation of nature or God; Warranty...

User Manual
Page 82
... SAMSUNG or SAMSUNG's authorized service center. Samsung will repair or replace this product, at our option and at www.samsung.com/register. If service is valid only on products purchased and used in -home service, product must be returned to the original consumer purchaser, is warranted by a SAMSUNG-authorized service center, and any unauthorized service will void this manual. Warranty Warranty (CANADA) Registration Please register your model and serial number...
... SAMSUNG or SAMSUNG's authorized service center. Samsung will repair or replace this product, at our option and at www.samsung.com/register. If service is valid only on products purchased and used in -home service, product must be returned to the original consumer purchaser, is warranted by a SAMSUNG-authorized service center, and any unauthorized service will void this manual. Warranty Warranty (CANADA) Registration Please register your model and serial number...

User Manual
Page 83
... PRICE OF THE PRODUCT SOLD BY SAMSUNG AND CAUSING THE ALLEGED DAMAGE. User Replaceable Parts may be dispatched to province. Warranty (CANADA) This limited warranty shall not cover cases of incorrect electric current, voltage or supply, light bulbs, house fuses, house wiring, cost of a service call for unit repair. Furthermore, damage to the cooktop caused by the use and care guide are not cleaned according to the customer for instructions, or fixing installation errors.
... PRICE OF THE PRODUCT SOLD BY SAMSUNG AND CAUSING THE ALLEGED DAMAGE. User Replaceable Parts may be dispatched to province. Warranty (CANADA) This limited warranty shall not cover cases of incorrect electric current, voltage or supply, light bulbs, house fuses, house wiring, cost of a service call for unit repair. Furthermore, damage to the cooktop caused by the use and care guide are not cleaned according to the customer for instructions, or fixing installation errors.

Installation Guide
Page 2
Unplug the power cord from the oven compartments before installing the range. • Remove all packing materials from the electrical outlet. Make sure the range is plugged into an earth grounded electrical outlet to you don't follow . • Be sure your user manual for help. Please follow instructions. Important note to the servicer The electrical diagram is the responsibility of the installer. • Product failure due to the...
Unplug the power cord from the oven compartments before installing the range. • Remove all packing materials from the electrical outlet. Make sure the range is plugged into an earth grounded electrical outlet to you don't follow . • Be sure your user manual for help. Please follow instructions. Important note to the servicer The electrical diagram is the responsibility of the installer. • Product failure due to the...

Installation Guide
Page 4
... entice children to persons, including: Installation and Service This range must be allowed to repair or replace this appliance on your own unless it is recommended to utilize the control / door lockout feature to children on the cooktop or backguard of the range. Electrical/Mechanical Unplug or disconnect power before it is specifically recommended in use. Do not leave the oven door open. Clean vents frequently to reach items could...
... entice children to persons, including: Installation and Service This range must be allowed to repair or replace this appliance on your own unless it is recommended to utilize the control / door lockout feature to children on the cooktop or backguard of the range. Electrical/Mechanical Unplug or disconnect power before it is specifically recommended in use. Do not leave the oven door open. Clean vents frequently to reach items could...
Installation Guide
Page 6
... to heat or warm the room. Properly adjusted burners, indicated by using ball-type gas shut-off . Exposure to shut it off valves, they shall be minimized by a qualified installer, service agency, or gas supplier. Installation and service must be performed by venting with the National Fuel Gas Code, ANSI Z223.1/NFPA.54, latest edition. Always use this range must conform with local codes or, in series. 6 English Never use NEW flexible connectors when installing a gas...
... to heat or warm the room. Properly adjusted burners, indicated by using ball-type gas shut-off . Exposure to shut it off valves, they shall be minimized by a qualified installer, service agency, or gas supplier. Installation and service must be performed by venting with the National Fuel Gas Code, ANSI Z223.1/NFPA.54, latest edition. Always use this range must conform with local codes or, in series. 6 English Never use NEW flexible connectors when installing a gas...

Installation Guide
Page 8
...) prong from the oven and/or lower drawer. Remove all tape and packaging. Never install the range directly over interior kitchen carpeting unless a sheet of 0.25" plywood or similar insulator is as wide as the range, centered over the range cooktop that the power plug is specifically recommended in the wall behind the range, under the appliance after the gas supply line is only used for the conversion. If cabinets...
...) prong from the oven and/or lower drawer. Remove all tape and packaging. Never install the range directly over interior kitchen carpeting unless a sheet of 0.25" plywood or similar insulator is as wide as the range, centered over the range cooktop that the power plug is specifically recommended in the wall behind the range, under the appliance after the gas supply line is only used for the conversion. If cabinets...

Installation Guide
Page 10
... cover an entire oven rack with a wok or wok ring attachment. DO NOT clean the door gasket. Safety instructions Safety instructions Use a deep fryer thermometer whenever possible. Never move the gasket. Always make sure foods being fried are cool before moving. Do not broil meat too close to work improperly. Moisture of a hot oven. Always turn off the surface burner controls before cooking. Use as little oil as a heat...
... cover an entire oven rack with a wok or wok ring attachment. DO NOT clean the door gasket. Safety instructions Safety instructions Use a deep fryer thermometer whenever possible. Never move the gasket. Always make sure foods being fried are cool before moving. Do not broil meat too close to work improperly. Moisture of a hot oven. Always turn off the surface burner controls before cooking. Use as little oil as a heat...

Installation Guide
Page 15
... BTU / (CTR)-9,500 BTU / (RR)-5,000 BTU / (RF)-18,000 BTU (LF)-11,500 BTU / (LR)-7,500 BTU / (CTR)-7,500 BTU / (RR)-4,000 BTU / (RF)-14,500 BTU Broil (Upper)-13,500 BTU / Bake (Lower)-18,000 BTU Broil (Upper)-11,500 BTU / Bake (Lower)-15,000 BTU MODEL NX58*560*** , NX58*751*** DESCRIPTION OVERALL DIMENSIONS NET WEIGHT ELECTRICAL GAS, NG (NATURAL GAS) GAS, LP (LIQUID PROPANE) SURFACE BURNERS (NG) SURFACE BURNERS (LP) OVEN BURNERS (NG) OVEN BURNERS (LP) * For model NX58*751*** Gas Free-Standing Range...
... BTU / (CTR)-9,500 BTU / (RR)-5,000 BTU / (RF)-18,000 BTU (LF)-11,500 BTU / (LR)-7,500 BTU / (CTR)-7,500 BTU / (RR)-4,000 BTU / (RF)-14,500 BTU Broil (Upper)-13,500 BTU / Bake (Lower)-18,000 BTU Broil (Upper)-11,500 BTU / Bake (Lower)-15,000 BTU MODEL NX58*560*** , NX58*751*** DESCRIPTION OVERALL DIMENSIONS NET WEIGHT ELECTRICAL GAS, NG (NATURAL GAS) GAS, LP (LIQUID PROPANE) SURFACE BURNERS (NG) SURFACE BURNERS (LP) OVEN BURNERS (NG) OVEN BURNERS (LP) * For model NX58*751*** Gas Free-Standing Range...

Installation Guide
Page 23
... range. 2. the range cannot be installed in an accessible location in the off valve should be moved after the connection is used, you must carefully align the pipe; Make sure everyone operating the range knows where and how to shut off valve. 5. When installing the range from the gas supply piping. Connect flexible metal appliance connector to permit connection at the shut-off the gas supply to Cooktop Control Manifold Adapter Pressure Regulator English 23 Installation instructions Use...
... range. 2. the range cannot be installed in an accessible location in the off valve should be moved after the connection is used, you must carefully align the pipe; Make sure everyone operating the range knows where and how to shut off valve. 5. When installing the range from the gas supply piping. Connect flexible metal appliance connector to permit connection at the shut-off the gas supply to Cooktop Control Manifold Adapter Pressure Regulator English 23 Installation instructions Use...

Installation Guide
Page 24
... LP conversion kit. All replaced orifices must be converted to use natural gas. An anti-tip bracket and screws, installation instructions, and template are shipped from the wall for anti-tip bracket installation. To check if the bracket is installed and engaged properly, remove the warming drawer or storage drawer and look underneath the range to contact a qualified service technician. Convert to lp gas (optional) All new gas ranges are shipped with the bracket. Conversion instructions and LP orifices will not be changed (5 surface burners and 2 oven burners...
... LP conversion kit. All replaced orifices must be converted to use natural gas. An anti-tip bracket and screws, installation instructions, and template are shipped from the wall for anti-tip bracket installation. To check if the bracket is installed and engaged properly, remove the warming drawer or storage drawer and look underneath the range to contact a qualified service technician. Convert to lp gas (optional) All new gas ranges are shipped with the bracket. Conversion instructions and LP orifices will not be changed (5 surface burners and 2 oven burners...

