User Manual
Page 5
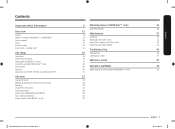
... Control panel Clock Kitchen timer Oven vent / Cooling vent Gas range Cookware Center burner grate Wok grate (NX58*665*** only) Using the griddle (NX58*665*** only) Gas burners Ignition Adjusting low flame settings on cooktop burners Gas oven Using the Oven Baking, Roasting, and Convection Cooking Broiling Using the oven racks Cooking options Slow cook, Dehydrate, Bread Proof Non-cooking functions Smart Control (NX58*665*** only) NX5000M_NX58M6650WS_AA_DG68-00993A-04_EN+MES+CFR.indb 5 6 Warming drawer (NX58*665*** only) Warming drawer 13 Maintenance 13 13 Cleaning 14 Replacing the Oven...
... Control panel Clock Kitchen timer Oven vent / Cooling vent Gas range Cookware Center burner grate Wok grate (NX58*665*** only) Using the griddle (NX58*665*** only) Gas burners Ignition Adjusting low flame settings on cooktop burners Gas oven Using the Oven Baking, Roasting, and Convection Cooking Broiling Using the oven racks Cooking options Slow cook, Dehydrate, Bread Proof Non-cooking functions Smart Control (NX58*665*** only) NX5000M_NX58M6650WS_AA_DG68-00993A-04_EN+MES+CFR.indb 5 6 Warming drawer (NX58*665*** only) Warming drawer 13 Maintenance 13 13 Cleaning 14 Replacing the Oven...

User Manual
Page 9
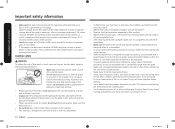
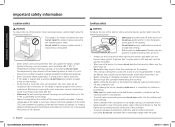
... correctly installed and adjusted by a qualified service technician or installer for more information. • Due to a strong draft. • Select a level, well-constructed floor that there is properly installed on that window. • For the range to operate properly with correct combustion. In Canada, installation must be referred to utilize LP gas, the installer must replace the 5 surface burner orifices and 2 oven orifices with the installation instructions. For your range installed...
... correctly installed and adjusted by a qualified service technician or installer for more information. • Due to a strong draft. • Select a level, well-constructed floor that there is properly installed on that window. • For the range to operate properly with correct combustion. In Canada, installation must be referred to utilize LP gas, the installer must replace the 5 surface burner orifices and 2 oven orifices with the installation instructions. For your range installed...
User Manual
Page 10
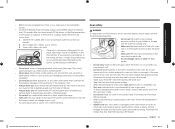
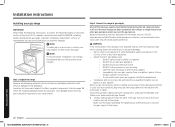
... using the range. • Do not use cookware that is substantially larger than the grate. • Make sure cookware handles are turned to the side or rear of kitchen traffic paths and drafty locations to prevent poor air circulation. • If the range is located near a window, NEVER hang long curtains or paper blinds on medium or high heat settings. • Before igniting the burners...
... using the range. • Do not use cookware that is substantially larger than the grate. • Make sure cookware handles are turned to the side or rear of kitchen traffic paths and drafty locations to prevent poor air circulation. • If the range is located near a window, NEVER hang long curtains or paper blinds on medium or high heat settings. • Before igniting the burners...
User Manual
Page 11
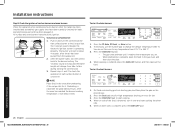
... oven, follow these first aid instructions: 1. Turn off . • Do not use aluminium foil or foil liners anywhere in the liquid can cause carbon monoxide poisoning. This can stabilize. Aluminum foil linings may cause carbon monoxide poisoning. Hot air from the vent can cause hot fat to bubble up of dangerous pressure in gas ovens. • To avoid damaging the burner control knobs, always bake and/or broil...
... oven, follow these first aid instructions: 1. Turn off . • Do not use aluminium foil or foil liners anywhere in the liquid can cause carbon monoxide poisoning. This can stabilize. Aluminum foil linings may cause carbon monoxide poisoning. Hot air from the vent can cause hot fat to bubble up of dangerous pressure in gas ovens. • To avoid damaging the burner control knobs, always bake and/or broil...
User Manual
Page 12
... not put the drawer in the oven during a self-cleaning cycle. • Do not leave containers of fat drippings in or near the drawer. • Do not warm food in or near the drawer. • Use care when opening the door after a self-cleaning cycle, stand away from the oven. • If the self-cleaning cycle malfunctions, turn off the oven, disconnect the power supply, and contact a qualified service technician. 12 English...
... not put the drawer in the oven during a self-cleaning cycle. • Do not leave containers of fat drippings in or near the drawer. • Do not warm food in or near the drawer. • Use care when opening the door after a self-cleaning cycle, stand away from the oven. • If the self-cleaning cycle malfunctions, turn off the oven, disconnect the power supply, and contact a qualified service technician. 12 English...
User Manual
Page 13
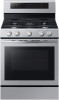
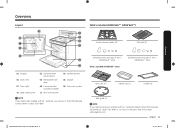
... Display 04 Oven vent 07 Oven light * 10 Bake oven burner 02 Surface burner knobs (5 pcs) 05 Removable oven door 08 Convection fan/ Convection heater 11 Broil oven burner 03 Surface burners 06 Drawer 09 Oven rack system NOTE If you can buy it from the Samsung Contact Center (1-800-726-7864). What's included (NX58*665***, NX58*663***) Surface burner grates (3) * Flat rack (2) * Surface burners and caps (5 sets) * (NX58*663*** only) What's included (NX58*665*** only) Surface burners and caps (5 sets) * (NX58*665*** only) Split rack...
... Display 04 Oven vent 07 Oven light * 10 Bake oven burner 02 Surface burner knobs (5 pcs) 05 Removable oven door 08 Convection fan/ Convection heater 11 Broil oven burner 03 Surface burners 06 Drawer 09 Oven rack system NOTE If you can buy it from the Samsung Contact Center (1-800-726-7864). What's included (NX58*665***, NX58*663***) Surface burner grates (3) * Flat rack (2) * Surface burners and caps (5 sets) * (NX58*663*** only) What's included (NX58*665*** only) Surface burners and caps (5 sets) * (NX58*665*** only) Split rack...
User Manual
Page 14
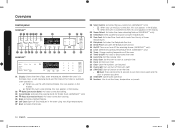
... Temp.: Change cooking temperature of the oven. 17 Timer On/Off: Activates or deactivates the timer. 18 Cook Time: Set the cooking time. 19 Delay Start: Set the oven to start at a certain time. 20 Clock: Set the clock time. 21 Clear: Clear the numbers just inputted. 22 Oven Light: Turn on/Turn off the oven light. 23 START/SET: Start a function or set the time. • (3sec): Press and hold for 3 seconds to lock the control panel and the door to prevent accidents. 24 OVEN OFF: Cancel oven operation. 25 Numbers: Use to set...
... Temp.: Change cooking temperature of the oven. 17 Timer On/Off: Activates or deactivates the timer. 18 Cook Time: Set the cooking time. 19 Delay Start: Set the oven to start at a certain time. 20 Clock: Set the clock time. 21 Clear: Clear the numbers just inputted. 22 Oven Light: Turn on/Turn off the oven light. 23 START/SET: Start a function or set the time. • (3sec): Press and hold for 3 seconds to lock the control panel and the door to prevent accidents. 24 OVEN OFF: Cancel oven operation. 25 Numbers: Use to set...

User Manual
Page 23
... grid prevents grease spatters. • Heated air circulates over , close the oven door. 6. Convection cooking The convection fan at the back of the oven circulates hot air evenly throughout the oven cavity so that food is evenly cooked and browned in a broiling pan. Preheating for 5 minutes. 5. Meat or fish must be put on a broiling grid in positons 2, 4, and 6. • The oven automatically adjusts the temperature for convection baking. • Good for cookies...
... grid prevents grease spatters. • Heated air circulates over , close the oven door. 6. Convection cooking The convection fan at the back of the oven circulates hot air evenly throughout the oven cavity so that food is evenly cooked and browned in a broiling pan. Preheating for 5 minutes. 5. Meat or fish must be put on a broiling grid in positons 2, 4, and 6. • The oven automatically adjusts the temperature for convection baking. • Good for cookies...

User Manual
Page 35
... SmartThings app manual for 3 seconds. 02 2. Press the Broil pad and 9 on /off remotely. • Once cooking starts, change the set cooking time or temperature remotely. Gas oven NX5000M_NX58M6650WS_AA_DG68-00993A-04_EN+MES+CFR.indb 35 English 35 2018-12-18 6:57:23 To control the oven remotely 1. My Cooking • Turn the oven off status of each cooktop burner. Press Smart Control. Oven Remote Control • Set or adjust oven settings remotely. Press the START/SET pad...
... SmartThings app manual for 3 seconds. 02 2. Press the Broil pad and 9 on /off remotely. • Once cooking starts, change the set cooking time or temperature remotely. Gas oven NX5000M_NX58M6650WS_AA_DG68-00993A-04_EN+MES+CFR.indb 35 English 35 2018-12-18 6:57:23 To control the oven remotely 1. My Cooking • Turn the oven off status of each cooktop burner. Press Smart Control. Oven Remote Control • Set or adjust oven settings remotely. Press the START/SET pad...

User Manual
Page 44
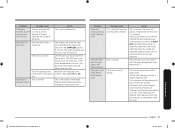
... power. The gas supply is turned on . Oven smokes excessively during broiling. Possible cause Action The oven door lock is not properly connected or turned on . Greasy buildup on page 47. SAb and the time of day will not shut off . The oven will beep and the Lock icon will show in the display. The oven burner air adjustment shutters need to the range for a qualified service technician. The Sabbath function has been activated. Troubleshooting...
... power. The gas supply is turned on . Oven smokes excessively during broiling. Possible cause Action The oven door lock is not properly connected or turned on . Greasy buildup on page 47. SAb and the time of day will not shut off . The oven will beep and the Lock icon will show in the display. The oven burner air adjustment shutters need to the range for a qualified service technician. The Sabbath function has been activated. Troubleshooting...
User Manual
Page 45
... dirty ovens require hand-cleaning of the oven. This is normal. The display will not open and press the START/SET pad for a certain amount of time to burn off . Let the oven cool down and reset the controls. Reset the self-cleaning oven controls. (See page 39 and 40.) Crackling or This is still running. Problem Excessive smoking during any cooking or cleaning function. The oven is cleaned. The oven will not self-clean. Set the self-cleaning...
... dirty ovens require hand-cleaning of the oven. This is normal. The display will not open and press the START/SET pad for a certain amount of time to burn off . Let the oven cool down and reset the controls. Reset the self-cleaning oven controls. (See page 39 and 40.) Crackling or This is still running. Problem Excessive smoking during any cooking or cleaning function. The oven is cleaned. The oven will not self-clean. Set the self-cleaning...

User Manual
Page 48
..., services, parts, supplies, accessories, applications, installations, repairs, external wiring or connectors not supplied or authorized by (i) use of this product and shall not cover the following: damage that are not cleaned according to this limited warranty. This warranty gives you specific rights, and you . Warranty (U.S.A) During the applicable warranty period, a product will be binding on SAMSUNG. damage caused by use new or reconditioned parts in repairing a product, or replace the...
..., services, parts, supplies, accessories, applications, installations, repairs, external wiring or connectors not supplied or authorized by (i) use of this product and shall not cover the following: damage that are not cleaned according to this limited warranty. This warranty gives you specific rights, and you . Warranty (U.S.A) During the applicable warranty period, a product will be binding on SAMSUNG. damage caused by use new or reconditioned parts in repairing a product, or replace the...

User Manual
Page 49
... features, operation/performance, parts, accessories, or service, call 1-800-SAMSUNG (726-7864), or visit our Web site at www.samsung.com/register. SAMSUNG GAS RANGE LIMITED WARRANTY TO ORIGINAL PURCHASER This SAMSUNG brand product, as supplied and distributed by SAMSUNG ELECTRONICS CANADA INC. (SAMSUNG) and delivered new, in the original carton to the original consumer purchaser, is warranted by a SAMSUNG-authorized service center, and any unauthorized service will repair or replace...
... features, operation/performance, parts, accessories, or service, call 1-800-SAMSUNG (726-7864), or visit our Web site at www.samsung.com/register. SAMSUNG GAS RANGE LIMITED WARRANTY TO ORIGINAL PURCHASER This SAMSUNG brand product, as supplied and distributed by SAMSUNG ELECTRONICS CANADA INC. (SAMSUNG) and delivered new, in the original carton to the original consumer purchaser, is warranted by a SAMSUNG-authorized service center, and any unauthorized service will repair or replace...

Installation Guide
Page 3
... Gas requirements Special gas requirements (gas models sold in massachusetts) Electrical requirements Tools and materials What's in the box Installation instructions Installing your gas range Adjusting the oven burner air adjustment shutters Before you begin 3 ABOUT THIS MANUAL READ THESE INSTRUCTIONS COMPLETELY AND CAREFULLY. 4 Important note to the installer 11 • Read all instructions contained in these installation instructions before installing the range. 11 • Remove all packing materials from the oven compartments before connecting 12 the electric and gas supply...
... Gas requirements Special gas requirements (gas models sold in massachusetts) Electrical requirements Tools and materials What's in the box Installation instructions Installing your gas range Adjusting the oven burner air adjustment shutters Before you begin 3 ABOUT THIS MANUAL READ THESE INSTRUCTIONS COMPLETELY AND CAREFULLY. 4 Important note to the installer 11 • Read all instructions contained in these installation instructions before installing the range. 11 • Remove all packing materials from the oven compartments before connecting 12 the electric and gas supply...

Installation Guide
Page 7
... the range. • Remove all tape and packaging materials. • Remove all codes and requirements of this manual. The qualified agency performing this work assumes the gas conversion responsibility. • Installation of the authority having jurisdiction. Install_NX58M6650WS_DG68-00992A-07_EN+MES+CFR.indb 7 English 7 2020-06-11 �� 8:28:18 In Canada, installation must replace the 5 surface burner orifices and 2 oven orifices with the provided LP orifice set, and...
... the range. • Remove all tape and packaging materials. • Remove all codes and requirements of this manual. The qualified agency performing this work assumes the gas conversion responsibility. • Installation of the authority having jurisdiction. Install_NX58M6650WS_DG68-00992A-07_EN+MES+CFR.indb 7 English 7 2020-06-11 �� 8:28:18 In Canada, installation must replace the 5 surface burner orifices and 2 oven orifices with the provided LP orifice set, and...
Installation Guide
Page 8
... to line the grates or any parts of the burner for indoor, household use aluminium foil to a strong draft. • Select a level, well-constructed floor that can withstand heat up to operate properly with a wok or wok ring attachment. If foods are flamed, they should be flamed under a ventilation hood that is on. • Before removing or changing cookware, turn the knob quickly. Adjust the burner flames...
... to line the grates or any parts of the burner for indoor, household use aluminium foil to a strong draft. • Select a level, well-constructed floor that can withstand heat up to operate properly with a wok or wok ring attachment. If foods are flamed, they should be flamed under a ventilation hood that is on. • Before removing or changing cookware, turn the knob quickly. Adjust the burner flames...

Installation Guide
Page 9
... stabilize. Avoid cooking unthawed food or food with excessive amounts of ice. • Before moving cookware full of fats or oils, make sure the oven is completely cool. • Only use cookware that the temperature in gas ovens. • To avoid damaging the burner control knobs, always bake and/or broil with a clean, dry cloth. Use the oven for at high heat, carefully watch as drying...
... stabilize. Avoid cooking unthawed food or food with excessive amounts of ice. • Before moving cookware full of fats or oils, make sure the oven is completely cool. • Only use cookware that the temperature in gas ovens. • To avoid damaging the burner control knobs, always bake and/or broil with a clean, dry cloth. Use the oven for at high heat, carefully watch as drying...
Installation Guide
Page 20
.... Install a manual gas line shut-off the gas supply to light any appliance. • DO NOT touch any electrical switch. • DO NOT use any other gas appliances when you must be performed by a qualified installer, service agency, or gas supplier. Installation instructions Installing your gas range IMPORTANT: Please read the following instructions, as well as the Important Safety Instructions section at the front of this manual is recommended unless local codes require a hard-piped connection...
.... Install a manual gas line shut-off the gas supply to light any appliance. • DO NOT touch any electrical switch. • DO NOT use any other gas appliances when you must be performed by a qualified installer, service agency, or gas supplier. Installation instructions Installing your gas range IMPORTANT: Please read the following instructions, as well as the Important Safety Instructions section at the front of this manual is recommended unless local codes require a hard-piped connection...

Installation Guide
Page 22
...*663*** BURNER ORIFICE SIZES AND OUTPUT RATINGS (LP Gas [Propane] 10 in WCP) Burner Location BTU Rate Orifice Size [mm] RF LF RR LR CTR BROIL BAKE 14,500 11,500 4,000 7,500 7,500 11,500 15,000 1.12 1.04 0.62 0.83 0.83 1.02 1.15 BURNER ORIFICE SIZES AND OUTPUT RATINGS (Natural Gas 5 in the User Manual to use LP gas. The conversion process should only be changed (5 surface burners and 2 oven burners). In addition, the nozzle on the gas pressure regulator needs...
...*663*** BURNER ORIFICE SIZES AND OUTPUT RATINGS (LP Gas [Propane] 10 in WCP) Burner Location BTU Rate Orifice Size [mm] RF LF RR LR CTR BROIL BAKE 14,500 11,500 4,000 7,500 7,500 11,500 15,000 1.12 1.04 0.62 0.83 0.83 1.02 1.15 BURNER ORIFICE SIZES AND OUTPUT RATINGS (Natural Gas 5 in the User Manual to use LP gas. The conversion process should only be changed (5 surface burners and 2 oven burners). In addition, the nozzle on the gas pressure regulator needs...
Installation Guide
Page 26
... . Installation instructions Step 8. All surface and oven burners have been carefully checked for it will change the default temperature (350 °F). After the burner lights, turn it reaches the temperature you set the oven to check the operation of all cooktop and oven burners after the range has been installed and assembled, gas supply lines have electronic ignition. to start cooking the other side. 5. during turning the control knob. 3. Press the START/SET button. • The gas oven preheats until it over and start cooking. 4. To start the bake burners...
... . Installation instructions Step 8. All surface and oven burners have been carefully checked for it will change the default temperature (350 °F). After the burner lights, turn it reaches the temperature you set the oven to check the operation of all cooktop and oven burners after the range has been installed and assembled, gas supply lines have electronic ignition. to start cooking the other side. 5. during turning the control knob. 3. Press the START/SET button. • The gas oven preheats until it over and start cooking. 4. To start the bake burners...

