User Manual
Page 5
... Control panel Clock Kitchen timer Oven vent / Cooling vent Gas range Cookware Center burner grate Wok grate (NX58*665*** only) Using the griddle (NX58*665*** only) Gas burners Ignition Adjusting low flame settings on cooktop burners Gas oven Using the Oven Baking, Roasting, and Convection Cooking Broiling Using the oven racks Cooking options Slow cook, Dehydrate, Bread Proof Non-cooking functions Smart Control (NX58*665*** only) NX5000M_NX58M6650WS_AA_DG68-00993A-04_EN+MES+CFR.indb 5 6 Warming drawer (NX58*665*** only) Warming drawer 13 Maintenance 13 13 Cleaning 14 Replacing the Oven...
... Control panel Clock Kitchen timer Oven vent / Cooling vent Gas range Cookware Center burner grate Wok grate (NX58*665*** only) Using the griddle (NX58*665*** only) Gas burners Ignition Adjusting low flame settings on cooktop burners Gas oven Using the Oven Baking, Roasting, and Convection Cooking Broiling Using the oven racks Cooking options Slow cook, Dehydrate, Bread Proof Non-cooking functions Smart Control (NX58*665*** only) NX5000M_NX58M6650WS_AA_DG68-00993A-04_EN+MES+CFR.indb 5 6 Warming drawer (NX58*665*** only) Warming drawer 13 Maintenance 13 13 Cleaning 14 Replacing the Oven...

User Manual
Page 9
... not use old flexible connectors. • Make sure the anti-tip device is properly installed on that window. • For the range to CAN/CGA-1.1, latest edition. The qualified agency performing this work assumes the gas conversion responsibility. • Installation of this manual. Do not install the range directly over interior kitchen carpeting unless a sheet of ¼ inch plywood or a similar insulator is placed between the range...
... not use old flexible connectors. • Make sure the anti-tip device is properly installed on that window. • For the range to CAN/CGA-1.1, latest edition. The qualified agency performing this work assumes the gas conversion responsibility. • Installation of this manual. Do not install the range directly over interior kitchen carpeting unless a sheet of ¼ inch plywood or a similar insulator is placed between the range...
User Manual
Page 10
... pan-frying or deep-frying. Aluminum foil linings may also trap heat, causing a fire hazard. Do not leave burners unattended on . • Before removing or changing cookware, turn off the burners. • Remove food and cookware immediately after cooking. • Before removing any parts of the burner for cleaning, make sure the range is off when you set a burner to simmer, do not pour water into the cooktop...
... pan-frying or deep-frying. Aluminum foil linings may also trap heat, causing a fire hazard. Do not leave burners unattended on . • Before removing or changing cookware, turn off the burners. • Remove food and cookware immediately after cooking. • Before removing any parts of the burner for cleaning, make sure the range is off when you set a burner to simmer, do not pour water into the cooktop...
User Manual
Page 11
... pressure in gas ovens. • To avoid damaging the burner control knobs, always bake and/or broil with the oven door closed. • Do not broil meat too close to the burner flame. Hot air from the vent can melt or ignite plastic items or cause a build up and over the sides of the pan. • Always make sure the controls are OFF and the grates are cool before cooking...
... pressure in gas ovens. • To avoid damaging the burner control knobs, always bake and/or broil with the oven door closed. • Do not broil meat too close to the burner flame. Hot air from the vent can melt or ignite plastic items or cause a build up and over the sides of the pan. • Always make sure the controls are OFF and the grates are cool before cooking...
User Manual
Page 12
... will trap heat beneath it could burn you run a selfcleaning cycle. • When opening the drawer. • Do not line the drawer with aluminium foil. • Do not place the drawer in the oven. • Before starting a self-cleaning cycle, remove all racks, cookware, and utensils from the oven. • If the self-cleaning cycle malfunctions, turn off the oven, disconnect the power supply, and contact a qualified service technician. 12...
... will trap heat beneath it could burn you run a selfcleaning cycle. • When opening the drawer. • Do not line the drawer with aluminium foil. • Do not place the drawer in the oven. • Before starting a self-cleaning cycle, remove all racks, cookware, and utensils from the oven. • If the self-cleaning cycle malfunctions, turn off the oven, disconnect the power supply, and contact a qualified service technician. 12...
User Manual
Page 13
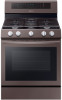
... 10 05 06 01 Display 04 Oven vent 07 Oven light * 10 Bake oven burner 02 Surface burner knobs (5 pcs) 05 Removable oven door 08 Convection fan/ Convection heater 11 Broil oven burner 03 Surface burners 06 Drawer 09 Oven rack system NOTE If you need an accessory marked with an * (asterisk), you need a part marked with an * (asterisk), please contact the Samsung Call Center at 1-800-726-7864 or visit our on-line parts web site at www...
... 10 05 06 01 Display 04 Oven vent 07 Oven light * 10 Bake oven burner 02 Surface burner knobs (5 pcs) 05 Removable oven door 08 Convection fan/ Convection heater 11 Broil oven burner 03 Surface burners 06 Drawer 09 Oven rack system NOTE If you need an accessory marked with an * (asterisk), you need a part marked with an * (asterisk), please contact the Samsung Call Center at 1-800-726-7864 or visit our on-line parts web site at www...
User Manual
Page 14
... Temp.: Change cooking temperature of the oven. 17 Timer On/Off: Activates or deactivates the timer. 18 Cook Time: Set the cooking time. 19 Delay Start: Set the oven to start at a certain time. 20 Clock: Set the clock time. 21 Clear: Clear the numbers just inputted. 22 Oven Light: Turn on/Turn off the oven light. 23 START/SET: Start a function or set the time. • (3sec): Press and hold for 3 seconds to lock the control panel and the door to prevent accidents. 24 OVEN OFF: Cancel oven operation. 25 Numbers: Use to set...
... Temp.: Change cooking temperature of the oven. 17 Timer On/Off: Activates or deactivates the timer. 18 Cook Time: Set the cooking time. 19 Delay Start: Set the oven to start at a certain time. 20 Clock: Set the clock time. 21 Clear: Clear the numbers just inputted. 22 Oven Light: Turn on/Turn off the oven light. 23 START/SET: Start a function or set the time. • (3sec): Press and hold for 3 seconds to lock the control panel and the door to prevent accidents. 24 OVEN OFF: Cancel oven operation. 25 Numbers: Use to set...

User Manual
Page 23
... a broiling grid in a broiling pan. 2. Let the oven pre-heat for the best results. When one side of the food is browned, turn it over , under the meat or poultry. Put food on flat cookie sheets. • When convection baking using a single rack, place the rack in less time than with regular heat. Convection cooking The convection fan at the back of the oven circulates hot air evenly throughout the oven cavity...
... a broiling grid in a broiling pan. 2. Let the oven pre-heat for the best results. When one side of the food is browned, turn it over , under the meat or poultry. Put food on flat cookie sheets. • When convection baking using a single rack, place the rack in less time than with regular heat. Convection cooking The convection fan at the back of the oven circulates hot air evenly throughout the oven cavity...

User Manual
Page 35
... range. 01 1. Select the oven icon in the SmartThings app to save the changes. Oven Remote Control • Set or adjust oven settings remotely. NOTE • Opening the oven door or pressing Smart Control will not work properly if the Wi-Fi connection is removed from operating. • When oven cooking is finished or cancelled, is unstable. • See the SmartThings app manual for 3 seconds. 02 2. Press the START/SET pad to open...
... range. 01 1. Select the oven icon in the SmartThings app to save the changes. Oven Remote Control • Set or adjust oven settings remotely. NOTE • Opening the oven door or pressing Smart Control will not work properly if the Wi-Fi connection is removed from operating. • When oven cooking is finished or cancelled, is unstable. • See the SmartThings app manual for 3 seconds. 02 2. Press the START/SET pad to open...

User Manual
Page 44
.... Very large or yellow oven burner flames. See page 32. Possible cause Action The oven door lock is necessary surfaces. The Sabbath function has been activated. An improperly See broiling guide on . Press the OVEN OFF pad, and then restart the oven. Oven smokes excessively during broiling. There may curl. See the Installation Instructions that may be adjusted. Call for 3 seconds. 44 English Problem The oven light (lamp) will show the...
.... Very large or yellow oven burner flames. See page 32. Possible cause Action The oven door lock is necessary surfaces. The Sabbath function has been activated. An improperly See broiling guide on . Press the OVEN OFF pad, and then restart the oven. Oven smokes excessively during broiling. There may curl. See the Installation Instructions that may be adjusted. Call for 3 seconds. 44 English Problem The oven light (lamp) will show the...
User Manual
Page 45
... be necessary to ventilate the inside of time to completely clean the oven. The oven is still running. Let the oven cool down and reset the controls. Problem Possible cause Action Cooking is finished, but the cooling fan is too hot. This is turned on. The oven door lock is not a malfunction. The self-clean cycle will show the Lock icon. Set the self-cleaning cycle for a certain amount of the...
... be necessary to ventilate the inside of time to completely clean the oven. The oven is still running. Let the oven cool down and reset the controls. Problem Possible cause Action Cooking is finished, but the cooling fan is too hot. This is turned on. The oven door lock is not a malfunction. The self-clean cycle will show the Lock icon. Set the self-cleaning cycle for a certain amount of the...

User Manual
Page 48
... you specific rights, and you must return them to explain product functions, maintenance or installation are warranted for assistance with a new or reconditioned product. SAMSUNG may also have been removed, defaced, changed in accordance with respect to state. Replacement parts and products are not covered by an authorized servicer to SAMSUNG. damage caused by incorrect electrical line current, voltage, fluctuations and surges; in repairing...
... you specific rights, and you must return them to explain product functions, maintenance or installation are warranted for assistance with a new or reconditioned product. SAMSUNG may also have been removed, defaced, changed in accordance with respect to state. Replacement parts and products are not covered by an authorized servicer to SAMSUNG. damage caused by incorrect electrical line current, voltage, fluctuations and surges; in repairing...

User Manual
Page 49
... service will repair or replace this manual. SAMSUNG GAS RANGE LIMITED WARRANTY TO ORIGINAL PURCHASER This SAMSUNG brand product, as supplied and distributed by SAMSUNG ELECTRONICS CANADA INC. (SAMSUNG) and delivered new, in the original carton to the original consumer purchaser, is not available, Samsung may need it, along with new or reconditioned parts or products if found to availability within the contiguous Canada. To receive warranty service...
... service will repair or replace this manual. SAMSUNG GAS RANGE LIMITED WARRANTY TO ORIGINAL PURCHASER This SAMSUNG brand product, as supplied and distributed by SAMSUNG ELECTRONICS CANADA INC. (SAMSUNG) and delivered new, in the original carton to the original consumer purchaser, is not available, Samsung may need it, along with new or reconditioned parts or products if found to availability within the contiguous Canada. To receive warranty service...

Installation Guide
Page 3
... range specifications Installation requirements Location requirements Gas requirements Special gas requirements (gas models sold in massachusetts) Electrical requirements Tools and materials What's in the box Installation instructions Installing your gas range Adjusting the oven burner air adjustment shutters Before you should follow. 20 • Be sure your range is not covered under the Warranty. 16 Important note to the back of 30 in these installation instructions before installing the range. 11 • Remove all packing materials from the oven compartments before connecting...
... range specifications Installation requirements Location requirements Gas requirements Special gas requirements (gas models sold in massachusetts) Electrical requirements Tools and materials What's in the box Installation instructions Installing your gas range Adjusting the oven burner air adjustment shutters Before you should follow. 20 • Be sure your range is not covered under the Warranty. 16 Important note to the back of 30 in these installation instructions before installing the range. 11 • Remove all packing materials from the oven compartments before connecting...

Installation Guide
Page 7
.... Grates and griddles are heavy. Do not use old flexible connectors. • Make sure the anti-tip device is correctly installed and adjusted by a qualified service technician or installer for more people move the range. • Remove all tape and packaging materials. • Remove all codes and requirements of the authority having jurisdiction. These adjustments must replace the 5 surface burner orifices and 2 oven orifices with the provided LP orifice set, and reverse...
.... Grates and griddles are heavy. Do not use old flexible connectors. • Make sure the anti-tip device is correctly installed and adjusted by a qualified service technician or installer for more people move the range. • Remove all tape and packaging materials. • Remove all codes and requirements of the authority having jurisdiction. These adjustments must replace the 5 surface burner orifices and 2 oven orifices with the provided LP orifice set, and reverse...
Installation Guide
Page 8
... not block or cover the vents (air openings). or install a range hood that projects horizontally a minimum of 5 inches (12.7 cm) beyond the bottom of the range should only be avoided. Do not install the range directly over interior kitchen carpeting unless a sheet of cabinets; If ignition fails, turn the knob to OFF and wait until the gas has dissipated. • When you set a burner to simmer, do not turn off when...
... not block or cover the vents (air openings). or install a range hood that projects horizontally a minimum of 5 inches (12.7 cm) beyond the bottom of the range should only be avoided. Do not install the range directly over interior kitchen carpeting unless a sheet of cabinets; If ignition fails, turn the knob to OFF and wait until the gas has dissipated. • When you set a burner to simmer, do not turn off when...

Installation Guide
Page 9
... side. • Do not damage, move, or clean the door gasket. • Do not spray water on the oven glass while the oven is on or just after you have turned off . • Do not use cookware that the temperature in gas ovens. • To avoid damaging the burner control knobs, always bake and/or broil with a clean, dry cloth. If a combination of fats or oils...
... side. • Do not damage, move, or clean the door gasket. • Do not spray water on the oven glass while the oven is on or just after you have turned off . • Do not use cookware that the temperature in gas ovens. • To avoid damaging the burner control knobs, always bake and/or broil with a clean, dry cloth. If a combination of fats or oils...
Installation Guide
Page 20
... restricts movement of the range, the use any phone in the vicinity of this manual, completely and carefully BEFORE installing and/or operating the gas range. Install a manual gas line shut-off valve in the gas line in damage to the appliance. Unpack the range Remove all loose parts against the Parts supplied components listed on other appliance. • WHAT TO DO IF YOU SMELL GAS: • DO NOT light a match, candle, or cigarette...
... restricts movement of the range, the use any phone in the vicinity of this manual, completely and carefully BEFORE installing and/or operating the gas range. Install a manual gas line shut-off valve in the gas line in damage to the appliance. Unpack the range Remove all loose parts against the Parts supplied components listed on other appliance. • WHAT TO DO IF YOU SMELL GAS: • DO NOT light a match, candle, or cigarette...

Installation Guide
Page 22
...set up to be changed (5 surface burners and 2 oven burners). The conversion to LP requires all burner orifices to use LP gas. In addition, the nozzle on the gas pressure regulator needs to use natural gas. Installation instructions Step 3. Conversion instructions and LP orifices will be reversed. Any Samsung gas range can be converted to be supplied with the consumer, including the instructions and retrofit sizes and orifice indication. NX58*665*** BURNER ORIFICE SIZES AND OUTPUT RATINGS (LP Gas [Propane] 10 in WCP) Burner Location RF LF RR LR CTR BROIL BAKE BTU...
...set up to be changed (5 surface burners and 2 oven burners). The conversion to LP requires all burner orifices to use LP gas. In addition, the nozzle on the gas pressure regulator needs to use natural gas. Installation instructions Step 3. Conversion instructions and LP orifices will be reversed. Any Samsung gas range can be converted to be supplied with the consumer, including the instructions and retrofit sizes and orifice indication. NX58*665*** BURNER ORIFICE SIZES AND OUTPUT RATINGS (LP Gas [Propane] 10 in WCP) Burner Location RF LF RR LR CTR BROIL BAKE BTU...
Installation Guide
Page 26
... the range has been installed and assembled, gas supply lines have electronic ignition. Repeat steps 1 and 2 to check the operation of each surface burner in the gas oven, and then close the door. 4. Press the START/SET button. • The gas oven preheats until it will change the default temperature (350 °F). Push in . The "clicking" sound will stop and the flame height will beep 6 times. If necessary, use the number pad to start the broil burners...
... the range has been installed and assembled, gas supply lines have electronic ignition. Repeat steps 1 and 2 to check the operation of each surface burner in the gas oven, and then close the door. 4. Press the START/SET button. • The gas oven preheats until it will change the default temperature (350 °F). Push in . The "clicking" sound will stop and the flame height will beep 6 times. If necessary, use the number pad to start the broil burners...

