User Manual
Page 10
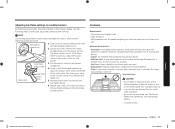
... for the type of local codes, with local codes where applicable. Any adjustment and service should be made by a qualified service technician or installer for indoor, household use . Synthetic flooring, such as linoleum, must replace the 5 surface burner orifices and 2 oven orifices with the manufacturer's instructions and all accessories from the cooktop, oven, and/or lower drawer. For your range to ventilate properly, make sure the range's vents are heavy.
... for the type of local codes, with local codes where applicable. Any adjustment and service should be made by a qualified service technician or installer for indoor, household use . Synthetic flooring, such as linoleum, must replace the 5 surface burner orifices and 2 oven orifices with the manufacturer's instructions and all accessories from the cooktop, oven, and/or lower drawer. For your range to ventilate properly, make sure the range's vents are heavy.
User Manual
Page 11
... cm) between the cooking surface and the bottom of the cabinets or install a range hood that projects horizontally a minimum of 5 inches (12.7 cm) beyond the smoking point. • Use a minimum amount of the cooktop, but not over the surface burners and ignite, causing a fire hazard. Aluminum foil linings may also trap heat, causing a fire hazard. When you flame food, the hood must have ignited. assembling. •...
... cm) between the cooking surface and the bottom of the cabinets or install a range hood that projects horizontally a minimum of 5 inches (12.7 cm) beyond the smoking point. • Use a minimum amount of the cooktop, but not over the surface burners and ignite, causing a fire hazard. Aluminum foil linings may also trap heat, causing a fire hazard. When you flame food, the hood must have ignited. assembling. •...
User Manual
Page 12
... oven door. • Keep the oven free from meat before you place an oversized pot in the wrong position, it might disrupt necessary air circulation and make the flame on the burner sputter and burn inefficiently. • Do not wear loose or hanging garments when using cooking or roasting bags in gas ovens. • To avoid damaging the burner control knobs, always bake and/or broil...
... oven door. • Keep the oven free from meat before you place an oversized pot in the wrong position, it might disrupt necessary air circulation and make the flame on the burner sputter and burn inefficiently. • Do not wear loose or hanging garments when using cooking or roasting bags in gas ovens. • To avoid damaging the burner control knobs, always bake and/or broil...

User Manual
Page 15
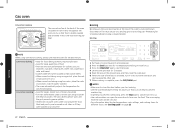
... START/SET: Start a function or set the clock time 3 1. In Sleep mode, the control panel is inactive, displaying only the time, until it is in the oven at very high temperatures. 10 Cooking Time: Set the cooking time. 11 Delay Start: Set the oven to start Control panel 03 01 02 04 17 16 You should know about the following features and components before you start at a certain time. 12 Timer On/Off: Activate or deactivate the timer. 13 Numbers: Use to set the time, temperature...
... START/SET: Start a function or set the clock time 3 1. In Sleep mode, the control panel is inactive, displaying only the time, until it is in the oven at very high temperatures. 10 Cooking Time: Set the cooking time. 11 Delay Start: Set the oven to start Control panel 03 01 02 04 17 16 You should know about the following features and components before you start at a certain time. 12 Timer On/Off: Activate or deactivate the timer. 13 Numbers: Use to set the time, temperature...
User Manual
Page 19
...; Glass: A slow heat conductor. NOTE Low setting adjustments should always be checked at the same time. Quickly turn one of the control knobs counterclockwise to increase the flame size. 5. Cookware Requirements • Flat bottom and straight sides • Tight-fitting lid • Well-balanced with two or more surface burners and set them between MED and HI. 2. Use the rear burners for range top cooking or oven use an oversized pan. The burner flames...
...; Glass: A slow heat conductor. NOTE Low setting adjustments should always be checked at the same time. Quickly turn one of the control knobs counterclockwise to increase the flame size. 5. Cookware Requirements • Flat bottom and straight sides • Tight-fitting lid • Well-balanced with two or more surface burners and set them between MED and HI. 2. Use the rear burners for range top cooking or oven use an oversized pan. The burner flames...
User Manual
Page 22
... to switch from the oven will be put on a broiling grid in positions 2 and 5 (Cakes, Cookies). • The oven automatically adjusts the temperature for different foods, see "Broiling guide" on flat cookie sheets. • When convection baking using a single rack, place the rack in a broiling pan. 2. NOTES • Make sure to close the oven door, and start the broiler. 4. The pan catches grease spills and the grid prevents grease spatters. • Heated air...
... to switch from the oven will be put on a broiling grid in positions 2 and 5 (Cakes, Cookies). • The oven automatically adjusts the temperature for different foods, see "Broiling guide" on flat cookie sheets. • When convection baking using a single rack, place the rack in a broiling pan. 2. NOTES • Make sure to close the oven door, and start the broiler. 4. The pan catches grease spills and the grid prevents grease spatters. • Heated air...
User Manual
Page 23
... time or temperature settings. An error tone will affect broiling times. • This guide is complete, the internal temperature increases by 5-10 °F degrees. Minimum and maximum settings All the features listed in the form of a long beep if the entered temperature or time is accepted. NOTES • This is for reference only. • Preheating for 5 minutes before broiling is recommended. • The size, weight, thickness, starting temperature...
... time or temperature settings. An error tone will affect broiling times. • This guide is complete, the internal temperature increases by 5-10 °F degrees. Minimum and maximum settings All the features listed in the form of a long beep if the entered temperature or time is accepted. NOTES • This is for reference only. • Preheating for 5 minutes before broiling is recommended. • The size, weight, thickness, starting temperature...
User Manual
Page 32
... following functions through the application: Oven remote control using the SmartThings app Error Check • Automatically recognize errors. My Cooking • Turn the oven off status of the oven • Monitor the on your range displays and the app will confirm you are connected. 4. Gas oven To control the oven remotely 1. Press 0 on the number pad to the oven, you set cooking time and temperature remotely. 3 1 2 1. Temp Probe • Monitor the current temperature and reset the probe setting. •...
... following functions through the application: Oven remote control using the SmartThings app Error Check • Automatically recognize errors. My Cooking • Turn the oven off status of the oven • Monitor the on your range displays and the app will confirm you are connected. 4. Gas oven To control the oven remotely 1. Press 0 on the number pad to the oven, you set cooking time and temperature remotely. 3 1 2 1. Temp Probe • Monitor the current temperature and reset the probe setting. •...

User Manual
Page 42
... oven door open and press the START/SET pad for 3 seconds. Call a qualified service technician. There may be adjusted and recalibrated. Problem The oven will show the Lock icon. Cause The oven is not completely plugged into a live, properly grounded outlet. The oven temperature needs to the range for at least 30 seconds and then reconnect the power. The Sabbath function has been activated. Replace the fuse or reset the circuit breaker...
... oven door open and press the START/SET pad for 3 seconds. Call a qualified service technician. There may be adjusted and recalibrated. Problem The oven will show the Lock icon. Cause The oven is not completely plugged into a live, properly grounded outlet. The oven temperature needs to the range for at least 30 seconds and then reconnect the power. The Sabbath function has been activated. Replace the fuse or reset the circuit breaker...
User Manual
Page 43
... the Bake and NUM 1 pads simultaneously for a qualified service technician. Problem Cooking is finished, but the cooling fan is turned on. The oven door lock is still running. Let the oven cool down the oven. The door must lock before broiling. Reset the self-cleaning oven controls. (See page 36.) Turn off . Self-clean will turn off. The oven will beep and the Lock icon will not operate if a surface burner is on . The self-cleaning oven controls are not being set . The oven...
... the Bake and NUM 1 pads simultaneously for a qualified service technician. Problem Cooking is finished, but the cooling fan is turned on. The oven door lock is still running. Let the oven cool down the oven. The door must lock before broiling. Reset the self-cleaning oven controls. (See page 36.) Turn off . Self-clean will turn off. The oven will beep and the Lock icon will not operate if a surface burner is on . The self-cleaning oven controls are not being set . The oven...
User Manual
Page 47
... service to state. This warranty gives you specific rights, and you . To obtain warranty service, please contact SAMSUNG at the number below for the remaining portion of this product and shall not cover the following: damage that are not cleaned according to instructions; damage caused by failure to operate and maintain the product according to the directions in normal household, noncommercial use and care guide...
... service to state. This warranty gives you specific rights, and you . To obtain warranty service, please contact SAMSUNG at the number below for the remaining portion of this product and shall not cover the following: damage that are not cleaned according to instructions; damage caused by failure to operate and maintain the product according to the directions in normal household, noncommercial use and care guide...
User Manual
Page 48
... by SAMSUNG ELECTRONICS CANADA INC. (SAMSUNG) and delivered new, in the original carton to and from an authorized service center. Samsung will repair or replace this manual. Questions For questions about features, operation/performance, parts, accessories, or service, call 1-800-SAMSUNG (726-7864), or visit our Web site at www.samsung.com/register. If service is valid only on products purchased and used in -home service, product...
... by SAMSUNG ELECTRONICS CANADA INC. (SAMSUNG) and delivered new, in the original carton to and from an authorized service center. Samsung will repair or replace this manual. Questions For questions about features, operation/performance, parts, accessories, or service, call 1-800-SAMSUNG (726-7864), or visit our Web site at www.samsung.com/register. If service is valid only on products purchased and used in -home service, product...

Installation Guide
Page 3
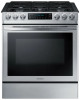
... 10/24/2018 12:51:24 PM Level the range Step 7. Assemble the surface burners Step 8. Connect the range to lp gas (optional) Step 4. Final installation checklist Adjusting the oven burner air adjustment shutters Before you begin Important safety information Gas range components Overview What's in the box Gas range specifications Installation requirements Location requirements To avoid breakage Gas requirements Special gas requirements (gas models sold in massachusetts) Electrical requirements Installation instructions Installing your range is installed and grounded properly by a qualified...
... 10/24/2018 12:51:24 PM Level the range Step 7. Assemble the surface burners Step 8. Connect the range to lp gas (optional) Step 4. Final installation checklist Adjusting the oven burner air adjustment shutters Before you begin Important safety information Gas range components Overview What's in the box Gas range specifications Installation requirements Location requirements To avoid breakage Gas requirements Special gas requirements (gas models sold in massachusetts) Electrical requirements Installation instructions Installing your range is installed and grounded properly by a qualified...
Installation Guide
Page 7
... your range to utilize LP gas, the installer must replace the 5 surface burner orifices and 2 oven orifices with the manufacturer's instructions and all accessories from the cooktop, oven, and/or lower drawer. The qualified agency performing this work assumes the gas conversion responsibility. • Installation of this manual. In Canada, installation must conform with the current Natural Gas Installation Code, CAN/CGA-B149.1, or the current Propane Installation Code, CAN/CGA-B149.2, and with the National Fuel Gas Code...
... your range to utilize LP gas, the installer must replace the 5 surface burner orifices and 2 oven orifices with the manufacturer's instructions and all accessories from the cooktop, oven, and/or lower drawer. The qualified agency performing this work assumes the gas conversion responsibility. • Installation of this manual. In Canada, installation must conform with the current Natural Gas Installation Code, CAN/CGA-B149.1, or the current Propane Installation Code, CAN/CGA-B149.2, and with the National Fuel Gas Code...
Installation Guide
Page 8
... use only. Do not install the range directly over interior kitchen carpeting unless a sheet of the cookware. • To avoid cookware discoloration, deformity, and/or carbon monoxide poisoning, do not turn off and completely cool. • After cleaning the burner spreader, make sure the burners have ignited. If ignition fails, turn the knob to OFF and wait until the gas has dissipated. • When you set a burner...
... use only. Do not install the range directly over interior kitchen carpeting unless a sheet of the cookware. • To avoid cookware discoloration, deformity, and/or carbon monoxide poisoning, do not turn off and completely cool. • After cleaning the burner spreader, make sure the burners have ignited. If ignition fails, turn the knob to OFF and wait until the gas has dissipated. • When you set a burner...
Installation Guide
Page 9
... prevent delayed eruptive boiling, always allow heated liquids to stand at least 10 minutes. 2. In the event of oil when shallow pan-frying or deep-frying. Immerse the scaled area in gas ovens. • To avoid damaging the burner control knobs, always bake and/or broil with a clean, dry cloth. Cover with the oven door closed. • Do not broil meat too close to the burner flame. Oven...
... prevent delayed eruptive boiling, always allow heated liquids to stand at least 10 minutes. 2. In the event of oil when shallow pan-frying or deep-frying. Immerse the scaled area in gas ovens. • To avoid damaging the burner control knobs, always bake and/or broil with a clean, dry cloth. Cover with the oven door closed. • Do not broil meat too close to the burner flame. Oven...
Installation Guide
Page 20
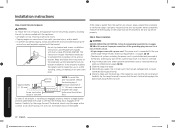
... union adapter to the range. 2. Check for easier installation. 3. Connect the range to gas supply Shut off the gas supply to the 0.5-in this manual, completely and carefully BEFORE installing and/or operating the gas range. Installation instructions Installing your gas range IMPORTANT: Please read the following instructions, as well as the Important Safety Instructions section at the regulator inlet. the range cannot be moved after the connection is used, you hire a professional installer. If the hard...
... union adapter to the range. 2. Check for easier installation. 3. Connect the range to gas supply Shut off the gas supply to the 0.5-in this manual, completely and carefully BEFORE installing and/or operating the gas range. Installation instructions Installing your gas range IMPORTANT: Please read the following instructions, as well as the Important Safety Instructions section at the regulator inlet. the range cannot be moved after the connection is used, you hire a professional installer. If the hard...
Installation Guide
Page 21
... gas shut-off valve from the factory set up to the appliance. When all connections have been made, make sure all burner orifices to use a flame to contact a qualified service technician. Any Samsung gas range can be converted to be supplied with the consumer, including the instructions and retrofit sizes and orifice indication. When using test pressures of torque when making gas line connections. The conversion to LP requires all range controls are shipped from the gas supply piping. BURNER ORIFICE SIZES AND OUTPUT RATINGS...
... gas shut-off valve from the factory set up to the appliance. When all connections have been made, make sure all burner orifices to use a flame to contact a qualified service technician. Any Samsung gas range can be converted to be supplied with the consumer, including the instructions and retrofit sizes and orifice indication. When using test pressures of torque when making gas line connections. The conversion to LP requires all range controls are shipped from the gas supply piping. BURNER ORIFICE SIZES AND OUTPUT RATINGS...
Installation Guide
Page 22
... range is required between the range bottom and the kitchen floor. Carefully tip the range forward. If it stayed connected during positioning. 4. Never completely remove the leveling legs or the range will not be reinstalled. Plug in the power cord. Make sure the outlet meets local or national electrical codes as referenced on the sheet and use the template for any part of tipping. Check the gas supply line to the anti-tip device properly. Installation instructions...
... range is required between the range bottom and the kitchen floor. Carefully tip the range forward. If it stayed connected during positioning. 4. Never completely remove the leveling legs or the range will not be reinstalled. Plug in the power cord. Make sure the outlet meets local or national electrical codes as referenced on the sheet and use the template for any part of tipping. Check the gas supply line to the anti-tip device properly. Installation instructions...
Installation Guide
Page 24
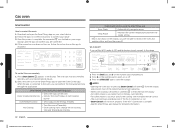
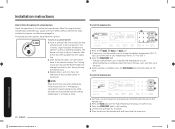
... start the broil burners 03 02 07 1. Press the Bake, Roast, or Bake pad. 2. When cooking is important for leaks, and electrical power cord has been plugged in. Let the oven pre-heat for low. 3. To turn the control knob for it. The 1 burner will light in a broiling pan, and then place the pan on a surface burner: 1. during turning the control knob. 3. You can set . • When preheating is operating properly. The "clicking" sound will stop and the flame...
... start the broil burners 03 02 07 1. Press the Bake, Roast, or Bake pad. 2. When cooking is important for leaks, and electrical power cord has been plugged in. Let the oven pre-heat for low. 3. To turn the control knob for it. The 1 burner will light in a broiling pan, and then place the pan on a surface burner: 1. during turning the control knob. 3. You can set . • When preheating is operating properly. The "clicking" sound will stop and the flame...

