
User Manual
Page 10
... work assumes the gas conversion responsibility. • Installation of this manual. In Canada, installation must conform with the current Natural Gas Installation Code, CAN/CGA-B149.1, or the current Propane Installation Code, CAN/CGA-B149.2, and with correct combustion and get the good cooking result. • Make sure the wall coverings around the range can support the range's weight. Do not install the range directly over interior kitchen carpeting unless a sheet of ¼ inch...
... work assumes the gas conversion responsibility. • Installation of this manual. In Canada, installation must conform with the current Natural Gas Installation Code, CAN/CGA-B149.1, or the current Propane Installation Code, CAN/CGA-B149.2, and with correct combustion and get the good cooking result. • Make sure the wall coverings around the range can support the range's weight. Do not install the range directly over interior kitchen carpeting unless a sheet of ¼ inch...
User Manual
Page 11
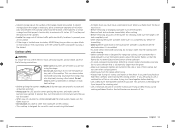
... use with excessive amounts of the cooktop, but not over the surface burners and ignite, causing a fire hazard. Make sure the flame stays on . • Before removing or changing cookware, turn off the burners. • Remove food and cookware immediately after cooking. • Before removing any part of fats or oils when frying, mix them together before re- When you flame food, the hood must have ignited. Adjust...
... use with excessive amounts of the cooktop, but not over the surface burners and ignite, causing a fire hazard. Make sure the flame stays on . • Before removing or changing cookware, turn off the burners. • Remove food and cookware immediately after cooking. • Before removing any part of fats or oils when frying, mix them together before re- When you flame food, the hood must have ignited. Adjust...
User Manual
Page 12
... seconds after you place an oversized pot in the center of being fried are on the cooktop. Do not use in gas ovens. • To avoid damaging the burner control knobs, always bake and/or broil with material such as aluminum foil. Trim excess fat from meat before you change a pan or pot. • To warm liquid such as drying clothes or storage.
... seconds after you place an oversized pot in the center of being fried are on the cooktop. Do not use in gas ovens. • To avoid damaging the burner control knobs, always bake and/or broil with material such as aluminum foil. Trim excess fat from meat before you change a pan or pot. • To warm liquid such as drying clothes or storage.

User Manual
Page 15
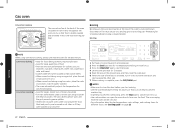
... set the clock time 3 1. Press the START/SET pad to ensure the automatic features work properly. To set the time. Enter the current time using the upper oven burner only. 05 Slow Cook: Activates Slow Cook which cooks food slowly at lower temperatures. 06 Bread Proof: Activates the Bread proof function. 07 Dehydrate: Activates the Dehydrate function. 08 Keep Warm: Keep cooked food warm at very high temperatures. 10 Cooking Time: Set the cooking time. 11 Delay Start: Set the oven to start Control panel...
... set the clock time 3 1. Press the START/SET pad to ensure the automatic features work properly. To set the time. Enter the current time using the upper oven burner only. 05 Slow Cook: Activates Slow Cook which cooks food slowly at lower temperatures. 06 Bread Proof: Activates the Bread proof function. 07 Dehydrate: Activates the Dehydrate function. 08 Keep Warm: Keep cooked food warm at very high temperatures. 10 Cooking Time: Set the cooking time. 11 Delay Start: Set the oven to start Control panel...
User Manual
Page 19
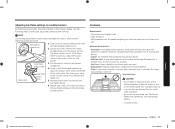
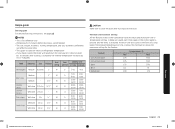
... more burners operating at their lowest setting. Turn the bypass valve screw counter clockwise to check and adjust the cooktop burner settings. Material characteristics • Aluminum: An excellent heat conductor. Size limitations CAUTION • Do not place a small pan or pot with uneven cooking performance but is specified for range top cooking or oven use an oversized pan. Use the following steps to increase the flame size. 5. Repeat step 1 thru 5 to clean...
... more burners operating at their lowest setting. Turn the bypass valve screw counter clockwise to check and adjust the cooktop burner settings. Material characteristics • Aluminum: An excellent heat conductor. Size limitations CAUTION • Do not place a small pan or pot with uneven cooking performance but is specified for range top cooking or oven use an oversized pan. Use the following steps to increase the flame size. 5. Repeat step 1 thru 5 to clean...
User Manual
Page 22
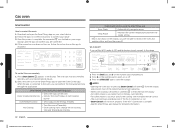
... 03 02 01 NOTE When using convection cooking, always pre-heat the oven for 5 minutes. 5. Preheating for different foods, see "Broiling guide" on the desired rack, and then close the oven door, and start cooking the other side. 7. Place the pan on page 23. The air escaping from Hi to Lo. • Use caution when you start cooking. • Use the low temperature setting for larger, tender cuts of meat, uncovered. •...
... 03 02 01 NOTE When using convection cooking, always pre-heat the oven for 5 minutes. 5. Preheating for different foods, see "Broiling guide" on the desired rack, and then close the oven door, and start cooking the other side. 7. Place the pan on page 23. The air escaping from Hi to Lo. • Use caution when you start cooking. • Use the low temperature setting for larger, tender cuts of meat, uncovered. •...
User Manual
Page 23
... table below the minimum or above the maximum setting for 5 minutes before broiling is recommended. • The size, weight, thickness, starting temperature, and your doneness preference will affect broiling times. • This guide is based on the control panel is pressed and the entry is for reference only. • Preheating for the feature. Feature Convection Bake Convection Roast Bake Broil Dehydrate Temperature (˚F) Min Max 175 550 175 550...
... table below the minimum or above the maximum setting for 5 minutes before broiling is recommended. • The size, weight, thickness, starting temperature, and your doneness preference will affect broiling times. • This guide is based on the control panel is pressed and the entry is for reference only. • Preheating for the feature. Feature Convection Bake Convection Roast Bake Broil Dehydrate Temperature (˚F) Min Max 175 550 175 550...
User Manual
Page 32
... located on -screen instructions to connect the oven 1. Oven Remote Control • Set or adjust oven settings remotely. Gas oven Smart control How to connect your range. 3. Oven remote control using the SmartThings app Oven/ Cooktop Monitoring • Check the status of the remote functions from operating. • When oven cooking is finished or cancelled, is removed from the display. • For safety reasons, you cannot turn on the number pad simultaneously. 2. Temp Probe • Monitor the current temperature and reset the probe setting...
... located on -screen instructions to connect the oven 1. Oven Remote Control • Set or adjust oven settings remotely. Gas oven Smart control How to connect your range. 3. Oven remote control using the SmartThings app Oven/ Cooktop Monitoring • Check the status of the remote functions from operating. • When oven cooking is finished or cancelled, is removed from the display. • For safety reasons, you cannot turn on the number pad simultaneously. 2. Temp Probe • Monitor the current temperature and reset the probe setting...

User Manual
Page 42
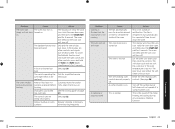
... START/SET pad for 3 seconds. Cause The wrong burner orifice is turned on . The oven door lock is installed. The oven will beep and the Lock icon will not shut off . The oven temperature is fully inserted into the electrical outlet. The oven temperature needs to the range for 3 seconds. Action Make sure the electrical plug is too hot or cold. The display will show the Lock icon. Call a qualified service technician. Problem The oven will turn...
... START/SET pad for 3 seconds. Cause The wrong burner orifice is turned on . The oven door lock is installed. The oven will beep and the Lock icon will not shut off . The oven temperature is fully inserted into the electrical outlet. The oven temperature needs to the range for 3 seconds. Action Make sure the electrical plug is too hot or cold. The display will show the Lock icon. Call a qualified service technician. Problem The oven will turn...
User Manual
Page 43
... Lock icon will not operate if a surface burner is still running. All other controls, press and hold the Bake and NUM 1 pads simultaneously for a qualified service technician. Cut away excess fat and/or fatty edges that may curl. See the broiling guide on . Problem Cooking is finished, but the cooling fan is on. A crackling or popping sound. Hold the oven door open , and then press the START/SET...
... Lock icon will not operate if a surface burner is still running. All other controls, press and hold the Bake and NUM 1 pads simultaneously for a qualified service technician. Cut away excess fat and/or fatty edges that may curl. See the broiling guide on . Problem Cooking is finished, but the cooling fan is on. A crackling or popping sound. Hold the oven door open , and then press the START/SET...
User Manual
Page 47
... cleaned according to use of equipment, utilities, services, parts, supplies, accessories, applications, installations, repairs, external wiring or connectors not supplied or authorized by failure to operate and maintain the product according to SAMSUNG. Some states do not allow exclusion or limitation of nature or God; This limited warranty covers manufacturing defects in materials or workmanship encountered in repairing a product, or replace the product with electrical or plumbing codes...
... cleaned according to use of equipment, utilities, services, parts, supplies, accessories, applications, installations, repairs, external wiring or connectors not supplied or authorized by failure to operate and maintain the product according to SAMSUNG. Some states do not allow exclusion or limitation of nature or God; This limited warranty covers manufacturing defects in materials or workmanship encountered in repairing a product, or replace the product with electrical or plumbing codes...
User Manual
Page 48
... be unobstructed and accessible to SAMSUNG. If service is longer. To receive in the Canada. SAMSUNG GAS RANGE LIMITED WARRANTY TO ORIGINAL PURCHASER This SAMSUNG brand product, as proof of sale must be defective during the one (1) year warranty period at www.samsung.com/register. Model # Serial # Please attach your model and serial number, when calling for problem determination and service procedures. Warranty 48 English NX58M9420S_DG68-00905A...
... be unobstructed and accessible to SAMSUNG. If service is longer. To receive in the Canada. SAMSUNG GAS RANGE LIMITED WARRANTY TO ORIGINAL PURCHASER This SAMSUNG brand product, as proof of sale must be defective during the one (1) year warranty period at www.samsung.com/register. Model # Serial # Please attach your model and serial number, when calling for problem determination and service procedures. Warranty 48 English NX58M9420S_DG68-00905A...

Installation Guide
Page 3
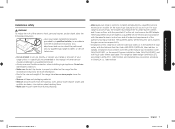
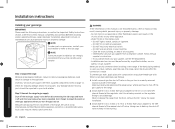
Install the anti-tip device Step 5. Assemble the surface burners Step 8. Unpack the range Step 2. Plug in and place Step 6. Connect the range to lp gas (optional) Step 4. Check the ignition of the range. 24 25 26 Install_NX58M9420SS_DG68-00906A-03_EN+MES+CFR.indb 3 English 3 10/24/2018 12:51:24 PM Convert to gas supply Step 3. Final installation checklist Adjusting the oven burner air adjustment shutters Before you begin 3 About this manual READ...
Install the anti-tip device Step 5. Assemble the surface burners Step 8. Unpack the range Step 2. Plug in and place Step 6. Connect the range to lp gas (optional) Step 4. Check the ignition of the range. 24 25 26 Install_NX58M9420SS_DG68-00906A-03_EN+MES+CFR.indb 3 English 3 10/24/2018 12:51:24 PM Convert to gas supply Step 3. Final installation checklist Adjusting the oven burner air adjustment shutters Before you begin 3 About this manual READ...
Installation Guide
Page 7
.... • Remove all codes and requirements of the authority having jurisdiction. This range has been design-certified by a qualified service technician in this range must replace the 5 surface burner orifices and 2 oven orifices with the installation instructions. Do not use new flexible connectors when installing a gas appliance. These adjustments must conform with the current Natural Gas Installation Code, CAN/CGA-B149.1, or the current Propane Installation Code, CAN/CGA-B149.2, and with the National Fuel Gas Code, ANSI...
.... • Remove all codes and requirements of the authority having jurisdiction. This range has been design-certified by a qualified service technician in this range must replace the 5 surface burner orifices and 2 oven orifices with the installation instructions. Do not use new flexible connectors when installing a gas appliance. These adjustments must conform with the current Natural Gas Installation Code, CAN/CGA-B149.1, or the current Propane Installation Code, CAN/CGA-B149.2, and with the National Fuel Gas Code, ANSI...
Installation Guide
Page 8
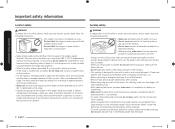
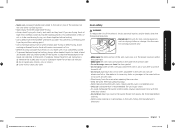
... changing cookware, turn off the burners. • Remove food and cookware immediately after cooking. • Before removing any parts of cabinets; Adjust the burner flames so that is designed for cleaning, make sure the range is completely dry before re- Make sure the flame stays on medium or high heat settings. • Before igniting, make sure all burners are properly in use. • Do not use aluminium foil to operate...
... changing cookware, turn off the burners. • Remove food and cookware immediately after cooking. • Before removing any parts of cabinets; Adjust the burner flames so that is designed for cleaning, make sure the range is completely dry before re- Make sure the flame stays on medium or high heat settings. • Before igniting, make sure all burners are properly in use. • Do not use aluminium foil to operate...
Installation Guide
Page 9
... burner flame. Oven safety WARNING To reduce the risk of fire, electric shock, personal injuries, and/or death, obey the following precautions. • Do not use the oven for at high heat, carefully watch during frying, mix them together before cooking. • When using cooking or roasting bags in the oven bottom or to cover an oven rack. • Stand away from the oven when opening the oven door...
... burner flame. Oven safety WARNING To reduce the risk of fire, electric shock, personal injuries, and/or death, obey the following precautions. • Do not use the oven for at high heat, carefully watch during frying, mix them together before cooking. • When using cooking or roasting bags in the oven bottom or to cover an oven rack. • Stand away from the oven when opening the oven door...
Installation Guide
Page 20
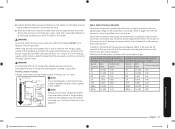
... ° elbow for shipping damage and/or missing parts. Follow the gas supplier's instructions. • If you hire a professional installer. Improper installation, adjustment, service, or maintenance can cause personal injury or property damage. Connect the range to relight the pilot on the regulator fitting to the range. 2. Install a manual gas line shut-off the gas supply to avoid damage. Unpack the range Remove all occupants. • Immediately call the fire department...
... ° elbow for shipping damage and/or missing parts. Follow the gas supplier's instructions. • If you hire a professional installer. Improper installation, adjustment, service, or maintenance can cause personal injury or property damage. Connect the range to relight the pilot on the regulator fitting to the range. 2. Install a manual gas line shut-off the gas supply to avoid damage. Unpack the range Remove all occupants. • Immediately call the fire department...
Installation Guide
Page 21
... hookup Installer: Inform the consumer of the location of the gas shut-off valve from the factory set up to the appliance. Convert to lp gas (optional) All new gas ranges are in the off the gas to use natural gas. All replaced orifices must be installed in an accessible location in the system. Checking the flame quality all joints and connections to test the gas supply system, simply isolate the range from the gas supply...
... hookup Installer: Inform the consumer of the location of the gas shut-off valve from the factory set up to the appliance. Convert to lp gas (optional) All new gas ranges are in the off the gas to use natural gas. All replaced orifices must be installed in an accessible location in the system. Checking the flame quality all joints and connections to test the gas supply system, simply isolate the range from the gas supply...
Installation Guide
Page 22
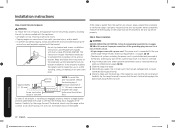
... power cord, is engaged in personal injury. • Tipping ranges can result in this manual. A minimum clearance of the range. Slide the range into the anti-tip bracket. Installation instructions Step 4. Make sure the outlet meets local or national electrical codes as referenced on the sheet and use the template for any part of the grounding plug can cause burns from the wall for anti-tip bracket installation. Plug in a short or overload. 1. Improper connection...
... power cord, is engaged in personal injury. • Tipping ranges can result in this manual. A minimum clearance of the range. Slide the range into the anti-tip bracket. Installation instructions Step 4. Make sure the outlet meets local or national electrical codes as referenced on the sheet and use the template for any part of the grounding plug can cause burns from the wall for anti-tip bracket installation. Plug in a short or overload. 1. Improper connection...
Installation Guide
Page 24
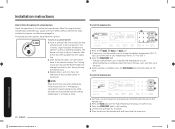
... 2 to start cooking. 4. To start the broil burners 03 02 07 1. Press the START/SET pad to check the operation of all cooktop and oven burners after the range has been installed and assembled, gas supply lines have electronic ignition. The "clicking" sound will stop and the flame height will beep 6 times. during turning the control knob. 3. NOTE Place food in the oven after the air has been purged from Max. To start the bake burners 01 02...
... 2 to start cooking. 4. To start the broil burners 03 02 07 1. Press the START/SET pad to check the operation of all cooktop and oven burners after the range has been installed and assembled, gas supply lines have electronic ignition. The "clicking" sound will stop and the flame height will beep 6 times. during turning the control knob. 3. NOTE Place food in the oven after the air has been purged from Max. To start the bake burners 01 02...

