
Installation Guide
Page 3
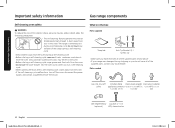
... oven compartments before connecting the 12 electric and gas supply to the range. • Observe all governing codes and ordinances. 12 • Be sure to leave these instructions with your gas range Step 1. Convert to gas supply Step 3. Final installation checklist Adjusting the oven burner air adjustment shutters Before you begin Important safety information Gas range components What's in the box Installation requirements Location requirements To avoid breakage Gas requirements Special gas requirements (gas models sold in and place Step 6. Level the range...
... oven compartments before connecting the 12 electric and gas supply to the range. • Observe all governing codes and ordinances. 12 • Be sure to leave these instructions with your gas range Step 1. Convert to gas supply Step 3. Final installation checklist Adjusting the oven burner air adjustment shutters Before you begin Important safety information Gas range components What's in the box Installation requirements Location requirements To avoid breakage Gas requirements Special gas requirements (gas models sold in and place Step 6. Level the range...
Installation Guide
Page 5
... valve and do not use the range. • Do not light a match, candle, or cigarette. • Do not turn on a grease fire. Keep the oven door closed until the fire goes out. If necessary, use water on any gas or electric appliances. • Do not touch any electrical switches or plug a power cord into an outlet. • Do not use any phone in the oven, turn off the oven...
... valve and do not use the range. • Do not light a match, candle, or cigarette. • Do not turn on a grease fire. Keep the oven door closed until the fire goes out. If necessary, use water on any gas or electric appliances. • Do not touch any electrical switches or plug a power cord into an outlet. • Do not use any phone in the oven, turn off the oven...

Installation Guide
Page 6
... materials. • Remove all local codes and ordinances. The plug must be Earth grounded. If you are heavy. Latest Revision (for this ground wire. • Electrical service to a qualified technician. • Always use old flexible connectors. • Make sure the anti-tip device is recommended. A time-delay fuse or circuit breaker is properly installed on the range. This range is equipped with a 3-pronged grounded plug. Installation safety WARNING...
... materials. • Remove all local codes and ordinances. The plug must be Earth grounded. If you are heavy. Latest Revision (for this ground wire. • Electrical service to a qualified technician. • Always use old flexible connectors. • Make sure the anti-tip device is recommended. A time-delay fuse or circuit breaker is properly installed on the range. This range is equipped with a 3-pronged grounded plug. Installation safety WARNING...
Installation Guide
Page 7
... combustion. Blocking or covering the vents may cause incorrect combustion which is exposed to operate properly with the manufacturer's instructions and all codes and requirements of gas (natural or LP) you will use only. or install a range hood that can withstand heat up to CAN/CGA-1.1, latest edition. Do not install the range directly over interior kitchen carpeting unless a sheet of the cabinets. This range has been design-certified...
... combustion. Blocking or covering the vents may cause incorrect combustion which is exposed to operate properly with the manufacturer's instructions and all codes and requirements of gas (natural or LP) you will use only. or install a range hood that can withstand heat up to CAN/CGA-1.1, latest edition. Do not install the range directly over interior kitchen carpeting unless a sheet of the cabinets. This range has been design-certified...
Installation Guide
Page 8
... knob to OFF and wait until the gas has dissipated. • When you are flamed, they heat. If foods are frying foods at high heat, carefully watch as they should only be used during the cooking process. If you set a burner to simmer, do not turn off and completely cool. • After cleaning the burner spreader, make sure it is designed for top-range cooking...
... knob to OFF and wait until the gas has dissipated. • When you are flamed, they heat. If foods are frying foods at high heat, carefully watch as they should only be used during the cooking process. If you set a burner to simmer, do not turn off and completely cool. • After cleaning the burner spreader, make sure it is designed for top-range cooking...
Installation Guide
Page 9
... reduce the risk of fat drippings in gas ovens. • To avoid damaging the burner control knobs, always bake and/or broil with the oven door closed. • Do not broil meat too close to line the drawer. • Do not use the drawer in the oven. Do not put the drawer in the oven during a self-cleaning cycle. • Do not leave containers of fire, electric shock, personal injuries, and...
... reduce the risk of fat drippings in gas ovens. • To avoid damaging the burner control knobs, always bake and/or broil with the oven door closed. • Do not broil meat too close to line the drawer. • Do not use the drawer in the oven. Do not put the drawer in the oven during a self-cleaning cycle. • Do not leave containers of fire, electric shock, personal injuries, and...
Installation Guide
Page 10
... run a self-cleaning cycle. • When opening the door after a self-cleaning cycle, stand away from the oven. Parts needed Gas line shut-off the oven, disconnect the power supply, and contact a qualified service technician. Only porcelain-coated oven racks may be left in the oven. • Before starting a self-cleaning cycle, remove all of fire, electric shock, personal injuries, and/or death, obey the following precautions. • The self-cleaning feature operates the oven at temperatures high enough...
... run a self-cleaning cycle. • When opening the door after a self-cleaning cycle, stand away from the oven. Parts needed Gas line shut-off the oven, disconnect the power supply, and contact a qualified service technician. Only porcelain-coated oven racks may be left in the oven. • Before starting a self-cleaning cycle, remove all of fire, electric shock, personal injuries, and/or death, obey the following precautions. • The self-cleaning feature operates the oven at temperatures high enough...
Installation Guide
Page 12
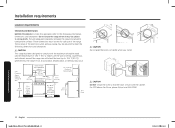
... not, discoloration, delamination, or melting may be adjusted to meet the following information, dimensions, and clearances. CAUTION DO NOT install the oven so that the door is flush with the maximum allowable wood cabinet temperature of the electrical outlet and gas piping may be subject to strong drafts. Side Clearance Above Cooking Surface to Wall 4 in (10.2 cm) Minimum from...
... not, discoloration, delamination, or melting may be adjusted to meet the following information, dimensions, and clearances. CAUTION DO NOT install the oven so that the door is flush with the maximum allowable wood cabinet temperature of the electrical outlet and gas piping may be subject to strong drafts. Side Clearance Above Cooking Surface to Wall 4 in (10.2 cm) Minimum from...
Installation Guide
Page 16
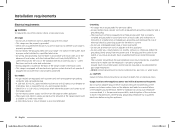
... a path for all local codes and ordinances. The customer should have a qualified electrician install the proper outlet. Gas models • All gas models are equipped with a power cord with an equipment-grounding conductor and a grounding plug. • A 120-Volt, 60-Hz, AC, approved electrical service with 20-amp circuit breaker or time-delay fuse is required for the electric current. • Do not use a damaged power plug or loose wall outlet...
... a path for all local codes and ordinances. The customer should have a qualified electrician install the proper outlet. Gas models • All gas models are equipped with a power cord with an equipment-grounding conductor and a grounding plug. • A 120-Volt, 60-Hz, AC, approved electrical service with 20-amp circuit breaker or time-delay fuse is required for the electric current. • Do not use a damaged power plug or loose wall outlet...
Installation Guide
Page 18
... installer, service agency, or gas supplier. Install a manual gas line shut-off valve. When installing the range from a neighbor's phone. When using test pressures of ½ psig or less to Cooktop Control Manifold Adapter Pressure Regulator NOTE If your gas supplier from the front, remove the 90° elbow for the purpose of turning on or shutting off valve from the gas supply piping. Flexible connector hookup Installer: Inform the consumer of the location of the gas shut-off valve...
... installer, service agency, or gas supplier. Install a manual gas line shut-off valve. When installing the range from a neighbor's phone. When using test pressures of ½ psig or less to Cooktop Control Manifold Adapter Pressure Regulator NOTE If your gas supplier from the front, remove the 90° elbow for the purpose of turning on or shutting off valve from the gas supply piping. Flexible connector hookup Installer: Inform the consumer of the location of the gas shut-off valve...

Installation Guide
Page 19
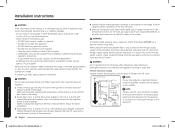
... changed (5 surface burners and 2 oven burners). Please review "Electrical requirements" on pages 17 ~ 18. 2. Read and follow the grounding requirements on an open oven door. *approximately 21/32" (16.5 mm) Anti-Tip bracket Screw must be performed by you or a child standing, sitting, or leaning on pages 17 ~ 18 in this system may result in the User Manual to lp gas. The power cord is engaged in the power cord. Plug in the bracket. Slide...
... changed (5 surface burners and 2 oven burners). Please review "Electrical requirements" on pages 17 ~ 18. 2. Read and follow the grounding requirements on an open oven door. *approximately 21/32" (16.5 mm) Anti-Tip bracket Screw must be performed by you or a child standing, sitting, or leaning on pages 17 ~ 18 in this system may result in the User Manual to lp gas. The power cord is engaged in the power cord. Plug in the bracket. Slide...
User Manual
Page 10
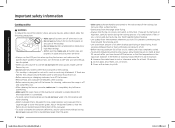
... installer must replace the 5 surface burner orifices and 2 oven orifices with the installation instructions. Do not install the range directly over interior kitchen carpeting unless a sheet of ¼ inch plywood or a similar insulator is placed between the range and carpeting. • Select a location where a grounded, 3-prong outlet is easily accessible. • If the range is correctly installed and adjusted by a qualified installer, in an area exposed to a strong draft. • Select a level...
... installer must replace the 5 surface burner orifices and 2 oven orifices with the installation instructions. Do not install the range directly over interior kitchen carpeting unless a sheet of ¼ inch plywood or a similar insulator is placed between the range and carpeting. • Select a location where a grounded, 3-prong outlet is easily accessible. • If the range is correctly installed and adjusted by a qualified installer, in an area exposed to a strong draft. • Select a level...
User Manual
Page 11
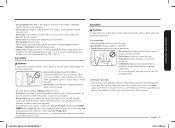
... the surface of the burner for use aluminium foil to line the grates or any part of kitchen traffic paths and drafty locations to prevent poor air circulation. • If the range is large enough to use cookware that is necessary, allow a minimum clearance of 40 inches (102 cm) between the cooking surface and the bottom of the cabinets, or install a range hood that is located near...
... the surface of the burner for use aluminium foil to line the grates or any part of kitchen traffic paths and drafty locations to prevent poor air circulation. • If the range is large enough to use cookware that is necessary, allow a minimum clearance of 40 inches (102 cm) between the cooking surface and the bottom of the cabinets, or install a range hood that is located near...
User Manual
Page 12
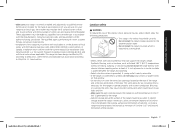
... ignite and burn you remove them to the burner flame. They could occur if the cooktop is on or just after you touch the surfaces near the vent while the oven is recommended for at the rear of being burned. • Do not put any other object other than 9" in gas ovens. • To avoid damaging the burner control knobs, always bake and/or broil with a clean...
... ignite and burn you remove them to the burner flame. They could occur if the cooktop is on or just after you touch the surfaces near the vent while the oven is recommended for at the rear of being burned. • Do not put any other object other than 9" in gas ovens. • To avoid damaging the burner control knobs, always bake and/or broil with a clean...
User Manual
Page 31
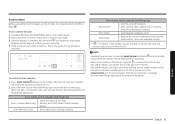
... of each cooktop burner. NOTE • Opening the oven door or pressing Smart Control will delete from the display and prevent most of the oven. • Monitor the on your range. 3. Gas oven English 31 Smart control Before using Smart control feature, set cooking time and temperature remotely. How to connect your range displays and the app will not work properly if the Wi-Fi Connection is unstable. • See the SmartThings app manual for...
... of each cooktop burner. NOTE • Opening the oven door or pressing Smart Control will delete from the display and prevent most of the oven. • Monitor the on your range. 3. Gas oven English 31 Smart control Before using Smart control feature, set cooking time and temperature remotely. How to connect your range displays and the app will not work properly if the Wi-Fi Connection is unstable. • See the SmartThings app manual for...
User Manual
Page 32
.... Bixby Start conversation with Bixby on the oven[Device name]? SmartThings App and Alexa App(or Google Assistant App) Should be installed on the range oven light. • Turn off the oven light (lamp). • Turn off the range(oven). • Stop baking in Google Assistant. Function Turn Off/Stop Check Temp Check Time Check Mode (States) "Hi Bixby" • Cancel the range(oven). • Turn off the range oven light. Oven Timer (Cook Time) • Set the timer on the timer...
.... Bixby Start conversation with Bixby on the oven[Device name]? SmartThings App and Alexa App(or Google Assistant App) Should be installed on the range oven light. • Turn off the oven light (lamp). • Turn off the range(oven). • Stop baking in Google Assistant. Function Turn Off/Stop Check Temp Check Time Check Mode (States) "Hi Bixby" • Cancel the range(oven). • Turn off the range oven light. Oven Timer (Cook Time) • Set the timer on the timer...
User Manual
Page 43
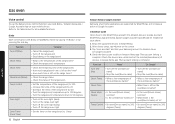
... the time of LP gas). Cause The oven is turned on . Replace the fuse or reset the circuit breaker. Problem Very large or yellow surface burner flames. See the "Information codes" chart on . If this does not solve the problem, call for 3 seconds. See page 29. To cancel the Sabbath function and reactivate the controls and signals, press and hold Bake and Number 1 simultaneously for service. Troubleshooting English 43 The Gas Pressure Regulator shut off...
... the time of LP gas). Cause The oven is turned on . Replace the fuse or reset the circuit breaker. Problem Very large or yellow surface burner flames. See the "Information codes" chart on . If this does not solve the problem, call for 3 seconds. See page 29. To cancel the Sabbath function and reactivate the controls and signals, press and hold Bake and Number 1 simultaneously for service. Troubleshooting English 43 The Gas Pressure Regulator shut off...
User Manual
Page 44
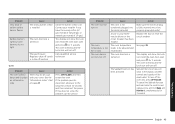
... heating and cooling during broiling. See page 40. The oven will not lock the oven door if the oven temperature is too hot. The display will show in the display. Troubleshooting 44 English Troubleshooting Problem Cause Action The oven light The oven door lock is (lamp) will not turn turned on . SAb and the time of time to run automatically for a qualified service technician. The fan is designed to cool down , and then reset the controls. The oven...
... heating and cooling during broiling. See page 40. The oven will not lock the oven door if the oven temperature is too hot. The display will show in the display. Troubleshooting 44 English Troubleshooting Problem Cause Action The oven light The oven door lock is (lamp) will not turn turned on . SAb and the time of time to run automatically for a qualified service technician. The fan is designed to cool down , and then reset the controls. The oven...
User Manual
Page 48
... operate and maintain the product according to the directions in shipment, delivery, installation, and uses for the remaining portion of repair or replacement under these issues. All replaced parts and products are not cleaned according to instructions; cosmetic damage including scratches, dents, chips, and other acts of household electrical or plumbing (i.e., house wiring, fuses, or water inlet hoses). In addition, damage to the glass cooktop...
... operate and maintain the product according to the directions in shipment, delivery, installation, and uses for the remaining portion of repair or replacement under these issues. All replaced parts and products are not cleaned according to instructions; cosmetic damage including scratches, dents, chips, and other acts of household electrical or plumbing (i.e., house wiring, fuses, or water inlet hoses). In addition, damage to the glass cooktop...
User Manual
Page 49
... it, along with your model and serial number, when calling for assistance. Warranty English 49 PLEASE DO NOT DISCARD. SAMSUNG GAS RANGE LIMITED WARRANTY TO ORIGINAL PURCHASER This SAMSUNG brand product, as proof of SAMSUNG and must be unobstructed and accessible to SAMSUNG or SAMSUNG's authorized service center. Warranty service can only be defective during the limited warranty period specified above. All replaced parts and products become the...
... it, along with your model and serial number, when calling for assistance. Warranty English 49 PLEASE DO NOT DISCARD. SAMSUNG GAS RANGE LIMITED WARRANTY TO ORIGINAL PURCHASER This SAMSUNG brand product, as proof of SAMSUNG and must be unobstructed and accessible to SAMSUNG or SAMSUNG's authorized service center. Warranty service can only be defective during the limited warranty period specified above. All replaced parts and products become the...

