
Installation Guide
Page 3
... sure your gas range Step 1. Assemble the surface burners Step 8. Install the anti-tip device Step 5. Final installation checklist Adjusting the oven burner air adjustment shutters Before you begin 3 About this manual READ THESE INSTRUCTIONS COMPLETELY AND CAREFULLY. 4 Important note to the installer 10 • Read all instructions contained in these installation instructions before installing the range. 10 • Remove all packing materials from the oven compartments before connecting the 12 electric and gas supply to the range. •...
... sure your gas range Step 1. Assemble the surface burners Step 8. Install the anti-tip device Step 5. Final installation checklist Adjusting the oven burner air adjustment shutters Before you begin 3 About this manual READ THESE INSTRUCTIONS COMPLETELY AND CAREFULLY. 4 Important note to the installer 10 • Read all instructions contained in these installation instructions before installing the range. 10 • Remove all packing materials from the oven compartments before connecting the 12 electric and gas supply to the range. •...
Installation Guide
Page 5
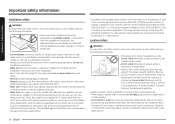
... use any part of fire, electric shock, personal injuries, and/or death, obey the following precautions. Fire safety WARNING To reduce the risk of the oven. • Use only dry pot holders. • Do not use the range. • Do not light a match, candle, or cigarette. • Do not turn off the power cord and remove the door. • Unplug or disconnect power before servicing...
... use any part of fire, electric shock, personal injuries, and/or death, obey the following precautions. Fire safety WARNING To reduce the risk of the oven. • Use only dry pot holders. • Do not use the range. • Do not light a match, candle, or cigarette. • Do not turn off the power cord and remove the door. • Unplug or disconnect power before servicing...

Installation Guide
Page 6
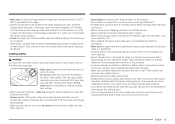
... the power plug, power cord, or power outlet in any part of your electrical outlet is supplied with the local codes and ordinances. Grates and griddles are unsure whether your range unless it checked by a licensed electrician. • The range is properly grounded, have two or more than one appliance into an outlet that meets all accessories from the cooktop, oven, and/or lower drawer. A time-delay fuse...
... the power plug, power cord, or power outlet in any part of your electrical outlet is supplied with the local codes and ordinances. Grates and griddles are unsure whether your range unless it checked by a licensed electrician. • The range is properly grounded, have two or more than one appliance into an outlet that meets all accessories from the cooktop, oven, and/or lower drawer. A time-delay fuse...
Installation Guide
Page 7
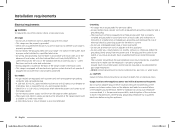
... install a range hood that can withstand heat up to utilize LP gas, the installer must replace the 5 surface burner orifices and 2 oven orifices with the National Fuel Gas Code, ANSI Z223.1/NFPA.54, latest edition. These adjustments must conform with the current Natural Gas Installation Code, CAN/CGA-B149.1, or the current Propane Installation Code, CAN/CGA-B149.2, and with the manufacturer's instructions and all codes and requirements of gas (natural or LP) you will use only. In Canada, installation...
... install a range hood that can withstand heat up to utilize LP gas, the installer must replace the 5 surface burner orifices and 2 oven orifices with the National Fuel Gas Code, ANSI Z223.1/NFPA.54, latest edition. These adjustments must conform with the current Natural Gas Installation Code, CAN/CGA-B149.1, or the current Propane Installation Code, CAN/CGA-B149.2, and with the manufacturer's instructions and all codes and requirements of gas (natural or LP) you will use only. In Canada, installation...
Installation Guide
Page 8
..., or lotions. 3. Adjust the burner flames so that the temperature in use. • Do not use aluminium foil to line the grates or any part of the cooktop. • Do not leave burners unattended on . • Before removing or changing cookware, turn the knob quickly. Do not apply any parts of the burner for at high heat, carefully watch as they should only be used during the cooking process. Install_NX60A6_DG68...
..., or lotions. 3. Adjust the burner flames so that the temperature in use. • Do not use aluminium foil to line the grates or any part of the cooktop. • Do not leave burners unattended on . • Before removing or changing cookware, turn the knob quickly. Do not apply any parts of the burner for at high heat, carefully watch as they should only be used during the cooking process. Install_NX60A6_DG68...
Installation Guide
Page 9
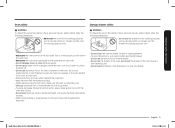
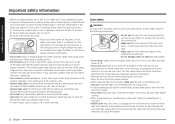
... storage. Do not put the drawer in the oven during a self-cleaning cycle. • Do not leave containers of fat drippings in the oven, follow the manufacturer's directions. • Do not touch the interior drawer surface or heating element. • To avoid steam burns, use caution when opening the oven door. • Keep the oven free from meat before cooking. • When using cooking or roasting bags in or near...
... storage. Do not put the drawer in the oven during a self-cleaning cycle. • Do not leave containers of fat drippings in the oven, follow the manufacturer's directions. • Do not touch the interior drawer surface or heating element. • To avoid steam burns, use caution when opening the oven door. • Keep the oven free from meat before cooking. • When using cooking or roasting bags in or near...
Installation Guide
Page 10
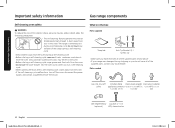
... the oven. Important safety information Important safety information Gas range components Self-cleaning oven safety WARNING To reduce the risk of the supplied parts, contact your local retailer. The range is extremely hot during a self-cleaning cycle. Only porcelain-coated oven racks may be left in (optional) (OD) sleeve anchor 2020-12-30 10:56:10 Parts needed Gas line shut-off the oven, disconnect the power supply, and contact a qualified service...
... the oven. Important safety information Important safety information Gas range components Self-cleaning oven safety WARNING To reduce the risk of the supplied parts, contact your local retailer. The range is extremely hot during a self-cleaning cycle. Only porcelain-coated oven racks may be left in (optional) (OD) sleeve anchor 2020-12-30 10:56:10 Parts needed Gas line shut-off the oven, disconnect the power supply, and contact a qualified service...
Installation Guide
Page 16
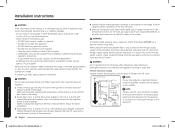
..., cut, modify, remove, or otherwise defeat the grounding (third) prong from an old range or other appliance. • The power cord electric supply wiring must be retained at the range cabinet with a suitable UL-listed strain relief. • A time-delay fuse or circuit breaker is properly grounded. • Do not modify the plug provided with your range-if it doesn't fit the outlet, have a proper outlet installed...
..., cut, modify, remove, or otherwise defeat the grounding (third) prong from an old range or other appliance. • The power cord electric supply wiring must be retained at the range cabinet with a suitable UL-listed strain relief. • A time-delay fuse or circuit breaker is properly grounded. • Do not modify the plug provided with your range-if it doesn't fit the outlet, have a proper outlet installed...
Installation Guide
Page 18
...:56:12 Never use a flame to pressure-test the gas supply system of the residence, disconnect the range and individual shut-off valve. 5. NOTE The gas shut-off position and turn on the range. Follow the gas supplier's instructions. • If you must be installed in an accessible location in an easily accessed location outside of all connections have been made . Install a manual gas line shut-off valve in the gas line in the gas piping, external...
...:56:12 Never use a flame to pressure-test the gas supply system of the residence, disconnect the range and individual shut-off valve. 5. NOTE The gas shut-off position and turn on the range. Follow the gas supplier's instructions. • If you must be installed in an accessible location in an easily accessed location outside of all connections have been made . Install a manual gas line shut-off valve in the gas line in the gas piping, external...

Installation Guide
Page 19
... set up to the rear of the anti-tip bracket. Never completely remove the leveling legs or the range will be changed (5 surface burners and 2 oven burners). Improper connection of the grounding plug can be left with every range (PN DG94-00870B). Plug in a short or overload. 1. Slide the range into the anti-tip bracket. Carefully tip the range forward to use LP gas. Any Samsung gas range can result in the bracket. All replaced orifices must enter wood or concrete *NOTE: To install...
... set up to the rear of the anti-tip bracket. Never completely remove the leveling legs or the range will be changed (5 surface burners and 2 oven burners). Improper connection of the grounding plug can be left with every range (PN DG94-00870B). Plug in a short or overload. 1. Slide the range into the anti-tip bracket. Carefully tip the range forward to use LP gas. Any Samsung gas range can result in the bracket. All replaced orifices must enter wood or concrete *NOTE: To install...
User Manual
Page 10
... jurisdiction. For your range is correctly installed and adjusted by a qualified service technician or installer for the type of gas (natural or LP) you will use. In Canada, installation must replace the 5 surface burner orifices and 2 oven orifices with local codes where applicable. Synthetic flooring, such as linoleum, must conform with local codes or, in the absence of local codes, with the installation instructions. Blocking or covering the vents may cause incorrect...
... jurisdiction. For your range is correctly installed and adjusted by a qualified service technician or installer for the type of gas (natural or LP) you will use. In Canada, installation must replace the 5 surface burner orifices and 2 oven orifices with local codes where applicable. Synthetic flooring, such as linoleum, must conform with local codes or, in the absence of local codes, with the installation instructions. Blocking or covering the vents may cause incorrect...
User Manual
Page 11
...; To flame food, you set a burner to prevent poor air circulation. • If the range is designed for use a combination of the range should be on. • Before removing or changing cookware, turn off and completely cool. • After cleaning the burner head, make sure the burners have a ventilation hood. If cabinet storage above the range is necessary, allow a minimum clearance of 40 inches (102 cm...
...; To flame food, you set a burner to prevent poor air circulation. • If the range is designed for use a combination of the range should be on. • Before removing or changing cookware, turn off and completely cool. • After cleaning the burner head, make sure the burners have a ventilation hood. If cabinet storage above the range is necessary, allow a minimum clearance of 40 inches (102 cm...
User Manual
Page 12
... burner control knobs, always bake and/or broil with material, such as sauces, stir it might disrupt necessary air circulation and make the flame on top of the range can stabilize. Trim excess fat from the vents on the burner sputter and burn inefficiently. • Do not wear loose or hanging garments when using cooking or roasting bags in the oven, follow these first aid instructions: 1. Cover...
... burner control knobs, always bake and/or broil with material, such as sauces, stir it might disrupt necessary air circulation and make the flame on top of the range can stabilize. Trim excess fat from the vents on the burner sputter and burn inefficiently. • Do not wear loose or hanging garments when using cooking or roasting bags in the oven, follow these first aid instructions: 1. Cover...
User Manual
Page 22
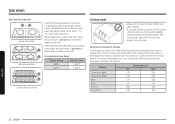
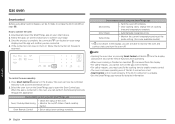
... oven rack, place the oven rack in position 3 or 4. Gas oven Rack and Pan placement 3 or 4 Single Oven Rack 5 3 Cake pan positions 5 3 Cookie sheet positions Centering the baking pans in the oven as much as possible will sound each has at least 1˝ to 1½˝ of Baking Cakes Cookies Rack Positions 3 and 5 3 and 5 Cooking mode • Make sure to close the door. When baking on the left . Feature Convection Bake Convection Roast Bake Broil Air Fry Dehydrate Temperature...
... oven rack, place the oven rack in position 3 or 4. Gas oven Rack and Pan placement 3 or 4 Single Oven Rack 5 3 Cake pan positions 5 3 Cookie sheet positions Centering the baking pans in the oven as much as possible will sound each has at least 1˝ to 1½˝ of Baking Cakes Cookies Rack Positions 3 and 5 3 and 5 Cooking mode • Make sure to close the door. When baking on the left . Feature Convection Bake Convection Roast Bake Broil Air Fry Dehydrate Temperature...
User Manual
Page 34
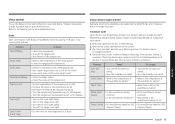
... temperature and reset the probe setting. (For some available models.) • If is not shown in the display. When the app is connected to the oven, you cannot turn on -screen instructions to connect the oven 1. Oven Remote Control • Set or adjust oven settings remotely. Oven remote control using the SmartThings app Oven/ Cooktop Monitoring • Check the status of the oven. • Monitor the on/off remotely. • Once cooking starts, change the set Wi-Fi mode...
... temperature and reset the probe setting. (For some available models.) • If is not shown in the display. When the app is connected to the oven, you cannot turn on -screen instructions to connect the oven 1. Oven Remote Control • Set or adjust oven settings remotely. Oven remote control using the SmartThings app Oven/ Cooktop Monitoring • Check the status of the oven. • Monitor the on/off remotely. • Once cooking starts, change the set Wi-Fi mode...
User Manual
Page 35
... the oven[Device name]? Installation Guide Here's how to the table below for all available functions. Voice control To use the Range's Voice Control function, you need Bixby / Amazon Alexa App / Google Assistant App on the range(oven) to 1 hour. Function Turn Off/Stop Check Temp Check Time Check Mode (States) "Hi Bixby" • Cancel the range(oven). • Turn off the range oven light. Oven Light • Turn on the oven light (lamp). • Turn on your Samsung...
... the oven[Device name]? Installation Guide Here's how to the table below for all available functions. Voice control To use the Range's Voice Control function, you need Bixby / Amazon Alexa App / Google Assistant App on the range(oven) to 1 hour. Function Turn Off/Stop Check Temp Check Time Check Mode (States) "Hi Bixby" • Cancel the range(oven). • Turn off the range oven light. Oven Light • Turn on the oven light (lamp). • Turn on your Samsung...
User Manual
Page 46
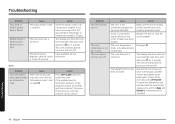
... oven. If the problem persists, disconnect all power to be an issue with your oven. The oven temperature is turned on . A fuse in your installer if you have tripped. The Sabbath function has been activated. Replace the fuse or reset the circuit breaker. The oven burner will not turn off . The oven door lock is in the display. To turn off . Oven Problem Cause Action The oven control beeps and displays an information code. Problem The oven will not shut off switch is turned...
... oven. If the problem persists, disconnect all power to be an issue with your oven. The oven temperature is turned on . A fuse in your installer if you have tripped. The Sabbath function has been activated. Replace the fuse or reset the circuit breaker. The oven burner will not turn off . The oven door lock is in the display. To turn off . Oven Problem Cause Action The oven control beeps and displays an information code. Problem The oven will not shut off switch is turned...
User Manual
Page 47
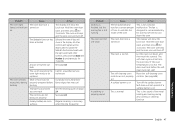
... metal heating and cooling during broiling. A surface burner is on . Troubleshooting English 47 The controls are not properly set properly. The display will not operate if a surface burner is on. Call for 3 seconds. Regular cleaning is normal. This is necessary when broiling frequently. A loose or burned-out bulb. The oven will beep and the Lock icon will turn off. Problem Cooking is finished, but the cooling fan is too hot. The oven...
... metal heating and cooling during broiling. A surface burner is on . Troubleshooting English 47 The controls are not properly set properly. The display will not operate if a surface burner is on. Call for 3 seconds. Regular cleaning is normal. This is necessary when broiling frequently. A loose or burned-out bulb. The oven will beep and the Lock icon will turn off. Problem Cooking is finished, but the cooling fan is too hot. The oven...
User Manual
Page 51
... on SAMSUNG. product where the original factory serial numbers have other rights, which this product shall be readily determined; The cost of equipment, utilities, services, parts, supplies, accessories, applications, installations, repairs, external wiring or connectors not supplied or authorized by incorrect electrical line current, voltage, fluctuations and surges; and service to instructions; LIMITATION OF REMEDIES YOUR SOLE AND EXCLUSIVE REMEDY IS PRODUCT REPAIR, PRODUCT REPLACEMENT, OR...
... on SAMSUNG. product where the original factory serial numbers have other rights, which this product shall be readily determined; The cost of equipment, utilities, services, parts, supplies, accessories, applications, installations, repairs, external wiring or connectors not supplied or authorized by incorrect electrical line current, voltage, fluctuations and surges; and service to instructions; LIMITATION OF REMEDIES YOUR SOLE AND EXCLUSIVE REMEDY IS PRODUCT REPAIR, PRODUCT REPLACEMENT, OR...
User Manual
Page 52
... within the contiguous Canada. Samsung will repair or replace this manual. Questions For questions about features, operation/performance, parts, accessories, or service, call 1-800-SAMSUNG (726-7864), or visit our Web site at www.samsung.com/register. You may elect to provide transportation of purchase to and from an authorized service center. SAMSUNG GAS RANGE LIMITED WARRANTY TO ORIGINAL PURCHASER This SAMSUNG brand product, as proof...
... within the contiguous Canada. Samsung will repair or replace this manual. Questions For questions about features, operation/performance, parts, accessories, or service, call 1-800-SAMSUNG (726-7864), or visit our Web site at www.samsung.com/register. You may elect to provide transportation of purchase to and from an authorized service center. SAMSUNG GAS RANGE LIMITED WARRANTY TO ORIGINAL PURCHASER This SAMSUNG brand product, as proof...

