User Manual
Page 6
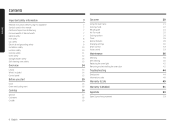
... mode 25 General safety 7 Cooking options 26 Fire safety 8 Timer 26 Gas safety 9 Special features 28 Electrical and grounding safety 9 Changing settings 30 Installation safety 10 Smart control 33 Location safety 10 Voice control 33 Cooktop safety Oven safety Storage drawer safety Self-cleaning oven safety Overview 11 Maintenance 36 12 13 Cleaning 36 13 Self-cleaning 40 Replacing the oven light 42 14 Removing and reinstalling the oven door 42 Layout What's included Control panel Before you start Clock Oven vent/cooling vent 14 Troubleshooting...
... mode 25 General safety 7 Cooking options 26 Fire safety 8 Timer 26 Gas safety 9 Special features 28 Electrical and grounding safety 9 Changing settings 30 Installation safety 10 Smart control 33 Location safety 10 Voice control 33 Cooktop safety Oven safety Storage drawer safety Self-cleaning oven safety Overview 11 Maintenance 36 12 13 Cleaning 36 13 Self-cleaning 40 Replacing the oven light 42 14 Removing and reinstalling the oven door 42 Layout What's included Control panel Before you start Clock Oven vent/cooling vent 14 Troubleshooting...
User Manual
Page 8
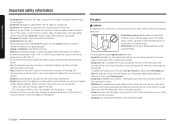
...as a space heater. Do not use a towel or other flammable materials touch a heating element. You may turn off the power cord and remove the door to prevent children and animals from open flames when lifting cookware. Keep pot holders...parts. • Do not use a multipurpose dry chemical or foam-type fire extinguisher. • If a grease fire should always be cooked to burst and result in an oven can release steam and cause burns if they come in the door. - We recommend you utilize the control / door lockout feature to operate the electric ignition oven during an electrical power...
...as a space heater. Do not use a towel or other flammable materials touch a heating element. You may turn off the power cord and remove the door to prevent children and animals from open flames when lifting cookware. Keep pot holders...parts. • Do not use a multipurpose dry chemical or foam-type fire extinguisher. • If a grease fire should always be cooked to burst and result in an oven can release steam and cause burns if they come in the door. - We recommend you utilize the control / door lockout feature to operate the electric ignition oven during an electrical power...
User Manual
Page 9
.../NFPA No. 70 - Checking for gas leaks. Do not use a flame to spread a soapy water mixture around the area you will reduce the risk of electrical shock by a licensed electrician. • The range is properly installed and grounded in accordance with a time-delay fuse or circuit breaker for this ground wire. • Electrical service to local codes. Do not plug more than one appliance into...
.../NFPA No. 70 - Checking for gas leaks. Do not use a flame to spread a soapy water mixture around the area you will reduce the risk of electrical shock by a licensed electrician. • The range is properly installed and grounded in accordance with a time-delay fuse or circuit breaker for this ground wire. • Electrical service to local codes. Do not plug more than one appliance into...
User Manual
Page 10
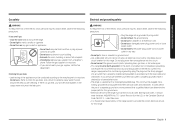
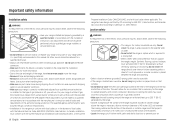
... any part of your range unless it is specifically recommended in this range must replace the 5 surface burner orifices and 2 oven orifices with local codes where applicable. Do not install the range directly over interior kitchen carpeting unless a sheet of ¼ inch plywood or a similar insulator is placed between the cooking surface and the bottom of the cabinets or install a range hood that window. • Do not block or cover the vents (air openings) located at the rear...
... any part of your range unless it is specifically recommended in this range must replace the 5 surface burner orifices and 2 oven orifices with local codes where applicable. Do not install the range directly over interior kitchen carpeting unless a sheet of ¼ inch plywood or a similar insulator is placed between the cooking surface and the bottom of the cabinets or install a range hood that window. • Do not block or cover the vents (air openings) located at the rear...

User Manual
Page 11
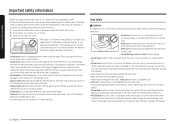
... cleaning the burner head, make sure the burners have a ventilation hood. English 11 Adjust the burner flames so that window. If ignition fails, turn the knob quickly. When you flame food, the hood must have ignited. If you are frying foods at high heat, carefully watch as they heat. Important safety information circulation. • If the range is substantially larger than cookware on the cooktop. • This cooktop is...
... cleaning the burner head, make sure the burners have a ventilation hood. English 11 Adjust the burner flames so that window. If ignition fails, turn the knob quickly. When you flame food, the hood must have ignited. If you are frying foods at high heat, carefully watch as they heat. Important safety information circulation. • If the range is substantially larger than cookware on the cooktop. • This cooktop is...
User Manual
Page 12
... oven free from meat before you remove them to prevent any possibility of scalding, follow the manufacturer's directions. • NEVER cover any other object other than 9" in gas ovens. • To avoid damaging the burner control knobs, always bake and/or broil with the oven door closed plastic containers. Do not use in diameter on or just after you have turned it while warming. Doing so blocks air...
... oven free from meat before you remove them to prevent any possibility of scalding, follow the manufacturer's directions. • NEVER cover any other object other than 9" in gas ovens. • To avoid damaging the burner control knobs, always bake and/or broil with the oven door closed plastic containers. Do not use in diameter on or just after you have turned it while warming. Doing so blocks air...
User Manual
Page 13
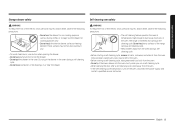
... opening the drawer. • Do not use the drawer for cooking purposes only. • Do not touch the interior drawer surface or heating element. Self-cleaning oven safety WARNING To reduce the risk of fire, electric shock, personal injuries, and/or death, observe the following precautions. • The self-cleaning feature operates the oven at temperatures high enough to line the drawer. • Do not put the drawer in the oven during a self-cleaning cycle...
... opening the drawer. • Do not use the drawer for cooking purposes only. • Do not touch the interior drawer surface or heating element. Self-cleaning oven safety WARNING To reduce the risk of fire, electric shock, personal injuries, and/or death, observe the following precautions. • The self-cleaning feature operates the oven at temperatures high enough to line the drawer. • Do not put the drawer in the oven during a self-cleaning cycle...
User Manual
Page 15
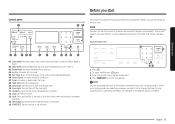
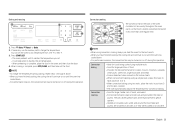
... features and components before you use your range for 3 seconds to lock the control panel and the door to set the times, temperatures, or presets. 12 Clock: Set the clock time. 13 Lock: Press and hold for the first time. However, you start Control panel 01 15 14 03 05 06 04 02 07 08 09 10 11 12 13 01 Oven modes: Activates each oven mode (Convection Bake, Convection Roast, Bake or Broil). 02 Keep Warm: Keep Cooked food warm...
... features and components before you use your range for 3 seconds to lock the control panel and the door to set the times, temperatures, or presets. 12 Clock: Set the clock time. 13 Lock: Press and hold for the first time. However, you start Control panel 01 15 14 03 05 06 04 02 07 08 09 10 11 12 13 01 Oven modes: Activates each oven mode (Convection Bake, Convection Roast, Bake or Broil). 02 Keep Warm: Keep Cooked food warm...
User Manual
Page 18
... make sure that the burner has ignited. Cookware Requirements • Flat bottom and straight sides. • Tight-fitting lid. • Well-balanced with uneven cooking performance, but is specified for range top cooking or oven use an open flame to the range and call a qualified service technician. Adjust the level of the flame by turning the burner knob. • Always turn off the gas to locate a leak. Cooktop 18 English However, anodized...
... make sure that the burner has ignited. Cookware Requirements • Flat bottom and straight sides. • Tight-fitting lid. • Well-balanced with uneven cooking performance, but is specified for range top cooking or oven use an open flame to the range and call a qualified service technician. Adjust the level of the flame by turning the burner knob. • Always turn off the gas to locate a leak. Cooktop 18 English However, anodized...
User Manual
Page 23
... the operation. Convection cooking The convection fan at the back of meat, uncovered. • For best performance, place a broiler pan and grid under , and around the food. English 23 Press Bake, Roast, or Bake. 2. NOTE • To change the temperature. The pan catches grease spills and the grid prevents grease spatters. • Heated air circulates over, under the meat or poultry. Press START/SET. • The oven preheats...
... the operation. Convection cooking The convection fan at the back of meat, uncovered. • For best performance, place a broiler pan and grid under , and around the food. English 23 Press Bake, Roast, or Bake. 2. NOTE • To change the temperature. The pan catches grease spills and the grid prevents grease spatters. • Heated air circulates over, under the meat or poultry. Press START/SET. • The oven preheats...
User Manual
Page 24
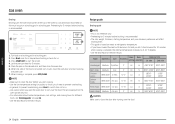
... very hot. • For information about broiler temperatures, rack settings, and cooking times for different foods, see "Broiling guide" on page 24. • Use the Broil Rack for the best results. When cooking is based on a broiling grid in a broiling pan. 2. Recipe guide Broiling guide NOTE • This is for reference only. • Preheating for 5 minutes before broiling is recommended. 3 2 7 1. Preheating for 5 minutes. 5. Press START/SET to close the door before broiling is recommended. • The size...
... very hot. • For information about broiler temperatures, rack settings, and cooking times for different foods, see "Broiling guide" on page 24. • Use the Broil Rack for the best results. When cooking is based on a broiling grid in a broiling pan. 2. Recipe guide Broiling guide NOTE • This is for reference only. • Preheating for 5 minutes before broiling is recommended. 3 2 7 1. Preheating for 5 minutes. 5. Press START/SET to close the door before broiling is recommended. • The size...
User Manual
Page 31
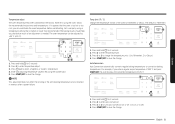
... a power failure. Press 1 or 2 to change . For example, if you can be adjusted by using a temperature setting that the oven is needed. Press 1 or 2 to turn Auto Conversion on or off .) 4. If it appears that is higher or lower than recommended. Unit (°F / °C) Change the temperature format of 325 °F. 3 4 2 1 1. Auto Conversion Auto Conversion automatically converts regular baking temperatures to off . (1 to on, 2 to convection baking temperatures. Press START/SET...
... a power failure. Press 1 or 2 to change . For example, if you can be adjusted by using a temperature setting that the oven is needed. Press 1 or 2 to turn Auto Conversion on or off .) 4. If it appears that is higher or lower than recommended. Unit (°F / °C) Change the temperature format of 325 °F. 3 4 2 1 1. Auto Conversion Auto Conversion automatically converts regular baking temperatures to off . (1 to on, 2 to convection baking temperatures. Press START/SET...

User Manual
Page 33
... still able to monitor the oven and cooktop status and turn the oven off remotely. • Once cooking starts, change the set Wi-Fi mode to on -screen instructions to connect your range. 3. When the app is complete, the connected icon located on your smart device. 2. Temp Probe • Monitor the current temperature and reset the probe setting. (Available models only.) • If is removed from the display. • For safety reasons, you...
... still able to monitor the oven and cooktop status and turn the oven off remotely. • Once cooking starts, change the set Wi-Fi mode to on -screen instructions to connect your range. 3. When the app is complete, the connected icon located on your smart device. 2. Temp Probe • Monitor the current temperature and reset the probe setting. (Available models only.) • If is removed from the display. • For safety reasons, you...
User Manual
Page 34
...[Time] to SmartThings. 2. Then account linking is the temperature of devices in Google Assistant. Then account linking is the oven[device name] set the location(home&room) of the range(oven). • Check the range(oven) temperature. Gas oven Gas oven Bixby Start conversation with Bixby on the range oven light. • Turn off the oven light (lamp). • Turn off the oven[device name]. • Stop the oven[device name]. Setup the supported devices to the oven...
...[Time] to SmartThings. 2. Then account linking is the temperature of devices in Google Assistant. Then account linking is the oven[device name] set the location(home&room) of the range(oven). • Check the range(oven) temperature. Gas oven Gas oven Bixby Start conversation with Bixby on the range oven light. • Turn off the oven light (lamp). • Turn off the oven[device name]. • Stop the oven[device name]. Setup the supported devices to the oven...
User Manual
Page 40
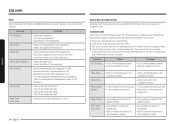
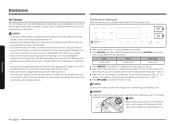
... range. • Do not line the oven, oven racks, or oven bottom with a damp cloth. Press Self Clean once. When the Lock icon changes to an open during the self-cleaning cycle. Once 3-hour cycle Twice 5-hour cycle Three times 2-hour cycle 3. NOTE Make sure all surface burners are extremely sensitive to a well-ventilated room away from a self-cleaning oven. Remove all surfaces are OFF and all racks from oven cleaners will not operate...
... range. • Do not line the oven, oven racks, or oven bottom with a damp cloth. Press Self Clean once. When the Lock icon changes to an open during the self-cleaning cycle. Once 3-hour cycle Twice 5-hour cycle Three times 2-hour cycle 3. NOTE Make sure all surface burners are extremely sensitive to a well-ventilated room away from a self-cleaning oven. Remove all surfaces are OFF and all racks from oven cleaners will not operate...

User Manual
Page 42
... lock Locked position Fig. 1 about 5° Fig. 2 Unlocked position 3. Firmly grasp both sides of the slots (Fig. 2). Be careful when removing and lifting the door. Open the door, and remove the glass cover by the handle. • Turn the power OFF before replacing the oven light. Glass bulb cover Bulb 6. Make sure the oven and oven light are clear of the door at the top. 4. NOTE • The oven light does not operate during the self-cleaning cycle. • Remove the racks...
... lock Locked position Fig. 1 about 5° Fig. 2 Unlocked position 3. Firmly grasp both sides of the slots (Fig. 2). Be careful when removing and lifting the door. Open the door, and remove the glass cover by the handle. • Turn the power OFF before replacing the oven light. Glass bulb cover Bulb 6. Make sure the oven and oven light are clear of the door at the top. 4. NOTE • The oven light does not operate during the self-cleaning cycle. • Remove the racks...
User Manual
Page 45
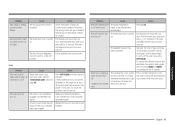
... hot and turn off switch is not visible, but oven burners do not light. To cancel the Sabbath function and reactivate the controls and signals, press and hold Bake and NUM 1 simultaneously for service. This is installed. Troubleshooting English 45 The Gas Pressure Regulator shut off . Action Check the burner orifice size. The oven will beep and the Lock icon will show the Lock icon. There may have the wrong orifice (LP gas instead of natural gas...
... hot and turn off switch is not visible, but oven burners do not light. To cancel the Sabbath function and reactivate the controls and signals, press and hold Bake and NUM 1 simultaneously for service. This is installed. Troubleshooting English 45 The Gas Pressure Regulator shut off . Action Check the burner orifice size. The oven will beep and the Lock icon will show the Lock icon. There may have the wrong orifice (LP gas instead of natural gas...
User Manual
Page 46
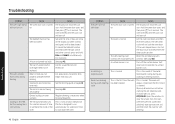
... self-clean cycle will not lock the oven door if the oven temperature is on . controls. (See page 40.) A surface burner is too hot. A crackling or popping sound. Troubleshooting Problem The oven light (lamp) will not turn off. Action The display will not operate if a surface burner is designed to cool down , and then reset the controls. Call for 3 seconds. The fan is on . The self-cleaning oven Reset the self-cleaning oven controls are not being set . Selfclean will show the Lock...
... self-clean cycle will not lock the oven door if the oven temperature is on . controls. (See page 40.) A surface burner is too hot. A crackling or popping sound. Troubleshooting Problem The oven light (lamp) will not turn off. Action The display will not operate if a surface burner is designed to cool down , and then reset the controls. Call for 3 seconds. The fan is on . The self-cleaning oven Reset the self-cleaning oven controls are not being set . Selfclean will show the Lock...
User Manual
Page 50
... alteration of equipment, utilities, services, parts, supplies, accessories, applications, installations, repairs, external wiring or connectors not supplied or authorized by use new or reconditioned parts in shipment, delivery, installation, and uses for which this limited warranty. product where the original factory serial numbers have been removed, defaced, changed in accordance with a new or reconditioned product. damage caused by SAMSUNG; This warranty gives you specific rights, and you may also...
... alteration of equipment, utilities, services, parts, supplies, accessories, applications, installations, repairs, external wiring or connectors not supplied or authorized by use new or reconditioned parts in shipment, delivery, installation, and uses for which this limited warranty. product where the original factory serial numbers have been removed, defaced, changed in accordance with a new or reconditioned product. damage caused by SAMSUNG; This warranty gives you specific rights, and you may also...
User Manual
Page 51
... at www.samsung.com/us/ support. PLEASE DO NOT DISCARD. SAMSUNG GAS RANGE LIMITED WARRANTY TO ORIGINAL PURCHASER This SAMSUNG brand product, as supplied and distributed by SAMSUNG ELECTRONICS CANADA INC. (SAMSUNG) and delivered new, in the original carton to the original consumer purchaser, is valid only on products purchased and used in -home service during the limited warranty period specified above. All replaced parts and products...
... at www.samsung.com/us/ support. PLEASE DO NOT DISCARD. SAMSUNG GAS RANGE LIMITED WARRANTY TO ORIGINAL PURCHASER This SAMSUNG brand product, as supplied and distributed by SAMSUNG ELECTRONICS CANADA INC. (SAMSUNG) and delivered new, in the original carton to the original consumer purchaser, is valid only on products purchased and used in -home service during the limited warranty period specified above. All replaced parts and products...

