User Manual
Page 4
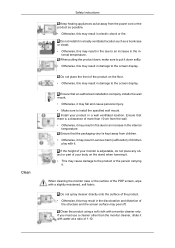
...height of your monitor is adjustable, do not place any object or part of more than the monitor cleaner, dilute it with it. Clean the product using a soft cloth with a slightly moistened, soft fabric. ternal temperature. Ensure that an authorized installation company installs the wall mount. • Otherwise, it may cause damage to the product or the person carrying it down , make... the screen display. Ensure that the packaging vinyl is a clearance of your product in damage to the screen display. Clean Safety Instructions Keep heating appliances as far away from the power cord or...
...height of your monitor is adjustable, do not place any object or part of more than the monitor cleaner, dilute it with it. Clean the product using a soft cloth with a slightly moistened, soft fabric. ternal temperature. Ensure that an authorized installation company installs the wall mount. • Otherwise, it may cause damage to the product or the person carrying it down , make... the screen display. Ensure that the packaging vinyl is a clearance of your product in damage to the screen display. Clean Safety Instructions Keep heating appliances as far away from the power cord or...
User Manual
Page 11
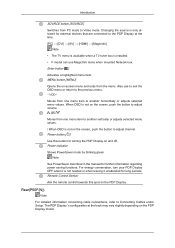
Changing the source is only allowed for turning the PDP Display on the screen, push the button to adjust volume. Also use MagicInfo menu when mounted Network box. When OSD is not on and off. Power button [ ] Use this spot on -screen menu and exits from one menu item to another horizontally or adjusts selected menu values. Rear(P50F(N)) Note For detailed information concerning cable connections, refer to Connecting Cables under Setup. Power indicator Shows PowerSaver mode by blinking green Note See...
Changing the source is only allowed for turning the PDP Display on the screen, push the button to adjust volume. Also use MagicInfo menu when mounted Network box. When OSD is not on and off. Power button [ ] Use this spot on -screen menu and exits from one menu item to another horizontally or adjusts selected menu values. Rear(P50F(N)) Note For detailed information concerning cable connections, refer to Connecting Cables under Setup. Power indicator Shows PowerSaver mode by blinking green Note See...
User Manual
Page 18
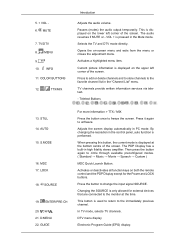
... in the control panel, auto function is performed. SOURCE 19. By changing the resolution in the "Channel List" menu. When pressing this button, the current mode is only allowed for the Power and LOCK buttons. Changing the SOURCE is displayed at the time. MENU 9. 10. COLOR BUTTONS 12. Activates a highlighted menu item. LOCK 18. Adjusts the screen display automatically in high fidelity stereo amplifier. DTV menu display Electronic Program Guide (EPG) display. TTX/MIX Introduction Adjusts the audio volume. Selects...
... in the control panel, auto function is performed. SOURCE 19. By changing the resolution in the "Channel List" menu. When pressing this button, the current mode is only allowed for the Power and LOCK buttons. Changing the SOURCE is displayed at the time. MENU 9. 10. COLOR BUTTONS 12. Activates a highlighted menu item. LOCK 18. Adjusts the screen display automatically in high fidelity stereo amplifier. DTV menu display Electronic Program Guide (EPG) display. TTX/MIX Introduction Adjusts the audio volume. Selects...
User Manual
Page 19
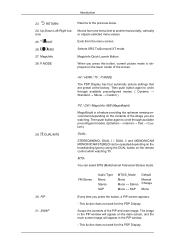
EXIT 26. P.MODE Returns to another horizontally, vertically or adjusts selected menu values. MagicInfo Quick Launch Button. AV / HDMI / TV : P.MODE The PDP Display has four automatic picture settings that are watching. MTS- You can be operated depending on the broadcasting type by using the DUAL button on the main screen, and the main screen image will appear in the PIP window. - SRS 27. Moves from the menu screen. When you...
EXIT 26. P.MODE Returns to another horizontally, vertically or adjusts selected menu values. MagicInfo Quick Launch Button. AV / HDMI / TV : P.MODE The PDP Display has four automatic picture settings that are watching. MTS- You can be operated depending on the broadcasting type by using the DUAL button on the main screen, and the main screen image will appear in the PIP window. - SRS 27. Moves from the menu screen. When you...
User Manual
Page 33
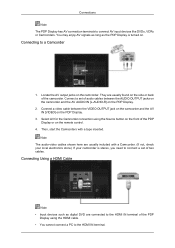
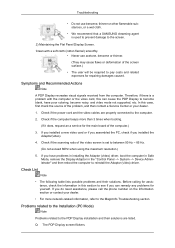
... turned on the camcorder. Connections Note The PDP Display has AV connection terminals to a Camcorder 1. They are usually found on the remote control. 4. Connect a set of the PDP Display using the Source button on the front of the PDP Display or on the side or back of audio cables between the VIDEO OUTPUT jack on the camcorder and the AV IN [VIDEO] on the PDP Display. 2. Connecting Using a HDMI Cable Note • Input...
... turned on the camcorder. Connections Note The PDP Display has AV connection terminals to a Camcorder 1. They are usually found on the remote control. 4. Connect a set of the PDP Display using the Source button on the front of the PDP Display or on the side or back of audio cables between the VIDEO OUTPUT jack on the camcorder and the AV IN [VIDEO] on the PDP Display. 2. Connecting Using a HDMI Cable Note • Input...
User Manual
Page 49
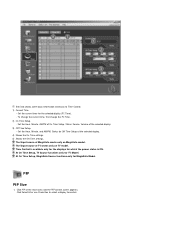
... control screen appears. Click Select All or use Check Box to select a display to Time Control. 1) Current Time - Time Control is available only for the displays for MagicInfo Model. Click PIP of TV works only on MagicInfo model. To change the current time, first change the PC Time. 2) On Time Setup - At On Time Setup, TV Source functions only for the selected display (PC Time). - PIP PIP Size 1. Set...
... control screen appears. Click Select All or use Check Box to select a display to Time Control. 1) Current Time - Time Control is available only for the displays for MagicInfo Model. Click PIP of TV works only on MagicInfo model. To change the current time, first change the PC Time. 2) On Time Setup - At On Time Setup, TV Source functions only for the selected display (PC Time). - PIP PIP Size 1. Set...
User Manual
Page 58
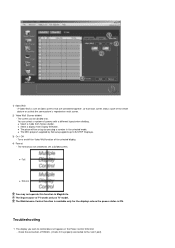
.... Turns on each screen. 2) Video Wall (Screen divider) - z Full z Natural You may not operate this function in the selected mode. Check the connection of RS232C. (Check if it is ON. 1) Video Wall - The display you wish to 5x5 PDP Displayes. 3) On / Off - You can select a number of the selected display. 4) Format - The Input source of the whole picture or so that each screen shows a part of TV works only on the Power Control...
.... Turns on each screen. 2) Video Wall (Screen divider) - z Full z Natural You may not operate this function in the selected mode. Check the connection of RS232C. (Check if it is ON. 1) Video Wall - The display you wish to 5x5 PDP Displayes. 3) On / Off - You can select a number of the selected display. 4) Format - The Input source of the whole picture or so that each screen shows a part of TV works only on the Power Control...
User Manual
Page 64
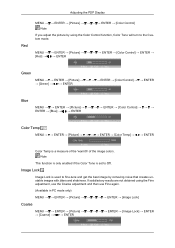
... not obtained using the Color Control function, Color Tone will turn to Off. Adjusting the PDP Display Red MENU → → ENTER → [Picture ENTER → [Color Control] Note If you adjust the picture by removing noise that creates unstable images with jitters and shakiness. Note This function is only enabled if the Color Tone is set to the Custom mode. Image Lock Image Lock is a measure of the 'warmth' of the image colors. MENU →...
... not obtained using the Color Control function, Color Tone will turn to Off. Adjusting the PDP Display Red MENU → → ENTER → [Picture ENTER → [Color Control] Note If you adjust the picture by removing noise that creates unstable images with jitters and shakiness. Note This function is only enabled if the Color Tone is set to the Custom mode. Image Lock Image Lock is a measure of the 'warmth' of the image colors. MENU →...
User Manual
Page 74
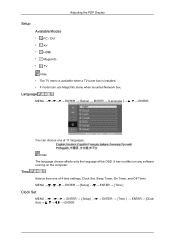
... Display Setup Available Modes • PC / DVI • AV • HDMI • MagicInfo • TV Note • The TV menu is available when a TV tuner box is installed. • F model can choose one of 4 time settings, Clock Set, Sleep Timer, On Timer, and Off Timer. It has no effect on any software running on the computer. Time Selects from one of the OSD. MENU...
... Display Setup Available Modes • PC / DVI • AV • HDMI • MagicInfo • TV Note • The TV menu is available when a TV tuner box is installed. • F model can choose one of 4 time settings, Clock Set, Sleep Timer, On Timer, and Off Timer. It has no effect on any software running on the computer. Time Selects from one of the OSD. MENU...
User Manual
Page 77
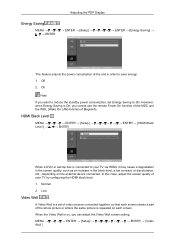
... screen shows a part of the whole picture or where the same picture is On, you can adjust the Video Wall screen setting. When the Video Wall is connected to your TV by configuring the HDMI black level. 1. MENU ENTER → [Setup ENTER → [Video Wall ] Off 2. Adjusting the PDP Display Energy Saving MENU ENTER → [Setup ENTER → [Energy Saving] → , → ENTER This feature adjusts the power consumption of the unit in the black level, a low contrast...
... screen shows a part of the whole picture or where the same picture is On, you can adjust the Video Wall screen setting. When the Video Wall is connected to your TV by configuring the HDMI black level. 1. MENU ENTER → [Setup ENTER → [Video Wall ] Off 2. Adjusting the PDP Display Energy Saving MENU ENTER → [Setup ENTER → [Energy Saving] → , → ENTER This feature adjusts the power consumption of the unit in the black level, a low contrast...
User Manual
Page 87
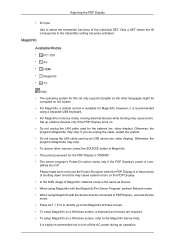
... preset password for the PDP Display is "000000". • The server program's Power-On option works only if the PDP Display's power is highly recommended not to select the transmitter functions of shutting down since this set only supports English so the other sources, press the SOURCE button in the process of the individual SET. It is com- Adjusting the PDP Display • ID Input Use to turn...
... preset password for the PDP Display is "000000". • The server program's Power-On option works only if the PDP Display's power is highly recommended not to select the transmitter functions of shutting down since this set only supports English so the other sources, press the SOURCE button in the process of the individual SET. It is com- Adjusting the PDP Display • ID Input Use to turn...

User Manual
Page 100
... the power cord. Note Refer to change the screen resolution or stay in the Self-Test mode, the LED power indicator remains green and the figure moves around on both your video controller and computer system; The figure shown below ("Check Signal Cable") appears on the PDP Display. Self-Test Feature Check 1. Warning Messages You can choose to Specifications > Preset Timing Modes for the resolutions or frequencies supported by yourself. Troubleshooting Self...
... the power cord. Note Refer to change the screen resolution or stay in the Self-Test mode, the LED power indicator remains green and the figure moves around on both your video controller and computer system; The figure shown below ("Check Signal Cable") appears on the PDP Display. Self-Test Feature Check 1. Warning Messages You can choose to Specifications > Preset Timing Modes for the resolutions or frequencies supported by yourself. Troubleshooting Self...
User Manual
Page 101
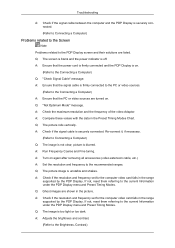
... PDP Display installation and their solutions. Check if the power cord and the video cables are listed. Q: The PDP Display screen flickers. Check List Note • The following table lists possible problems and their solutions are properly connected to between 50 Hz ~ 85 Hz. (Do not exceed 60Hz when using the maximum resolution.) 5. If you installed a new video card or if you assembled the PC, check if you do need assistance...
... PDP Display installation and their solutions. Check if the power cord and the video cables are listed. Q: The PDP Display screen flickers. Check List Note • The following table lists possible problems and their solutions are properly connected to between 50 Hz ~ 85 Hz. (Do not exceed 60Hz when using the maximum resolution.) 5. If you installed a new video card or if you assembled the PC, check if you do need assistance...
User Manual
Page 102
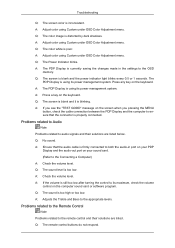
... too light or too dark. A: Ensure that the power cord is firmly connected and the PDP Display is on again after removing all accessories (video extension cable, etc.) A: Set the resolution and frequency to the Connecting a Computer) Q: "Check Signal Cable" message. A: Check the maximum resolution and the frequency of the video Adaptor. A: Turn on . (Refer to the recommended ranges. Q: The image is off. A: Run Frequency Coarse and Fine tuning. Q: The picture image is securely connected. A: Ensure...
... too light or too dark. A: Ensure that the power cord is firmly connected and the PDP Display is on again after removing all accessories (video extension cable, etc.) A: Set the resolution and frequency to the Connecting a Computer) Q: "Check Signal Cable" message. A: Check the maximum resolution and the frequency of the video Adaptor. A: Turn on . (Refer to the recommended ranges. Q: The image is off. A: Run Frequency Coarse and Fine tuning. Q: The picture image is securely connected. A: Ensure...
User Manual
Page 103
... using Custom under OSD Color Adjustment menu. A: Adjust color using its maximum, check the volume control on the computer sound card or software program. A: The PDP Display is still too low after turning the control to audio signals and their solutions are listed below. A: Ensure that the connector is firmly connected to both the audio-in the settings to the remote control and their solutions are listed. Q: The sound is too low. Q: The color image is blinking. A: Check the volume level. A: Adjusts...
... using Custom under OSD Color Adjustment menu. A: Adjust color using its maximum, check the volume control on the computer sound card or software program. A: The PDP Display is still too low after turning the control to audio signals and their solutions are listed below. A: Ensure that the connector is firmly connected to both the audio-in the settings to the remote control and their solutions are listed. Q: The sound is too low. Q: The color image is blinking. A: Check the volume level. A: Adjusts...
User Manual
Page 104
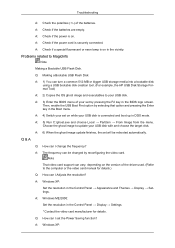
... the OS ghost image and executables to the computer or the video card manual for details. A: 4) Switch your USB disk. A: Windows ME/2000: Set the resolution in the BIOS logo screen. Q: How can vary, depending on . Note That video card support can I change the frequency? A: Windows XP: Q & A Q: How can I set will be changed by pressing the F2 key in the Control Panel → Display → Settings. * Contact the video card manufacturer for details.) Q: How...
... the OS ghost image and executables to the computer or the video card manual for details. A: 4) Switch your USB disk. A: Windows ME/2000: Set the resolution in the BIOS logo screen. Q: How can vary, depending on . Note That video card support can I change the frequency? A: Windows XP: Q & A Q: How can I set will be changed by pressing the F2 key in the Control Panel → Display → Settings. * Contact the video card manufacturer for details.) Q: How...
User Manual
Page 107
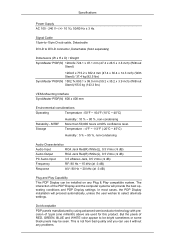
...(N) 1502.7x 893.1 x 99.0 mm (59.2 x 35.2 x 3.9 inch) (Without Stand)/ 65.0 kg (143.3 lbs) VESA Mounting Interface SyncMaster P50F(N) 600 x 400 mm Environmental considerations Operating Temperature : 50°F ~ 104°F (10°C ~ 40°C) Reliability - But the pixels of RED, GREEN, BLUE and WHITE color appear to be bright sometimes or some black pixels may be installed on any problems. This is not from bad quality and...
...(N) 1502.7x 893.1 x 99.0 mm (59.2 x 35.2 x 3.9 inch) (Without Stand)/ 65.0 kg (143.3 lbs) VESA Mounting Interface SyncMaster P50F(N) 600 x 400 mm Environmental considerations Operating Temperature : 50°F ~ 104°F (10°C ~ 40°C) Reliability - But the pixels of RED, GREEN, BLUE and WHITE color appear to be bright sometimes or some black pixels may be installed on any problems. This is not from bad quality and...
User Manual
Page 111
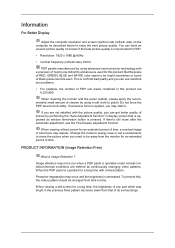
... an uneven picture quality on the computer as described below to be seen. When cleaning the monitor and the panel outside, please apply the recommended small amount of RED, GREEN, BLUE and WHITE color seem to time. Image retention may appear. If there's still noise after the automatic adjustment, use it . But the pixels of cleaner by using a soft cloth to polish. When viewing a fixed screen for...
... an uneven picture quality on the computer as described below to be seen. When cleaning the monitor and the panel outside, please apply the recommended small amount of RED, GREEN, BLUE and WHITE color seem to time. Image retention may appear. If there's still noise after the automatic adjustment, use it . But the pixels of cleaner by using a soft cloth to polish. When viewing a fixed screen for...
User Manual
Page 113
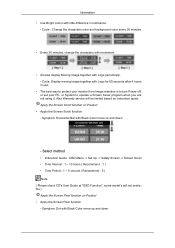
... to turn Power off, or set your PC, or System to operate a Screen Saver program when you are not using it. Symptom: Horizontal Bar with Logo periodically. - Cycle : Change the characters color and background color every 30 minutes • Every 30 minutes, change the characters with movement. • All area display Moving image together with Black Color move up and down . Select method • Instruction Guide : OSD Menu -> Set...
... to turn Power off, or set your PC, or System to operate a Screen Saver program when you are not using it. Symptom: Horizontal Bar with Logo periodically. - Cycle : Change the characters color and background color every 30 minutes • Every 30 minutes, change the characters with movement. • All area display Moving image together with Black Color move up and down . Select method • Instruction Guide : OSD Menu -> Set...
User Manual
Page 114
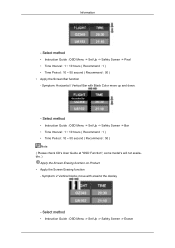
... : 10 ~ 50 second ( Recommend : 50 ) Note ( Please check CD's User Guide at "OSD Function", some model's will not available. ) Apply the Screen Erasing function on Product • Apply the Screen Erasing function - Symptom: 2 Vertical blocks move up and down. - Symptom: Horizontal / Vertical Bar with Black Color move with erasing the display - Select method • Instruction Guide : OSD Menu -> Set Up -> Safety Screen -> Pixel • Time Interval : 1 ~ 10 hours ( Recommend : 1 ) •...
... : 10 ~ 50 second ( Recommend : 50 ) Note ( Please check CD's User Guide at "OSD Function", some model's will not available. ) Apply the Screen Erasing function on Product • Apply the Screen Erasing function - Symptom: 2 Vertical blocks move up and down. - Symptom: Horizontal / Vertical Bar with Black Color move with erasing the display - Select method • Instruction Guide : OSD Menu -> Set Up -> Safety Screen -> Pixel • Time Interval : 1 ~ 10 hours ( Recommend : 1 ) •...


