User Manual
Page 3
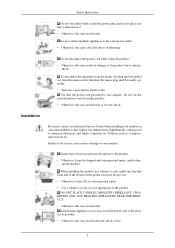
... to electric shock. Use only the power cord provided by our company. Installation Be sure to contact an authorized Service Center when installing your monitor. When installing the product in a cabinet or rack, make sure that at airports, train stations etc. DO NOT PLACE CANDLES, MOSQUITO REPELLANT... may result in damage to the product due to the same power outlet. • Otherwise, this may result in fire. Failure to your monitor in a location with heavy dust, high or low temperatures, high humidity, and exposed to chemical substances and where it operates for 24 hours such...
... to electric shock. Use only the power cord provided by our company. Installation Be sure to contact an authorized Service Center when installing your monitor. When installing the product in a cabinet or rack, make sure that at airports, train stations etc. DO NOT PLACE CANDLES, MOSQUITO REPELLANT... may result in damage to the product due to the same power outlet. • Otherwise, this may result in fire. Failure to your monitor in a location with heavy dust, high or low temperatures, high humidity, and exposed to chemical substances and where it operates for 24 hours such...

User Manual
Page 4
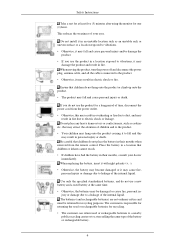
... the product on the stand when lowering it. • This may cause damage to the screen display. When cleaning the monitor case or the surface of more than the monitor cleaner, dilute it may result in fire. 3 Do not spray cleaner directly onto the surface of the product. •...you must use a cleaner other than 10 cm from children. • Otherwise, it with a slightly moistened, soft fabric. If the height of your monitor is kept away from the wall. • Otherwise, it down softly. • Otherwise, this may result in serious harm (suffocation) if children play with...
... the product on the stand when lowering it. • This may cause damage to the screen display. When cleaning the monitor case or the surface of more than the monitor cleaner, dilute it may result in fire. 3 Do not spray cleaner directly onto the surface of the product. •...you must use a cleaner other than 10 cm from children. • Otherwise, it with a slightly moistened, soft fabric. If the height of your monitor is kept away from the wall. • Otherwise, it down softly. • Otherwise, this may result in serious harm (suffocation) if children play with...

User Manual
Page 6
..., do not turn the volume too high. • Having the sound too loud may damage your hearing. Safety Instructions Do not try to move the monitor by a table or curtain. • Otherwise, it may result in fire due to the product. • Otherwise, your eyesight may be failing. 5 Do not use...
..., do not turn the volume too high. • Having the sound too loud may damage your hearing. Safety Instructions Do not try to move the monitor by a table or curtain. • Otherwise, it may result in fire due to the product. • Otherwise, your eyesight may be failing. 5 Do not use...
User Manual
Page 7
... selling the same type of the battery or rechargeable battery. 6 If you use a new battery and a used battery at least five (5) minutes after using the monitor for recycling. • The customer can return used or rechargeable batteries for one (1) hour. The batteries (and rechargeable batteries) are not ordinary refuse and must...
... selling the same type of the battery or rechargeable battery. 6 If you use a new battery and a used battery at least five (5) minutes after using the monitor for recycling. • The customer can return used or rechargeable batteries for one (1) hour. The batteries (and rechargeable batteries) are not ordinary refuse and must...

User Manual
Page 13
... Connection Terminal (Input)) DVI / PC / HDMI IN [HDMI] Connect the HDMI terminal at the back of your PDP Display to the HDMI terminal of your monitor to the video output terminal of the external device using a HDMI cable. AV AUDIO IN [L- AUDIO - AUDIO - R] Headphone output terminal. 12 AUDIO OUT [L- DVI / PC...
... Connection Terminal (Input)) DVI / PC / HDMI IN [HDMI] Connect the HDMI terminal at the back of your PDP Display to the HDMI terminal of your monitor to the video output terminal of the external device using a HDMI cable. AV AUDIO IN [L- AUDIO - AUDIO - R] Headphone output terminal. 12 AUDIO OUT [L- DVI / PC...
User Manual
Page 14
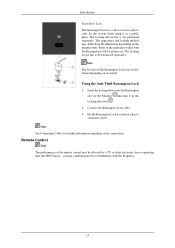
... the system when using it in a public place. Using the Anti-Theft Kensington Lock 1. The appearance and locking method may be different depending on the Monitor and turn it in the locking direction . 2. Remote Control Note The performance of the Kensington Lock may differ from the illustration depending on the manufacturer...
... the system when using it in a public place. Using the Anti-Theft Kensington Lock 1. The appearance and locking method may be different depending on the Monitor and turn it in the locking direction . 2. Remote Control Note The performance of the Kensington Lock may differ from the illustration depending on the manufacturer...

User Manual
Page 16
... left corner of the screen. Opens the on both the remote control and the PDP Display except for external devices that are connected to the monitor at the bottom centre of the screen. Current picture information is displayed on the upper left corner of the screen. The PDP Display has a ...built-in the control panel, auto function is pressed in PC mode. This button is only allowed for the Power and LOCK buttons. 4. MENU 9. 10. TTX/MIX 13. SOURCE ...
... left corner of the screen. Opens the on both the remote control and the PDP Display except for external devices that are connected to the monitor at the bottom centre of the screen. Current picture information is displayed on the upper left corner of the screen. The PDP Display has a ...built-in the control panel, auto function is pressed in PC mode. This button is only allowed for the Power and LOCK buttons. 4. MENU 9. 10. TTX/MIX 13. SOURCE ...
User Manual
Page 58
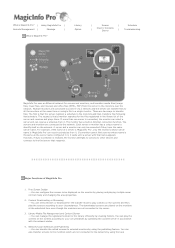
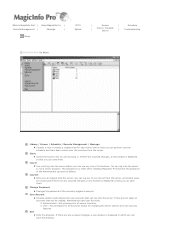
... Pro? | Using MagicInfo Pro | Remote Management | Message | What is 'MagicInfo Pro' can receive a schedule from the server to the monitors over the network. Library Option | Screen | | Client / Contents | Server Schedule Troubleshooting MagicInfo Pro uses an Ethernet network for the transfer ...connect to other servers and connects to be connected if they have the same server name. Each server or monitor has a unique name to a single monitor. A server and a monitor can configure the screens to the first server that schedule. However, if Auto Connection is that the server...
... Pro? | Using MagicInfo Pro | Remote Management | Message | What is 'MagicInfo Pro' can receive a schedule from the server to the monitors over the network. Library Option | Screen | | Client / Contents | Server Schedule Troubleshooting MagicInfo Pro uses an Ethernet network for the transfer ...connect to other servers and connects to be connected if they have the same server name. Each server or monitor has a unique name to a single monitor. A server and a monitor can configure the screens to the first server that schedule. However, if Auto Connection is that the server...

User Manual
Page 59
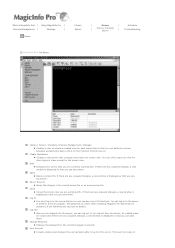
The PXE allows you to recover the operating system image for a monitor. Instants message → You can display a message on the monitor. MDC and System → The MDC and System functions allow you to control, view the status of, and diagnose monitors. 7. VNC → The VNC function allows you to a monitor remotely and view the status of schedules. 6. Update and PXE → The Update function allows you to connect to easily update the programs on selected monitors regardless of and control and diagnose it. 8. schedules. 5.
The PXE allows you to recover the operating system image for a monitor. Instants message → You can display a message on the monitor. MDC and System → The MDC and System functions allow you to control, view the status of, and diagnose monitors. 7. VNC → The VNC function allows you to a monitor remotely and view the status of schedules. 6. Update and PXE → The Update function allows you to connect to easily update the programs on selected monitors regardless of and control and diagnose it. 8. schedules. 5.
User Manual
Page 60
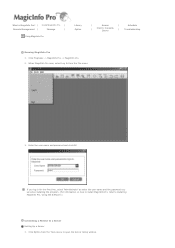
... the password you set when installing the program. (For information on how to install MagicInfo Pro, refer to Installing MagicInfo Pro, Using the Software.) Connecting a Monitor to open the Server Setup window. Click Programs -> MagicInfo Pro -> MagicInfo Pro. 2. Enter the user name and password and click OK. When MagicInfo Pro runs...
... the password you set when installing the program. (For information on how to install MagicInfo Pro, refer to Installing MagicInfo Pro, Using the Software.) Connecting a Monitor to open the Server Setup window. Click Programs -> MagicInfo Pro -> MagicInfo Pro. 2. Enter the user name and password and click OK. When MagicInfo Pro runs...
User Manual
Page 61
...select 'Automatic connection using the Setup menu or the Network Connection item. If the server and monitor are on the monitor identical to enter this time, the IP address of the server which the monitor will connect to the description of the Network Connection item as the connection method. When setting ...same network, make sure to MagicInfo Pro and then enter the IP address and server name using a server name' in the Value field of the monitor in the Network Device item. 4. Make sure to the name of the Server Name item. 3. If the server is more information, refer to ...
...select 'Automatic connection using the Setup menu or the Network Connection item. If the server and monitor are on the monitor identical to enter this time, the IP address of the server which the monitor will connect to the description of the Network Connection item as the connection method. When setting ...same network, make sure to MagicInfo Pro and then enter the IP address and server name using a server name' in the Value field of the monitor in the Network Device item. 4. Make sure to the name of the Server Name item. 3. If the server is more information, refer to ...
User Manual
Page 62
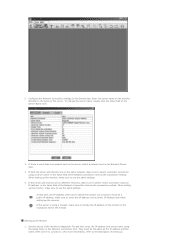
Select Library from the displayed menu to register it to the library. Right-click on the server. 3. Select a photo file, music file, movie file, document, or Flash file etc. A message is displayed to notify that the monitor is successfully connected to open the Library View. 2. File Sub-Menus Registering a Library 1. on the selected file and select Send To Library from the File menu to the server. MagicInfo in the OSD pages.) 2.
Select Library from the displayed menu to register it to the library. Right-click on the server. 3. Select a photo file, music file, movie file, document, or Flash file etc. A message is displayed to notify that the monitor is successfully connected to open the Library View. 2. File Sub-Menus Registering a Library 1. on the selected file and select Send To Library from the File menu to the server. MagicInfo in the OSD pages.) 2.

User Manual
Page 63
..., Movie, Flash, Web, Text, or Source from the File menu to the Tree View in step 2. You can select a file by the monitor when the Operating Mode of the monitor is set to Player or is set the area for the file to set , tree items are used when registering a screen. The...
..., Movie, Flash, Web, Text, or Source from the File menu to the Tree View in step 2. You can select a file by the monitor when the Operating Mode of the monitor is set to Player or is set the area for the file to set , tree items are used when registering a screen. The...

User Manual
Page 64
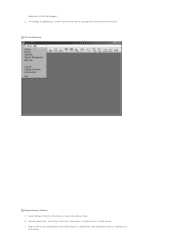
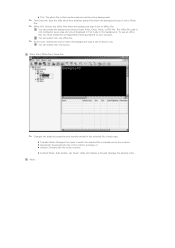
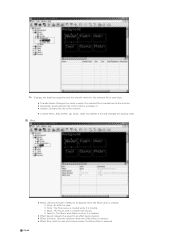
Registering a Schedule 1. The Operating Mode of the selected monitors must be set to display the saved screen on a monitor(s). Right-click the Edit View and select Add from the File menu to be registered in the Edit View at the left. Register a schedule to ...Schedule if they can only select the schedules for the screens you saved using the Screen menu. Select the monitors to which the schedule is to be performed. After finishing registering areas, select Save from the File menu to register other areas on the server...
Registering a Schedule 1. The Operating Mode of the selected monitors must be set to display the saved screen on a monitor(s). Right-click the Edit View and select Add from the File menu to be registered in the Edit View at the left. Register a schedule to ...Schedule if they can only select the schedules for the screens you saved using the Screen menu. Select the monitors to which the schedule is to be performed. After finishing registering areas, select Save from the File menu to register other areas on the server...

User Manual
Page 65
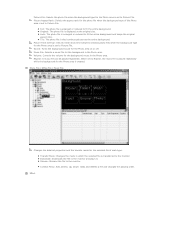
Sending a Message 1. Configure the settings for the message in the toolbar under the menu bar. Select the checkbox next to the monitors for which you want to change the date or time of the schedule, drag it to register a message. 3. Select Message from the Tools menu. Select... the checkbox next to the monitors for which will be displayed on the selected monitors, click the Send Message icon in the List View at the bottom right. If you enter here will be displayed on...
Sending a Message 1. Configure the settings for the message in the toolbar under the menu bar. Select the checkbox next to the monitors for which you want to change the date or time of the schedule, drag it to register a message. 3. Select Message from the Tools menu. Select... the checkbox next to the monitors for which will be displayed on the selected monitors, click the Send Message icon in the List View at the bottom right. If you enter here will be displayed on...
User Manual
Page 67
... out from the server. Close z Closes the screen view you are working in which you can perform a screen schedule and have basic control over the monitors from the server, all functions except for changing the server options and user account features. If there are two types of its functions. Exit z Exits...
... out from the server. Close z Closes the screen view you are working in which you can perform a screen schedule and have basic control over the monitors from the server, all functions except for changing the server options and user account features. If there are two types of its functions. Exit z Exits...
User Manual
Page 79
... screen view to perform a server program. Save / Save As z Saves the changes in account. You can perform a screen schedule and performs basic control for the monitors from the server, all created views are closed and if there are working with . If you can save them . What is MagicInfo Pro? | Using MagicInfo...
... screen view to perform a server program. Save / Save As z Saves the changes in account. You can perform a screen schedule and performs basic control for the monitors from the server, all created views are closed and if there are working with . If you can save them . What is MagicInfo Pro? | Using MagicInfo...
User Manual
Page 84
...set to Source List. You can select only one source. z Transfer Mode: Changes the mode in the background. z Download: Downloads the file to the monitor. You can create the background using a Power Point, Excel, Word, or PDF file. z Stream: Streams the file to Office File. The office file... Down: Adds and deletes a file and changes the playing order. Office File: Selects the office files when the background type is set to the monitor. Photo File / Office File / Music File Changes the detailed properties and transfer mode for the selected file of each type. Source List: Selects...
...set to Source List. You can select only one source. z Transfer Mode: Changes the mode in the background. z Download: Downloads the file to the monitor. You can create the background using a Power Point, Excel, Word, or PDF file. z Stream: Streams the file to Office File. The office file... Down: Adds and deletes a file and changes the playing order. Office File: Selects the office files when the background type is set to the monitor. Photo File / Office File / Music File Changes the detailed properties and transfer mode for the selected file of each type. Source List: Selects...
User Manual
Page 88
...Volume: Controls the volume for the selected file of the Photo area is transferred to the monitor. z Auto: The photo file is set to Picture File. Repeat: A music file can be played repeatedly.... z Download: Downloads the file to the monitor. z Original: The photo file is tiled continuously across the entire background. Photo File / Office File ... file for the Photo area on or off. z Stream: Streams the file to the monitor and plays it. Picture File: Selects the photo file when the background type for the Photo area is...
...Volume: Controls the volume for the selected file of the Photo area is transferred to the monitor. z Auto: The photo file is set to Picture File. Repeat: A music file can be played repeatedly.... z Download: Downloads the file to the monitor. z Original: The photo file is tiled continuously across the entire background. Photo File / Office File ... file for the Photo area on or off. z Stream: Streams the file to the monitor and plays it. Picture File: Selects the photo file when the background type for the Photo area is...
User Manual
Page 92
...z Effect Direction: Sets the direction when the Slide effect is selected. z Download: Downloads the file to the monitor. Effect Flash z Effect: Selects the type of each type. z Stream: Streams the file to the monitor and plays it is moving. { Block: The Movie area is created with blocks. { Fade In: The... Movie area fades in which the selected file is transferred to the monitor. z Effect Size: Sets the size of an effect being created. Changes the detailed properties and the transfer mode for the selected file of effect to...
...z Effect Direction: Sets the direction when the Slide effect is selected. z Download: Downloads the file to the monitor. Effect Flash z Effect: Selects the type of each type. z Stream: Streams the file to the monitor and plays it is moving. { Block: The Movie area is created with blocks. { Fade In: The... Movie area fades in which the selected file is transferred to the monitor. z Effect Size: Sets the size of an effect being created. Changes the detailed properties and the transfer mode for the selected file of effect to...


