
Open Source Guide (ENGLISH)
Page 1
... copy or copies of the Program or any portion of it, thus forming a work based on what is believed to using it. (Some other Free Software Foundation software is covered by the GNU Lesser General Public License instead.) You can change it. To prevent this, we want to control the distribution of derivative or collective works based on a medium customarily...
... copy or copies of the Program or any portion of it, thus forming a work based on what is believed to using it. (Some other Free Software Foundation software is covered by the GNU Lesser General Public License instead.) You can change it. To prevent this, we want to control the distribution of derivative or collective works based on a medium customarily...
Open Source Guide (ENGLISH)
Page 2
... to be of the greatest possible use to the public, we recommend making it free software that everyone can do so by permitting redistribution under the terms of warranty; It is found. You can redistribute and change. and each file should have at least the "copyright" line and a pointer to where the ...OR CONSEQUENTIAL DAMAGES ARISING OUT OF THE USE OR INABILITY TO USE THE LIBRARY (INCLUDING BUT NOT LIMITED TO LOSS OF DATA OR DATA BEING RENDERED INACCURATE OR LOSSES SUSTAINED BY YOU OR THIRD PARTIES OR A FAILURE OF THE LIBRARY TO OPERATE WITH ANY OTHER SOFTWARE), EVEN IF SUCH HOLDER OR OTHER ...
... to be of the greatest possible use to the public, we recommend making it free software that everyone can do so by permitting redistribution under the terms of warranty; It is found. You can redistribute and change. and each file should have at least the "copyright" line and a pointer to where the ...OR CONSEQUENTIAL DAMAGES ARISING OUT OF THE USE OR INABILITY TO USE THE LIBRARY (INCLUDING BUT NOT LIMITED TO LOSS OF DATA OR DATA BEING RENDERED INACCURATE OR LOSSES SUSTAINED BY YOU OR THIRD PARTIES OR A FAILURE OF THE LIBRARY TO OPERATE WITH ANY OTHER SOFTWARE), EVEN IF SUCH HOLDER OR OTHER ...

User Manual (user Manual) (ver.1.0) (English)
Page 3
... plug will provide convenient, dependable service and enjoyment for ventilation to -use instructions. • Unplug the TV receiver from the type of the best products in mind when installing, using your safety, this TV is a possibility, such as near a radiator or heat register. We designed it one of power source indicated on -screen menus and closed captioning capabilities, making it with slots in...
... plug will provide convenient, dependable service and enjoyment for ventilation to -use instructions. • Unplug the TV receiver from the type of the best products in mind when installing, using your safety, this TV is a possibility, such as near a radiator or heat register. We designed it one of power source indicated on -screen menus and closed captioning capabilities, making it with slots in...

User Manual (user Manual) (ver.1.0) (English)
Page 4
... of antenna discharge unit, connection to an antenna discharge unit, size of grounding conductors, location of time. if the TV has been exposed to service the TV yourself. This television receiver provides display of television closed captioning in wire to grounding electrodes, and requirements for the grounding electrode. 2 SAFETY • Protect the power cord. When installing an outside antenna or cable system is connected to the TV, be sure the service technician uses replacement parts specified...
... of antenna discharge unit, connection to an antenna discharge unit, size of grounding conductors, location of time. if the TV has been exposed to service the TV yourself. This television receiver provides display of television closed captioning in wire to grounding electrodes, and requirements for the grounding electrode. 2 SAFETY • Protect the power cord. When installing an outside antenna or cable system is connected to the TV, be sure the service technician uses replacement parts specified...

User Manual (user Manual) (ver.1.0) (English)
Page 5
... your dealer or an experienced radio/television technician for help. For 240 Volt applications use only UL Listed detachable power cord with SWEDAC (MPR II) recommendations for products marked with the instructions, may not cause harmful interference, and (2) this device must use shielded signal interface cables to operate the equipment. MPR II Compliance This monitor complies with NEMA configuration 5-15P type...
... your dealer or an experienced radio/television technician for help. For 240 Volt applications use only UL Listed detachable power cord with SWEDAC (MPR II) recommendations for products marked with the instructions, may not cause harmful interference, and (2) this device must use shielded signal interface cables to operate the equipment. MPR II Compliance This monitor complies with NEMA configuration 5-15P type...

User Manual (user Manual) (ver.1.0) (English)
Page 6
... Camcorder 2.7 Installing Batteries in the Remote Control 2.8 Chapter 3: Operation 3.1 Turning the TV On and Off 3.1 Adjusting basic convergence 3.1 Adjust Red Convergence 3.2 Adjust Blue Convergence 3.2 Viewing the Menus and On-Screen Displays 3.3 Viewing the Menus 3.3 Viewing the Display 3.3 Selecting a Menu Language 3.4 Memorizing the Channels 3.5 Selecting the Video Signal-source 3.5 Storing Channels in Memory (Automatic Method 3.6 Adding and Erasing Channels (Manual Method 3.7 Changing Channels 3.7 Using the Channel Buttons 3.7 Directly Accessing Channels 3.7 Setting the...
... Camcorder 2.7 Installing Batteries in the Remote Control 2.8 Chapter 3: Operation 3.1 Turning the TV On and Off 3.1 Adjusting basic convergence 3.1 Adjust Red Convergence 3.2 Adjust Blue Convergence 3.2 Viewing the Menus and On-Screen Displays 3.3 Viewing the Menus 3.3 Viewing the Display 3.3 Selecting a Menu Language 3.4 Memorizing the Channels 3.5 Selecting the Video Signal-source 3.5 Storing Channels in Memory (Automatic Method 3.6 Adding and Erasing Channels (Manual Method 3.7 Changing Channels 3.7 Using the Channel Buttons 3.7 Directly Accessing Channels 3.7 Setting the...

User Manual (user Manual) (ver.1.0) (English)
Page 7
... DVD 4.1 Setting Up Your Remote Control to Operate Your Cable Box 4.2 Setting the On/Off Timer 4.4 Setting the Sleep Timer 4.5 Viewing Closed Captions 4.6 Fine Tuning Channels 4.7 LNA(Low Noise Amplifier 4.8 Special Audio Options: Dolby Surround, MTS, and Headphones . . . 4.9 Dolby Prologic 4.9 Dolby 3D Phonic 4.10 Choosing a Multi-Channel Sound (MTS) Soundtrack. . . . . 4.11 Using Wireless Headphones 4.12 Setting up Wireless Headphones with Picture-in-Picture. . . . 4.12 Viewing Picture-in-Picture 4.13 Activating Picture-in-Picture 4.13 Selecting a Signal Source (Antenna or Cable...
... DVD 4.1 Setting Up Your Remote Control to Operate Your Cable Box 4.2 Setting the On/Off Timer 4.4 Setting the Sleep Timer 4.5 Viewing Closed Captions 4.6 Fine Tuning Channels 4.7 LNA(Low Noise Amplifier 4.8 Special Audio Options: Dolby Surround, MTS, and Headphones . . . 4.9 Dolby Prologic 4.9 Dolby 3D Phonic 4.10 Choosing a Multi-Channel Sound (MTS) Soundtrack. . . . . 4.11 Using Wireless Headphones 4.12 Setting up Wireless Headphones with Picture-in-Picture. . . . 4.12 Viewing Picture-in-Picture 4.13 Activating Picture-in-Picture 4.13 Selecting a Signal Source (Antenna or Cable...

User Manual (user Manual) (ver.1.0) (English)
Page 9
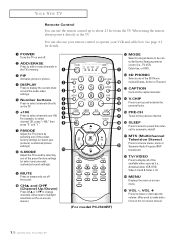
... the power is turned off . ´ TIMER indicator When the TV is set before using this button to select items on the on -screen menu. This indicator illuminates when the TIMER mode is turned on, the TIMER indicator blinks ten times. Also press to highlight various items on the on-screen menu. ˆ MENU Press to see an on-screen menu of all the available signal sources. Also used to display a menu of your TV...
... the power is turned off . ´ TIMER indicator When the TV is set before using this button to select items on the on -screen menu. This indicator illuminates when the TIMER mode is turned on, the TIMER indicator blinks ten times. Also press to highlight various items on the on-screen menu. ˆ MENU Press to see an on-screen menu of all the available signal sources. Also used to display a menu of your TV...

User Manual (user Manual) (ver.1.0) (English)
Page 11
... audio output jacks of a DVD player & SET-TOP BOX. ' DTV INPUT (For models PCJ532RF/PCJ534RF/ PCJ611RF/PCJ614RF/PCK5315R/PCK6115R) Connects video from a DVD player. Here are identical to A/V signals being displayed on connecting equipment, see pages 2.1 - 2.7. Œ VHF/UHF Connect to an antenna or to a cable TV system. ´ WIRELESS HEADPHONES Connect a pair of input jacks, you can connect two different A/V components (i.e., a VCR and a laserdisc, 2 VCRs, etc.) For more information on the big screen. (Typically used...
... audio output jacks of a DVD player & SET-TOP BOX. ' DTV INPUT (For models PCJ532RF/PCJ534RF/ PCJ611RF/PCJ614RF/PCK5315R/PCK6115R) Connects video from a DVD player. Here are identical to A/V signals being displayed on connecting equipment, see pages 2.1 - 2.7. Œ VHF/UHF Connect to an antenna or to a cable TV system. ´ WIRELESS HEADPHONES Connect a pair of input jacks, you can connect two different A/V components (i.e., a VCR and a laserdisc, 2 VCRs, etc.) For more information on the big screen. (Typically used...
User Manual (user Manual) (ver.1.0) (English)
Page 12
.../ERASE Press to add or erase channels in the TV's memory. ˇ PIP Activates picture in picture. ¨ DISPLAY Press to display the current channel and the audio-video settings. ˆ Number buttons Press to select channels directly on -screen menus.) 1.5 CHAPTER ONE: YOUR NEW TV " S.MODE Adjust the TV sound by selecting one of the preset factory settings (or select your VCR and cable box. When using the remote, always point it directly at the...
.../ERASE Press to add or erase channels in the TV's memory. ˇ PIP Activates picture in picture. ¨ DISPLAY Press to display the current channel and the audio-video settings. ˆ Number buttons Press to select channels directly on -screen menus.) 1.5 CHAPTER ONE: YOUR NEW TV " S.MODE Adjust the TV sound by selecting one of the preset factory settings (or select your VCR and cable box. When using the remote, always point it directly at the...

User Manual (user Manual) (ver.1.0) (English)
Page 19
... (supplied) to hook up to view your TV. 2 Connect a set of audio cables between the ANTENNA OUT terminal on the VCR and the antenna terminal on the TV. A coaxial cable is usually included with a VCR. (If not, check your VCR is stereo, you are using are underneath the number "2." 2.5 CHAPTER TWO: INSTALLATION If your local electronics store). 4 Connect a set of the TV. Make sure the jacks you must connect two cables. 5 Connect a video cable...
... (supplied) to hook up to view your TV. 2 Connect a set of audio cables between the ANTENNA OUT terminal on the VCR and the antenna terminal on the TV. A coaxial cable is usually included with a VCR. (If not, check your VCR is stereo, you are using are underneath the number "2." 2.5 CHAPTER TWO: INSTALLATION If your local electronics store). 4 Connect a set of the TV. Make sure the jacks you must connect two cables. 5 Connect a video cable...

User Manual (user Manual) (ver.1.0) (English)
Page 20
... information about how to the input signal. Refer to your local electronics store.) Connecting a Second VCR to Record from the set -top box are supported in their corresponding inputs on the TV. Connecting a Digital TV Set-Top Box (For models PCJ532RF/PCJ534RF/PCJ611RF/PCJ614RF/PCK5315R/PCK6115R) Connect the Y, Pb, and Pr video outputs of the set of audio cables between the AUDIO OUT jacks on the TV and the AUDIO IN jacks on the...
... information about how to the input signal. Refer to your local electronics store.) Connecting a Second VCR to Record from the set -top box are supported in their corresponding inputs on the TV. Connecting a Digital TV Set-Top Box (For models PCJ532RF/PCJ534RF/PCJ611RF/PCJ614RF/PCK5315R/PCK6115R) Connect the Y, Pb, and Pr video outputs of the set of audio cables between the AUDIO OUT jacks on the TV and the AUDIO IN jacks on the...

User Manual (user Manual) (ver.1.0) (English)
Page 23
...: OPERATION Be sure to use the POWER button on the front panel. Press CH ▼ three times to highlight "Convergence" (the letters change to highlight the Setup icon (starts blinking). 2 Press VOL +. Adjusting Basic Convergence If the color appears spread out or "smeared" on the front panel.) First steps: 1 Press MENU. Chapter Three OPERATION Turning the TV On and Off Press POWER. You can also use the remote control for the convergence adjustments. (The Convergence Adjustment...
...: OPERATION Be sure to use the POWER button on the front panel. Press CH ▼ three times to highlight "Convergence" (the letters change to highlight the Setup icon (starts blinking). 2 Press VOL +. Adjusting Basic Convergence If the color appears spread out or "smeared" on the front panel.) First steps: 1 Press MENU. Chapter Three OPERATION Turning the TV On and Off Press POWER. You can also use the remote control for the convergence adjustments. (The Convergence Adjustment...

User Manual (user Manual) (ver.1.0) (English)
Page 25
... has five icons: Video, Audio, Setup, Dolby and PIP. ▼ The on , press MENU. Then press VOL+ to access the icon's sub-menu. ▼ You can also use the MENU, CHANNEL, and VOLUME buttons on the screen. The main menu appears on the control panel of the TV to make selections. 3 Press MENU to exit. OPERATION Viewing the Menus and On-Screen Displays Viewing the Menus 1 With the power on -screen menus disappear from the...
... has five icons: Video, Audio, Setup, Dolby and PIP. ▼ The on , press MENU. Then press VOL+ to access the icon's sub-menu. ▼ You can also use the MENU, CHANNEL, and VOLUME buttons on the screen. The main menu appears on the control panel of the TV to make selections. 3 Press MENU to exit. OPERATION Viewing the Menus and On-Screen Displays Viewing the Menus 1 With the power on -screen menus disappear from the...

User Manual (user Manual) (ver.1.0) (English)
Page 33
..." which automatically recalls your personalized picture settings. 1 Press MENU to display the menu. Video icon will be highlighted (blinking). or VOL + to select the "Standard," "Mild," or "Custom" picture setting. 3 Alternate method: Simply press the P.MODE button on the remote control to select one of the standard picture settings. • Choose Standard for the standard factory settings. • Choose Mild ("Mild Contrast") when viewing the TV in low light, or when...
..." which automatically recalls your personalized picture settings. 1 Press MENU to display the menu. Video icon will be highlighted (blinking). or VOL + to select the "Standard," "Mild," or "Custom" picture setting. 3 Alternate method: Simply press the P.MODE button on the remote control to select one of the standard picture settings. • Choose Standard for the standard factory settings. • Choose Mild ("Mild Contrast") when viewing the TV in low light, or when...

User Manual (user Manual) (ver.1.0) (English)
Page 37
... the other codes listed for your brand of VCR. ▼ Make sure you want to use the remote to controlling the TV, the universal remote can also operate a VCR, DVD and a cable box (even if your VCR. ✓ Set the DVD mode in the "VCR" mode, the volume buttons still control your Samsung remote control, press SET. In addition to operate your VCR. ▼ When your remote control is illuminated. 3 On your TV's volume. If your VCR turns on .
... the other codes listed for your brand of VCR. ▼ Make sure you want to use the remote to controlling the TV, the universal remote can also operate a VCR, DVD and a cable box (even if your VCR. ✓ Set the DVD mode in the "VCR" mode, the volume buttons still control your Samsung remote control, press SET. In addition to operate your VCR. ▼ When your remote control is illuminated. 3 On your TV's volume. If your VCR turns on .

User Manual (user Manual) (ver.1.0) (English)
Page 42
... TV decodes and displays the closed captions that supplements the information in Field 1. (For example, Channel 1 may be necessary to "Channels" and "Field": Use the CH ▲, CH ▼, VOL + and VOL - Press VOL+ to select the "Caption" menu. Press VOL - All VCRs record the closed caption signal from television programs, so home-recorded video tapes also provide closed captions as in your television schedule and on the remote control...
... TV decodes and displays the closed captions that supplements the information in Field 1. (For example, Channel 1 may be necessary to "Channels" and "Field": Use the CH ▲, CH ▼, VOL + and VOL - Press VOL+ to select the "Caption" menu. Press VOL - All VCRs record the closed caption signal from television programs, so home-recorded video tapes also provide closed captions as in your television schedule and on the remote control...

User Manual (user Manual) (ver.1.0) (English)
Page 45
... times. Next, press VOL+ or VOL- In Normal Mode, the sound of a stadium or a movie theater. Press MENU twice to highlight "Mode." The wireless headphone option is smaller than the TV speaker. For "3D Phonic," see next page. After entering values for "Rear" and "Delay." (Some trial-and-error experimenting is either not present or not used. Dolby Prologic Your Samsung TV...
... times. Next, press VOL+ or VOL- In Normal Mode, the sound of a stadium or a movie theater. Press MENU twice to highlight "Mode." The wireless headphone option is smaller than the TV speaker. For "3D Phonic," see next page. After entering values for "Rear" and "Delay." (Some trial-and-error experimenting is either not present or not used. Dolby Prologic Your Samsung TV...

User Manual (user Manual) (ver.1.0) (English)
Page 57
... picture or sound. Check the antenna connections. Press the TV/VIDEO button. Note: If you watch a still image or the screen in color. Make sure the program is broadcast in the 16:9 aspect ratio format for 30 seconds, then try this list of these troubleshooting tips apply, then call your TV. The TV won't turn on the screen. 5.1 CHAPTER FIVE: TROUBLESHOOTING Adjust the antenna. Chapter Five TROUBLESHOOTING If the TV seems to put your remote control...
... picture or sound. Check the antenna connections. Press the TV/VIDEO button. Note: If you watch a still image or the screen in color. Make sure the program is broadcast in the 16:9 aspect ratio format for 30 seconds, then try this list of these troubleshooting tips apply, then call your TV. The TV won't turn on the screen. 5.1 CHAPTER FIVE: TROUBLESHOOTING Adjust the antenna. Chapter Five TROUBLESHOOTING If the TV seems to put your remote control...

User Manual (user Manual) (ver.1.0) (English)
Page 58
... differences in the TV channel frequencies Specifications Model Voltage Frequency of service. Using Your TV in Another Country If you plan to take your TV with electric motors that spill into it can cause serious damage. APPENDIX Cleaning and Maintaining Your TV With proper care, your TV unit will give you many years of Operation Power Consumption Dimension Weight PCJ532RF / PCJ533RF / PCJ534RF / PCJ611RF / PCJ614RF / PCK5315R / PCK6115R...
... differences in the TV channel frequencies Specifications Model Voltage Frequency of service. Using Your TV in Another Country If you plan to take your TV with electric motors that spill into it can cause serious damage. APPENDIX Cleaning and Maintaining Your TV With proper care, your TV unit will give you many years of Operation Power Consumption Dimension Weight PCJ532RF / PCJ533RF / PCJ534RF / PCJ611RF / PCJ614RF / PCK5315R / PCK6115R...


