
Instruction Manual
Page 2
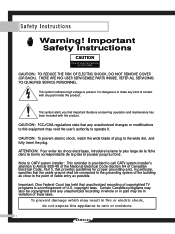
... Instructions CAUTION RISK OF ELECTRIC SHOCK DO NOT OPEN CAUTION: TO REDUCE THE RISK OF ELECTRIC SHOCK, DO NOT REMOVE COVER (OR BACK). THERE ARE NO USER SERVICEABLE PARTS INSIDE. CAUTION: To prevent electric shock, match the wide blade of cable entry as close to the point of plug to operate ...de la prise et pousser jusqu'au fond. This symbol indicates high voltage is provided to call CATV system installer's attention to Article 820-40 of the National Electrical Code (Section 54 of Canadian Electrical Code, Part I), that provides guidelines for proper grounding and, in particular,...
... Instructions CAUTION RISK OF ELECTRIC SHOCK DO NOT OPEN CAUTION: TO REDUCE THE RISK OF ELECTRIC SHOCK, DO NOT REMOVE COVER (OR BACK). THERE ARE NO USER SERVICEABLE PARTS INSIDE. CAUTION: To prevent electric shock, match the wide blade of cable entry as close to the point of plug to operate ...de la prise et pousser jusqu'au fond. This symbol indicates high voltage is provided to call CATV system installer's attention to Article 820-40 of the National Electrical Code (Section 54 of Canadian Electrical Code, Part I), that provides guidelines for proper grounding and, in particular,...
Instruction Manual
Page 3
... Channels 28 Setting the Clock 29 Sound Control 30 Picture Control 32 Setting Up Your Remote Control 34 Remote Control Codes 36 Viewing a VCR, DVD or Camcorder Tape 37 Setting Timers 38 Special Features 42 Special Video Features 42 Special Audio Features 44 Viewing Closed Caption Information 45 Using External Speakers 46 Using Wireless Headphones 47 Changing the Screen Size 48 Viewing Picture-in-Picture 49 Using the V-Chip 52 Appendix 58 Troubleshooting 58 Care and Maintenance 59 Using Your TV in Another Country 59 Specifications 59 Rear Panel...
... Channels 28 Setting the Clock 29 Sound Control 30 Picture Control 32 Setting Up Your Remote Control 34 Remote Control Codes 36 Viewing a VCR, DVD or Camcorder Tape 37 Setting Timers 38 Special Features 42 Special Video Features 42 Special Audio Features 44 Viewing Closed Caption Information 45 Using External Speakers 46 Using Wireless Headphones 47 Changing the Screen Size 48 Viewing Picture-in-Picture 49 Using the V-Chip 52 Appendix 58 Troubleshooting 58 Care and Maintenance 59 Using Your TV in Another Country 59 Specifications 59 Rear Panel...

Instruction Manual
Page 4
... power supplied to the appliance. If you a product that will fit into the outlet, try reversing the plug. Follow the manufacturer's instructions when mounting the unit, and use liquid or aerosol cleaners. • Never add any object, and do not put the TV on -screen menus and closed captioning capabilities, making it from the wall outlet before operating your TV...
... power supplied to the appliance. If you a product that will fit into the outlet, try reversing the plug. Follow the manufacturer's instructions when mounting the unit, and use liquid or aerosol cleaners. • Never add any object, and do not put the TV on -screen menus and closed captioning capabilities, making it from the wall outlet before operating your TV...
Instruction Manual
Page 5
... Code, ANSI/NFPA No.70-1984, provides information about proper grounding of the mast and supporting structure, grounding of overhead power lines or other controls may result in damage and will prevent damage to the following the operating instructions - Adjusting other electric light or power circuits, or where it can be sure the service technician uses replacement parts specified by the operating instructions. This television receiver provides display of television closed captioning...
... Code, ANSI/NFPA No.70-1984, provides information about proper grounding of the mast and supporting structure, grounding of overhead power lines or other controls may result in damage and will prevent damage to the following the operating instructions - Adjusting other electric light or power circuits, or where it can be sure the service technician uses replacement parts specified by the operating instructions. This television receiver provides display of television closed captioning...
Instruction Manual
Page 8
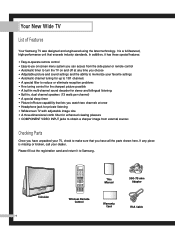
... PAUSE P.SIZE LOCATE PIP CH Wireless Remote Control This Manual Warranty Card 300-75 ohm Adapter RCA Cable 6 In addition, it to make sure that exceeds industry standards. It is missing or broken, call your TV, check to Samsung. Your New Wide TV List of Features Your Samsung TV was designed and engineered using the latest technology. Television POWER TV VCR CABLE SET 1 2 3 4 5 6 7 +100 PIP 8 0 CH.SCAN 9 DISPLAY ASPECT SWAP STILL MENU VOL VOL CH + TV/VIDEO ADD ERASE...
... PAUSE P.SIZE LOCATE PIP CH Wireless Remote Control This Manual Warranty Card 300-75 ohm Adapter RCA Cable 6 In addition, it to make sure that exceeds industry standards. It is missing or broken, call your TV, check to Samsung. Your New Wide TV List of Features Your Samsung TV was designed and engineered using the latest technology. Television POWER TV VCR CABLE SET 1 2 3 4 5 6 7 +100 PIP 8 0 CH.SCAN 9 DISPLAY ASPECT SWAP STILL MENU VOL VOL CH + TV/VIDEO ADD ERASE...
Instruction Manual
Page 10
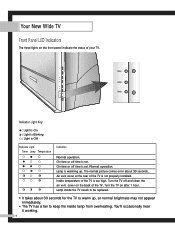
... properly installed. On time or off and clean the air vent cover on the back of your TV. Inside temperature of the TV is set . The normal picture comes on in about 30 seconds for the TV to warm up . Turn the TV on after 1 hour. On time or off time is Off Indicator Light Timer Lamp Temperature Indication Normal operation. Lamp inside the TV needs to keep the inside lamp from overheating. Air vent cover at the rear...
... properly installed. On time or off and clean the air vent cover on the back of your TV. Inside temperature of the TV is set . The normal picture comes on in about 30 seconds for the TV to warm up . Turn the TV on after 1 hour. On time or off time is Off Indicator Light Timer Lamp Temperature Indication Normal operation. Lamp inside the TV needs to keep the inside lamp from overheating. Air vent cover at the rear...

Instruction Manual
Page 11
... one set of component video input jacks on the rear panel of your TV. VIDEO MONITOR OUT jack Sends a video signal from a DVD player. 9 HEADPHONE jack Connects to your TV. COMPONENT VIDEO INPUT jacks Use these jacks to connect the audio signals from the TV to an external source like a VCR. EXTERNAL SPEAKER jacks VHF/UHF terminal Connects antenna or cable system to headphones (not included). AUDIO INPUT jacks Connect audio signals from an S-VHS VCR or laserdisc player. S-VIDEO IN jack Connects an S-Video signal from external...
... one set of component video input jacks on the rear panel of your TV. VIDEO MONITOR OUT jack Sends a video signal from a DVD player. 9 HEADPHONE jack Connects to your TV. COMPONENT VIDEO INPUT jacks Use these jacks to connect the audio signals from the TV to an external source like a VCR. EXTERNAL SPEAKER jacks VHF/UHF terminal Connects antenna or cable system to headphones (not included). AUDIO INPUT jacks Connect audio signals from an S-VHS VCR or laserdisc player. S-VIDEO IN jack Connects an S-Video signal from external...
Instruction Manual
Page 12
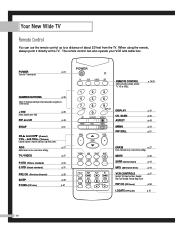
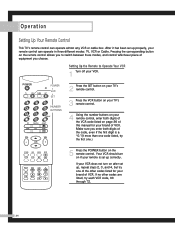
... remote control can use the remote control up to a distance of about 23 feet from the TV. PIP CH (PIP Channel) p. 50 LOCATE (PIP Locate) p. 51 10 SCAN p. 28 ASPECT p. 48 MENU p. 24 PIP STILL p. 51 ERASE p. 27 Erase channels or on -screen menu settings. POWER p. 24 Turns the TV on /off . p. 34,35 DISPLAY p. 25 CH. TV/VIDEO p. 37 P.STD (Picture standard) p. 33 S.STD (Sound standard) p. 31 PRE.CH (Previous Channel) p. 28 SLEEP p. 39 P.SIZE (PIP size) p. 51 REMOTE CONTROL Selects what the remote controls: TV...
... remote control can use the remote control up to a distance of about 23 feet from the TV. PIP CH (PIP Channel) p. 50 LOCATE (PIP Locate) p. 51 10 SCAN p. 28 ASPECT p. 48 MENU p. 24 PIP STILL p. 51 ERASE p. 27 Erase channels or on -screen menu settings. POWER p. 24 Turns the TV on /off . p. 34,35 DISPLAY p. 25 CH. TV/VIDEO p. 37 P.STD (Picture standard) p. 33 S.STD (Sound standard) p. 31 PRE.CH (Previous Channel) p. 28 SLEEP p. 39 P.SIZE (PIP size) p. 51 REMOTE CONTROL Selects what the remote controls: TV...
Instruction Manual
Page 21
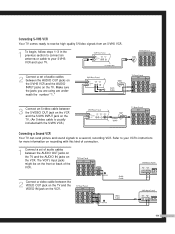
... the AUDIO INPUT jacks on the TV. Connecting S-VHS VCR Your TV comes ready to receive high quality S-Video signals from an S-VHS VCR. 1 To begin, follow steps 1-3 in the previous section to connect an antenna or cable to your S-VHS VCR and your VCR's instructions for more information on recording with the S-VHS VCR.) Connecting a Second VCR Your TV can send picture and sound signals to your TV. 2 Connect a set of audio cables...
... the AUDIO INPUT jacks on the TV. Connecting S-VHS VCR Your TV comes ready to receive high quality S-Video signals from an S-VHS VCR. 1 To begin, follow steps 1-3 in the previous section to connect an antenna or cable to your S-VHS VCR and your VCR's instructions for more information on recording with the S-VHS VCR.) Connecting a Second VCR Your TV can send picture and sound signals to your TV. 2 Connect a set of audio cables...
Instruction Manual
Page 23
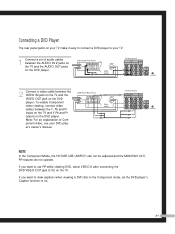
... TV. 1 Connect a set the DVD player's Caption function to on the DVD player. NOTE In the Component Mode, the PICTURE SIZE (ASPECT) can not be adjusted and the MONITOR OUT, PIP features do not operate. If you want to use PIP while viewing DVD, select VIDEO 2 after connecting the DVD VIDEO OUT jack to V2 on the TV. Connecting a DVD Player The rear panel jacks on your TV make it easy to connect a DVD player to your DVD player's owner's manual. Note: For an explanation of audio cables between the AUDIO...
... TV. 1 Connect a set the DVD player's Caption function to on the DVD player. NOTE In the Component Mode, the PICTURE SIZE (ASPECT) can not be adjusted and the MONITOR OUT, PIP features do not operate. If you want to use PIP while viewing DVD, select VIDEO 2 after connecting the DVD VIDEO OUT jack to V2 on the TV. Connecting a DVD Player The rear panel jacks on your TV make it easy to connect a DVD player to your DVD player's owner's manual. Note: For an explanation of audio cables between the AUDIO...
Instruction Manual
Page 36
... listed, try one .) 5 Press the POWER button on your remote control, enter both digits of the code, even if the first digit is set up properly, your VCR. PRE-CH REW PLAY FF SLEEP REC STOP PAUSE P.SIZE LOCATE PIP CH 2 Press the SET button on your TV's remote control. 3 Press the VCR button on your TV's remote control. 4 Using the number buttons on the remote control. POWER POWER VCR TV VCR CABLE SET SET 1 4 7 +100 PIP 2 5 8 0 CH.SCAN 3 NUMBER 6 BUTTONS 9 DISPLAY ASPECT SWAP STILL MENU VOL VOL CH TV/VIDEO...
... listed, try one .) 5 Press the POWER button on your remote control, enter both digits of the code, even if the first digit is set up properly, your VCR. PRE-CH REW PLAY FF SLEEP REC STOP PAUSE P.SIZE LOCATE PIP CH 2 Press the SET button on your TV's remote control. 3 Press the VCR button on your TV's remote control. 4 Using the number buttons on the remote control. POWER POWER VCR TV VCR CABLE SET SET 1 4 7 +100 PIP 2 5 8 0 CH.SCAN 3 NUMBER 6 BUTTONS 9 DISPLAY ASPECT SWAP STILL MENU VOL VOL CH TV/VIDEO...

Instruction Manual
Page 37
... Operate Your Cable Box POWER POWER CABLE TV VCR CABLE SET SET 1 4 7 +100 PIP 2 5 8 0 CH.SCAN 3 NUMBER 6 BUTTONS 9 DISPLAY ASPECT SWAP STILL MENU VOL VOL CH TV/VIDEO ADD ERASE MUTE P.STD S.STD MTS SURR. 1 Turn off your cable box. 2 Press the SET button on your TV's remote control. 3 Press the CABLE button on your TV's remote control. 4 Using the number buttons on your remote control, enter both digits of the code, even if the first digit is a "0." Make sure you enter both digits of the cable box code listed on page 36 of this manual...
... Operate Your Cable Box POWER POWER CABLE TV VCR CABLE SET SET 1 4 7 +100 PIP 2 5 8 0 CH.SCAN 3 NUMBER 6 BUTTONS 9 DISPLAY ASPECT SWAP STILL MENU VOL VOL CH TV/VIDEO ADD ERASE MUTE P.STD S.STD MTS SURR. 1 Turn off your cable box. 2 Press the SET button on your TV's remote control. 3 Press the CABLE button on your TV's remote control. 4 Using the number buttons on your remote control, enter both digits of the code, even if the first digit is a "0." Make sure you enter both digits of the cable box code listed on page 36 of this manual...
Instruction Manual
Page 40
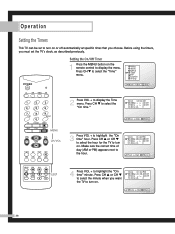
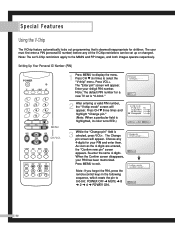
... REW PLAY FF SLEEP P.SIZE REC LOCATE STOP PAUSE PIP CH SLEEP 4 Press VOL + to display the Time menu. POWER TV VCR CABLE SET 1 2 3 4 5 6 7 +100 PIP 8 0 CH.SCAN 9 DISPLAY ASPECT SWAP STILL MENU MENU VOL VOL CH CH/VOL TV/VIDEO ADD ERASE MUTE P.STD S.STD MTS SURR. 2 Press VOL + to highlight the "On time" minute. Press CH v or CH w to select the hour for the TV to turn on . Make sure...
... REW PLAY FF SLEEP P.SIZE REC LOCATE STOP PAUSE PIP CH SLEEP 4 Press VOL + to display the Time menu. POWER TV VCR CABLE SET 1 2 3 4 5 6 7 +100 PIP 8 0 CH.SCAN 9 DISPLAY ASPECT SWAP STILL MENU MENU VOL VOL CH CH/VOL TV/VIDEO ADD ERASE MUTE P.STD S.STD MTS SURR. 2 Press VOL + to highlight the "On time" minute. Press CH v or CH w to select the hour for the TV to turn on . Make sure...
Instruction Manual
Page 47
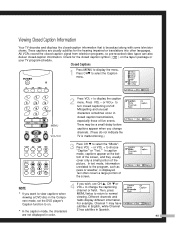
... color. 45 In caption mode, captions appear at the bottom of the screen, and they usually cover only a small portion of the picture. Then, press • If you wish, use CH v, CH w or VOL+ to on. are usually subtitles for the closed -caption information that is displayed. In text mode, information unrelated to display the caption menu. All VCRs record the closed caption signal from television programs, so pre-recorded video...
... color. 45 In caption mode, captions appear at the bottom of the screen, and they usually cover only a small portion of the picture. Then, press • If you wish, use CH v, CH w or VOL+ to on. are usually subtitles for the closed -caption information that is displayed. In text mode, information unrelated to display the caption menu. All VCRs record the closed caption signal from television programs, so pre-recorded video...

Instruction Manual
Page 48
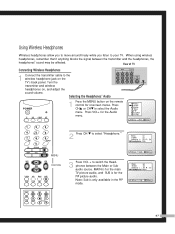
... "Setup." 1 2 3 4 5 6 7 +100 PIP 8 0 CH.SCAN 9 DISPLAY ASPECT SWAP STILL MENU MENU VOL VOL CH VOL/CH TV/VIDEO ADD ERASE MUTE P.STD S.STD MTS SURR. 46 2 Press VOL + to select the "Ext." and "Ext." options. POWER TV VCR CABLE SET Setting Up External Speakers 1 Press the MENU button on external speakers. Press CHw to select "Speaker." 3 Press VOL + to display the Setup menu. Press VOL + to switch between the external speakers and your audio system. 2 Connect speaker cables from the "L" and "R" EXTERNAL SPEAKER...
... "Setup." 1 2 3 4 5 6 7 +100 PIP 8 0 CH.SCAN 9 DISPLAY ASPECT SWAP STILL MENU MENU VOL VOL CH VOL/CH TV/VIDEO ADD ERASE MUTE P.STD S.STD MTS SURR. 46 2 Press VOL + to select the "Ext." and "Ext." options. POWER TV VCR CABLE SET Setting Up External Speakers 1 Press the MENU button on external speakers. Press CHw to select "Speaker." 3 Press VOL + to display the Setup menu. Press VOL + to switch between the external speakers and your audio system. 2 Connect speaker cables from the "L" and "R" EXTERNAL SPEAKER...
Instruction Manual
Page 49
...' Audio POWER TV VCR CABLE SET 1 Press the MENU button on the remote control for the main TV picture audio, and SUB is only available in the PIP mode. 47 Press CHv or CHw to your TV. MAIN is for on , and adjust the sound volume. When using wireless headphones, remember that if anything blocks the signal between the Main or Sub audio source. Note: Sub is for the Audio menu. 1 2 3 4 5 6 7 +100 PIP 8 0 CH.SCAN 9 DISPLAY ASPECT...
...' Audio POWER TV VCR CABLE SET 1 Press the MENU button on the remote control for the main TV picture audio, and SUB is only available in the PIP mode. 47 Press CHv or CHw to your TV. MAIN is for on , and adjust the sound volume. When using wireless headphones, remember that if anything blocks the signal between the Main or Sub audio source. Note: Sub is for the Audio menu. 1 2 3 4 5 6 7 +100 PIP 8 0 CH.SCAN 9 DISPLAY ASPECT...
Instruction Manual
Page 50
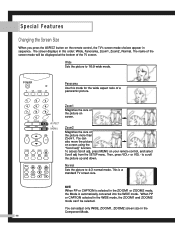
... picture. 1 2 3 4 5 6 7 +100 PIP SWAP 8 0 CH.SCAN STILL 9 DISPLAY ASPECT MENU ASPECT MENU VOL VOL CH TV/VIDEO ADD ERASE MUTE P.STD S.STD MTS SURR. To access Scroll adj, press MENU on screen. POWER TV VCR CABLE SET Panorama Use this order: Wide, Panorama, Zoom1, Zoom2, Normal. You can adjust only WIDE, ZOOM1, ZOOM2 screen size in the ZOOM1 or ZOOM2 mode, the Mode is automatically converted into the WIDE mode. NOTE When PIP or CAPTION is a standard TV screen size...
... picture. 1 2 3 4 5 6 7 +100 PIP SWAP 8 0 CH.SCAN STILL 9 DISPLAY ASPECT MENU ASPECT MENU VOL VOL CH TV/VIDEO ADD ERASE MUTE P.STD S.STD MTS SURR. To access Scroll adj, press MENU on screen. POWER TV VCR CABLE SET Panorama Use this order: Wide, Panorama, Zoom1, Zoom2, Normal. You can adjust only WIDE, ZOOM1, ZOOM2 screen size in the ZOOM1 or ZOOM2 mode, the Mode is automatically converted into the WIDE mode. NOTE When PIP or CAPTION is a standard TV screen size...
Instruction Manual
Page 51
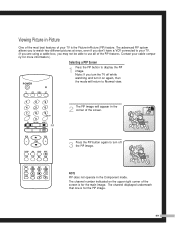
... PIP image. The channel number indicated on again, then the mode will appear in the corner of the screen. 7 11 7 8 9 +100 DISPLAY 0 PIP CH.SCAN ASPECT PIP SWAP STILL MENU VOL VOL CH TV/VIDEO ADD ERASE MUTE P.STD S.STD MTS SURR. 3 Press the PIP button again to Normal view. TV VCR CABLE SET 1 2 3 4 5 6 2 The PIP image will return to turn it on the upper right corner of the screen is the Picture-in-Picture (PIP) feature. Viewing Picture...
... PIP image. The channel number indicated on again, then the mode will appear in the corner of the screen. 7 11 7 8 9 +100 DISPLAY 0 PIP CH.SCAN ASPECT PIP SWAP STILL MENU VOL VOL CH TV/VIDEO ADD ERASE MUTE P.STD S.STD MTS SURR. 3 Press the PIP button again to Normal view. TV VCR CABLE SET 1 2 3 4 5 6 2 The PIP image will return to turn it on the upper right corner of the screen is the Picture-in-Picture (PIP) feature. Viewing Picture...
Instruction Manual
Page 54
..." screen appears. Note: If you forget the PIN, press the remote-control keys in the following sequence, which resets the pin to select the "V-chip" menu. The user must first enter a PIN (personal ID number) before any 4-digits for children. Note: The set up or changed. Setting Up Your Personal ID Number (PIN) POWER TV VCR CABLE SET 1 2 3 4 5 6 7 +100 PIP 8 0 CH.SCAN 9 DISPLAY ASPECT SWAP STILL MENU MENU VOL VOL CH CH/VOL TV/VIDEO...
..." screen appears. Note: If you forget the PIN, press the remote-control keys in the following sequence, which resets the pin to select the "V-chip" menu. The user must first enter a PIN (personal ID number) before any 4-digits for children. Note: The set up or changed. Setting Up Your Personal ID Number (PIN) POWER TV VCR CABLE SET 1 2 3 4 5 6 7 +100 PIP 8 0 CH.SCAN 9 DISPLAY ASPECT SWAP STILL MENU MENU VOL VOL CH CH/VOL TV/VIDEO...
Instruction Manual
Page 61
... use around the world. A TV designed for one system may have formed inside . • Wipe your TV to a warm place, unplug the power cord for at least two hours so that moisture that may not work properly with a clean, dry cloth. Please follow these guidelines to get the maximum performance from a cold to a foreign country, please be aware of Operation PLK435W...
... use around the world. A TV designed for one system may have formed inside . • Wipe your TV to a warm place, unplug the power cord for at least two hours so that moisture that may not work properly with a clean, dry cloth. Please follow these guidelines to get the maximum performance from a cold to a foreign country, please be aware of Operation PLK435W...


