
Instruction Manual
Page 2
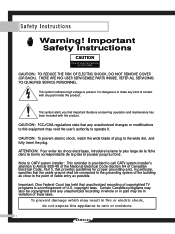
...operation and maintenance has been included with any kind of cable entry as close to the wide slot, and fully insert the plug. i Important Safety Instructions CAUTION RISK OF ELECTRIC SHOCK DO NOT OPEN CAUTION: TO REDUCE THE RISK OF ELECTRIC SHOCK, DO NOT REMOVE COVER (OR BACK). THERE ARE NO USER SERVICEABLE PARTS INSIDE... appliance to make any part inside this product. This symbol indicates high voltage is provided to call CATV system installer's attention to Article 820-40 of the National Electrical Code (Section 54 of Canadian Electrical Code, Part I), that provides guidelines for...
...operation and maintenance has been included with any kind of cable entry as close to the wide slot, and fully insert the plug. i Important Safety Instructions CAUTION RISK OF ELECTRIC SHOCK DO NOT OPEN CAUTION: TO REDUCE THE RISK OF ELECTRIC SHOCK, DO NOT REMOVE COVER (OR BACK). THERE ARE NO USER SERVICEABLE PARTS INSIDE... appliance to make any part inside this product. This symbol indicates high voltage is provided to call CATV system installer's attention to Article 820-40 of the National Electrical Code (Section 54 of Canadian Electrical Code, Part I), that provides guidelines for...
Instruction Manual
Page 3
... Channels 28 Setting the Clock 29 Sound Control 30 Picture Control 32 Setting Up Your Remote Control 34 Remote Control Codes 36 Viewing a VCR, DVD or Camcorder Tape 37 Setting Timers 38 Special Features 42 Special Video Features 42 Special Audio Features 44 Viewing Closed Caption Information 45 Using External Speakers 46 Using Wireless Headphones 47 Changing the Screen Size 48 Viewing Picture-in-Picture 49 Using the V-Chip 52 Appendix 58 Troubleshooting 58 Care and Maintenance 59 Using Your TV in Another Country 59 Specifications 59 Rear Panel...
... Channels 28 Setting the Clock 29 Sound Control 30 Picture Control 32 Setting Up Your Remote Control 34 Remote Control Codes 36 Viewing a VCR, DVD or Camcorder Tape 37 Setting Timers 38 Special Features 42 Special Video Features 42 Special Audio Features 44 Viewing Closed Caption Information 45 Using External Speakers 46 Using Wireless Headphones 47 Changing the Screen Size 48 Viewing Picture-in-Picture 49 Using the V-Chip 52 Appendix 58 Troubleshooting 58 Care and Maintenance 59 Using Your TV in Another Country 59 Specifications 59 Rear Panel...

Instruction Manual
Page 4
... and more likely to offer you for choosing Samsung! Do not put the TV on the TV and in mind when installing, using your outlet. 2 S If you 've followed the manufacturer's instructions for mounting. • Operate your TV. • Keep the safety and operating instructions for future reference. • Heed all safety and operating instructions before cleaning. We are proud to overturn. • The...
... and more likely to offer you for choosing Samsung! Do not put the TV on the TV and in mind when installing, using your outlet. 2 S If you 've followed the manufacturer's instructions for mounting. • Operate your TV. • Keep the safety and operating instructions for future reference. • Heed all safety and operating instructions before cleaning. We are proud to overturn. • The...
Instruction Manual
Page 5
...: (1) This device may result in performance - Refer all servicing to rain or water - This television receiver provides display of television closed captioning in the vicinity of antenna discharge unit, connection to the TV, be placed in accordance with §15.119 of time. • Protect the power cord. When installing an outside antenna or cable system is connected to grounding electrodes, and requirements for long periods of...
...: (1) This device may result in performance - Refer all servicing to rain or water - This television receiver provides display of television closed captioning in the vicinity of antenna discharge unit, connection to the TV, be placed in accordance with §15.119 of time. • Protect the power cord. When installing an outside antenna or cable system is connected to grounding electrodes, and requirements for long periods of...
Instruction Manual
Page 8
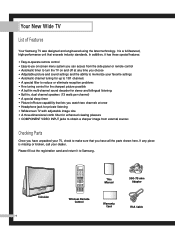
..., call your TV, check to Samsung. Television POWER TV VCR CABLE SET 1 2 3 4 5 6 7 +100 PIP 8 0 CH.SCAN 9 DISPLAY ASPECT SWAP STILL MENU VOL VOL CH + TV/VIDEO ADD ERASE MUTE P.STD S.STD MTS SURR. Please fill out the registration card and return it has these special features: • Easy-to-operate remote control • Easy-to-use on-screen menu system you can access from the side panel or remote control • Automatic timer to turn the TV on and...
..., call your TV, check to Samsung. Television POWER TV VCR CABLE SET 1 2 3 4 5 6 7 +100 PIP 8 0 CH.SCAN 9 DISPLAY ASPECT SWAP STILL MENU VOL VOL CH + TV/VIDEO ADD ERASE MUTE P.STD S.STD MTS SURR. Please fill out the registration card and return it has these special features: • Easy-to-operate remote control • Easy-to-use on-screen menu system you can access from the side panel or remote control • Automatic timer to turn the TV on and...
Instruction Manual
Page 10
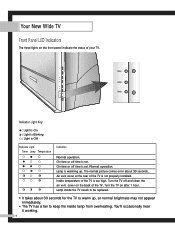
... working. 8 Normal operation. Indicator Light Key : Light is On : Light is Blinking : Light is too high. On time or off time is not properly installed. Inside temperature of your TV. Lamp inside the TV needs to be replaced. • It takes about 30 seconds. Turn the TV off and clean the air vent cover on in about 30 seconds for the TV to warm up . The normal picture comes on the back of the TV is set...
... working. 8 Normal operation. Indicator Light Key : Light is On : Light is Blinking : Light is too high. On time or off time is not properly installed. Inside temperature of your TV. Lamp inside the TV needs to be replaced. • It takes about 30 seconds. Turn the TV off and clean the air vent cover on in about 30 seconds for the TV to warm up . The normal picture comes on the back of the TV is set...

Instruction Manual
Page 11
... Connects antenna or cable system to your TV. HEADPHONE jack Connects to headphones (not included). VIDEO INPUT jacks Connect video signals from a DVD player when using the component video jacks, these audio jacks function as audio for V2(Video2). COMPONENT AUDIO INPUT jacks Use these jacks to connect the component video signals from the TV to an external source like VCRs or laserdisc players. VIDEO MONITOR OUT jack Sends a video signal from a DVD player. 9 COMPONENT VIDEO INPUT jacks Use these jacks to connect the audio signals from external...
... Connects antenna or cable system to your TV. HEADPHONE jack Connects to headphones (not included). VIDEO INPUT jacks Connect video signals from a DVD player when using the component video jacks, these audio jacks function as audio for V2(Video2). COMPONENT AUDIO INPUT jacks Use these jacks to connect the component video signals from the TV to an external source like VCRs or laserdisc players. VIDEO MONITOR OUT jack Sends a video signal from a DVD player. 9 COMPONENT VIDEO INPUT jacks Use these jacks to connect the audio signals from external...
Instruction Manual
Page 12
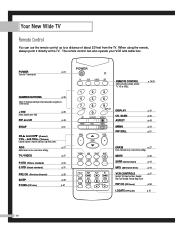
... cable box. NUMBER BUTTONS p. 28 Select TV channels directly or enter data when using the remote, always point it directly at the TV. p. 34,35 DISPLAY p. 25 CH. The remote control can use the remote control up to a distance of about 23 feet from the TV. and VOL+ (Volume) Controls volume, channel selection, and menu items. ADD p. 27 Add channels or on -screen menu settings. SCAN p. 28 ASPECT p. 48 MENU p. 24 PIP STILL p. 51 ERASE p. 27 Erase channels or on -screen menu settings...
... cable box. NUMBER BUTTONS p. 28 Select TV channels directly or enter data when using the remote, always point it directly at the TV. p. 34,35 DISPLAY p. 25 CH. The remote control can use the remote control up to a distance of about 23 feet from the TV. and VOL+ (Volume) Controls volume, channel selection, and menu items. ADD p. 27 Add channels or on -screen menu settings. SCAN p. 28 ASPECT p. 48 MENU p. 24 PIP STILL p. 51 ERASE p. 27 Erase channels or on -screen menu settings...
Instruction Manual
Page 21
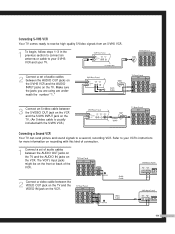
... VCR and the AUDIO INPUT jacks on the TV. Connecting S-VHS VCR Your TV comes ready to receive high quality S-Video signals from an S-VHS VCR. 1 To begin, follow steps 1-3 in the previous section to connect an antenna or cable to your S-VHS VCR and your VCR's instructions for more information on recording with this kind of connection. 1 Connect a set of the VCR. 2 Connect a video cable between the VIDEO OUT jack...
... VCR and the AUDIO INPUT jacks on the TV. Connecting S-VHS VCR Your TV comes ready to receive high quality S-Video signals from an S-VHS VCR. 1 To begin, follow steps 1-3 in the previous section to connect an antenna or cable to your S-VHS VCR and your VCR's instructions for more information on recording with this kind of connection. 1 Connect a set of the VCR. 2 Connect a video cable between the VIDEO OUT jack...
Instruction Manual
Page 23
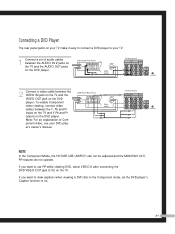
If you want to use PIP while viewing DVD, select VIDEO 2 after connecting the DVD VIDEO OUT jack to on. 21 NOTE In the Component Mode, the PICTURE SIZE (ASPECT) can not be adjusted and the MONITOR OUT, PIP features do not operate. To enable Component video viewing, connect video cables between the VIDEO IN jack on the TV and the VIDEO OUT jack on the DVD player. Note: For an explanation of audio cables between the AUDIO IN 2 jacks...
If you want to use PIP while viewing DVD, select VIDEO 2 after connecting the DVD VIDEO OUT jack to on. 21 NOTE In the Component Mode, the PICTURE SIZE (ASPECT) can not be adjusted and the MONITOR OUT, PIP features do not operate. To enable Component video viewing, connect video cables between the VIDEO IN jack on the TV and the VIDEO OUT jack on the DVD player. Note: For an explanation of audio cables between the AUDIO IN 2 jacks...
Instruction Manual
Page 36
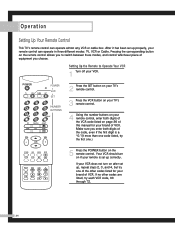
Pressing the corresponding button on the remote control. POWER POWER VCR TV VCR CABLE SET SET 1 4 7 +100 PIP 2 5 8 0 CH.SCAN 3 NUMBER 6 BUTTONS 9 DISPLAY ASPECT SWAP STILL MENU VOL VOL CH TV/VIDEO ADD ERASE MUTE P.STD S.STD MTS SURR. Make sure you enter both digits of the VCR code listed on page 36 of this manual for your brand of VCR. Your VCR should turn on if your remote is a "0."(If more than one code listed, try...
Pressing the corresponding button on the remote control. POWER POWER VCR TV VCR CABLE SET SET 1 4 7 +100 PIP 2 5 8 0 CH.SCAN 3 NUMBER 6 BUTTONS 9 DISPLAY ASPECT SWAP STILL MENU VOL VOL CH TV/VIDEO ADD ERASE MUTE P.STD S.STD MTS SURR. Make sure you enter both digits of the VCR code listed on page 36 of this manual for your brand of VCR. Your VCR should turn on if your remote is a "0."(If more than one code listed, try...

Instruction Manual
Page 37
... cable box code listed on page 36 of this manual for your brand of cable box. If no other codes listed for your brand of cable box. Setting Up the Remote to Operate Your Cable Box POWER POWER CABLE TV VCR CABLE SET SET 1 4 7 +100 PIP 2 5 8 0 CH.SCAN 3 NUMBER 6 BUTTONS 9 DISPLAY ASPECT SWAP STILL MENU VOL VOL CH TV/VIDEO ADD ERASE MUTE P.STD S.STD MTS SURR. 1 Turn off your cable box. 2 Press the SET button on your TV's remote control. 3 Press the CABLE button on your TV's remote control. 4 Using the number buttons on your remote control, enter both digits...
... cable box code listed on page 36 of this manual for your brand of cable box. If no other codes listed for your brand of cable box. Setting Up the Remote to Operate Your Cable Box POWER POWER CABLE TV VCR CABLE SET SET 1 4 7 +100 PIP 2 5 8 0 CH.SCAN 3 NUMBER 6 BUTTONS 9 DISPLAY ASPECT SWAP STILL MENU VOL VOL CH TV/VIDEO ADD ERASE MUTE P.STD S.STD MTS SURR. 1 Turn off your cable box. 2 Press the SET button on your TV's remote control. 3 Press the CABLE button on your TV's remote control. 4 Using the number buttons on your remote control, enter both digits...
Instruction Manual
Page 40
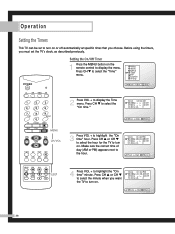
... time." 3 Press VOL + to select the "Time" menu. Before using the timers, you choose. PRE-CH REW PLAY FF SLEEP P.SIZE REC LOCATE STOP PAUSE PIP CH SLEEP 4 Press VOL + to display the menu. Setting the On/Off Timer 1 Press the MENU button on the remote control to highlight the "On time" minute. Operation Setting the Timers This TV can be set to turn on or off automatically at specific times that you must set the TV...
... time." 3 Press VOL + to select the "Time" menu. Before using the timers, you choose. PRE-CH REW PLAY FF SLEEP P.SIZE REC LOCATE STOP PAUSE PIP CH SLEEP 4 Press VOL + to display the menu. Setting the On/Off Timer 1 Press the MENU button on the remote control to highlight the "On time" minute. Operation Setting the Timers This TV can be set to turn on or off automatically at specific times that you must set the TV...
Instruction Manual
Page 47
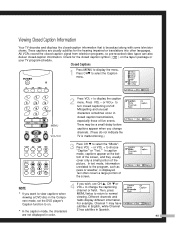
... turn closed captioning on the tape's package or your TV program-schedule. Press CHw to display the caption menu. TV VCR CABLE SET 1 2 3 4 5 6 7 +100 PIP 8 0 CH.SCAN 9 DISPLAY ASPECT SWAP STILL MENU MENU VOL CH VOL VOL/CH 2 Press VOL + to select the Caption menu. or VOL+ to change channels. (These do not indicate the TV is displayed. In caption mode, captions appear at the bottom of the screen, and they usually cover only a small portion of the screen. Check...
... turn closed captioning on the tape's package or your TV program-schedule. Press CHw to display the caption menu. TV VCR CABLE SET 1 2 3 4 5 6 7 +100 PIP 8 0 CH.SCAN 9 DISPLAY ASPECT SWAP STILL MENU MENU VOL CH VOL VOL/CH 2 Press VOL + to select the Caption menu. or VOL+ to change channels. (These do not indicate the TV is displayed. In caption mode, captions appear at the bottom of the screen, and they usually cover only a small portion of the screen. Check...

Instruction Manual
Page 48
... menu. and "Ext." POWER TV VCR CABLE SET Setting Up External Speakers 1 Press the MENU button on the remote control to switch between the external speakers and your audio system. 2 Connect speaker cables from the "L" and "R" EXTERNAL SPEAKER jacks on the back of your TV are only for connecting to external speakers, and using them for any other connection can hear more vivid stereo sound if you connect external speakers to display the Setup menu. options. Press CHw to select "Setup." 1 2 3 4 5 6 7 +100 PIP 8 0 CH.SCAN 9 DISPLAY ASPECT SWAP STILL MENU MENU...
... menu. and "Ext." POWER TV VCR CABLE SET Setting Up External Speakers 1 Press the MENU button on the remote control to switch between the external speakers and your audio system. 2 Connect speaker cables from the "L" and "R" EXTERNAL SPEAKER jacks on the back of your TV are only for connecting to external speakers, and using them for any other connection can hear more vivid stereo sound if you connect external speakers to display the Setup menu. options. Press CHw to select "Setup." 1 2 3 4 5 6 7 +100 PIP 8 0 CH.SCAN 9 DISPLAY ASPECT SWAP STILL MENU MENU...
Instruction Manual
Page 49
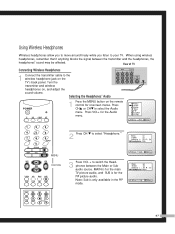
...' Audio POWER TV VCR CABLE SET 1 Press the MENU button on -screen menus. Note: Sub is for the PIP picture audio. When using wireless headphones, remember that if anything blocks the signal between the Main or Sub audio source. Press VOL+ for on the remote control for the Audio menu. 1 2 3 4 5 6 7 +100 PIP 8 0 CH.SCAN 9 DISPLAY ASPECT SWAP STILL MENU MENU VOL VOL CH CH/VOL TV/VIDEO ADD ERASE MUTE P.STD S.STD MTS SURR. Rear of TV Connecting Wireless...
...' Audio POWER TV VCR CABLE SET 1 Press the MENU button on -screen menus. Note: Sub is for the PIP picture audio. When using wireless headphones, remember that if anything blocks the signal between the Main or Sub audio source. Press VOL+ for on the remote control for the Audio menu. 1 2 3 4 5 6 7 +100 PIP 8 0 CH.SCAN 9 DISPLAY ASPECT SWAP STILL MENU MENU VOL VOL CH CH/VOL TV/VIDEO ADD ERASE MUTE P.STD S.STD MTS SURR. Rear of TV Connecting Wireless...
Instruction Manual
Page 50
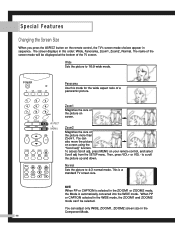
... mode. POWER TV VCR CABLE SET Panorama Use this order: Wide, Panorama, Zoom1, Zoom2, Normal. You can adjust only WIDE, ZOOM1, ZOOM2 screen size in the WIDE mode, the ZOOM1 and ZOOM2 mode can't be displayed at the bottom of a panoramic picture. 1 2 3 4 5 6 7 +100 PIP SWAP 8 0 CH.SCAN STILL 9 DISPLAY ASPECT MENU ASPECT MENU VOL VOL CH TV/VIDEO ADD ERASE MUTE P.STD S.STD MTS SURR. Then, press VOL+ or VOL - Special Features Changing...
... mode. POWER TV VCR CABLE SET Panorama Use this order: Wide, Panorama, Zoom1, Zoom2, Normal. You can adjust only WIDE, ZOOM1, ZOOM2 screen size in the WIDE mode, the ZOOM1 and ZOOM2 mode can't be displayed at the bottom of a panoramic picture. 1 2 3 4 5 6 7 +100 PIP SWAP 8 0 CH.SCAN STILL 9 DISPLAY ASPECT MENU ASPECT MENU VOL VOL CH TV/VIDEO ADD ERASE MUTE P.STD S.STD MTS SURR. Then, press VOL+ or VOL - Special Features Changing...
Instruction Manual
Page 51
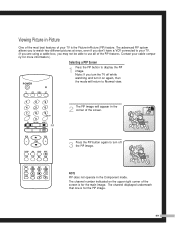
... view. TV VCR CABLE SET 1 2 3 4 5 6 2 The PIP image will return to turn off while watching and turn the TV off the PIP image. PRE-CH REW PLAY FF SLEEP REC STOP PAUSE P.SIZE LOCATE PIP CH NOTE PIP does not operate in the Component mode. The channel displayed underneath that one is for the PIP image. 49 Contact your cable company for more information.) Selecting a PIP Screen POWER 1 Press the PIP button to your TV. (If you are using a cable box...
... view. TV VCR CABLE SET 1 2 3 4 5 6 2 The PIP image will return to turn off while watching and turn the TV off the PIP image. PRE-CH REW PLAY FF SLEEP REC STOP PAUSE P.SIZE LOCATE PIP CH NOTE PIP does not operate in the Component mode. The channel displayed underneath that one is for the PIP image. 49 Contact your cable company for more information.) Selecting a PIP Screen POWER 1 Press the PIP button to your TV. (If you are using a cable box...
Instruction Manual
Page 54
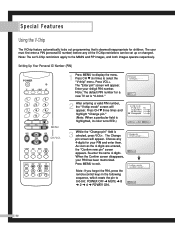
... Confirm screen disappears, your 4-digit PIN number. Setting Up Your Personal ID Number (PIN) POWER TV VCR CABLE SET 1 2 3 4 5 6 7 +100 PIP 8 0 CH.SCAN 9 DISPLAY ASPECT SWAP STILL MENU MENU VOL VOL CH CH/VOL TV/VIDEO ADD ERASE MUTE P.STD S.STD MTS SURR. Choose any of the V-Chip restrictions can be set up or changed. Note: If you forget the PIN, press the remote-control keys in the following sequence, which resets the...
... Confirm screen disappears, your 4-digit PIN number. Setting Up Your Personal ID Number (PIN) POWER TV VCR CABLE SET 1 2 3 4 5 6 7 +100 PIP 8 0 CH.SCAN 9 DISPLAY ASPECT SWAP STILL MENU MENU VOL VOL CH CH/VOL TV/VIDEO ADD ERASE MUTE P.STD S.STD MTS SURR. Choose any of the V-Chip restrictions can be set up or changed. Note: If you forget the PIN, press the remote-control keys in the following sequence, which resets the...
Instruction Manual
Page 61
... place, unplug the power cord for one system may have formed inside . • Wipe your TV. A TV designed for at least two hours so that moisture that may not work properly with a clean, dry cloth. Cabinet • Never open the cabinet or touch the parts inside the unit can dry completely. Never use around the world. Using the TV in use water, cleaning fluids, wax...
... place, unplug the power cord for one system may have formed inside . • Wipe your TV. A TV designed for at least two hours so that moisture that may not work properly with a clean, dry cloth. Cabinet • Never open the cabinet or touch the parts inside the unit can dry completely. Never use around the world. Using the TV in use water, cleaning fluids, wax...


