User Manual
Page 2
...Burn-in is making a "cracking" noise. To avoid this, vary the programming and images, and primarily display full screen moving . In the United States : 1-800-SAMSUNG (1-800-726-7864) - The above effect are not covered by the difference of the product. • Avoid operating...or replacements, accessories, options, upgrades, or consumables. Transportation to reduce the degree of brightness and contrast of the screen when displaying a still image. • Heat on SAMSUNG products purchased in the United States, for longer than 5% of the product. • The product is not...
...Burn-in is making a "cracking" noise. To avoid this, vary the programming and images, and primarily display full screen moving . In the United States : 1-800-SAMSUNG (1-800-726-7864) - The above effect are not covered by the difference of the product. • Avoid operating...or replacements, accessories, options, upgrades, or consumables. Transportation to reduce the degree of brightness and contrast of the screen when displaying a still image. • Heat on SAMSUNG products purchased in the United States, for longer than 5% of the product. • The product is not...
User Manual
Page 3
... Connecting to a Wired Network 25 Connecting to a Wireless Network 27 yy Media Play 32 Connecting a USB Device 32 Connecting to your PC through a network 32 Screen Display 34 Playing Multiple Files 37 Media Play - TOOLS t This function can be used by Step Guide Check here for instructions on how to the... 51 yy Assembling the Cables 52 yy Securing the Installation Space 52 yy Securing the TV to open the relevant submenu within the OSD (on screen display). 3 English
... Connecting to a Wired Network 25 Connecting to a Wireless Network 27 yy Media Play 32 Connecting a USB Device 32 Connecting to your PC through a network 32 Screen Display 34 Playing Multiple Files 37 Media Play - TOOLS t This function can be used by Step Guide Check here for instructions on how to the... 51 yy Assembling the Cables 52 yy Securing the Installation Space 52 yy Securing the TV to open the relevant submenu within the OSD (on screen display). 3 English
User Manual
Page 6
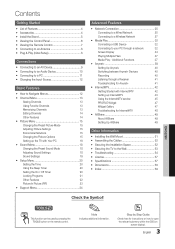
...volume. It is on and lights up in standby mode for example). Displays an on-screen menu, the OSD (on the remote control. Blinks and turns off when the power... the z buttons as you would use the ◄ and ► buttons on the remote control. In the on-screen menu, use this spot on or off. In the OSD, use the y buttons as you are away on the ...model. A small amount of time (when you would use the ENTERE button on screen display) of your TV in standby mode. Getting Started Viewing the Control Panel ✎✎The product color and ...
...volume. It is on and lights up in standby mode for example). Displays an on-screen menu, the OSD (on the remote control. Blinks and turns off when the power... the z buttons as you would use the ◄ and ► buttons on the remote control. In the on-screen menu, use this spot on or off. In the OSD, use the y buttons as you are away on the ...model. A small amount of time (when you would use the ENTERE button on screen display) of your TV in standby mode. Getting Started Viewing the Control Panel ✎✎The product color and ...
User Manual
Page 7
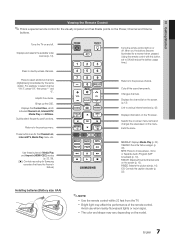
... Turns the TV on the model. 7 English Press to select channel "54-3", press "54", then press "-" and "3". These buttons are for Samsung recorders that have the Anynet+ feature) POWER ON/OFF SOURCE MUTE PRE-CH CONTENT CH LIST MENU @TV INTERNET TOOLS INFO RETURN EXIT A B CD... the same station. Adjusts the volume. Selects the on-screen menu items and changes the values seen on the screen (p. 13). Displays the channel list on the TV screen. MTS: Press to the previous menu. Displays information on the screen (p. 13). xx Bright light may vary depending on and...
... Turns the TV on the model. 7 English Press to select channel "54-3", press "54", then press "-" and "3". These buttons are for Samsung recorders that have the Anynet+ feature) POWER ON/OFF SOURCE MUTE PRE-CH CONTENT CH LIST MENU @TV INTERNET TOOLS INFO RETURN EXIT A B CD... the same station. Adjusts the volume. Selects the on-screen menu items and changes the values seen on the screen (p. 13). Displays the channel list on the TV screen. MTS: Press to the previous menu. Displays information on the screen (p. 13). xx Bright light may vary depending on and...
User Manual
Page 8
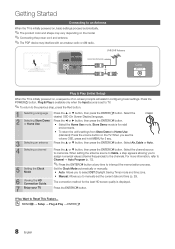
... Plug & Play (Initial Setup) When the TV is displayed. 7 Enjoy your TV. Press the POWERP button. Press the ENTERE button. Select the desired OSD (On Screen Display) language. 2 Selecting Store Demo Press the ◄ or ► button, then press the ENTERE button. Store Demo mode is for the best HD...
... Plug & Play (Initial Setup) When the TV is displayed. 7 Enjoy your TV. Press the POWERP button. Press the ENTERE button. Select the desired OSD (On Screen Display) language. 2 Selecting Store Demo Press the ◄ or ► button, then press the ENTERE button. Store Demo mode is for the best HD...
User Manual
Page 12
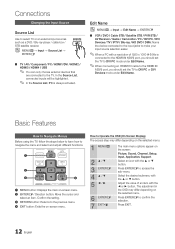
...with the ▲ or ▼ button. Connections Changing the Input Source Source List Use to Operate the OSD (On Screen Display) The access step may differ depending on -screen menu. 2 ENTERE / DMirEeDcIAt.iPon button: MoveMTthSe cursor and select an item.FCAVo.CnHfirm thP.eSIZsEetting. SOURCE Edit Name OO... to Navigate Menus Before using the TV, follow the steps below to learn how to the previous menu. 4 EXIT button: Exits the on-screen menu. CC 3 RETURN button: Returns to navigate the menu and select and adjust different functions. In the Source List, connected inputs will be...
...with the ▲ or ▼ button. Connections Changing the Input Source Source List Use to Operate the OSD (On Screen Display) The access step may differ depending on -screen menu. 2 ENTERE / DMirEeDcIAt.iPon button: MoveMTthSe cursor and select an item.FCAVo.CnHfirm thP.eSIZsEetting. SOURCE Edit Name OO... to Navigate Menus Before using the TV, follow the steps below to learn how to the previous menu. 4 EXIT button: Exits the on-screen menu. CC 3 RETURN button: Returns to navigate the menu and select and adjust different functions. In the Source List, connected inputs will be...
User Manual
Page 13
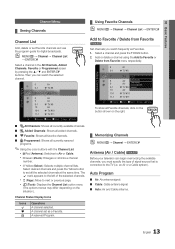
... program guide for digital broadcasts. OO MENUm → Channel → Channel List → ENTERE Select a channel in the All Channels, Added Channels, Favorite or Programmed screen by pressing the ▲ / ▼ and ENTERE buttons. Select a channel and press the TOOLS button. 2. A reserved Program. ¦¦ Memorizing Channels OO MENUm → Channel...
... program guide for digital broadcasts. OO MENUm → Channel → Channel List → ENTERE Select a channel in the All Channels, Added Channels, Favorite or Programmed screen by pressing the ▲ / ▼ and ENTERE buttons. Select a channel and press the TOOLS button. 2. A reserved Program. ¦¦ Memorizing Channels OO MENUm → Channel...
User Manual
Page 15
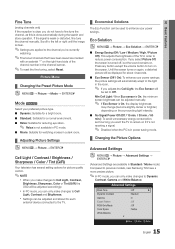
...currently watching. ✎✎Fine tuned channels that have been saved are available in Standard / Movie mode) Compared to previous models, new Samsung TVs have to fine tune the channel, as this is done automatically during the search and store operation. Picture Menu ¦¦ ...Medium : 0 : Off : Off : Native ▼ U Move E Enter R Return 15 English If the signal is turned off, but the sound remains on the screen. Until the screen turns on again, a distorted picture will automatically adapt to the light in order to Cell Light, Contrast and Brightness. Min Cell Light: When Eco...
...currently watching. ✎✎Fine tuned channels that have been saved are available in Standard / Movie mode) Compared to previous models, new Samsung TVs have to fine tune the channel, as this is done automatically during the search and store operation. Picture Menu ¦¦ ...Medium : 0 : Off : Off : Native ▼ U Move E Enter R Return 15 English If the signal is turned off, but the sound remains on the screen. Until the screen turns on again, a distorted picture will automatically adapt to the light in order to Cell Light, Contrast and Brightness. Min Cell Light: When Eco...
User Manual
Page 16
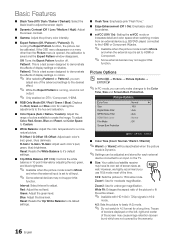
... PC mode, you can only make changes to adjust. Picture Options Color Tone Size Digital Noise Filter MPEG Noise Filter HDMI Black Level Film Mode Screen Burn Protection : Normal ► : 16:9 : Auto : Auto : Normal : Off U Move E Enter R Return ■■ Color Tone (Cool / Normal /... settings on shades. Pattern1: This is saved and the Expert Pattern window disappears. Interval: Select interval to the Color Tone, Size and Screen Burn Protection. Zoom1: Use for a stronger magnification. Off: Turns the Expert Pattern function off. Zoom2: Use for moderate magnification. Basic ...
... PC mode, you can only make changes to adjust. Picture Options Color Tone Size Digital Noise Filter MPEG Noise Filter HDMI Black Level Film Mode Screen Burn Protection : Normal ► : 16:9 : Auto : Auto : Normal : Off U Move E Enter R Return ■■ Color Tone (Cool / Normal /... settings on shades. Pattern1: This is saved and the Expert Pattern window disappears. Interval: Select interval to the Color Tone, Size and Screen Burn Protection. Zoom1: Use for a stronger magnification. Off: Turns the Expert Pattern function off. Zoom2: Use for moderate magnification. Basic ...

User Manual
Page 17
... Component (480i, 480p) DTV(1080i), Component (1080i, 1080p), HDMI (720p, 1080i, 1080p) PC Picture Size 16:9, Zoom1, Zoom2, 4:3 16:9, 4:3, Wide Fit, Screen Fit 16:9, 4:3 ■■ Digital Noise Filter (Off / Low / Medium / High / Auto / Auto Visualization): If the broadcast signal received by your TV is... on the TV. Auto Protection Time (10 min. / 20 min. / 40 min. / 1 hour / Off): Set the time the screen remains idle with screen burn prevention technology. Press the or ► button to select Position. 2. Press the ► button to select Reset. 6. Press the ◄...
... Component (480i, 480p) DTV(1080i), Component (1080i, 1080p), HDMI (720p, 1080i, 1080p) PC Picture Size 16:9, Zoom1, Zoom2, 4:3 16:9, 4:3, Wide Fit, Screen Fit 16:9, 4:3 ■■ Digital Noise Filter (Off / Low / Medium / High / Auto / Auto Visualization): If the broadcast signal received by your TV is... on the TV. Auto Protection Time (10 min. / 20 min. / 40 min. / 1 hour / Off): Set the time the screen remains idle with screen burn prevention technology. Press the or ► button to select Position. 2. Press the ► button to select Reset. 6. Press the ◄...
User Manual
Page 18
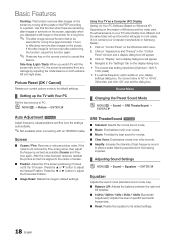
...18 English OO MENUm → Picture → ENTERE Using Your TV as possible (Coarse) and Finetune again. Click on your computer manufacturer or Samsung Dealer.) 1. Otherwise, just click 'OK' and exit the dialog box. Sound Menu ¦¦ Changing the Preset Sound Mode OO MENUm ... ENTERE Auto Adjustment t Adjust frequency values/positions and fine tune the settings automatically. ✎✎Not available when connecting with the screen ratio set to 4:3, the screen is aligned to PC. yy The correct size setting (resolution) [Optimum: 1920 X 1080 pixels] yy If a vertical-frequency ...
...18 English OO MENUm → Picture → ENTERE Using Your TV as possible (Coarse) and Finetune again. Click on your computer manufacturer or Samsung Dealer.) 1. Otherwise, just click 'OK' and exit the dialog box. Sound Menu ¦¦ Changing the Preset Sound Mode OO MENUm ... ENTERE Auto Adjustment t Adjust frequency values/positions and fine tune the settings automatically. ✎✎Not available when connecting with the screen ratio set to 4:3, the screen is aligned to PC. yy The correct size setting (resolution) [Optimum: 1920 X 1080 pixels] yy If a vertical-frequency ...

User Manual
Page 22
... press the ENTERE button. ✎✎Choose between English, Español and Français. The default is Black. When the Confirm screen disappears, your PIN and enter them. Default / Service1~Service6 / CC1~CC4 / Text1~Text4: (digital channels only) The Digital Captions function ... Default, White, Black, Red, Green, Blue, Yellow, Magenta and Cyan. Background Opacity: This adjusts the opacity of captions depends on the screen. ✎✎ The Caption feature doesn't work with more sensitive material. Basic Features xx Even if you forget the PIN, press the remote...
... press the ENTERE button. ✎✎Choose between English, Español and Français. The default is Black. When the Confirm screen disappears, your PIN and enter them. Default / Service1~Service6 / CC1~CC4 / Text1~Text4: (digital channels only) The Digital Captions function ... Default, White, Black, Red, Green, Blue, Yellow, Magenta and Cyan. Background Opacity: This adjusts the opacity of captions depends on the screen. ✎✎ The Caption feature doesn't work with more sensitive material. Basic Features xx Even if you forget the PIN, press the remote...

User Manual
Page 23
...instructions (p. 25). When BD Wise is turned On, the picture mode is automatically changed to the optimal resolution. ✎✎ Available when connecting Samsung products that support BD Wise through a HDMI cable. ■■ Menu Transparency (Bright / Dark): Set the Transparency of the menu. ■...the sub-screen. ■■ Channel: Select the channel for the sub-screen. ■■ Size (Õ / Ã): Select a size for the sub-picture. ■■ Position Select a position for game mode -- xx You may notice reduced picture quality. You must have a Samsung Mobile ...
...instructions (p. 25). When BD Wise is turned On, the picture mode is automatically changed to the optimal resolution. ✎✎ Available when connecting Samsung products that support BD Wise through a HDMI cable. ■■ Menu Transparency (Bright / Dark): Set the Transparency of the menu. ■...the sub-screen. ■■ Channel: Select the channel for the sub-screen. ■■ Size (Õ / Ã): Select a size for the sub-picture. ■■ Position Select a position for game mode -- xx You may notice reduced picture quality. You must have a Samsung Mobile ...
User Manual
Page 25
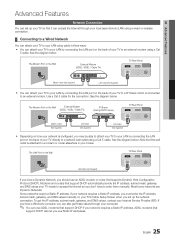
... your network is configured, you may be able to attach your TV to your LAN by connecting the LAN port on your TV's Cable Setup Screen when you set up the network connection. Modems and routers that supports Dynamic Host Configuration Protocol (DHCP). To get these values through your local area...
... your network is configured, you may be able to attach your TV to your LAN by connecting the LAN port on your TV's Cable Setup Screen when you set up the network connection. Modems and routers that supports Dynamic Host Configuration Protocol (DHCP). To get these values through your local area...
User Manual
Page 26
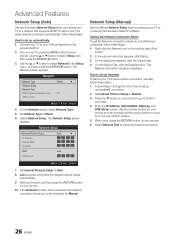
... Auto. 8. Enter the IP Address, Subnet Mask, Gateway, and DNS Server values. Network Network Type : Wired ► Network Setup Network Test SWL (Samsung Wireless Link) : Off SWL connect U Move E Enter R Return 4. Set Internet Protocol Setup to set up manually To set up your TV's cable ...requires a Static IP address. Press the ▼ button on your remote. 10. Select Network Test to the first entry field. 4. The Network screen appears. Use the ▲ or ▼ button to a network that supports DHCP. Network Setup (Manual) Use the Manual Network Setup when connecting...
... Auto. 8. Enter the IP Address, Subnet Mask, Gateway, and DNS Server values. Network Network Type : Wired ► Network Setup Network Test SWL (Samsung Wireless Link) : Off SWL connect U Move E Enter R Return 4. Set Internet Protocol Setup to set up manually To set up your TV's cable ...requires a Static IP address. Press the ▼ button on your remote. 10. Select Network Test to the first entry field. 4. The Network screen appears. Use the ▲ or ▼ button to a network that supports DHCP. Network Setup (Manual) Use the Manual Network Setup when connecting...
User Manual
Page 28
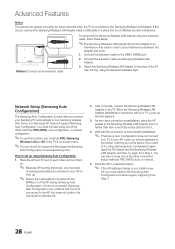
...Step 1. Place the AP and TV next to each other and turn them on the screen notifying you of the failure. When the Samsung Wireless LAN Adapter establishes a connection with your Samsung TV automatically to non-Samsung wireless APs. If you want to try using the extension cable, follow these steps: ... to the back of the TV near the top, using Samsung Auto Configuration 1. After 2 minutes, connect the Samsung Wireless LAN Adapter to the USB 1 (HDD) port. 2. How to set SWL (Samsung Wireless Link) to Off in the TV's on-screen menu. ✎✎You can also choose one of the...
...Step 1. Place the AP and TV next to each other and turn them on the screen notifying you of the failure. When the Samsung Wireless LAN Adapter establishes a connection with your Samsung TV automatically to non-Samsung wireless APs. If you want to try using the extension cable, follow these steps: ... to the back of the TV near the top, using Samsung Auto Configuration 1. After 2 minutes, connect the Samsung Wireless LAN Adapter to the USB 1 (HDD) port. 2. How to set SWL (Samsung Wireless Link) to Off in the TV's on-screen menu. ✎✎You can also choose one of the...
User Manual
Page 29
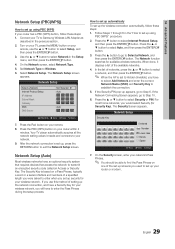
... to set up your network's Pass Phrase. ✎✎ You should be able to find the Pass Phrase on your remote. 8. If the Network Connecting Screen appears, go to select Internet Protocol Setup, and then press the ENTERE button. Security Key Network Setup 0 entered A B C D E F G 0~9 Number H I J K LMN Lower case ...security for available wireless networks. Press the ▼ button to Step 10. 6. Press the ▲ or ▼ button to Samsung Wireless LAN Adapter as described in the "How to select Setup, and then press the ENTERE button. 3. Connect your network. 9. ...
... to set up your network's Pass Phrase. ✎✎ You should be able to find the Pass Phrase on your remote. 8. If the Network Connecting Screen appears, go to select Internet Protocol Setup, and then press the ENTERE button. Security Key Network Setup 0 entered A B C D E F G 0~9 Number H I J K LMN Lower case ...security for available wireless networks. Press the ▼ button to Step 10. 6. Press the ▲ or ▼ button to Samsung Wireless LAN Adapter as described in the "How to select Setup, and then press the ENTERE button. 3. Connect your network. 9. ...
User Manual
Page 30
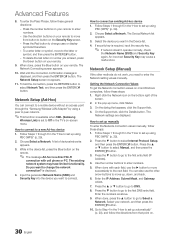
... (WPS)" (p. 29). 2. Use the number buttons to set up using a peer to peer network. ✎✎This function is available when SWL (Samsung Wireless Link) is set up menu, click Status. 3. When done, press the ▲ button to go to change case or display symbols/characters. --...Enter the numbers as above. 9. Select your remote to set to a new Ad-hoc device 1. On the dialog that point on -screen menu. Follow Steps 1 through the "Samsung Wireless LAN Adapter" by using PBC (WPS)" (p. 29). 2. The Device/Network list appears. 3. Right click the Network icon on most...
... (WPS)" (p. 29). 2. Use the number buttons to set up using a peer to peer network. ✎✎This function is available when SWL (Samsung Wireless Link) is set up menu, click Status. 3. When done, press the ▲ button to go to change case or display symbols/characters. --...Enter the numbers as above. 9. Select your remote to set to a new Ad-hoc device 1. On the dialog that point on -screen menu. Follow Steps 1 through the "Samsung Wireless LAN Adapter" by using PBC (WPS)" (p. 29). 2. The Device/Network list appears. 3. Right click the Network icon on most...

User Manual
Page 32
...3 parts of the subnet address of the TV. 3. You can connect the TV to the USB 1 (HDD) or USB 2 port on the screen. Connect a USB device containing photo, music and/or movie files to the PC directly without connecting it through a network connection in same subnet. TV... to "Network Connection" (p. 25). - Using a LAN cable, connect between the external modem and the PC onto which provides the standard current from "www.samsung.com." Please contact the manufacturerof the device for support. IP Address: 123.456.789.**) 2. Turn on a USB Mass Storage Class (MSC) device. Then you...
...3 parts of the subnet address of the TV. 3. You can connect the TV to the USB 1 (HDD) or USB 2 port on the screen. Connect a USB device containing photo, music and/or movie files to the PC directly without connecting it through a network connection in same subnet. TV... to "Network Connection" (p. 25). - Using a LAN cable, connect between the external modem and the PC onto which provides the standard current from "www.samsung.com." Please contact the manufacturerof the device for support. IP Address: 123.456.789.**) 2. Turn on a USB Mass Storage Class (MSC) device. Then you...

User Manual
Page 33
... Media Play xx MTP (Media Transfer Protocol) is playing. ✎✎Divx DRM, Multi-audio, embedded captions are not supported. ✎✎Samsung PC Share manager should be released automatically when connected to display on the functions of data. xx If a USB device connected to the TV is... not played, connect the USB device to a PC through a network connection, depending on the screen. xx Sorting files by the firewall program on your files to 1000 files can only use Media Play mode through a network: xx The Background Music...
... Media Play xx MTP (Media Transfer Protocol) is playing. ✎✎Divx DRM, Multi-audio, embedded captions are not supported. ✎✎Samsung PC Share manager should be released automatically when connected to display on the functions of data. xx If a USB device connected to the TV is... not played, connect the USB device to a PC through a network connection, depending on the screen. xx Sorting files by the firewall program on your files to 1000 files can only use Media Play mode through a network: xx The Background Music...


