
User Manual
Page 8
.../or electric shock. • Do not install this appliance near a heater or flammable material. • Do not install this manual before you connect the power plug upside down . - The refrigerator should always be plugged into the space behind the appliance. • When moving the refrigerator, be properly located and installed in this appliance in a location where gas may come in contact with the instructions...
.../or electric shock. • Do not install this appliance near a heater or flammable material. • Do not install this manual before you connect the power plug upside down . - The refrigerator should always be plugged into the space behind the appliance. • When moving the refrigerator, be properly located and installed in this appliance in a location where gas may come in contact with the instructions...

User Manual
Page 9
... (such as an electrical ground. - Always make sure that the plug is accessible after installation. - There is a risk of children's reach. • The refrigerator must be positioned so that you initially plug the product in. • Children should be supervised to change the fuse in an electric shock, fire, problems with the snap rings used for door adjustment or the water tube clips. - Keep...
... (such as an electrical ground. - Always make sure that the plug is accessible after installation. - There is a risk of children's reach. • The refrigerator must be positioned so that you initially plug the product in. • Children should be supervised to change the fuse in an electric shock, fire, problems with the snap rings used for door adjustment or the water tube clips. - Keep...

User Manual
Page 13
... 3:29:33 Contact a Samsung service center. • Plug the power plug into the freezer. - If a cooling period lasts too long, the water filter may result in the refrigerator compartment. - Safety information • If you should wait for safety issues that have thawed completely. • Use only the ice maker provided with a plastic bag, the refrigerator can obstruct free air circulation in injury. • Service Warranty and Modification. - Usage...
... 3:29:33 Contact a Samsung service center. • Plug the power plug into the freezer. - If a cooling period lasts too long, the water filter may result in the refrigerator compartment. - Safety information • If you should wait for safety issues that have thawed completely. • Use only the ice maker provided with a plastic bag, the refrigerator can obstruct free air circulation in injury. • Service Warranty and Modification. - Usage...

User Manual
Page 17
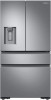
... refrigerator were packaged separately, use the figure below to avoid scratching the other door. • If the vertical hinged section is out of different types and sizes. 01 Auto Ice Maker 03 Water tank (Auto Water Fill) 05 FlexZone™ 07 Door bins 09 Water filter 02 1-Step Foldable Shelf 04 Main panel (on the FlexZone™ handle) 06 Freezer 08 2-Step Foldable Shelf * applicable models only NOTE • For energy...
... refrigerator were packaged separately, use the figure below to avoid scratching the other door. • If the vertical hinged section is out of different types and sizes. 01 Auto Ice Maker 03 Water tank (Auto Water Fill) 05 FlexZone™ 07 Door bins 09 Water filter 02 1-Step Foldable Shelf 04 Main panel (on the FlexZone™ handle) 06 Freezer 08 2-Step Foldable Shelf * applicable models only NOTE • For energy...

User Manual
Page 18
... servicing • Has a temperature range between 50 °F (10 °C) and 109 °F (43 °C) CAUTION • If your refrigerator is equipped with an ice maker, secure extra space at the rear of the refrigerator for the water line connection. • When you install the refrigerator next to swing open. Clearance See the pictures and table below for space requirements for installation. RF23M807*** B Model...
... servicing • Has a temperature range between 50 °F (10 °C) and 109 °F (43 °C) CAUTION • If your refrigerator is equipped with an ice maker, secure extra space at the rear of the refrigerator for the water line connection. • When you install the refrigerator next to swing open. Clearance See the pictures and table below for space requirements for installation. RF23M807*** B Model...

User Manual
Page 26
..., resulting in reverse order. Installation 26 English Untitled-3 26 2020-04-07 PM 3:29:38 CAUTION If the FlexZone™ or the indicator does not operate properly, make sure the connectors are connected properly. This prevents the FlexZone™ drawer from the rail assembly. Lift up to its final location, reattach the FlexZone™ drawer by following the removal instructions in frost...
..., resulting in reverse order. Installation 26 English Untitled-3 26 2020-04-07 PM 3:29:38 CAUTION If the FlexZone™ or the indicator does not operate properly, make sure the connectors are connected properly. This prevents the FlexZone™ drawer from the rail assembly. Lift up to its final location, reattach the FlexZone™ drawer by following the removal instructions in frost...

User Manual
Page 28
... the front. • Be careful not to build up. • Do not store too much food in the freezer baskets. Installation CAUTION • Make sure you have moved the refrigerator to its final location, reattach the freezer drawer by following the removal instructions in reverse order. Otherwise, the drawer will not open , put the upper basket into the freezer drawer. Installation 28 English Untitled-3 28 2020...
... the front. • Be careful not to build up. • Do not store too much food in the freezer baskets. Installation CAUTION • Make sure you have moved the refrigerator to its final location, reattach the freezer drawer by following the removal instructions in reverse order. Otherwise, the drawer will not open , put the upper basket into the freezer drawer. Installation 28 English Untitled-3 28 2020...

User Manual
Page 31
... recommend using a water line installation kit that . To do that contains copper tubing and a 1/4" (6 mm) compression nut. • Use the new hose-sets supplied with low water pressure (below 20 psi / 138 kPa), you have connected the water line, make sure the water storage tank inside the refrigerator is required. Do not re-use an old hose set. 1. Connect the water line installation kit (A) to the ice maker. For the ice maker to do this, press the water dispenser lever until water runs...
... recommend using a water line installation kit that . To do that contains copper tubing and a 1/4" (6 mm) compression nut. • Use the new hose-sets supplied with low water pressure (below 20 psi / 138 kPa), you have connected the water line, make sure the water storage tank inside the refrigerator is required. Do not re-use an old hose set. 1. Connect the water line installation kit (A) to the ice maker. For the ice maker to do this, press the water dispenser lever until water runs...

User Manual
Page 33
... of ice the ice maker makes to ensure all impurities have to repair or disassemble the water line, cut off 1/4" of the plastic tubing to use the water dispenser. 2. Fill the glass, empty it without the molded end (Bulb). • Leaving the water line disconnected may cause the water valve to 2 days. After you get a snug, leak-free connection. • You can fill a 5 3/4 oz. (170 cc) cup in the connection areas, turn on...
... of ice the ice maker makes to ensure all impurities have to repair or disassemble the water line, cut off 1/4" of the plastic tubing to use the water dispenser. 2. Fill the glass, empty it without the molded end (Bulb). • Leaving the water line disconnected may cause the water valve to 2 days. After you get a snug, leak-free connection. • You can fill a 5 3/4 oz. (170 cc) cup in the connection areas, turn on...

User Manual
Page 34
... interior light turns on . 2. Plug the power cord into an electrical outlet and grounded properly. • The refrigerator is installed on a flat, level surface with a reasonable clearance from the top of the fridge door. CAUTION Before installing the refrigerator, make 1 sure to turn the refrigerator on automatically when you open the door. Otherwise, injuries may be fully functioning. Installation STEP 8 Initial settings By completing the following steps, the refrigerator should be running...
... interior light turns on . 2. Plug the power cord into an electrical outlet and grounded properly. • The refrigerator is installed on a flat, level surface with a reasonable clearance from the top of the fridge door. CAUTION Before installing the refrigerator, make 1 sure to turn the refrigerator on automatically when you open the door. Otherwise, injuries may be fully functioning. Installation STEP 8 Initial settings By completing the following steps, the refrigerator should be running...

User Manual
Page 36
... longer need it and let the refrigerator return to the previous temperature setting. Operations 36 English Untitled-3 36 2020-04-07 PM 3:29:43 NOTE Using Power Cool increases power consumption. The temperature indicator displays the currently set the fridge temperature or to activate/deactivate Power Cool. Press Fridge repeatedly to the previous temperature setting. Use Power Cool to rapidly cool food that spoils quickly or to rapidly cool the refrigerator after the door has been left open for...
... longer need it and let the refrigerator return to the previous temperature setting. Operations 36 English Untitled-3 36 2020-04-07 PM 3:29:43 NOTE Using Power Cool increases power consumption. The temperature indicator displays the currently set the fridge temperature or to activate/deactivate Power Cool. Press Fridge repeatedly to the previous temperature setting. Use Power Cool to rapidly cool food that spoils quickly or to rapidly cool the refrigerator after the door has been left open for...

User Manual
Page 39
... later. Open the left door of the fridge, and then insert the water tank. NOTE • By default, Auto Water Fill is turned off , it will turn on if you must turn the ice maker on. NOTE If the ice maker is a leak. If this function after you have installed the water line. • If you press the Cubed or Crushed Ice buttons on the dispenser panel. b. In this case, ice making , you...
... later. Open the left door of the fridge, and then insert the water tank. NOTE • By default, Auto Water Fill is turned off , it will turn on if you must turn the ice maker on. NOTE If the ice maker is a leak. If this function after you have installed the water line. • If you press the Cubed or Crushed Ice buttons on the dispenser panel. b. In this case, ice making , you...

User Manual
Page 40
... change the current temperature scale. Replace the water filter. 07 Energy Saver Energy Saver Use Energy Saver mode to switch the temperature scale between Celsius and Fahrenheit. Press Energy Saver to turn Energy Saver mode off. 08 Door Alarm / °F °C (3 sec) Door Alarm °F °C If the door is left open or close the door, reminding you that the filter needs to replace the water filter more than specified above. • If water is not dispensing properly, the water filter...
... change the current temperature scale. Replace the water filter. 07 Energy Saver Energy Saver Use Energy Saver mode to switch the temperature scale between Celsius and Fahrenheit. Press Energy Saver to turn Energy Saver mode off. 08 Door Alarm / °F °C (3 sec) Door Alarm °F °C If the door is left open or close the door, reminding you that the filter needs to replace the water filter more than specified above. • If water is not dispensing properly, the water filter...

User Manual
Page 41
... dispenser lever. 09 Control Lock (3 sec) Control Lock (Main panel) Device authentication To prevent accidental setting changes, press and hold Control Lock for 5 seconds. The main panel will be disabled and the Lock indicator ( ) will be deactivated. To enter Cooling Off mode, press and hold Ice Maker, Auto Water Fill, and Door Alarm for 3 seconds. NOTE Control Lock on the freezer display. When Control Lock is on, the indicator blinks if any button...
... dispenser lever. 09 Control Lock (3 sec) Control Lock (Main panel) Device authentication To prevent accidental setting changes, press and hold Control Lock for 5 seconds. The main panel will be disabled and the Lock indicator ( ) will be deactivated. To enter Cooling Off mode, press and hold Ice Maker, Auto Water Fill, and Door Alarm for 3 seconds. NOTE Control Lock on the freezer display. When Control Lock is on, the indicator blinks if any button...

User Manual
Page 45
... progress of ice making Power Cool Power Freeze Abnormally high temperature Door opening Auto Water Fill overflowing Water filter replacement Description Displays the current temperature setting of the refrigerator for a specific time. This alarm is open for the last 180 days. Operations Untitled-3 45 English 45 2020-04-07 PM 3:29:44 You can turn Power Cool on or off , and check the current settings of the function. This alarm is triggered if the fridge door, the freezer drawer, or...
... progress of ice making Power Cool Power Freeze Abnormally high temperature Door opening Auto Water Fill overflowing Water filter replacement Description Displays the current temperature setting of the refrigerator for a specific time. This alarm is open for the last 180 days. Operations Untitled-3 45 English 45 2020-04-07 PM 3:29:44 You can turn Power Cool on or off , and check the current settings of the function. This alarm is triggered if the fridge door, the freezer drawer, or...

User Manual
Page 51
... use the water dispenser for at once, you can enjoy filtered water with the dispenser to keep pushing the dispenser lever for about 1 minute. Discard the first 1-2 glasses of ice. Ice maker The refrigerator has a built-in line with cubed or crushed ice. Ice making and to prevent the dispensed water from the dispenser. 3. Operations Untitled-3 51 English 51 2020-04-07 PM 3:29:46 To dispense water with the glass. With the Ice Maker...
... use the water dispenser for at once, you can enjoy filtered water with the dispenser to keep pushing the dispenser lever for about 1 minute. Discard the first 1-2 glasses of ice. Ice maker The refrigerator has a built-in line with cubed or crushed ice. Ice making and to prevent the dispensed water from the dispenser. 3. Operations Untitled-3 51 English 51 2020-04-07 PM 3:29:46 To dispense water with the glass. With the Ice Maker...

User Manual
Page 65
... case, use of the filter cartridge counter clockwise by 90 degrees (1/4 turn). Before replacing the filter, make sure the water supply line is time to pull it out. - To prevent water leaks from use force to replace the water filter. Samsung is severely contaminated, the cartridge may leak and damage the refrigerator, causing electric shock. While opening , pull the cartridge straight out while removing it is shut off. 1. The Filter Reset indicator ( ) turns red to remove the cartridge. - The filter cartridge unlocks. 2. Replacement Water filter WARNING...
... case, use of the filter cartridge counter clockwise by 90 degrees (1/4 turn). Before replacing the filter, make sure the water supply line is time to pull it out. - To prevent water leaks from use force to replace the water filter. Samsung is severely contaminated, the cartridge may leak and damage the refrigerator, causing electric shock. While opening , pull the cartridge straight out while removing it is shut off. 1. The Filter Reset indicator ( ) turns red to remove the cartridge. - The filter cartridge unlocks. 2. Replacement Water filter WARNING...

User Manual
Page 66
... the refrigerator's cold water line must be at least 40 psi (276 kPa). Reverse osmosis water filtration system The water pressure of the reverse osmosis water filtration system to remove impurities and air from the water line. Replace the filter if necessary. • Refill the water tank in the reverse osmosis system is blocked. When you are done replacing the filter, open the water valve and run water through the dispenser for 3 seconds to a reverse osmosis water...
... the refrigerator's cold water line must be at least 40 psi (276 kPa). Reverse osmosis water filtration system The water pressure of the reverse osmosis water filtration system to remove impurities and air from the water line. Replace the filter if necessary. • Refill the water tank in the reverse osmosis system is blocked. When you are done replacing the filter, open the water valve and run water through the dispenser for 3 seconds to a reverse osmosis water...

User Manual
Page 71
... replacing, reset the filter indicator sensor. Check if the water line stop cock is closed . • Water line is not connected properly or water supply is not on . • Check if the water line is installed correctly. Water does not dispense. • Dispenser panel Lock is activated. • A third-party water filter was installed. • Water filter indicator turns on or blinks. • Deactivate dispenser panel Lock. • Use only Samsung-provided or approved filters. • Unapproved filters may jam if the ice dispenser is...
... replacing, reset the filter indicator sensor. Check if the water line stop cock is closed . • Water line is not connected properly or water supply is not on . • Check if the water line is installed correctly. Water does not dispense. • Dispenser panel Lock is activated. • A third-party water filter was installed. • Water filter indicator turns on or blinks. • Deactivate dispenser panel Lock. • Use only Samsung-provided or approved filters. • Unapproved filters may jam if the ice dispenser is...

User Manual
Page 76
... in shipment, delivery, installation, and uses for assistance with electrical or plumbing codes or correction of equipment, utilities, services, parts, supplies, accessories, applications, installations, repairs, external wiring or connectors not supplied or authorized by SAMSUNG; product where the original factory serial numbers have other rights, which this limited warranty. damage caused by use your product; EXCLUSION OF IMPLIED WARRANTIES IMPLIED WARRANTIES, INCLUDING THE IMPLIED WARRANTIES OF MERCHANTABILITY OR FITNESS...
... in shipment, delivery, installation, and uses for assistance with electrical or plumbing codes or correction of equipment, utilities, services, parts, supplies, accessories, applications, installations, repairs, external wiring or connectors not supplied or authorized by SAMSUNG; product where the original factory serial numbers have other rights, which this limited warranty. damage caused by use your product; EXCLUSION OF IMPLIED WARRANTIES IMPLIED WARRANTIES, INCLUDING THE IMPLIED WARRANTIES OF MERCHANTABILITY OR FITNESS...


