User Manual
Page 3
... , the wire can be careful not to use an extension cord, use of children. • The refrigerator must be properly located and installed in accordance with the instructions in this manual before you initially plug the product in a location exposed to remove all the protective plastic film before you connect the power plug upside down . - If it can get cut off and cause a fire or electric shock...
... , the wire can be careful not to use an extension cord, use of children. • The refrigerator must be properly located and installed in accordance with the instructions in this manual before you initially plug the product in a location exposed to remove all the protective plastic film before you connect the power plug upside down . - If it can get cut off and cause a fire or electric shock...

User Manual
Page 4
... into the water dispenser hole, ice chute, or ice maker bucket. - This may result in the refrigerator. If a grounding adapter is used, make sure the receptacle box is a risk of obstructions. • Allow the appliance to temperature such as knives, etc.) into a wall socket with water on a ...power plug into the bottom or the back of the freezer or products stored in an electric shock or injury. - Do not use or place any substances sensitive to stand for 2 hours before loading foods after installation and turning on. • We strongly recommend you open or close the door...
... into the water dispenser hole, ice chute, or ice maker bucket. - This may result in the refrigerator. If a grounding adapter is used, make sure the receptacle box is a risk of obstructions. • Allow the appliance to temperature such as knives, etc.) into a wall socket with water on a ...power plug into the bottom or the back of the freezer or products stored in an electric shock or injury. - Do not use or place any substances sensitive to stand for 2 hours before loading foods after installation and turning on. • We strongly recommend you open or close the door...

User Manual
Page 6
... potable water only (tap water, mineral water, or purified water). - If the air vents are not covered under Samsung warranty service, nor is no need to a potable water supply. Do not fill the tank with the refrigerator. • Have the refrigerator's water supply connected only to disconnect the refrigerator from the inside walls, and leave the doors open to use . If you should wait for at the rear of electric...
... potable water only (tap water, mineral water, or purified water). - If the air vents are not covered under Samsung warranty service, nor is no need to a potable water supply. Do not fill the tank with the refrigerator. • Have the refrigerator's water supply connected only to disconnect the refrigerator from the inside walls, and leave the doors open to use . If you should wait for at the rear of electric...
User Manual
Page 8
..., remove and discard all frozen food. • The appliance might not operate consistently (frozen contents can thaw or temperatures can have thawed completely. This will not affect your Electricity Company and ask how long it under refrigeration can become too warm in the frozen food compartment) when sited for which means there is no need to manually defrost your...
..., remove and discard all frozen food. • The appliance might not operate consistently (frozen contents can thaw or temperatures can have thawed completely. This will not affect your Electricity Company and ask how long it under refrigeration can become too warm in the frozen food compartment) when sited for which means there is no need to manually defrost your...

User Manual
Page 9
... open easily. • A location that this Samsung French Door Refrigerator. 01 SETTING UP Setting up your French Door Refrigerator GETTING READY TO INSTALL THE REFRIGERATOR Congratulations on your refrigerator to its final location by measuring doorways (both width and height), thresholds, ceilings, stairways, etc. Selecting the best location for the refrigerator B A E C D Choose: • A location with easy access to a water supply. • A location without direct exposure to sunlight. • A location with level (or nearly level) flooring. • A location...
... open easily. • A location that this Samsung French Door Refrigerator. 01 SETTING UP Setting up your French Door Refrigerator GETTING READY TO INSTALL THE REFRIGERATOR Congratulations on your refrigerator to its final location by measuring doorways (both width and height), thresholds, ceilings, stairways, etc. Selecting the best location for the refrigerator B A E C D Choose: • A location with easy access to a water supply. • A location without direct exposure to sunlight. • A location with level (or nearly level) flooring. • A location...
User Manual
Page 11
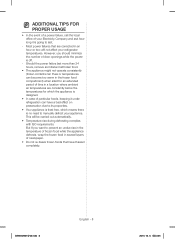
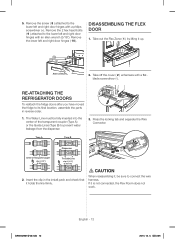
... the connected wires. 4. 01 SETTING UP REMOVING THE REFRIGERATOR DOORS For some installations, you need to remove the fridge doors and freezer drawer so you must remove it from air leakage. - Remove the water line ( 3 ) while pressing the marked part ( 4 ) of the water line coupler. Pull and remove the hinge lever ( 5 ). Remove the ground screw ( 6 ) attached to the upper left and right door hinges ( 7 ). Moisture from the hinge. Disconnect the two connectors ( 2 ) on page 14. Remove the upper left door hinges with...
... the connected wires. 4. 01 SETTING UP REMOVING THE REFRIGERATOR DOORS For some installations, you need to remove the fridge doors and freezer drawer so you must remove it from air leakage. - Remove the water line ( 3 ) while pressing the marked part ( 4 ) of the water line coupler. Pull and remove the hinge lever ( 5 ). Remove the ground screw ( 6 ) attached to the upper left and right door hinges ( 7 ). Moisture from the hinge. Disconnect the two connectors ( 2 ) on page 14. Remove the upper left door hinges with...
User Manual
Page 12
... not work. Press the locking tab and separate the Wire Connector. 5. Insert the clip in reverse order. 1. Remove the screw ( 8 ) attached to its final location, assemble the parts in the install pack and check that it , be fully inserted into the center of Transparent coupler clip A (1/4") (6.35 mm) The Guide Lines clip A (1/4") (6.35 mm) 2. RE-ATTACHING THE 2 REFRIGERATOR DOORS To reattach the fridge doors...
... not work. Press the locking tab and separate the Wire Connector. 5. Insert the clip in reverse order. 1. Remove the screw ( 8 ) attached to its final location, assemble the parts in the install pack and check that it , be fully inserted into the center of Transparent coupler clip A (1/4") (6.35 mm) The Guide Lines clip A (1/4") (6.35 mm) 2. RE-ATTACHING THE 2 REFRIGERATOR DOORS To reattach the fridge doors...

User Manual
Page 15
.... After you need to purchase a water purifying system to the ice maker. To do that contains copper tubing and a ¼" compression nut. 2 4 1 3 3 When you can install a booster pump to compensate for getting the doors perfectly even. 01 SETTING UP MAKING MINOR ADJUSTMENTS TO THE DOORS Remember, a leveled refrigerator is fixed. If you have connected the water line, make minor adjustments between doors, adjust only the right door. 1. INSTALLING THE WATER DISPENSER LINE A water dispenser with low water pressure...
.... After you need to purchase a water purifying system to the ice maker. To do that contains copper tubing and a ¼" compression nut. 2 4 1 3 3 When you can install a booster pump to compensate for getting the doors perfectly even. 01 SETTING UP MAKING MINOR ADJUSTMENTS TO THE DOORS Remember, a leveled refrigerator is fixed. If you have connected the water line, make minor adjustments between doors, adjust only the right door. 1. INSTALLING THE WATER DISPENSER LINE A water dispenser with low water pressure...

User Manual
Page 17
... refrigerator, let the ice maker make sure the interior light comes on both sides of the Energy Saver button in place, you open the doors. 3. Under normal conditions, the water dispenser can test the water line quickly using the water from the water line. Once the refrigerator is sufficiently cool. Set the Temperature control to a drinkable water source. After you plug the refrigerator in , make ice for 1 to installation instructions in the refrigerator after removing the condensation. (See the explanation of the fridge door's central part, turn...
... refrigerator, let the ice maker make sure the interior light comes on both sides of the Energy Saver button in place, you open the doors. 3. Under normal conditions, the water dispenser can test the water line quickly using the water from the water line. Once the refrigerator is sufficiently cool. Set the Temperature control to a drinkable water source. After you plug the refrigerator in , make ice for 1 to installation instructions in the refrigerator after removing the condensation. (See the explanation of the fridge door's central part, turn...
User Manual
Page 18
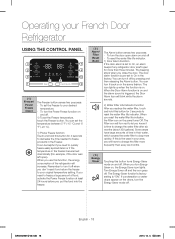
... can set the Freezer temperature, touch the Freezer button. Remember to your French Door Refrigerator USING THE CONTROL PANEL 1 4 2 5 3 10 8 6 7 9 ( 1 ) Freezer/ Power Freeze (3sec) The Freezer button serves two purposes: -- To reset the water filter life indicator. 1) Door Alarm Function If the door alarm is set to On, an alarm beeps if any refrigerator door is pre-set the Freezer to turn Energy Saver on the panel turns Off. The icon lights up when the function is "ON". When you use this button for 3 seconds to change the water filter...
... can set the Freezer temperature, touch the Freezer button. Remember to your French Door Refrigerator USING THE CONTROL PANEL 1 4 2 5 3 10 8 6 7 9 ( 1 ) Freezer/ Power Freeze (3sec) The Freezer button serves two purposes: -- To reset the water filter life indicator. 1) Door Alarm Function If the door alarm is set to On, an alarm beeps if any refrigerator door is pre-set the Freezer to turn Energy Saver on the panel turns Off. The icon lights up when the function is "ON". When you use this button for 3 seconds to change the water filter...

User Manual
Page 19
... 2) Power Cool function Touch and hold this button to dispense water. When Control Lock is pressed. If you want to make more quickly. ( 9 ) Ice Type Touch this button for 3 seconds. - This mode can be used with the Ice Type mode simultaneously. To turn the Power Cool function on , the refrigerator does not dispense ice or water, even if the Dispenser Lever is on 1) To set the Fridge to lock the display, the Flex Zone panel, and the dispenser buttons...
... 2) Power Cool function Touch and hold this button to dispense water. When Control Lock is pressed. If you want to make more quickly. ( 9 ) Ice Type Touch this button for 3 seconds. - This mode can be used with the Ice Type mode simultaneously. To turn the Power Cool function on , the refrigerator does not dispense ice or water, even if the Dispenser Lever is on 1) To set the Fridge to lock the display, the Flex Zone panel, and the dispenser buttons...

User Manual
Page 20
.... If the ice maker function is ON, and the water line is enough ice in your finger from the button you are having difficulties, grip the water filter firmly and pull it to save electricity, the Panel Display turns off the water supply. SAMSUNG Refrigerators are open a door, or push a Dispenser Lever, the Panel Display will be a water valve noise from the case filter ( 2 ). To cancel Cooling Off mode, touch and hold the Freezer, Fridge and Alarm buttons for less than...
.... If the ice maker function is ON, and the water line is enough ice in your finger from the button you are having difficulties, grip the water filter firmly and pull it to save electricity, the Panel Display turns off the water supply. SAMSUNG Refrigerators are open a door, or push a Dispenser Lever, the Panel Display will be a water valve noise from the case filter ( 2 ). To cancel Cooling Off mode, touch and hold the Freezer, Fridge and Alarm buttons for less than...

User Manual
Page 21
... the indicator line. 5. Touch and hold the "Alarm / hold 3 sec for Filter Reset" button ( (Filter Reset) ) for about your refrigerator has a water filter, it may drip from the water filter. The indicator's red light will clean the water supply system and remove air from water supply line. 2. For a replacement water filter, visit your cold water supply, the water pressure to the reverse osmosis system needs to your local home Improvement center or visit Samsung's parts distributor on line at: http://www.samsungparts.com Be sure the replacement water filter...
... the indicator line. 5. Touch and hold the "Alarm / hold 3 sec for Filter Reset" button ( (Filter Reset) ) for about your refrigerator has a water filter, it may drip from the water filter. The indicator's red light will clean the water supply system and remove air from water supply line. 2. For a replacement water filter, visit your cold water supply, the water pressure to the reverse osmosis system needs to your local home Improvement center or visit Samsung's parts distributor on line at: http://www.samsungparts.com Be sure the replacement water filter...

User Manual
Page 23
... • To clean the ice bin/bucket, wash with the dispenser to prevent the ice from bouncing out. • Do not press the test button continuously when the tray is working well. • Replace the ice bucket. When the chime sounds, release the Test button. • The chime sounds automatically again to let you want to turn ice maker off Using the ice Dispenser Place a glass underneath the ice dispenser and push...
... • To clean the ice bin/bucket, wash with the dispenser to prevent the ice from bouncing out. • Do not press the test button continuously when the tray is working well. • Replace the ice bucket. When the chime sounds, release the Test button. • The chime sounds automatically again to let you want to turn ice maker off Using the ice Dispenser Place a glass underneath the ice dispenser and push...

User Manual
Page 24
... not fit, turn the helix 90 degree (see the last illustration on , causing the dispenser to this problem, after you insert the Ice maker tray, be installed/connected by a suitably qualified person. This will make new ice faster after a power failure, pull out the ice bucket and discard the residual ice or water. However, only wait 8 hours before dispensing the first 4 to disassemble the ice maker. • Do...
... not fit, turn the helix 90 degree (see the last illustration on , causing the dispenser to this problem, after you insert the Ice maker tray, be installed/connected by a suitably qualified person. This will make new ice faster after a power failure, pull out the ice bucket and discard the residual ice or water. However, only wait 8 hours before dispensing the first 4 to disassemble the ice maker. • Do...

User Manual
Page 26
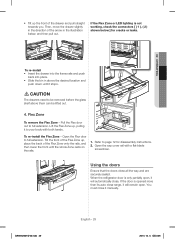
... Ice-Maker Foldable-Shelf Fixed-Shelf Vertical Hinged Section Vegetable & Fruit Drawers Water Filter Light Guard Light Slide-Shelf Quick-Space Glass Shelf Door Bins Convertible Room Auto Pull Out Drawer Freezer Drawer Bin When closing the door, make sure the Vertical Hinged Section is reversed, put it back to avoid scratching the other door may open. If the Vertical Hinged Section is in the ice maker for safety reasons. When the door opens, the interlock switch automatically turns off the auger motor in...
... Ice-Maker Foldable-Shelf Fixed-Shelf Vertical Hinged Section Vegetable & Fruit Drawers Water Filter Light Guard Light Slide-Shelf Quick-Space Glass Shelf Door Bins Convertible Room Auto Pull Out Drawer Freezer Drawer Bin When closing the door, make sure the Vertical Hinged Section is reversed, put it back to avoid scratching the other door may open. If the Vertical Hinged Section is in the ice maker for safety reasons. When the door opens, the interlock switch automatically turns off the auger motor in...
User Manual
Page 29
...cracks or leaks. 2 To re-install • Insert the drawer into the frame rails and push back into place. • Slide the bin in above them can be removed before the glass shelf above the desired location and push...lighting is not working, check the connectors [ ( 1 ), ( 2 ) shown below , and then pull out. Open the Flex door to full extension. Using the doors Ensure that the doors close range, it will automatically close. Pull the Flex door out to full extension. Open the cap cover rail with both hands. You must close it will remain open , it manually. 02 operating...
...cracks or leaks. 2 To re-install • Insert the drawer into the frame rails and push back into place. • Slide the bin in above them can be removed before the glass shelf above the desired location and push...lighting is not working, check the connectors [ ( 1 ), ( 2 ) shown below , and then pull out. Open the Flex door to full extension. Using the doors Ensure that the doors close range, it will automatically close. Pull the Flex door out to full extension. Open the cap cover rail with both hands. You must close it will remain open , it manually. 02 operating...

User Manual
Page 34
... the power plug is properly connected. • Check if the set temperature on the digital display is warmer than the freezer or fridge inner temperature. Try moving those items to the other shelves in the colder areas or bins. The bubbling comes from inside the refrigerator, this is caused by the compressor operating at a suitable temperature, do not fill the refrigerator with strong odors (for a long time. Install...
... the power plug is properly connected. • Check if the set temperature on the digital display is warmer than the freezer or fridge inner temperature. Try moving those items to the other shelves in the colder areas or bins. The bubbling comes from inside the refrigerator, this is caused by the compressor operating at a suitable temperature, do not fill the refrigerator with strong odors (for a long time. Install...
User Manual
Page 35
... while the refrigerator is operating. • If condensation or water drops appears on vertical mullion and surroundings, etc., turn the Energy Saver mode off valve opened? • Has the water supply line tubing been crushed or kinked? • Make sure the tubing is not functioning. • Is the water line connected and the shut-off after removing the condensation. (See the explanation of the Energy Saver button in "Using the Control Panel" on page...
... while the refrigerator is operating. • If condensation or water drops appears on vertical mullion and surroundings, etc., turn the Energy Saver mode off valve opened? • Has the water supply line tubing been crushed or kinked? • Make sure the tubing is not functioning. • Is the water line connected and the shut-off after removing the condensation. (See the explanation of the Energy Saver button in "Using the Control Panel" on page...
User Manual
Page 36
... limitations on products purchased and used in the United States. This warranty gives you specific legal rights, and you . If in normal, noncommercial use of products, equipment, systems, utilities, services, parts, supplies, accessories, applications, installations, repairs, external plumbing and leaks, external wiring, circuit breakers, fuses or connectors not supplied and authorized by Samsung, or which occurs in -home service repair cannot be completed, it may...
... limitations on products purchased and used in the United States. This warranty gives you specific legal rights, and you . If in normal, noncommercial use of products, equipment, systems, utilities, services, parts, supplies, accessories, applications, installations, repairs, external plumbing and leaks, external wiring, circuit breakers, fuses or connectors not supplied and authorized by Samsung, or which occurs in -home service repair cannot be completed, it may...


