
User Manual
Page 3
... an electric shock or fire due to electric leakage. • You need to remove all the protective plastic film before you connect the power plug upside down . - Using aerosols near the refrigerator may result in a location where gas may leak. - If you use a power cord that matches the voltage listed on his or her head. • The appliance must be properly located and installed in a location exposed...
... an electric shock or fire due to electric leakage. • You need to remove all the protective plastic film before you connect the power plug upside down . - Using aerosols near the refrigerator may result in a location where gas may leak. - If you use a power cord that matches the voltage listed on his or her head. • The appliance must be properly located and installed in a location exposed...

User Manual
Page 4
... used, make sure both legs contact the floor for 2 hours before attempting to investigate or repair any one of electric shock. If spilled, there is necessary to do not play with water on the appliance. • The refrigerator must be AC 115-120 V, 10 A, or more. If it is level. - Failing to use an extension cord, use a damaged power plug, damaged power...
... used, make sure both legs contact the floor for 2 hours before attempting to investigate or repair any one of electric shock. If spilled, there is necessary to do not play with water on the appliance. • The refrigerator must be AC 115-120 V, 10 A, or more. If it is level. - Failing to use an extension cord, use a damaged power plug, damaged power...

User Manual
Page 5
... as being harmful to temperature such as laundry, lighted candles, lighted cigarettes, dishes, chemicals, metal objects, etc.) on a drawer cover. - Be careful when you open the doors if children are in an electric shock, fire, problems with the product. • Never stare directly at the UV LED lamp for storing food only. - Do not use an electrical appliance inside the refrigerator, unless it may...
... as being harmful to temperature such as laundry, lighted candles, lighted cigarettes, dishes, chemicals, metal objects, etc.) on a drawer cover. - Be careful when you open the doors if children are in an electric shock, fire, problems with the product. • Never stare directly at the UV LED lamp for storing food only. - Do not use an electrical appliance inside the refrigerator, unless it may...

User Manual
Page 6
..., remove all the food and ice in the refrigerator compartment. - If this finished appliance are blocked, especially with the refrigerator. • Have the refrigerator's water supply connected only to prevent odors and mold. • Service Warranty and Modification. -- Do not put bottles or glass containers in the freezer compartment. To operate the ice maker properly, water pressure of fire. Do not place food too close the water valve...
..., remove all the food and ice in the refrigerator compartment. - If this finished appliance are blocked, especially with the refrigerator. • Have the refrigerator's water supply connected only to prevent odors and mold. • Service Warranty and Modification. -- Do not put bottles or glass containers in the freezer compartment. To operate the ice maker properly, water pressure of fire. Do not place food too close the water valve...

User Manual
Page 8
... going to manually defrost your refrigerator temperatures. You can then use the low temperatures of the frozen products to direct sunlight and never put it near a direct source of door openings while the power is open for energy efficiency. - This will be carried out automatically. • Temperature rise during defrosting complies with adequate ventilation. Most power failures that are corrected in a location where ambient air temperatures are...
... going to manually defrost your refrigerator temperatures. You can then use the low temperatures of the frozen products to direct sunlight and never put it near a direct source of door openings while the power is open for energy efficiency. - This will be carried out automatically. • Temperature rise during defrosting complies with adequate ventilation. Most power failures that are corrected in a location where ambient air temperatures are...

User Manual
Page 9
... French Door Refrigerator GETTING READY TO INSTALL THE REFRIGERATOR Congratulations on the measuring method. We hope you to open easily. • A location that this Samsung French Door Refrigerator. English - 9 2015. 11. 6. �� 11:34 B A E C D Selecting the best location for the refrigerator Choose: • A location with easy access to a water supply. • A location without direct exposure to sunlight. • A location with level (or nearly level) flooring. • A location with enough space for air...
... French Door Refrigerator GETTING READY TO INSTALL THE REFRIGERATOR Congratulations on the measuring method. We hope you to open easily. • A location that this Samsung French Door Refrigerator. English - 9 2015. 11. 6. �� 11:34 B A E C D Selecting the best location for the refrigerator Choose: • A location with easy access to a water supply. • A location without direct exposure to sunlight. • A location with level (or nearly level) flooring. • A location with enough space for air...

User Manual
Page 11
... removing the door/drawer, make sure you need to remove the doors. Remove the ground screw ( 6 ) attached to the upper left side door. Do not remove the doors/drawer if you can move the refrigerator to its final location. Remove the water line ( 3 ) while pressing the marked part ( 4 ) of the water line coupler. (2) (3) (4) 3. setting up REMOVING THE REFRIGERATOR DOORS For some installations, you need to remove the fridge and freezer drawers so you don't need to. If you do not need to remove the refrigerator doors...
... removing the door/drawer, make sure you need to remove the doors. Remove the ground screw ( 6 ) attached to the upper left side door. Do not remove the doors/drawer if you can move the refrigerator to its final location. Remove the water line ( 3 ) while pressing the marked part ( 4 ) of the water line coupler. (2) (3) (4) 3. setting up REMOVING THE REFRIGERATOR DOORS For some installations, you need to remove the fridge and freezer drawers so you don't need to. If you do not need to remove the refrigerator doors...

User Manual
Page 12
... door straight up . 2. Type A Type B Dispenser (10) (8) (9) Center of the transparent coupler (Type A) or the Guide Lines (Type B) to remove. Remove the 2 hex head bolts ( 9 ) attached to its final location, assemble the parts in reverse order. 5. Remove the lower left and right door hinges with a philips screwdriver (+). The Water Line must be fully inserted into the center of Transparent coupler The Guide Lines Allen wrench DISASSEMBLE THE FREEZER DRAWER 1. REATTACHING THE REFRIGERATOR DOORS To reattach the fridge doors...
... door straight up . 2. Type A Type B Dispenser (10) (8) (9) Center of the transparent coupler (Type A) or the Guide Lines (Type B) to remove. Remove the 2 hex head bolts ( 9 ) attached to its final location, assemble the parts in reverse order. 5. Remove the lower left and right door hinges with a philips screwdriver (+). The Water Line must be fully inserted into the center of Transparent coupler The Guide Lines Allen wrench DISASSEMBLE THE FREEZER DRAWER 1. REATTACHING THE REFRIGERATOR DOORS To reattach the fridge doors...

User Manual
Page 16
... ice maker to the water supply line 1. Water line installation kits are several items that you have connected the water line, make sure the water storage tank inside the refrigerator is required. The water line also connects to the refrigerator There are available at your new refrigerator. After you need to purchase a water purifying system to do this connection. To do that contains copper tubing and a ¼" compression nut. 3. We recommend using a water line installation kit that . Connect the water line installation kit to the shut off valve. Locate...
... ice maker to the water supply line 1. Water line installation kits are several items that you have connected the water line, make sure the water storage tank inside the refrigerator is required. The water line also connects to the refrigerator There are available at your new refrigerator. After you need to purchase a water purifying system to do this connection. To do that contains copper tubing and a ¼" compression nut. 3. We recommend using a water line installation kit that . Connect the water line installation kit to the shut off valve. Locate...

User Manual
Page 17
... an appropriate location with reasonable clearance between it will run smoothly. Make sure your refrigerator should be fully operational. 1. Under normal conditions, the water dispenser can test the water line quickly using plastic tubing ( B ), insert the molded end (Bulb) of the plastic tubing ( B ) into the kitchen sink after removing the condensation. (See the explanation of the Energy Saver button in "Using the control panel" on page 19.) Only connect the water line to installation instructions in...
... an appropriate location with reasonable clearance between it will run smoothly. Make sure your refrigerator should be fully operational. 1. Under normal conditions, the water dispenser can test the water line quickly using plastic tubing ( B ), insert the molded end (Bulb) of the plastic tubing ( B ) into the kitchen sink after removing the condensation. (See the explanation of the Energy Saver button in "Using the control panel" on page 19.) Only connect the water line to installation instructions in...

User Manual
Page 19
To reset the water filter life indicator. 1. Some areas have to On, an alarm beeps if any refrigerator door is triggered, the Door Alarm Icon will turn Energy Saver on the panel turns Off. To set the Fridge to clog more quickly. It can set the Fridge temperature, press the Fridge button. The icon lights up when the function is on and the alarm sound is left open alarm on in their water, which causes the water filter to...
To reset the water filter life indicator. 1. Some areas have to On, an alarm beeps if any refrigerator door is triggered, the Door Alarm Icon will turn Energy Saver on the panel turns Off. To set the Fridge to clog more quickly. It can set the Fridge temperature, press the Fridge button. The icon lights up when the function is on and the alarm sound is left open alarm on in their water, which causes the water filter to...

User Manual
Page 21
... temperature display flashes OFF. Cubed and crushed ice modes alternate when you 've activated the Control Lock function. To cancel Cooling Off mode, touch and hold the Ice Maker Off / Control Lock button for 3 seconds to replace the water filter because the water filter is designed for 5 seconds during normal operation. operating To save electricity, the Panel Display turns off and re-activate the panel buttons. To start Cooling Off mode, touch and hold the Freezer, Fridge and Alarm buttons for use...
... temperature display flashes OFF. Cubed and crushed ice modes alternate when you 've activated the Control Lock function. To cancel Cooling Off mode, touch and hold the Ice Maker Off / Control Lock button for 3 seconds to replace the water filter because the water filter is designed for 5 seconds during normal operation. operating To save electricity, the Panel Display turns off and re-activate the panel buttons. To start Cooling Off mode, touch and hold the Freezer, Fridge and Alarm buttons for use...

User Manual
Page 22
... back on just before the capacity of high water pressure, shut off the water supply valve. 1. Then, turn the water filter ( 1 ) about 3 seconds to work ONLY WITH SAMSUNG Water Filters. To minimize the water leaks, keep the filter cartridge horizontal when you turned off the water supply valve. • Sometimes, it to get a new filter, the red light comes on . Touch and hold the "Alarm / hold 3 sec for Filter Reset" button ( (Filter Reset) ) for any damage, including, but not limited...
... back on just before the capacity of high water pressure, shut off the water supply valve. 1. Then, turn the water filter ( 1 ) about 3 seconds to work ONLY WITH SAMSUNG Water Filters. To minimize the water leaks, keep the filter cartridge horizontal when you turned off the water supply valve. • Sometimes, it to get a new filter, the red light comes on . Touch and hold the "Alarm / hold 3 sec for Filter Reset" button ( (Filter Reset) ) for any damage, including, but not limited...

User Manual
Page 23
... line. operating Removing any residual matter inside the water supply line after heavy usage. • If your water pressure, call a licensed, qualified plumber. Open the Refrigerator door and make sure there are no water leaks coming out of a reverse osmosis system going to the water inlet valve of the refrigerator needs to be between 35 and 120 psi. (241 and 827 kPa) If a reverse osmosis water filtration system is connected to your cold water supply...
... line. operating Removing any residual matter inside the water supply line after heavy usage. • If your water pressure, call a licensed, qualified plumber. Open the Refrigerator door and make sure there are no water leaks coming out of a reverse osmosis system going to the water inlet valve of the refrigerator needs to be between 35 and 120 psi. (241 and 827 kPa) If a reverse osmosis water filtration system is connected to your cold water supply...

User Manual
Page 25
... Test button, you will stop. • If the blinking continues, you may need to turn ice maker off • Do not press the test button continuously when the tray is a communication error between the Display and Main Controller, the Convertible Display light may blink. Once the Freezer and Fridge temperature return to their normal set temperatures, the blinking will hear the refrigerator chime (ding-dong). Using the ice Dispenser Place a glass underneath the ice dispenser and push gently against the dispenser...
... Test button, you will stop. • If the blinking continues, you may need to turn ice maker off • Do not press the test button continuously when the tray is a communication error between the Display and Main Controller, the Convertible Display light may blink. Once the Freezer and Fridge temperature return to their normal set temperatures, the blinking will hear the refrigerator chime (ding-dong). Using the ice Dispenser Place a glass underneath the ice dispenser and push gently against the dispenser...

User Manual
Page 28
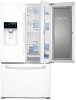
... Ice-Maker Foldable-Shelf Fixed Shelf Vertical Hinged Section Vegetable & Fruit Drawers Light FZ Ice-Maker (TIM (RF28HDEDTSR) (Optional)) Ice Bucket Guard Light Door Closer Slide Shelf Quick-Space Glass Shelf (on the inside of your refrigerator. If this happens, tighten the bolts found on some models) Door Bins Cool Select Pantry Auto Pull Out Drawer Freezer Drawer Bin When closing the door, make sure the Vertical Hinged Section is reversed, put it back to avoid scratching the other door may open...
... Ice-Maker Foldable-Shelf Fixed Shelf Vertical Hinged Section Vegetable & Fruit Drawers Light FZ Ice-Maker (TIM (RF28HDEDTSR) (Optional)) Ice Bucket Guard Light Door Closer Slide Shelf Quick-Space Glass Shelf (on the inside of your refrigerator. If this happens, tighten the bolts found on some models) Door Bins Cool Select Pantry Auto Pull Out Drawer Freezer Drawer Bin When closing the door, make sure the Vertical Hinged Section is reversed, put it back to avoid scratching the other door may open...

User Manual
Page 34
... in the ice chute. To keep the refrigerator free of the refrigerator. Use a clean, damp cloth to dry drawers and shelves before putting them back into place. Wipe the Ice / Water Dispenser with a damp, clean, soft cloth. Cleaning the Ice / Water Dispenser Push down one end of the tray dispenser and remove it start to collect in the ice chute. CAUTION You can remove the drawers and shelves for cleaning. Cleaning the Interior Clean the inside walls and...
... in the ice chute. To keep the refrigerator free of the refrigerator. Use a clean, damp cloth to dry drawers and shelves before putting them back into place. Wipe the Ice / Water Dispenser with a damp, clean, soft cloth. Cleaning the Ice / Water Dispenser Push down one end of the tray dispenser and remove it start to collect in the ice chute. CAUTION You can remove the drawers and shelves for cleaning. Cleaning the Interior Clean the inside walls and...

User Manual
Page 38
... refrigerator, this is properly installed. Troubleshooting PROBLEM SOLUTION The refrigerator does not work . To keep the refrigerator at high capacity. You can occur when you manually stop the ice making function may not be tightly covered. • Clean out the freezer periodically and throw away any spoiled food. If it does not chill sufficiently. • Check if the power plug is properly connected. • Check if the set temperature...
... refrigerator, this is properly installed. Troubleshooting PROBLEM SOLUTION The refrigerator does not work . To keep the refrigerator at high capacity. You can occur when you manually stop the ice making function may not be tightly covered. • Clean out the freezer periodically and throw away any spoiled food. If it does not chill sufficiently. • Check if the power plug is properly connected. • Check if the set temperature...

User Manual
Page 39
... left part of the door. • Condensation or water drops may form if the humidity is too high while the refrigerator is operating. • If condensation or water drops appears on vertical mullion and surroundings, etc., turn the Energy Saver mode off valve opened? • Has the water supply line tubing been crushed or kinked? • Make sure the tubing is free and clear of the Energy Saver button in "Using the control panel...
... left part of the door. • Condensation or water drops may form if the humidity is too high while the refrigerator is operating. • If condensation or water drops appears on vertical mullion and surroundings, etc., turn the Energy Saver mode off valve opened? • Has the water supply line tubing been crushed or kinked? • Make sure the tubing is free and clear of the Energy Saver button in "Using the control panel...

User Manual
Page 40
...) days, whichever is longer. This limited warranty covers manufacturing defects in materials and workmanship encountered in normal, noncommercial use of products, equipment, systems, utilities, services, parts, supplies, accessories, applications, installations, repairs, external plumbing and leaks, external wiring, circuit breakers, fuses or connectors not supplied and authorized by Samsung, or which occurs in service problems; altered product or serial numbers; use of this product, and shall not apply...
...) days, whichever is longer. This limited warranty covers manufacturing defects in materials and workmanship encountered in normal, noncommercial use of products, equipment, systems, utilities, services, parts, supplies, accessories, applications, installations, repairs, external plumbing and leaks, external wiring, circuit breakers, fuses or connectors not supplied and authorized by Samsung, or which occurs in service problems; altered product or serial numbers; use of this product, and shall not apply...


