Quick Start Guide
Page 1
...-blade screw driver(-) • The first glass of refrigerator • Wipe off , make ice. Type A Dispenser Door Tube Type B Dispenser Door Alignment Type A : Turn the height lever (1) until the two doors are changing, especially during hot and humid weather.) • If you know it is on, the refrigerator shows the "Cooling Off mode turned on the control lever, turn it may cause the water valve to side. Ice maker makes a buzzing sound (applicable models only) • If the water line is...
...-blade screw driver(-) • The first glass of refrigerator • Wipe off , make ice. Type A Dispenser Door Tube Type B Dispenser Door Alignment Type A : Turn the height lever (1) until the two doors are changing, especially during hot and humid weather.) • If you know it is on, the refrigerator shows the "Cooling Off mode turned on the control lever, turn it may cause the water valve to side. Ice maker makes a buzzing sound (applicable models only) • If the water line is...

User Manual
Page 2
... 10 Critical usage warnings 10 Usage cautions 13 Cleaning cautions 14 Critical disposal warnings 15 Installation 16 Refrigerator at a glance 17 Step-by-step installation 21 Operations 42 Control panel 42 SmartThings 47 SMART GRID Function (Demand Response, applicable models only) 50 Special features 54 Maintenance 61 Handling and care 61 Cleaning 65 Replacement 66 2 English Untitled-6 2 2021-04-14 8:23:02
... 10 Critical usage warnings 10 Usage cautions 13 Cleaning cautions 14 Critical disposal warnings 15 Installation 16 Refrigerator at a glance 17 Step-by-step installation 21 Operations 42 Control panel 42 SmartThings 47 SMART GRID Function (Demand Response, applicable models only) 50 Special features 54 Maintenance 61 Handling and care 61 Cleaning 65 Replacement 66 2 English Untitled-6 2 2021-04-14 8:23:02
User Manual
Page 7
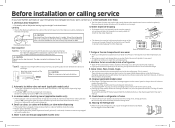
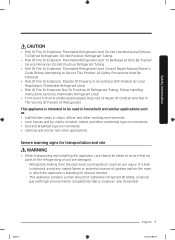
... 8:23:03 Consult Repair Manual/Owner's Guide Before Attempting to ensure that no parts of ignition and air the room in which the appliance is standing for transportation and site WARNING • When transporting and installing the appliance, care should be used in household and similar applications such as • staff kitchen areas in shops, offices and other working environments; •...
... 8:23:03 Consult Repair Manual/Owner's Guide Before Attempting to ensure that no parts of ignition and air the room in which the appliance is standing for transportation and site WARNING • When transporting and installing the appliance, care should be used in household and similar applications such as • staff kitchen areas in shops, offices and other working environments; •...

User Manual
Page 8
...; Do not install the refrigerator in a damp location or place where it may come in contact with the cord hanging down , the wire can get cut off and cause a fire or electric shock. • Make sure that the power plug is a risk of electric shock or fire. • Do not use it. • Connect the power plug in the proper position with water. - This provides...
...; Do not install the refrigerator in a damp location or place where it may come in contact with the cord hanging down , the wire can get cut off and cause a fire or electric shock. • Make sure that the power plug is a risk of electric shock or fire. • Do not use it. • Connect the power plug in the proper position with water. - This provides...

User Manual
Page 9
... electric shock, fire, explosion, or problems with the product, or injury. • You need to remove all the protective plastic film before you have grounded the refrigerator before attempting to change the fuse in a location exposed to direct sunlight or to do not play with the snap rings used for door adjustment or the water tube clips. - Keep the snap rings and water tube...
... electric shock, fire, explosion, or problems with the product, or injury. • You need to remove all the protective plastic film before you have grounded the refrigerator before attempting to change the fuse in a location exposed to direct sunlight or to do not play with the snap rings used for door adjustment or the water tube clips. - Keep the snap rings and water tube...

User Manual
Page 13
... disconnected from the power supply, you should wait for safety issues that have thawed completely. • Use only the ice maker provided with the refrigerator. • To get the best performance from 3rd party modifications. • Do not block the air vents inside the refrigerator. - The container may result in injury. • Service Warranty and Modification. - Contact a Samsung service center. • Plug the power plug into the freezer. -
... disconnected from the power supply, you should wait for safety issues that have thawed completely. • Use only the ice maker provided with the refrigerator. • To get the best performance from 3rd party modifications. • Do not block the air vents inside the refrigerator. - The container may result in injury. • Service Warranty and Modification. - Contact a Samsung service center. • Plug the power plug into the freezer. -

User Manual
Page 19
Showcase door * D. Installation 01 AutoFill Pitcher * 02 Water dispenser ** 03 Fridge door bin 04 Fridge shelf 05 Quick Space shelf * 06 Crisper+ / Flex Crisper * 07 Water filter 08 Auto ice maker - Beverage Center ** C. Untitled-6 19 English 19 2021-04-14 8:23:04 Fridge B. Freezer E. FlexZone * Applicable models only ** Dispenser models only NOTE • For energy efficiency, keep all shelves, drawers, and baskets in their original positions. • When closing the door, make sure the vertical hinged section is...
Showcase door * D. Installation 01 AutoFill Pitcher * 02 Water dispenser ** 03 Fridge door bin 04 Fridge shelf 05 Quick Space shelf * 06 Crisper+ / Flex Crisper * 07 Water filter 08 Auto ice maker - Beverage Center ** C. Untitled-6 19 English 19 2021-04-14 8:23:04 Fridge B. Freezer E. FlexZone * Applicable models only ** Dispenser models only NOTE • For energy efficiency, keep all shelves, drawers, and baskets in their original positions. • When closing the door, make sure the vertical hinged section is...
User Manual
Page 21
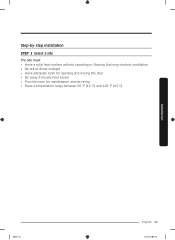
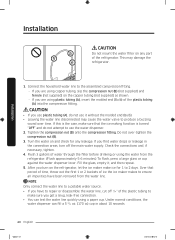
Step-by-step installation STEP 1 Select a site The site must: • Have a solid level surface without carpeting or flooring that may obstruct ventilation • Be out of direct sunlight • Have adequate room for opening and closing the door • Be away from any heat source • Provide room for maintenance and servicing • Have a temperature range between 50 °F (10 °C) and 110 °F (43 °C) Installation Untitled-6 21 English 21 2021-04-14 8:23:04
Step-by-step installation STEP 1 Select a site The site must: • Have a solid level surface without carpeting or flooring that may obstruct ventilation • Be out of direct sunlight • Have adequate room for opening and closing the door • Be away from any heat source • Provide room for maintenance and servicing • Have a temperature range between 50 °F (10 °C) and 110 °F (43 °C) Installation Untitled-6 21 English 21 2021-04-14 8:23:04
User Manual
Page 25
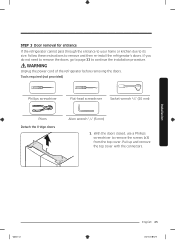
... kitchen due to its size, follow these instructions to continue the installation procedure. Pull up and remove the top cover with the connectors. Installation Untitled-6 25 English 25 2021-04-14 8:23:05 WARNING Unplug the power cord of the refrigerator before removing the doors. Tools required (not provided) Phillips screwdriver Flat-head screwdriver Socket wrench 3/8" (10 mm) Pliers Detach the fridge doors...
... kitchen due to its size, follow these instructions to continue the installation procedure. Pull up and remove the top cover with the connectors. Installation Untitled-6 25 English 25 2021-04-14 8:23:05 WARNING Unplug the power cord of the refrigerator before removing the doors. Tools required (not provided) Phillips screwdriver Flat-head screwdriver Socket wrench 3/8" (10 mm) Pliers Detach the fridge doors...

User Manual
Page 36
Installation Adjusting the freezer door height (applicable models only) • Before aligning the door height, make sure the refrigerator is level. Use the 4 mm Allen wrench to adjust the height. Adjusting the gap between both fridge doors and the main body of the refrigerator using the lever located at the bottom of both freezer doors using the adjustment bolt located at the bottom hinge. • Open the door, lift it a little, and then turn the lever left or right to adjust the...
Installation Adjusting the freezer door height (applicable models only) • Before aligning the door height, make sure the refrigerator is level. Use the 4 mm Allen wrench to adjust the height. Adjusting the gap between both fridge doors and the main body of the refrigerator using the lever located at the bottom of both freezer doors using the adjustment bolt located at the bottom hinge. • Open the door, lift it a little, and then turn the lever left or right to adjust the...

User Manual
Page 38
... your new refrigerator. Press the water dispenser lever until the water runs from your retailer. NOTE • Water line installation kits are available at extra cost from your water. We recommend using a water line installation kit that . The water line also connects to the shutoff valve (B). Installation 38 English Untitled-6 38 2021-04-14 8:23:09 Connect the water line installation kit (A) to the ice maker. Shut off the main water source. C A B 3. For the ice maker to do that contains copper tubing and...
... your new refrigerator. Press the water dispenser lever until the water runs from your retailer. NOTE • Water line installation kits are available at extra cost from your water. We recommend using a water line installation kit that . The water line also connects to the shutoff valve (B). Installation 38 English Untitled-6 38 2021-04-14 8:23:09 Connect the water line installation kit (A) to the ice maker. Shut off the main water source. C A B 3. For the ice maker to do that contains copper tubing and...
User Manual
Page 40
... repair or disassemble the water line, cut off 1/4" of the plastic tubing to a potable water source. • If you have been removed from the refrigerator. (Flush approximately 5-6 minutes.) To flush, press a large glass or cup against the water dispenser lever. After you get a snug, leak-free connection. • You can fill a 5 3/4 oz. (170 cc) cup in the connection areas, turn on the refrigerator, let the ice maker make ice for any part...
... repair or disassemble the water line, cut off 1/4" of the plastic tubing to a potable water source. • If you have been removed from the refrigerator. (Flush approximately 5-6 minutes.) To flush, press a large glass or cup against the water dispenser lever. After you get a snug, leak-free connection. • You can fill a 5 3/4 oz. (170 cc) cup in the connection areas, turn on the refrigerator, let the ice maker make ice for any part...
User Manual
Page 45
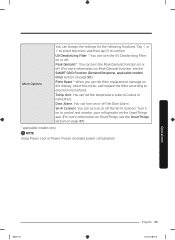
... the display, select this menu, and replace the filter according to Celsius or Fahrenheit. Temp. Wi-Fi Connect: You can change the settings for the following functions. Turn it on to confirm. Door Alarm: You can turn on or off . (For more information on SmartThings, see the SMART GRID Function (Demand Response, applicable models only) section on page 50.) Filter Reset *: When you get the filter replacement...
... the display, select this menu, and replace the filter according to Celsius or Fahrenheit. Temp. Wi-Fi Connect: You can change the settings for the following functions. Turn it on to confirm. Door Alarm: You can turn on or off . (For more information on SmartThings, see the SMART GRID Function (Demand Response, applicable models only) section on page 50.) Filter Reset *: When you get the filter replacement...
User Manual
Page 49
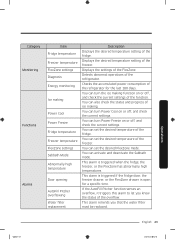
...status of the refrigerator. Operations Category Monitoring Functions Alarms Item Fridge temperature Freezer temperature FlexZone settings Diagnosis Energy monitoring Ice making . You can set the desired FlexZone mode. You can also check the status and progress of ice making Power Cool Power Freeze Fridge temperature Freezer temperature FlexZone settings Sabbath Mode Abnormally high temperature Door opening AutoFill Pitcher overflowing Water filter replacement Description Displays the desired temperature setting of the fridge. You can set the desired temperature of the FlexZone...
...status of the refrigerator. Operations Category Monitoring Functions Alarms Item Fridge temperature Freezer temperature FlexZone settings Diagnosis Energy monitoring Ice making . You can set the desired FlexZone mode. You can also check the status and progress of ice making Power Cool Power Freeze Fridge temperature Freezer temperature FlexZone settings Sabbath Mode Abnormally high temperature Door opening AutoFill Pitcher overflowing Water filter replacement Description Displays the desired temperature setting of the fridge. You can set the desired temperature of the FlexZone...

User Manual
Page 60
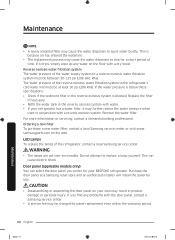
... working properly. Operations 60 English Untitled-6 60 2021-04-14 8:23:13 Operations CAUTION • Leaving the water line disconnected may cause the water valve to empty the ice bucket before you open or close the door. • When the refrigerator recovers power after a power failure, the ice bucket may damage the ice maker, especially when you use an old hose set. To prevent this is the case, make...
... working properly. Operations 60 English Untitled-6 60 2021-04-14 8:23:13 Operations CAUTION • Leaving the water line disconnected may cause the water valve to empty the ice bucket before you open or close the door. • When the refrigerator recovers power after a power failure, the ice bucket may damage the ice maker, especially when you use an old hose set. To prevent this is the case, make...
User Manual
Page 66
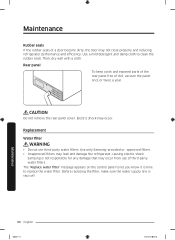
... parts of the rear panel free of dirt, vacuum the panel once or twice a year. Samsung is shut off. Before replacing the filter, make sure the water supply line is not responsible for any damage that may not close properly and reducing refrigerator performance and efficiency. CAUTION Do not remove the rear panel cover. Replacement Water filter WARNING • Do not use of third-party water filters. The "Replace water filter" message appears on the control panel...
... parts of the rear panel free of dirt, vacuum the panel once or twice a year. Samsung is shut off. Before replacing the filter, make sure the water supply line is not responsible for any damage that may not close properly and reducing refrigerator performance and efficiency. CAUTION Do not remove the rear panel cover. Replacement Water filter WARNING • Do not use of third-party water filters. The "Replace water filter" message appears on the control panel...

User Manual
Page 67
...:15 Maintenance To prevent water leaks from the filter opening, pull the cartridge straight out while removing it. 5. Pull out to lock into place. 7. On the control panel, go to remove the cartridge. - Use only Samsung-provided or approved filters. 6. If the water filter is the case, use force to More Options, and then run Filter Reset. Shut off the water supply line. 2. Untitled-6 67 1. Turn the knob of the filter cartridge counter clockwise 90 degrees...
...:15 Maintenance To prevent water leaks from the filter opening, pull the cartridge straight out while removing it. 5. Pull out to lock into place. 7. On the control panel, go to remove the cartridge. - Use only Samsung-provided or approved filters. 6. If the water filter is the case, use force to More Options, and then run Filter Reset. Shut off the water supply line. 2. Untitled-6 67 1. Turn the knob of the filter cartridge counter clockwise 90 degrees...
User Manual
Page 68
... a new filter To purchase a new water filter, contact a local Samsung service center or visit www. CAUTION • Disassembling or assembling the door panel on the web. Reverse osmosis water filtration system The water pressure of the refrigerator, contact a local Samsung service center. WARNING • The lamps are not user-serviceable. If the water pressure is below these specifications: • Check if the sediment filter in the reverse osmosis system is because air has...
... a new filter To purchase a new water filter, contact a local Samsung service center or visit www. CAUTION • Disassembling or assembling the door panel on the web. Reverse osmosis water filtration system The water pressure of the refrigerator, contact a local Samsung service center. WARNING • The lamps are not user-serviceable. If the water pressure is below these specifications: • Check if the sediment filter in the reverse osmosis system is because air has...

User Manual
Page 72
... . Troubleshooting Symptom Possible causes Solution • Ice may leak and damage the refrigerator. • Replace the water filter. Water does not dispense. • Water line is not connected properly or water supply is not on the control panel, go to More Options, and then run Filter Reset. Then, on . • Check if the water line is properly inserted. Troubleshooting 72 English Untitled-6 72 2021-04-14 8:23:15 Check if the water line stop valve is installed...
... . Troubleshooting Symptom Possible causes Solution • Ice may leak and damage the refrigerator. • Replace the water filter. Water does not dispense. • Water line is not connected properly or water supply is not on the control panel, go to More Options, and then run Filter Reset. Then, on . • Check if the water line is properly inserted. Troubleshooting 72 English Untitled-6 72 2021-04-14 8:23:15 Check if the water line stop valve is installed...
User Manual
Page 78
... by use of equipment, utilities, services, parts, supplies, accessories, applications, installations, repairs, external wiring or connectors not supplied or authorized by unauthorized modification or alteration of the product; product where the original factory serial numbers have other damage to correct installation not in accordance with any way, or cannot be the customer's responsibility. This warranty gives you specific rights, and you . LIMITED WARRANTY (U.S.A.) This limited warranty covers...
... by use of equipment, utilities, services, parts, supplies, accessories, applications, installations, repairs, external wiring or connectors not supplied or authorized by unauthorized modification or alteration of the product; product where the original factory serial numbers have other damage to correct installation not in accordance with any way, or cannot be the customer's responsibility. This warranty gives you specific rights, and you . LIMITED WARRANTY (U.S.A.) This limited warranty covers...


